background image

HARDWARE INSTALLATION

This section describes how to install your CD-ROM drive into your computer.

Note: If you are not comfortable about opening your PC and attempting the CD-ROM

drive installation, many local computer shops can perform this service for a
reasonable cost.

This installation assumes you have a PC with an available connector on an IDE
interface cable. If your PC has an IDE hard drive, there is usually an available
connector in the middle of the same cable that attaches from the motherboard (or
controller card) IDE connector to the hard drive. If the last sentence does not describe
your system, you may need to purchase an IDE controller card to install this CD-ROM
drive. Inspecting and knowing your PC system will make your installation easier and
less time consuming.

A final note before installation: The cable connecting to your floppy disk drive is not an
IDE cable. Do not attempt to attach the CD-ROM drive to this cable.
If the CD-ROM drive is to be connected to the same cable as the hard drive, be sure
that the hard drive is set as master. Hard drives can be set as single, master, or slave.
Check your hard drive owner's manual or contact the hard drive manufacturer for
correct jumper settings.

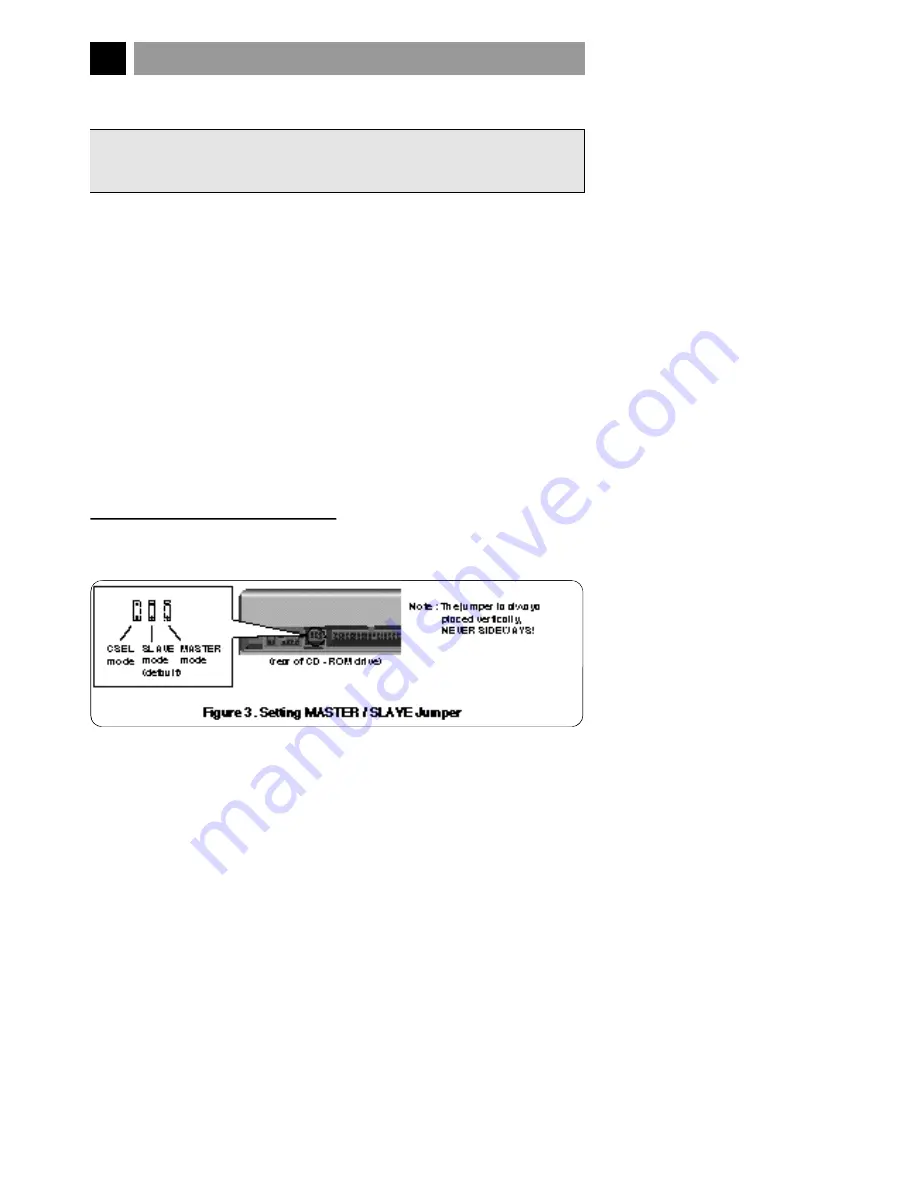
SETTING MASTER / SLAVE JUMPER

* You will see three pairs of pins and a jumper (cap) at the back of the CD-ROM drive.

This jumper is used to set the CD-ROM Drive as a CSEL, MASTER, or SLAVE device in
your PC. Examples of how the jumper can be placed are shown in Figure 3 below.

* Move the jumper (clip on one pair of pins) from its default factory position (SLAVE), to

CSEL or MASTER as needed (see the following description for the setup that matches
your system), using the above diagram to place the jumper.

E-7

WARNING:
To protect the CD-ROM Drive, your computer, and peripheral devices from damage,
turn off their power before installing the drive.

Summary of Contents for CRD-8320B

Page 1: ...CD ROM DRIVE OWNER S MANUAL MODEL CRD 8320B To enjoy fully all the features and functions of your CD ROM Drive Please read this Owner s Manual carefully and completely ...

Page 2: ...se limits are designed to provide reasonable protection against harmful interference in a residential installation This equipment generates uses and can radiate radio frequency energy and if not installed and used in accordance with the instructions may cause harmful interference to radio communications However there is no guarantee that interference will not occur in a particular installation If ...

Page 3: ...rt ßö Easy audio CD control button support ßö Supports Windows 95 Plug and Play ATAPI protocol SYSTEM REQUIREMENTS An IBM PC or compatible with the following system components ßö IBM Compatible 486SX or above With PIO mode 4 recommended ßö A Minimum of 640K memory ßö Floppy disk drive 3 1 2 inch ßö MS DOS version 3 1 or greater ßö An open front facing half height drive bay ßö An existing IDE contr...

Page 4: ...ject Hole Insert a paper clip here to eject the drawer manually or when there is no power Ï Play Skip Button When an Audio CD is in the Disc Drawer pressing this button will start playing audio CDs from the first track If an audio CD is playing pressing this button will skip to the next track Ì Open Close Stop Button This button is pressed to open or close the CD tray The button works only when po...

Page 5: ...different sound card you will need to contact the sound card manufacturer to obtain the proper cable for that card È Master Slave CSEL Jumper These three jumpers are used to set the CD ROM Drive to either a Master Slave or CSEL drive Refer to section HARDWARE INSTALLATION Í Interface Connector This 40 pin connector is used to transfer and control signals between the CD ROM Drive and your PC Connec...

Page 6: ... temperature mechanical vibration direct sunlight ßö Operation During operation excessive vibration or a sudden jolt to the drive may cause a malfunction Avoid exposing the drive to sudden changes in temperature This may cause condensation to collect inside the drive ßö Transportation Always remove the disc before moving the drive ...

Page 7: ...cable connecting to your floppy disk drive is not an IDE cable Do not attempt to attach the CD ROM drive to this cable If the CD ROM drive is to be connected to the same cable as the hard drive be sure that the hard drive is set as master Hard drives can be set as single master or slave Check your hard drive owner s manual or contact the hard drive manufacturer for correct jumper settings SETTING ...

Page 8: ...ting system for boot up is set up as the Primary Master Your CD ROM drive should be set to the Slave mode E 8 Note Many older 1X and 2X CD ROM drives used a 40 pin controller card that were not IDE compatible These were proprietary interface cards for use with a particular model CD ROM Drive Many older Sony Panasonic and Mitsumi drives used 40 pin proprietary interface cards If you are upgrading f...

Page 9: ...ther the CD ROM drive is a master or slave unit the diagram below represents the different ways in which the CD ROM may be configured in your PC The table below the diagram shows the possible Jumper placements that would correspond to each of the different configurations shown E 9 If you have the system with two IDE channels in the case of an enhanced IDE PC do not install an IDE controller card i...

Page 10: ...om an unused half height slot Step 4 Slide the CD ROM drive into the half height slot and secure the drive in place with screws and brackets Note If there is too much space between the sides of the drive and the drive bay you may need to install spacer brackets available at your local computer store Step 5 Push the power supply cable connector firmly into the power in connector E 10 ...

Page 11: ...or a sound card to the CD ROM drive use an audio cable to connect the drive to the sound device Note This CD ROM Drive can be used vertically To use the drive vertically open the drawer and move the 2 plastic clips on the bottom to hold a disc vertically After placing a CD into the tray move the top 2 plastic clips to hold the top of the CD in place Use only standard 12cm discs Do not touch the un...

Page 12: ...nd name of the device driver Modifies your AUTOEXEC BAT file to load MSCDEX Terminates and returns control to the user LIST OF FILES TO BE INSTALLED IN YOUR PC NMSCDEX EXE Microsoft MS DOS CD ROM Extension software which enables the computer to access the CD ROM drive NGSCDROM SYS CD ROM device driver NEJECT EXE Software eject program which can eject the CD tray NCLOSE EXE Software close program w...

Page 13: ... the installation is completed remove the diskette and reboot your PC CD ROM EXTENSION PROGRAM MSCDEX EXE OPTIONS There are several options that are set for the Microsoft CD Extension program Generally these settings do not have to be changed for the CD ROM drive to work so these options are needed no further However you may decide to change the MSCDEX option settings depending on your operating e...

Page 14: ...ur system for new hardware It will locate the CD ROM drive and load the generic driver TROUBLESHOOTING When the CD ROM drive does not work with the hard disk drive in primary IDE channel SOLUTION 1 Check the CD ROM drive Master Slave Jumper setting The CD ROM drive must be set to the Slave mode 2 Check to be sure your hard disk Interface type is IDE type 3 Check your hard disk Master Slave Jumper ...

Page 15: ... Rate ECC on 1block 10 15 bits single 1 block 10 12 bits 32 ø ECC off 1block 10 12 bits single 1 block 10 9 bits 32 ø User Data Block 2 048 bytes block Mode1 Mode2 Form1 2 340 2 336 bytes block Mode2 2 324 bytes block Mode2 Form2 2 352 bytes block CD DA Supported Disc CD DA CD ROM CD ROM XA READY Photo CD CD Plus CD Extra CD RW Frequency Response 90 Hz 20 kHz 1 3 dB Dynamic Range 80 dB S N Ratio 8...

Page 16: ...Ave Englewood Cliffs NJ 07632 LG Electronics U K Ltd Goldstar House 264 Bath Road Slough Berks SL1 4DT LG Electronics Deutschland GmbH Jakob Kaiser Straße 12 47877 Willich 1 GERMANY LG Goldstar France SARL 12 RUE LECH WALESA BAT B 77322 LOGNES MARNE LA VALLEE CEDEX 2 FRANCH Printed in Korea P NO 3828HM1012A CLASS 1 LASER PRODUCT KLASSE 1 LASER PRODUKT LUOKAN 1 LASER LAITE KLASS 1 LASER APPARAT ...

Reviews: