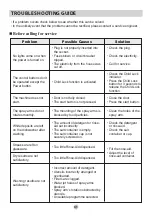
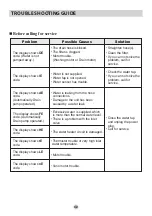
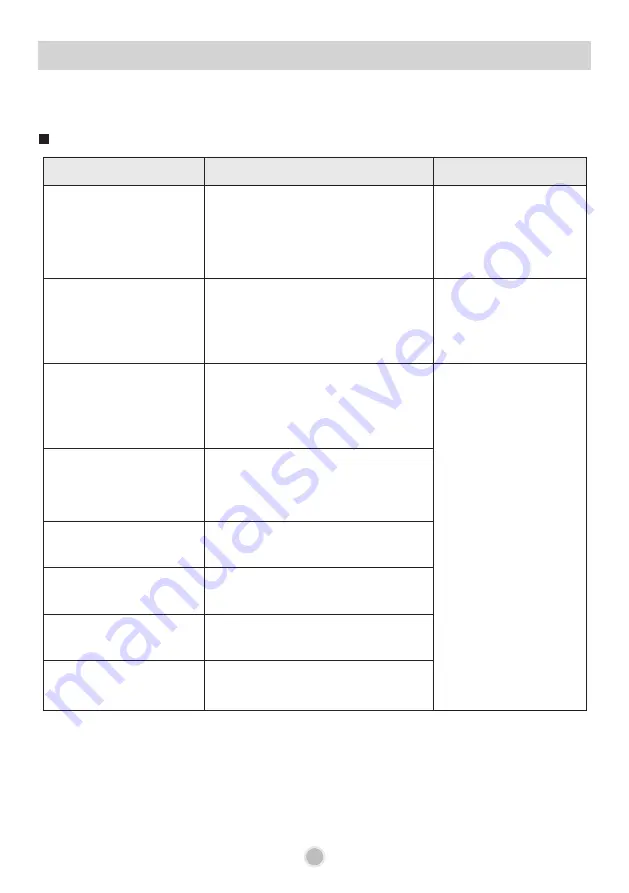
background image

32

32

Problem

The display shows OE 

code. (Water is not 

pumped away.)

•  The drain hose is kinked.

•  The filter is clogged.

•  Motor trouble. 

(Washing motor or Drain motor)

The display shows IE 

code.

•  Water is not supplied.

•  Water tap is not opened.

•  Water sensor has trouble.

The display shows AE 

code.

(Automatically Drain 

pump operated.)

•  Straighten hose(s).

•  Clean the filter.

•  If you can not solve the 

problem, call for 

service.

•  Check the water tap.

•  If you can not solve the 

problem, call for 

service.

•  Close the water tap 

and unplug the power 

plug.

•  Call for service.

•  Water is leaking from the hose 

connections.

•  Damage to the unit has been 

caused by a water leak.

The display shows FE 

code. (Automatically 

Drain pump operated.)

•  Excessive water is supplied, which 

is more than the normal water level.

•  There is a problem with the inlet 

valve.

The display shows HE 

code.

•  The water heater circuit is damaged.

The display shows tE 

code.
The display shows LE 

code.

•  Thermistor trouble or very high inlet 

water temperature.

•  Motor trouble.

Solution

Possible Causes

TROUBLE SHOOTING GUIDE

 Before calling for service

The display shows nE 

code.

•  Vario motor trouble.

Summary of Contents for D1454 series

Page 1: ...y criteria sample 5 The part should not contain prohibited substances Pb Cd Hg Cr 6 PBB PBDE and details should comply with LG standard of LG 63 A 5501 34 가 P NO 다 FRONT BACK 나 WORK 가 BRAND LG D1455W L M T B C D A F B U D1454W L M T B C D A F B U D1465W L M T B C D A F B U D1464W L M T B C D A F B U DW TS610S DW TS610T DW TS610W DW TS605T DW TS605W D1455W L M T B C D A F B U D1454W L M T B C D A F...

Page 2: ...ASHER OWNER S MANUAL Before beginning installation read these instructions carefully This will simplify installation and ensure that the dishwasher is installed correctly and safely Leave these instructions near the dishwasher after installation for future reference D1455 D1454 D1465 D1464 KD 827SW KD 827ST KD 827SS KD 826SW KD 826ST MFL66281401 www lg com ...

Page 3: ... system level of your dishwasher 17 Salt Filling 18 Adding Rinse Aid 18 INFORMATION FOR ENERGY TEST 19 HOW TO USE AND OPERATE Daily use load 20 Cutlery Rack 21 Cutlery Basket 22 Lower Rack 22 Upper Rack 23 Adding Detergent 25 Refilling 26 Drying 27 OPERATING SEQUENCE 28 PROGRAMME 29 USER MAINTENANCE INSTRUCTIONS Keeping the dishwasher 30 Filters 30 Lower Spray Arm 30 Upper Spray Arm 30 Water Inlet...

Page 4: ...ys read and obey all safety messages This is the safety alert symbol This symbol alerts you to potential hazards that can kill or hurt you and others All safety messages will follow the safety alert symbol and either the word DANGER WARNING or CAUTION These words mean WARNING You may be slightly injured or cause damage to the product if you do not follow instructions All safety messages will tell ...

Page 5: ... If the product is installed outside the normal service area any cost of transportation involved in the repair of the product or the replacement of a defective part shall be borne by the owner IMPORTANT SAFETY INSTRUCTIONS Read all instructions before use WARNING To reduce the risk of fire electric shock or injury to persons when using the dishwasher follow basic precautions including the followin...

Page 6: ...away from the dishwasher when the door is open Check that the detergent receptacle is empty after completion of the wash cycle Controls may be locked using Child Lock mode to prevent all the settings from being changed by a child Keep children away from detergents and rinse aids Do not allow children to operate the dishwasher Young children should be supervised to ensure that they do not play with...

Page 7: ...additional outlets or branch circuits Check the specification page of this owner s manual to be certain Do not overload wall outlets Overloaded wall outlets loose or damaged wall outlets extension cords frayed power cords or damaged or cracked wire insulation are dangerous Any of these conditions could result in an electric shock or fire Periodically examine the cord of your appliance and if its a...

Page 8: ...erous voltages Note in case of an application warning sign the rules according to ISO 3864 should be adhered to 1 This dishwasher is designed to fit the size shown as below 2 Select a location as close to sink as possible for ease of connection to the water and drain pipes 3 To ensure good drainage the dishwasher should not be installed more than 3 meters away from the sink 4 If dishwasher is inst...

Page 9: ...ancing adjustments should be made using a spanner 2 Slide the dishwasher into the cabinet opening carefully Make sure that the drain hose inside the cabinet is not kinked or stretched Adjust leg 8 3 To reduce noise attach the strip to the machine base Remove the adhesive cover and attach the strip to the machine base hiding the legs Trim the edges if desired The bottom of the strip should touch th...

Page 10: ... siphoning one of the following methods must be used When the drain hose is connected to a sink S trap or waste disposal unit the hose must be looped up to the underside of the bench top and secured Drain hose Extension Extend drain hose as shown below Fig A When the drain hose is connected to a separate standpipe it is essential that an airtight connection be made Refer to Fig B Fig B Drainage co...

Page 11: ...the level of the dishwasher If the door slants to the right see fig C and follow these instructions 1 Unscrew counter clockwise the left leg of the back side and correct the level 2 Check the opening of door and repeat if necessary until the door opens and closes properly When the product is correctly leveled there should be no slant stickiness or friction sound Fig C Case 1 In case the door is sl...

Page 12: ...et Hose 9 Power Cord 10 Adjustable Leg 11 Upper Rack 12 Cutlery Basket 13 Detergent And Rinse Aid Dispenser 14 Vapor Vent Cover 15 Upper Spray Arm 16 Lower Spray Arm 17 Filter ASM 18 Lower Rack 19 Salt Container Cap 20 Cutlery Rack 21 Steam Nozzle The appearance and specifications may vary without notice Funnel Noise Strip ...

Page 13: ...12 MODEL D1455 MODEL D1454 FUNCTION OF CONTROL BUTTON ...

Page 14: ...13 SMARTDIAGNOSIS function is available only for the products with a SMARTDIAGNOSIS mark Refer to Page 34 ...

Page 15: ...14 MODEL D1465 KD 827SW KD 827ST KD 827SS MODEL D1464 KD 826SW KD 826ST FUNCTION OF CONTROL BUTTON ...

Page 16: ...15 SMARTDIAGNOSIS function is available only for the products with a SMARTDIAGNOSIS mark Refer to Page 34 ...

Page 17: ...f you want to delay the start of selected programme press this button Pressing this button will increase time by 1 hour The delay start time can be adjusted from 1 hour to 19 hours Power For operating press this button first for power on After operating this button automatically switches off for safety and energy saving In case of irregular surge disturbance to the machine the power may be automat...

Page 18: ...witched off 2 Press Half Load and Power button simultaneously and keep them pressed 3 To change the setting Simply press the Half Load button then the figure will change one by one The display will change between and 4 Once the hardness setting is correctly adjusted press the Delay Start button The hardness setting is then saved Step 2 Setting up the softening system level of your dishwasher Step1...

Page 19: ...otherwise water stains will be left behind on the dishes and interior containers If the tap water exceeds a certain level of hardness it must be softened I e decalcified This is achieved by adding a special salt to the water softener inside the dishwasher The required amount of salt is set up according to how hard your tap water is This model has a water softener to soften hard water Please read t...

Page 20: ...ed into the uppermost position It is the most efficient programme in terms of its combined energy and water consumption for that type of tableware Program Time in minutes Water in Liter Energy in KWh Eco 225 9 0 92 2 Cutlery Rack 3 Upper Rack 1 Cutlery Basket 1 2 3 4 5 6 7 b b a b f c f b 4 Lower Rack a Milk Egg Margarine Tea Oat Meat Spinach d g b e c f Milk Egg Margarine Tea Oat Meat Spinach e e...

Page 21: ...ad 1 Cutlery Basket 2 Cutlery Rack 3 Upper Rack 4 Lower Rack HOW TO USE AND OPERATE Do not use the pot and pan with plastic handle Poor washing for smudges of waterproof or long lasting lipsticks on the glass CAUTION ...

Page 22: ...loading in the dishwasher While you load items into the dishwasher Load all items with the opening down Make sure that water does not collect in a deep base Deep based items should be placed at an angle to help water run off and dry properly Make sure that all items do not touch each other Take care not to obstruct the rotation of spray arms Plastic items do not dry as well as steel or porcelain i...

Page 23: ...ensils such as whisks the cover can be opened by being unhinged Take care not to obstruct the rotation of the spray arm Pull the rack out to the end of the rails then lift the front of the rack so the rollers clear the stop on the end of the rail The rack can now be slid forward and removed from the rails The entire cutlery rack can be removed if more space is needed on the upper rack for larger i...

Page 24: ...a pair of rows of tines Each pair can be folded separately to load large dishes especially bowls To make the space between two tines wider fold down the rear row of each pair Fold down the back side rows of tines to load pots 4 Upper Rack The upper rack is suitable for delicate items such as small plates long cutlery cups glasses and dishwasher safe plastic items Fold up whole tines E g Loading di...

Page 25: ...ockery items 45mm There is a 45mm gain in height when the upper rack is moved to the lower position After adjusting the rack levels check that the spray arms are free to rotate Move the upper rack to the lower position Pull up the levers on either side of the rack Move to upper position Lift the rack upward Adjusting the height of the upper rack HOW TO USE AND OPERATE Before adjusting ensure the r...

Page 26: ...mmended Chambers hold up to 50g including pre wash chamber The amount of detergent required depends on the programme Please refer to the guide table The detergent is dispensed automatically during the operation The chamber lid remains open after operation PROGRAMME AMOUNT OF DETERGENT Pre wash Onto the door Main wash Dispenser Quick Dry 5g 20g Quick 10g Eco 35g Auto 10g 25g Steam Care 20g SteamDua...

Page 27: ...t with specific programmes only You will obtain optimum rinsing and drying results by using conventional rinse aids The use of Dishwasher Tablet products may also cause the soap dispenser to remain shut therefore failing to dispense the soap tablet These combined detergent products can alternatively be placed in the filter prior to starting the wash cycle Please contact the detergent manufacturer ...

Page 28: ... recommend the salt refill should always be carried out as mentioned on previous page prior to starting the next operation This will immediately thin and drain away any excess salt solution For refilling Salt D1454 D1455 D1464 KD 826S D1465 KD 827S When the lamp is lit this means that the salt aid is almost empty Refill the Salt Aid chamber as soon as possible NOTE After filling with salt it may t...

Page 29: ... window shows the remaining time The time in the display window will start to decrease minute by minute If the door is opened during the programme a safety device ensures that the machine stops Once the door is re closed the programme will start from where it was interrupted 8 At the end of the washing programme End is displayed on the digital display and a buzzer sounds And the dishwasher automat...

Page 30: ... of the dishwasher This cycle adds the gentle power of steam to boost the cleaning power of the delicate cycle The cycle is adequate for effectively cleaning delicate items like fine china or stemware This cycle adds the strong power of steam to boost the cleaning power of the intensive cycle The cycle is adequate for effectively cleaning strongly polluted items like pots and pans This programme o...

Page 31: ...rds Check that the water jet holes are not blocked If cleaning is required remove the arm by unscrewing the nut Clean the spray arm and replace it in the reverse order Water Inlet A filter is incorporated in the connection of the valve on the water inlet hose If insufficient water flows into the dishwasher check that the filter is not blocked Cleaning the filter Disconnect the dishwasher from the ...

Page 32: ...er Too little Rinse Aid dispensed Dry results are not satisfactory Too little Rinse Aid dispensed The spray arms do not rotate smoothly Clean the holes of the spray arm The mounting of the spray arms is blocked by food particles Washing results are not satisfactory Incorrect amount of detergent Utensils incorrectly arranged or overloaded Filters are clogged Water jet holes of spray arms blocked Sp...

Page 33: ...m call for service Close the water tap and unplug the power plug Call for service Water is leaking from the hose connections Damage to the unit has been caused by a water leak The display shows FE code Automatically Drain pump operated Excessive water is supplied which is more than the normal water level There is a problem with the inlet valve The display shows HE code The water heater circuit is ...

Page 34: ...inutes of sensing except draining and filling the unit s display will then show the processing time The display shows numbers between 1 19 Odor Buzzing sound High Temperature Alarm This is not an error code but indicates the setting of the delay start To cancel the function turn the power off To change the course and option open the door and select another course and option Countdown will then con...

Page 35: ...s are being transmitted If the call centre agent is not able to get an accurate recording of the data you may be asked to try again 5 Once the countdown is over and the tones have stopped the machine will display END and turn off automatically after a few seconds Resume your conversation with the call centre agent who will then be able to assist you using the information transmitted for analysis a...

Page 36: ...35 SPECIFICATION Capacity 14 Place settings Weight See rating label Power Supply See rating label Power Consumption 1 900 W 0 49 W The off mode The left on mode Water Feed Pressure 50 800 kPa ...

Page 37: ......

Reviews: