background image

2 9

Part 8

TROUBLESHOOTING GUIDE

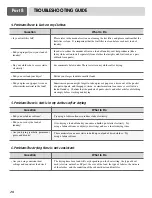
7.Problem:It takes too long for my clothes to dry

Question

What to Do

• Did you properly sort your loads of

laundry?

• Are you drying large loads of heavy

fabrics?

• Are the dryer controls properly set?

• Is the lint filter clean before each

new load of laundry?

• Are the exhaust ducts clear and

properly configured?

• Is the fuse blown, or is the circuit

breaker tripped?

• Did you overload your dryer?

• Did you under load your dryer?

Separate heavy weight items from light weight items when creating loads.

Heavy fabrics take longer to dry because they tend to retain more moisture.  To help
reduce and maintain more consistent drying times for large and heavy fabrics,
separate these items into smaller loads of a consistent size.

Use the appropriate control settings for the type of load you are drying.

Please confirm that the lint filter is clean prior to each new load of laundry.

Confirm through review of the appropriate sections of this manual that the exhaust
venting ductwork is properly configured.  Confirm that the venting is free of
obstructions.  Confirm that the outside wall dampers are moving freely, that the
dampers are not pushed in, and that nothing has been set against the dampers.

Check your home’s or laundry room’s fuse box/circuit breaker box and replace the
fuse or reset the circuit breaker.  (IMPORTANT: electric dryers generally use two
fuses or breakers.)

Divide your larger load into a number of smaller loads.

If you are only drying a handful of items, add a few extra pieces to help ensure
proper tumbling action.

8.Problem:My clothes are wrinkled

Question

What to Do

• Are you over drying your laundry?

• Are you removing your laundry

from the dryer soon after the
drying cycle is complete?

Over drying a load of laundry can lead to wrinkled clothes.  Try a shorter drying
time, and remove items while they still retain a slight amount of moisture.

Remove your laundry from the dryer after the drying cycle ends and either hang or
fold the items.

9.Problem:My clothes are shrinking

Question

What to Do

• Are you following the care

instructions for your garment?

To avoid shrinkage, please carefully follow the care and use instructions for your
garment, because some fabrics will naturally shrink when washed.  Other fabrics
can be washed but will shrink when dried in a dryer.

Summary of Contents for D5932W

Page 1: ... favor lea su manual del propietario cuidadosamente ya que le proveerá de instrucciones sobre la segura instalación manejo y mantenimiento Consérvelo para futuras referencias archive el modelo y números de serie de su secadora 1 800 243 0000 para el Servicio LG Atención al Cliente 24 horas al día 7 días a la semana ...

Page 2: ...P No 3828EL4001A Electric and Gas Dryer 1 800 243 0000 24 HOURS A DAY 7 DAYS A WEEK FOR LG CUSTOMER SERVICE ...

Page 3: ...Manufactured or Mobile Home 11 PART3 ELECTRICAL REQUIREMENTS FOR ELECTRIC DRYER 12 16 3 Wire Connection with a Power Supply Cord 14 4 Wire Connection with a Power Supply Cord 15 Optional 3 wire Connection 16 PART4 ELECTRICAL REQUIREMENTS FOR GAS DRYERS 17 PART5 GAS REQUIREMENTS AND INSTRUCTIONS 18 PART6 EXHAUST REQUIREMENTS AND MAINTENANCE 19 20 PART7 FEATURES AND BENEFITS 21 26 Using Your Dryer T...

Page 4: ...ng to the instructions in this manual LG will repair or replace any of its mechanical or electrical parts if they are defective in material or workmanship Warranty Restriction If the dryer is subjected to other than private family use all warranty coverage is effective for only 90 days You will need the complete model and serial numbers when requesting information We recommend that you staple your...

Page 5: ... service personnel 13 Do not place items exposed to cooking oils in your dryer Items contaminated with cooking oils may contribute to a chemical reaction that could cause a load to catch fire 14 Do not use fabric softners or products to eliminate static unless recommended by the manufacturer of the fabric softner or product GROUNDING INSTRUCTIONS This appliance must be grounded In the event of mal...

Page 6: ...oil on them including cooking oil Articles containing foam rubber rubber like materials plastic or similar materials should be dried on a clothesline or by using an air cycle Failure to follow these instructions can result in fire death or serious injury A qualified service person or company must perform installation and service of this appliance California Safe Drinking Water and Toxic Enforcemen...

Page 7: ...ease confirm that the dryer has the required clearances through reference to the following information and manual sections on Exhaust Requirements and Maintenance If you are installing your dryer in a manufactured or mobile home please refer to STEP 9 below for additional instructions Installing Your Dryer in a Closet or Recessed Area Following are instructions concerning and the minimum clearance...

Page 8: ... 1 inch If the dryer is not level and if the slope exceeds 2 5 cm 1 inch a load may not tumble properly and internal sensors may malfunction Note Other sections of this manual also provide important information concerning the placement of and clearances for your dryer Please review this entire manual before proceeding with any installation The door on your dryer may be installed to open either to ...

Page 9: ...r Use as few elbow joints as possible Use duct tape on all duct joints Insulate ductwork that runs through unheated areas in order to reduce condensation and lint build up on pipe walls and PLEASE BE AWARE THAT FAILURE TO EXHAUST THE DRYER CORRECTLY WILL VOID THE DRYER S WARRANTY STEP 3 Connecting the Exhaust and Venting System WARNING Use a heavy metal vent Do not use a plastic vent Do not use a ...

Page 10: ...ply Following are several warnings and instructions concerning making the electrical connection for electric dryers More detailed information concerning the electrical connection is provided at the manual section entitled Electrical Requirements For Electric Dryer and it is important that you thoroughly review that section and the remainder of this manual before taking any steps to install or use ...

Page 11: ...ryers Close the door to the dryer drum drying compartment and after completing all steps in this manual for proper installation of this dryer start the dryer on a heat setting as described more fully in the operating instructions that accompany the dryer After the dryer starts the igniter will glow red and the main burner will ignite Warning If all air is not purged from the gas line the gas ignit...

Page 12: ...ented to the outside using the back left or bottom panel Gas dryer may not be vented to the outside using the right side panel because of the burner housing 6 The dryer exhaust duct must be affixed securely to the manufactured or mobile home structure and the exhaust duct must be made of a material that will resist fire and combustion and it is recommended that you use a rigid or flexible metal pi...

Page 13: ... of the line ELECTRICAL SERVICE FOR THE DRYER SHOULD BE OF MAXIMUM RATE VOLTAGE LISTED ON THE NAMEPLATE DO NOT CONNECT DRYER TO 110 115 OR 120 VOLT CIRCUIT Heating elements are available for field installation in dryers which are to be conected to electrical service of different voltage than that listed on nameplate such as 208 Volt d If branch circuit to dryer is fifteen feet 4 50 m or less in le...

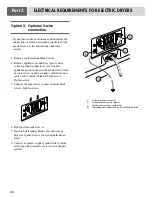
Page 14: ... appropriate electrical connection for your home Important If your local codes or ordinances do not allow the connection of a frame grounding conductor to the neutral wire use the instructions under Option 3 Optional 3 wire connection 3 wire receptacle NEMA type10 30R Use the instructions at this section if your home has a 4 wire receptacle NEMA type 14 30R and you will be using a UL listed 120 24...

Page 15: ...wire white or center wire of power supply cord to the center silver colored terminal screw of the terminal block Tighten screw 3 Connect the other wires to outer terminal block screws Tighten screws 4 Tighten strain relief screws 5 Insert tab of terminal block cover into slot of dryer rear panel Secure cover with hold down screw d g f a lf your local codes or ordinances permit the connection of a ...

Page 16: ...bare of power supply cable to external ground conductor screw Tighten screw 4 Connect neutral wire white or center wire of power supply cord to the center silver colored terminal screw of the terminal block a External ground connector b Green or bare copper wire of power supply cord c 3 4 in 1 9 cm UL listed strain relief d Center silver colored terminal block screw e Neutral grounding wire green ...

Page 17: ...wire of power supply cord cable under center silver colored terminal block screw Tighten screw 3 Connect the other wires to outer terminal block screws Tighten screws 4 Tighten strain relief screws 5 Insert tab of terminal block cover into slot of dryer rear panel Secure cover with hold down screw 6 Connect a separate copper ground wire from the external ground connector screw to an adequate groun...

Page 18: ... help guard against shock The plug should be plugged directed into a properly grounded three prong receptacle that is rated 120 Volts AC alternating current 15 Amps This plug in order to be properly and fully effective must be plugged into a properly installed outlet that is grounded in accordance with all local codes and ordinances b The dryer must be grounded in order to reduce the risk of elect...

Page 19: ...ed as shown 6 If using a rigid pipe the rigid pipe should be 1 2 inch IPS If acceptable under local codes and ordinances and when acceptable to your gas supplier 3 8 inch approved tubing may be used where lengths are less than 20 feet 6 1m Larger tubing should be used for lengths in excess of 20 feet 6 1m It is also important that you use pipe joint compound that is insoluble in LP gas 7 To reduce...

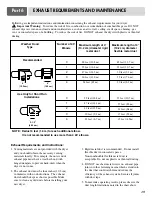
Page 20: ...installing your new dryer 3 Rigid metal duct is recommended Do not install flexible duct in concealed spaces Non combustible flexible metal duct is acceptable Do not use plastic or thin foil ducting 4 DO NOT use sheet metal screws on exhaust pipe joints or other fastening means which extend into the duct that could catch lint and reduce the efficiency of the exhaust system Secure all joints with d...

Page 21: ...yer because wiring errors can cause serious injury to you and your dryer Cleaning the Lint Screen 1 Clean the lint filter either before drying each load or after drying each load Always make sure the lint filter is clean before starting a new load because a clogged lint filter may increase drying times 2 To clean pull the lint screen straight up and roll any lint off the screen with your fingers D...

Page 22: ...perating this dryer WARNING Fire Hazard No washer can completely remove oil Do not dry anything that has ever had any type of oil on it including cooking oils Items containing foam rubber or plastic must be dried on a clothesline or by using an Air Cycle Failure to follow these instructions can result in death or fire WARNING Explosion Hazard Keep flammable materials and vapors such as gasoline aw...

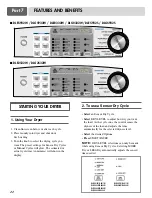
Page 23: ...e in minutes will show in the display 1 Using Your Dryer Select an Sensor Dry Cycle Select DRY LEVEL to adjust how dry you want the load As the cycle runs the control senses the dryness of the load and adjusts the time automatically for the selected dryness level Select the desired Options Press START PAUSE NOTE DRY LEVEL selections can only be made while using Sensor Dry Cycles Selecting MORE Dry...

Page 24: ...pants 4 work shirts 2 sweatpants 2 sweatshirts Towels 10 bath towels 10 hand towels 14 wash cloths Mixed Load 3 sheets 1 king 2 twin 4 pillowcases 3 shirts 3 blouses 9 T shirts 9 shorts 10 handkerchiefs Following are sample loads for Super Capacity Dryers 5 Loading To stop your dryer at any time Press START PAUSE or open the door Pausing or Restarting To pause the dryer at any time Open the door o...

Page 25: ...uch as lingerie exercise wear or sheer curtains Estimated Time with SENSOR DRY LEVEL Normal setting Sensor Dry Cycles Load Type Temp High Medium High Medium Low Low Ultra Low Time Minutes 54 55 41 36 32 34 Sensor Dry Cycle Use Manual Cycles to select a specific amount of drying time and a drying temperature When a Manual Cycle is selected the ESTIMATED TIME REMAINING display shows the actual time ...

Page 26: ...door NOTE If you do not select WRINKLE CARE the dryer stops after cool down WRINKLE CARE This chart shows examples of items that can be dried using AIR DRY Reset cycle to complete drying if needed Check to see that coverings are securely stitched Shake and fluff pillows by hand periodically during the cycle Dry item completely Foam rubber pillows are slow to dry NOTE Air Dry is not available with ...

Page 27: ...ORMAL cycles This option reduces certain types of bacteria The ANTI BACTERIAL process produces high temperature during the cycle NOTE Do not use this cycle on delicate fabrics 11 Anti Bacterial Set up your favorite combination of settings and save them here for one touch recall To store a CUSTOM PROGRAM 1 Select a cycle 2 Change DRY LEVEL and TEMP CONTROL 3 Select OPTIONS you want 4 Press and hold...

Page 28: ...ripped the dryer might tumble but not heat Check your home s or laundry room s fuse box circuit breaker box and replace the fuse or reset the circuit breaker IMPORTANT electric dryers generally use two fuses or breakers Confirm that the house gas shutoff and the dryer gas shutoff are both fully open 3 Problem There are Greasy Spots on My Clothes Question What to Do Did you follow the instructions ...

Page 29: ...s shirts and other articles of clothing are empty before washing and drying Is your lint filter full Did you properly sort your load of laundry Do your clothes have excess static electricity Did you overload your dryer Did you place any paper tissue or other similar material in the load Did you use fabric softener Did you over dry the load of laundry Are you drying synthetic permanent press and bl...

Page 30: ... free of obstructions Confirm that the outside wall dampers are moving freely that the dampers are not pushed in and that nothing has been set against the dampers Check your home s or laundry room s fuse box circuit breaker box and replace the fuse or reset the circuit breaker IMPORTANT electric dryers generally use two fuses or breakers Divide your larger load into a number of smaller loads If yo...

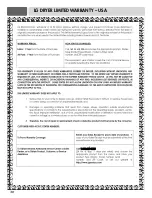
Page 31: ...3 0 LG DRYER LIMITED WARRANTY USA 1 800 243 0000 1 800 243 0000 ...

Page 32: ...EQUERIMIENTOS ELÉCTRICOS PARA SECADORA ELÉCTRICA 12 16 Conexión de 3 Alambres con un Cordón de Alimentación 14 Conexión de 4 Alambres con un Cordón de Alimentación 15 Conexión de 3 Alambres Opcional 16 PARTE 4 REQUERIMIENTOS ELÉCTRICOS PARA SECADORAS A GAS 17 PARTE 5 REQUERIMIENTOS E INSTRUCCIONES SOBRE EL GAS 18 PARTE 6 REQUERIMIENTOS Y MANTENIMIENTO SOBRE EL ESCAPE 19 20 PARTE 7 CARACTERÍSTICAS ...

Page 33: ...nstrucciones en este manual LG reparará o remplazará cualquiera de sus partes mecánicas o eléctricas si están defectuosas en el material o en la fabricación Restricción de la Garantía Si la secadora es utilizada para otro propósito que no sea el uso familiar privado toda cobertura de la garantía es efectiva por sólo 90 días Usted necesitará el número de modelo y de serie completos cuando solicite ...

Page 34: ... hayan sido expuestos a aceite de cocina dentro de la secadora Artículos contaminados con aceite de cocina pueden contribuir a una reacción química causante de incendiar una carga 14 No use suavizantes de telas o productos para eliminar la estática a menos que sea recomendado por el fabricante de estos productos INSTRUCCIONES DE CONEXIÓN A TIERRA Este artefacto debe estar conectado a tierra En cas...

Page 35: ...culos que contienen espuma hule materiales similares al hule plástico o materiales similares deben secarse en el tendedero o utilizando el ciclo de aire La falta de cumplimiento de estas instrucciones puede resultar en incendio muerte o lesiones serias Un técnico o una compañía calificada debe efectuar la instalación y proveer el servicio a este artefacto Decreto para la Seguridad del Agua Potable...

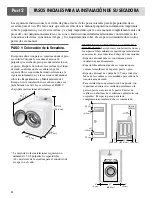
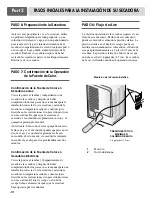
Page 36: ...bres requeridos haciendo referencia a la siguiente información y a las secciones del manual sobre los Requerimientos y Mantenimiento del Escape Si está instalando su secadora en una casa prefabricada o móvil favor refiérase al PASO 9 abajo para instrucciones adicionales Instalación de su Secadora en un Armario o Área Reducida Las siguientes son las instrucciones y los espacios libres mínimos reque...

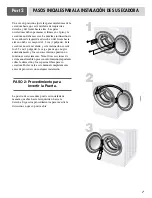
Page 37: ...cadora no está nivelada y si la inclinación excede los 2 5 cm 1 pulgada la carga puede que no gire adecuadamente y los sensores internos pueden no funcionar correctamente Nota Otras secciones de este manual también proveen información importante sobre la ubicación y los espacios libres para su secadora Por favor lea este manual completamente antes de proceder con cualquier instalación La puerta de...

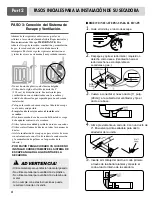
Page 38: ... en todas las uniones de ductos Aísle la instalación de escape que pase a través de áreas sin calentamiento con el fin de reducir la condensación y la acumulación de pelusas en las paredes de la tubería y POR FAVOR TENGA CUIDADO YA QUE DE NO INSTALAR CORRECTAMENTE EL SISTEMA DE ESCAPE ANULARÁ LA GARANTÍA DE LA SECADORA PASO 3 Conexión del Sistema de Escape y Ventilación ADVERTENCIA Utilice materia...

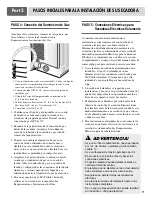
Page 39: ...as e instrucciones concernientes a la confección de la conexión eléctrica para secadoras eléctricas Información detallada adicional concerniente a la conexión eléctrica es suministrada en la sección del manual Requerimientos Eléctricos para la Secadora Eléctrica y es importante que usted lea esta sección completamente así como el resto del manual antes de tomar algún paso para instalar o usar esta...

Page 40: ...nto de secado de la secadora y después de haber completado todos los pasos de este manual para la instalación correcta de esta secadora encienda la secadora en temperatura caliente como mejor se describe en las instrucciones de operación provistas con la secadora Después que la secadora se enciende el encendedor resplandecerá en rojo y el quemador principal encenderá Advertencia Si no todo el aire...

Page 41: ...ero izquierdo o inferior Las secadoras a gas no pueden ser ventiladas al exterior usando el panel del lado derecho debido a la cubierta del quemador 6 El ducto de escape de la secadora debe estar fijo a la estructura de la casa prefabricada o móvil y el ducto de escape debe estar hecho de un material que resista fuego y combustión y es recomendable que utilice una tubería de metal flexible o rígid...

Page 42: ...ÉCTRICO PARA LA SECADORA DEBE SER DEL MÁXIMO RANGO DE VOLTAJE DESCRITO EN LA PLACA NO CONECTE LA SECADORA A UN CIRCUITO DE 110 115 Ó 120 VOLTIOS Hay elementos calefactores disponibles para secadoras que se conectarán a servicios eléctricos de diferente voltaje que los que se listan en la placa tal como de 208 voltios d Si la distancia entre la caja de circuito y la secadora es de 15 pies 4 50 m o ...

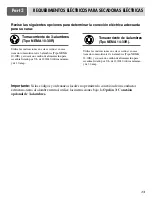
Page 43: ...n eléctrica adecuada para su casa Importante Si los códigos y ordenanzas locales no permiten la conexión de un conductor estructura tierra al alambre neutral utilice las instrucciones bajo la Opción 3 Conexión opcional de 3 alambres Tomacorriente de 3 alambres Tipo NEMA 10 30R Utilice las instrucciones en esta sección si su casa tiene un tomacorriente de 4 alambres Tipo NEMA 14 30R y si usará un c...

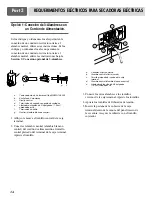
Page 44: ...bre blanco o central del cordón de alimentación al tornillo central plateado del terminal de la caja terminal Apriete el tornillo 3 Conecte los otros alambres a los tornillos externos de la caja terminal Apriete los tornillos 4 Apriete los tornillos del liberador de tensión 5 Inserte la pestaña de la cubierta de la caja terminal dentro de la ranura del panel trasero de la secadora Asegure la cubie...

Page 45: ... cable de alimentación al tornillo externo del conductor a tierra Apriete el tornillo 4 Conecte el alambre neutral alambre blanco o central del cordón de alimentación al tornillo central plateado de la caja terminal a Conector externo a tierra b Alambre de cobre verde o descubierto del cordón alimentación c Liberador de tensión de 3 4 pulgadas 1 9 cm listado por UL d Tornillo central plateado de l...

Page 46: ... central plateado de la caja terminal Apriete el tornillo 3 Conecte los otros alambres a los tornillos externos de la caja terminal Apriete los tornillos 4 Apriete los tornillos del liberador de tensión 5 Inserte la pestaña de la cubierta de la caja terminal dentro de la ranura del panel trasero de la secadora Asegure la cubierta con el tornillo sujetador 6 Conecte un alambre de cobre a tierra sep...

Page 47: ...un enchufe de tres clavijas para protección contra choques eléctricos El enchufe debe ser conectado directamente a un tomacorriente para tres clavijas debidamente conectado a tierra clasificado para 120 Voltios AC corriente alterna 15 Amperios Este enchufe para que sea debidamente y completamente efectivo debe estar enchufado en un tomacorriente debidamente instalado que esté conectado a tierra de...

Page 48: ...Si usa una tubería rígida deberá ser de 1 2 pulgada IPS Si es aceptable por los códigos y ordenanzas locales así como por su suplidor de gas podrá usarse tubería aprobada de 3 8 de pulgada para distancias menores de 20 pies 6 1 m Tuberías más grandes deberán usarse para distancias mayores de 20 pies 6 1 m También es importante que utilice sellador de uniones que sea insoluble en gas LP 7 Para redu...

Page 49: ...ntes de instalar su nueva secadora 3 Se recomienda un ducto de metal rígido No instale un ducto flexible en espacios ocultos Un ducto de metal flexible no combustible es aceptado No utilice ductos de plástico o lámina delgada 4 NO use tornillos para láminas de metal en las uniones de las tuberías de escape u otros sujetadores que puedan introducirse en el ducto y que puedan atrapar pelusas y reduc...

Page 50: ...u secadora Limpieza de la Malla de Pelusa 1 Limpie el filtro de pelusa antes o después de haber secado cada carga Siempre asegúrese que el filtro de pelusa esté limpio antes de empezar una nueva carga debido a que un filtro de pelusa obstruido puede aumentar el tiempo de secado 2 Para limpiarlo tire de la malla de pelusa hacia arriba y enrolle la pelusa fuera de la malla con los dedos No enjuague ...

Page 51: ...secadora ADVERTENCIA Peligro de Incendio Ninguna lavadora puede remover por completo el aceite Nunca seque nada que haya tenido contacto con algún tipo de aceite incluyendo aceite de cocinar Artículos que contengan espuma hule o plástico deben secarse en un tendedero o utilizando un Ciclo de Aire El no llevar a cabo estas instrucciones puede resultar en muerte o incendio ADVERTENCIA Peligro de Exp...

Page 52: ...la 1 Uso de la Secadora Seleccione un Ciclo de Sensor Dry sensor de secado Seleccione el DRY LEVEL Nivel de Secado para ajustar que tan seca quiere la carga Al correr el ciclo el control detecta sequedad de lacarga y ajusta el tiempo automáticamente para el nivel seleccionado de secado Seleccione las Option Opcíones deseadas Presione START PAUSE Inicio Pausa NOTA La selección del DRY LEVEL Nivel d...

Page 53: ...ajo 4 camisas de trabajo 2 pantalones de ejercicios 2 sudaderas Towels Toallas 10 toallas de baño 10 toallas de mano 14 paños para limpiar Mixed Load Carga Mixta 3 sabanas 1 grande 2 medianas 4 fundas de almohadas 3 camisas 3 blusas 9 camisetas 9 calzoncillos 10 pañuelos Los siguientes son ejemplos de cargas para Secadoras de Súper Capacidad 5 Cargar Para detener su secadora en cualquier momento P...

Page 54: ...cterísticas de Nivel de Sensor Dry sensor de secado Normal Tipos de Cargas del Ciclo de Sensor Dry sensor de secado Temperatura Tiempo Minutos Ciclo de Sensor Dry sensor de secado Heavy duty Use los Ciclos Manuales para seleccionar una cantidad especifica de tiempo de secado y una temperatura de secado Cuando un Ciclo Manual es seleccionado la pantalla del ESTIMATED TIME REMAINING Tiempo Restante ...

Page 55: ... enfriarse Wrinkle Care Anti Arrugas Utilice el Modificador de Air Seco para artículos que requieran secado sin calor así como hule plástico y telas sensibles al calor Esta tabla muestra ejemplos de artículos que pueden ser secados usando el Air Seco Cuando Use Air Dry Aire Seco Tipo de Carga TIEMPO FIJADO EN FABRICA MINUTOS Puede personalizar sus ciclos seleccionando las OPTION Opcíones 7 Option ...

Page 56: ...bacterias El proceso ANTIBACTERIAL produce altas temperaturas durante el ciclo NOTA no use este ciclo en prendas delicadas 11 ANTI BACTERIAL Programe su combinación favorita de características y guárdelas aquí para ejecutarlo con un sólo toque Para guardar un PROGRAMA PERSONAL 1 Seleccione el ciclo 2Cambie el Dry Level Nivel de Secado y el CONTROL de TEMP 3 Seleccione la OPTION Opción de su prefer...

Page 57: ...2 7 Part 8 GUÍA PARA LA SOLUCIÓN DE PROBLEMAS Consejos para la solución de problemas Ahorre tiempo y dinero Primero revise las tablas en las siguientes p áginas y quizás no necesite llamar a servicio ...

Page 58: ...2 8 Part 8 GUÍA PARA LA SOLUCIÓN DE PROBLEMAS ...

Page 59: ...2 9 Part 8 GUÍA PARA LA SOLUCIÓN DE PROBLEMAS ...

Page 60: ...3 0 GARANTÍA LIMITADA DE LA SECADORA LG USA 1 800 243 0000 1 800 243 0000 ...

Reviews: