


DWG.
No.
TRIG.
DR COMPLETED
도면 DR 완료
완료일 :
LG 전자 (주)
LG Electronics Inc.
UNIT
SCALE 1 1
mm
REVIEWED
DESIGNED
RELATED DWG.
CHECKED APPROVED
조 수 민
권 대 한 김 현 석
17.03.15
17.03.15
17.03.15
MODELING
I
T
L
E
T
APPROVED
승인자
PREPARED
시방자
DATE
년/월/일
REF. NO.
시방 번호
REV. NO.
기호
REVISION DESCRIPTION
변경 사항
4
3
2
1
RELEASING THIS DRAWING
WITHOUT PERMISSION LG
Electronics SHOULD BE
ACCUSED ACCORDING TO THE
LAWS AND COMPANY RULES.
이 도면은 LG전자의 자산으로 불법
유출시 관계법과 회사규정에 의해 처벌됨.
ILLUSTRATOR
MFL67652513
MANUAL,OWNER’S
TD Drop In Dryer
1/1
MFL67652513
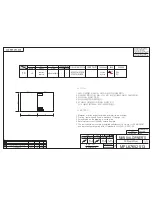
<< 주기 >>
1. 재질, 인쇄방법, 인쇄도수, 외곽치수등은 작업표에 준한다.
2. 인쇄내용, 문자크기 및 형상, 선의 굵기 등은 설계에서 제시된 FILM에 준함.
3. 외곽치수는 절단후 치수임.
4. 양산전에 설계 한도를 득할 것.
5. 본 부품에 금지물질이 포함되지 않도록 하고,
상세 내용은 LG(63)-A-5501-34를 만족할 것.
<< NOTES >>
1. Material, printing and exterier size are refer to work tables.
2. Printing, text size and line are based on LG design film.
3. Exterier size on the drawing is cutting line.
4. Before product controlled by criteria sample.
5. The part should not contain prohibited substances(Pb,Cd,Hg,Cr+6,PBB,PBDE)
and details should comply with LG standard of LG(63)-A-5501-34.
P/NO. 다
<FRONT>
<BACK>
나
WORK
BRAND
LG
-
DLE7050*
DLG7051*
13
나
MODEL
MFL67652513
다
P/NO.
표지:모조지 150g OFFSET 인쇄
내지:모조지 80g OFFSET 인쇄
MATERIAL AND PRINTING DESCRIPTION
1
1
PRINTING DEGREE
EXTERIER INTERIER
LG MODEL 명
LANGUAGE
PAGE
EUS
무선
REMARK
SEC.
96
English
Spanish
182
182
257
가
1
100
정영석
조수민
17.03.22
EAGH300928
내용 (치수 현실화, 목차 오류 수정 등) 및 페이지 수 현실화
Summary of Contents for DLE7050 Series
Page 48: ...Memo MFL67652513_en_170321 indd 47 2017 03 22 9 39 27 ...
Page 49: ...Memo MFL67652513_en_170321 indd 48 2017 03 22 9 39 27 ...
Page 50: ...Memo MFL67652513_en_170321 indd 49 2017 03 22 9 39 27 ...
Page 51: ...Memo MFL67652513_en_170321 indd 50 2017 03 22 9 39 27 ...
Page 98: ...Memo MFL67652513_sp_170321 indd 47 2017 03 22 9 39 44 ...
Page 99: ...Memo MFL67652513_sp_170321 indd 48 2017 03 22 9 39 44 ...
Page 100: ...Memo MFL67652513_sp_170321 indd 49 2017 03 22 9 39 44 ...


