background image

3

IMPORTANT SAFETY INSTRUCTIONS

ENGLISH

IMPORTANT SAFETY INSTRUCTIONS

READ ALL INSTRUCTIONS BEFORE USE

Safety for a Dryer

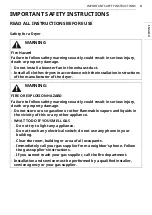
WARNING

Fire Hazard
Failure to follow safety warnings exactly could result in serious injury, 

death or property damage.

Do not install a booster fan in the exhaust duct.

Install all clothes dryers in accordance with the installation instructions 

of the manufacturer of the dryer.

WARNING:

FIRE OR EXPLOSION HAZARD
Failure to follow safety warnings exactly could result in serious injury, 

death or property damage.

Do not store or use gasoline or other flammable vapors and liquids in 

the vicinity of this or any other appliance.

WHAT TO DO IF YOU SMELL GAS

Do not try to light any appliance.

Do not touch any electrical switch; do not use any phone in your 

building.

Clear the room, building or area of all occupants.

Immediately call your gas supplier from a neighbor’s phone. Follow 

the gas supplier’s instructions.

If you cannot reach your gas supplier, call the fire department.

Installation and service must be performed by a qualified installer, 

service agency or your gas supplier.

Summary of Contents for DLEX89 0 Series

Page 1: ...d this owner s manual thoroughly before operating the appliance and keep it handy for reference at all times ENGLISH DLEX89 0 DLGX89 1 MFL67731062 Rev 01_122221 www lg com Copyright 2021 LG Electronics Inc All Rights Reserved ...

Page 2: ...ling the Vent Kit 20 Stacking the Appliance 21 Venting the Dryer 22 Connecting Gas Dryers 23 Connecting Electric Dryers 27 Connecting the Water Inlet Hose 29 Final Installation Check 32 OPERATION 32 Before Use 33 Loading the Dryer 35 Control Panel 37 Dry Cycles 41 Cycle Modifiers 42 Options and Extra Functions 44 SMART FUNCTIONS 44 LG ThinQ Application 46 Smart DiagnosisTM Function 48 MAINTENANCE ...

Page 3: ...low safety warnings exactly could result in serious injury death or property damage Do not store or use gasoline or other flammable vapors and liquids in the vicinity of this or any other appliance WHAT TO DO IF YOU SMELL GAS Do not try to light any appliance Do not touch any electrical switch do not use any phone in your building Clear the room building or area of all occupants Immediately call y...

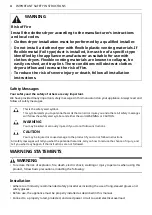
Page 4: ...erformed by a qualified installer Do not install a clothes dryer with flexible plastic venting materials If flexible metal foil type duct is installed it must be of a specific type identified by the appliance manufacturer as suitable for use with clothes dryers Flexible venting materials are known to collapse be easily crushed and trap lint These conditions will obstruct clothes dryer airflow and ...

Page 5: ...omes otherwise restricted in use or during installation The exhaust duct must be 4 inches 10 2 cm in diameter with no obstructions The exhaust duct should be kept as short as possible Make sure to clean any old ducts before installing your new dryer Rigid semi rigid or flexible metal ducting is recommended for use between the dryer and the wall All non rigid metal transition duct must be UL listed...

Page 6: ... has not been used for such a period before using the appliance turn on all hot water faucets and let the water flow from each for several minutes This will release any accumulated hydrogen gas As the gas is flammable do not smoke or use an open flame during this time Fix the drain hose securely in place Do not put oily or greasy clothing candles or flammable materials on top of the appliance Do n...

Page 7: ...ing a STEAM CYCLE Do not touch the steam nozzle in the drum during or after a STEAM CYCLE On models with a steam feeder tank do not fill the steam feeder with hot water over 86 30 gasoline dry cleaning solvents or other flammable or explosive substances Grounding Instructions Improper connection of the equipment grounding conductor can result in a risk of electric shock Check with a qualified elec...

Page 8: ...here it will not be exposed to temperatures below freezing or exposed to outdoor weather conditions Operation Clean the lint filter before or after each load Do not use fabric softeners or products to eliminate static unless recommended by the manufacturer of the fabric softener or product If the drain hose is frozen in winter thaw it out before use ...

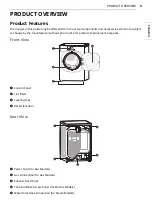
Page 9: ... subject to change by the manufacturer without prior notice for product improvement purposes Front View a Control Panel b Lint filters c Leveling feet d Reversible door Rear View a Power Cord for Gas Models b Gas Connection for Gas Models c Exhaust Duct Oulet d Terminal Block Access Panel for Electric Models e Water Inlet Hose Connection for Steam Models ...

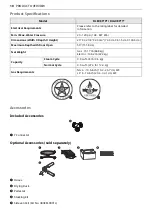
Page 10: ...efer to the rating label for detailed information Min Max Water Pressure 20 120 psi 138 827 kPa Dimensions Width X Depth X Height 29 X 32 1 8 X 40 3 4 74 0 cm X 81 5 cm X 103 6 cm Maximum Depth with Door Open 59 151 8 cm Net Weight Gas 151 7 lb 68 8 kg Electric 148 2 lb 67 2 kg Capacity Steam Cycle 9 0 cu ft 8 lb 3 6 kg Normal Cycle 9 0 cu ft 27 3 lb 12 4 kg Gas Requirements NG 4 10 5 inch 10 2 26...

Page 11: ...VIEW ENGLISH NOTE For your safety and extended product life use only authorized components The manufacturer is not responsible for product malfunction or accidents caused by the use of unauthorized components or parts ...

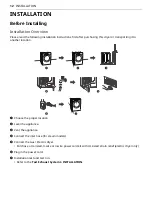
Page 12: ...to another location a Choose the proper location b Level the appliance c Vent the appliance d Connect the inlet hose for steam models e Connect the Gas Electric dryer Purchase a UL listed 3 wire or 4 wire power cord kit with UL listed strain relief electric dryer only f Plug in the power cord g Installation test and test run Refer to the Test Exhaust System in INSTALLATION ...

Page 13: ...ers Contact your local building inspector Flooring To avoid noise and vibration the appliance must be installed and leveled on a solidly constructed floor with a maximum slope of 1 inch 2 5 cm If required adjust the leveling legs to compensate for the unevenness of the floor NOTE A sturdy floor is needed to support the total appliance weight when loaded The combined weight of a companion appliance...

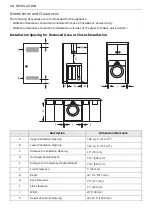
Page 14: ...llation Spacing for Recessed Area or Closet Installation Description Dimension Clearance A Upper Ventilation Opening 2 48 sq in 310 cm2 B Lower Ventilation Opening 2 24 sq in 155 cm2 C Distance to Ventilation Opening 2 3 76 mm D Overhead Cabinet Depth 1 14 356 mm E Distance to the Overhead Cabinet Shelf 2 18 457 mm F Front Clearance 1 25 mm G Depth 32 1 16 815 mm H Back Clearance 2 5 127 mm I Side...

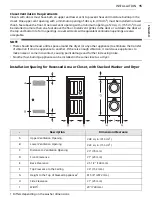
Page 15: ...ound the dryer or any other appliance to eliminate the transfer of vibration from one appliance to another If there is enough vibration it could cause appliances to make noise or come into contact causing paint damage and further increasing noise No other fuel burning appliance can be installed in the same closet as a dryer Installation Spacing for Recessed Area or Closet with Stacked Washer and D...

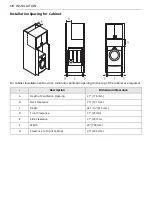
Page 16: ...entilation openings in the top of the cabinet are required Description Dimension Clearance A Depth of Ventilation Opening 2 7 178 mm B Back Clearance 2 5 127 mm C Depth 32 1 16 815 mm D Front Clearance 2 1 25mm E Side Clearance 2 1 25 mm F Width 29 740 mm G Clearance to Top of Cabinet 2 9 229 mm ...

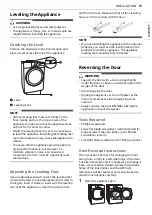
Page 17: ... appliance is level from side to side and front to back Make sure that all four leveling feet are in firm contact with the floor NOTE If you are installing the appliance on the optional pedestal you must use the leveling feet on the pedestal to level the appliance The appliance leveling feet should be fully retracted Reversing the Door WARNING Support the door with a stool or box that fits under t...

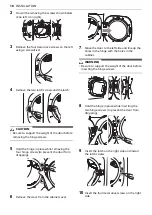
Page 18: ...le removing the four hinge screws to prevent the door from dropping 6 Remove the door from the cabinet cover 7 Move the door to the left side and line up the holes in the hinge with the holes in the cabinet WARNING Be sure to support the weight of the door before inserting the hinge screws 8 Hold the hinge in place while inserting the two hinge screws to prevent the door from dropping 9 Insert the...

Page 19: ... out the exhaust duct b 2 Press the tabs on the knockout c and carefully remove the knockout for the desired vent opening Right side venting is not available on gas models Press the adapter duct d onto the blower housing and secure to the base of the dryer as shown 3 Preassemble a 4 10 2 cm elbow e to the next 4 10 2 cm duct section and secure all joints with duct tape Be sure that the male end of...

Page 20: ...e washer on top of the dryer If appliances are already installed disconnect them from all power water and drain connections This stacking kit includes Two 2 side rails One 1 front rail Four 4 screws To ensure safe and secure installation please observe the following instructions 1 Make sure the surface of the washer is clean and dry Remove paper backing from the tape on one of the stacking kit sid...

Page 21: ...id metal transition duct must be UL listed Use of other materials for transition duct could affect drying time DO NOT use sheet metal screws or other fasteners which extend into the duct that could catch lint and reduce the efficiency of the exhaust system Secure all joints with duct tape Ductwork is not provided with the dryer You should obtain the necessary ductwork locally The vent hood should ...

Page 22: ...ave it replaced with a properly grounded 3 prong wall outlet Gas Supply Requirements WARNING DO NOT attempt any disassembly of the dryer disassembly requires the attention and tools of an authorized and qualified service technician or company DO NOT use an open flame to inspect for gas leaks Use a noncorrosive leak detection fluid Gas pressure must not exceed 8 inch 20 4 cm water column for NG or ...

Page 23: ... All connections must be in accordance with local codes and regulations Gas dryers MUST exhaust to the outdoors 1 Make sure that the gas supply to the laundry room is turned OFF and the dryer is unplugged Confirm that the type of gas available in your laundry room is appropriate for the dryer 2 Remove the shipping cap from the gas fitting at the back of the dryer Be careful not to damage the threa...

Page 24: ...ptacle and the appliance terminal block IS NOT supplied with the appliance Type of pigtail and gauge of wire must conform to local codes and with instructions on the following pages Do not modify the plug and internal wire provided with the appliance The appliance should be connected to a 4 hole outlet If the plug does not fit the outlet a proper outlet will need to be installed by a qualified ele...

Page 25: ...k shape a Ground Wire 2 Remove the terminal block access cover on the upper back of the appliance 3 Install UL listed strain relief into the power cord through hole 4 Thread the 4 wire 10 AWG minimum copper power cable prepared in step 1 through the strain relief a Terminal Block b UL Listed Strain Relief c UL Listed 4 Wire Power Cord 5 Transfer the appliance s ground wire from behind the green gr...

Page 26: ...und screw 7 Tighten all screws securely 8 Reinstall the terminal block access cover a White Wire from Dryer harness b Hot Leads of Power Cord Black and Red c Neutral Wire White d External Ground Wire if required by local codes e Ground Screw Three Wire Direct Wire 1 Remove 3 5 inches 8 9 cm of the outer covering from the wire Strip 1 inch 2 5 cm insulation from each wire Bend the ends of the three...

Page 27: ...hose fittings Overtightening or cross threading can damage the valves or couplings resulting in leaking and property damage Do not reuse old hoses Use only new hoses when installing the appliance Old hoses could leak or burst causing flooding and property damage Contact an LG Customer Information Center for assistance in buying hoses CAUTION Periodically check the hoses for cracks leaks and wear a...

Page 28: ...th the washing machine 1 Shut off the cold water tap and remove the washer inlet hose 2 Connect the short hose c to the Y connector d using one of the rubber seals 3 Connect the other end of the short hose c to the cold water faucet 4 Connect the long dryer hose b to one side of the Y connector d Connect the washer hose to the washer and the other side of the Y connector d NOTE Before connecting t...

Page 29: ...d not exceed 0 6 inch 1 5 cm The dryer should be checked while the dryer is running with no load Checking Levelness Once the dryer is in its final location recheck the dryer to be sure it is level Make sure it is level front to back and side to side and that all four leveling feet are in firm contact with the floor Test Exhaust System Once you have completed the installation of the appliance use t...

Page 30: ... be performed to alert you to any existing problems with the exhaust duct in your home However since the test performed during normal operation provides more accurate information on the condition of the exhaust duct than the installation test the results during the two tests may not be the same Do not interrupt the test cycle as this could result in inaccurate results Even if the LED doesn t light...

Page 31: ...31 INSTALLATION ENGLISH Check for blockages and lint buildup Make sure the ductwork is not crushed or restricted Excess or crushed transition duct Too many elbows or exhaust too long ...

Page 32: ...n The preset temperature dry level and option settings for that cycle will be shown Pressing the Start Pause button without selecting a cycle immediately starts the Normal cycle with the default settings Select the Normal cycle to change the default settings 5 Adjust Settings Default settings for the selected cycle can now be changed if desired using the cycle modifier and option buttons Not all m...

Page 33: ...rying woolen items in a dryer After the cycle the items may still be damp Do not repeat the cycle Pull the items to their original shape if needed and lay them flat to finish drying Woven and Loopknit Materials Some woven and loopknit materials may shrink depending on quality Permanent Press and Synthetics Do not overload your dryer Take out permanent press items as soon as the dryer stops to redu...

Page 34: ...34 OPERATION Do not tumble dry Do not dry used with do not wash Heat Setting Label Directions High Medium Low No Heat Air Tumble Dry Label Directions ...

Page 35: ...s button to pause the cycle without losing the current settings NOTE If you do not press the Start Pause button to resume a cycle within a certain time the appliance turns off automatically and all cycle settings are lost d Extra Options and Functions Cycle Modifier Buttons Use these buttons to select the desired options for the selected cycle Not all options are available for each cycle Remote St...

Page 36: ...p when the appliance is in the cool down stage d Estimated Time Remaining When a drying cycle is selected the estimated drying time for the selected cycle is displayed This time will change if you select extra options for the cycle The cycle time on Sensor Dry cycles may fluctuate as the appliance recalculates drying time for optimal results e M lights up when the Normal cycle is selected with the...

Page 37: ... mixed loads except delicate fabrics such as wool or silk Dry Level Default Normal Available All Temperature Default Med High Available Med High Cycle Heavy Duty Description Use this cycle for drying heavy duty clothes like jeans or garments that need extra drying Dry Level Default Normal Available All Temperature Default High Available High Cycle Bedding Description Use this cycle for drying blan...

Page 38: ...ems Dry Level Default Normal Available Very More Normal Temperature Default High Available High Cycle Towels Description Use this cycle for drying towels Dry Level Default Normal Available All Temperature Default Med High Available Med High Cycle Steam SanitaryTM Description Use this cycle to reduce bacteria on laundry using TurboSteam Dry Level Not adjustable Temperature Default High Available Hi...

Page 39: ...lect a specific amount of drying time When a Manual Dry cycle is selected the actual time remaining in your cycle appears on the display You can change the actual time in the cycle by pressing the More Time or Less Time buttons Special Drying Cycles Selectable Drying Options Cycle Speed Dry Description Use this cycle to quickly dry a small load of laundry Dry Level Not adjustable Temperature Defau...

Page 40: ... is set the drying time will increase NOTE The TurboSteam and Energy Saver options cannot be used together Heavy Duty Bedding Perm Press Steam SanitaryTM Not adjustable Steam FreshTM Not adjustable Delicates Small Load Towels Air Dry Speed Dry Downloaded Cycle Option TurboSteam Reduce Static Energy Saver Wrinkle Care Damp Dry Signal ...

Page 41: ...utomatically adjust the cycle time according to the selected dryness level Selecting Very will increase the cycle time while Damp will decrease the cycle time Use a Damp setting for items that you wish to iron Temp Use this button to adjust the temperature setting This allows precise care of fabrics and garments Press the Temp button repeatedly to scroll through available settings Time Dry Use thi...

Page 42: ...th delicate fabrics such as wool silk or easily discolored fabrics When the filter duct is clogged this option may not have optimal results When this function is operating the drum will stop to allow steam to stay in the drum Reduce Static Use this function to add steam late in the drying cycle to reduce the static electricity caused by dry fabrics rubbing together 1 Turn on the dryer and turn the...

Page 43: ...t that illuminates when the appliance is turned on The light automatically turns off when the dryer door is closed and the cycle starts To turn on the light during a cycle press and hold the Signal button for 3 seconds The drum light will turn on and then turn off automatically after 4 minutes Signal Use this button to adjust the volume of the end of cycle signal or turn off the signal Press the S...

Page 44: ...door is opened the remote control feature is disabled Push Messages When the cycle is complete or the appliance has problems you will receive a push message Smart Diagnosis This function provides useful information for diagnosing and solving issues with the appliance based on the pattern of use Settings Allows you to set various options on the appliance and in the application This feature is only ...

Page 45: ...the Appliance Remotely Remote Start Use a smartphone to control the appliance remotely You can also monitor the cycle operation so you know how much time is left in the cycle Using Remote Start 1 Put the laundry into the drum and close the dryer door 2 Press the Power button 3 Press and hold the Energy Saver button for 3 seconds to enable the remote control function 4 Start a cycle from the LG Thi...

Page 46: ... cm 7 8 inches between the antenna and your body Users must follow the specific operating instructions for satisfying RF exposure compliance IC Radiation Exposure Statement This equipment complies with IC radiation exposure limits set forth for an uncontrolled environment This equipment should be installed and operated with a minimum distance of 20 cm 7 8 inches between the antenna and your body N...

Page 47: ...gnosis provided in the LG ThinQ application 1 Press the Power button to turn on the appliance Do not press any other buttons 2 Hold the mouthpiece of your phone in front of the Power button 3 Press and hold the Temp button for 3 seconds or longer while continuing to hold your phone to the Power button 4 Keep the phone in place untill the tone transmission has finished The display will count down t...

Page 48: ...r and a mild nonabrasive household detergent Then wipe dry The stainless steel drum can be cleaned with a conventional stainless steel cleaner used according to the manufacturer s specifications Never use steel wool or abrasive cleansers they may scratch or damage the surface Cleaning Around and Under the Appliance Vacuum lint and dust from around the dryer and underneath it regularly Maintaining ...

Page 49: ... the lint filter has become very dirty or clogged with fabric softener wash the lint filter in warm soapy water and allow it to dry thoroughly before reinstalling NOTE NEVER operate the appliance without the lint filter in place ...

Page 50: ...ic softener sheet residue can reduce the airflow to the point that the time required to dry clothing will be greatly increased For more tips see the troubleshooting charts Q Why does my dryer start by itself every few minutes A This is how the Wrinkle Care feature works The dryer runs briefly every few minutes for up to 3 hours after the cycle finishes This feature is designed to help prevent wrin...

Page 51: ...use Solution Flow SenseTM indicator shows four bars during the drying cycle Exhaust system is too long or has too many turns restrictions Install a shorter or straighter duct run See the Installation instructions for details Partial blockage of the ductwork due to lint buildup or other foreign object Ductwork should be checked cleaned immediately The appliance can be used in this condition but dry...

Page 52: ...te control settings for the type of load you are drying Some loads may require an adjustment of the dry level setting for proper drying Lint filter needs to be cleaned Remove the lint from the filter before every load With the lint removed hold the filter up to a light to see if it is dirty or clogged With some loads that produce high amounts of lint such as new bath towels it may be necessary to ...

Page 53: ...lter not cleaned properly Remove the lint from the filter before every load With the lint removed hold the filter up to a light to see if it is dirty or clogged If it looks dirty follow the cleaning instructions in the MAINTENANCE section With some loads that produce high amounts of lint it may be necessary to clean the filter during the cycle Laundry not sorted properly Some fabrics are lint prod...

Page 54: ...TM The function of this cycle is to remove wrinkles from fabric Use an iron to replace creases and pleats in garments Garments have static after using the Reduce Static option This is normal The amount of static experienced will depend on the individual moisture level in the skin Garments are too damp or too dry after using the Reduce Static option Correct drying options not selected Select the lo...

Page 55: ...a on your smartphone before connecting the appliance The wireless network name SSID is set incorrectly The wireless network name SSID should be a combination of English letters and numbers Do not use special characters The router frequency is not 2 4 GHz Only a 2 4 GHz router frequency is supported Set the wireless router to 2 4 GHz and connect the appliance to the wireless router To check the rou...

Page 56: ... OF MERCHANTABILITY OR FITNESS FOR A PARTICULAR PURPOSE ON THE PRODUCT IS LIMITED IN DURATION TO THE DURATION OF THE ABOVE LIMITED WARRANTY UNDER NO CIRCUMSTANCES SHALL LG OR ITS U S DISTRIBUTORS DEALERS BE LIABLE FOR ANY INDIRECT INCIDENTAL CONSEQUENTIAL SPECIAL OR PUNITIVE DAMAGES INCLUDING WITHOUT LIMITATION LOST GOODWILL LOST REVENUES OR PROFITS WORK STOPPAGE IMPAIRMENT OF OTHER GOODS COST OF ...

Page 57: ...iscounted Product Refurbished Product or any Product sold As Is Where Is With all Faults or similar disclaimer Products with original serial numbers that have been removed altered or cannot be readily determined at the discretion of LG Increases in utility costs and additional utility expenses in any way associated with the Product Any noises associated with normal operation Products used for othe...

Page 58: ...tment Arbitration 111 Sylvan Avenue Englewood Cliffs NJ 07632 If there is a conflict between the AAA Rules and the rules set forth in this section the rules set forth in this section will govern This arbitration provision is governed by the Federal Arbitration Act Judgment may be entered on the arbitrator s award in any court of competent jurisdiction All issues are for the arbitrator to decide ex...

Page 59: ... c the product model name or model number and d the serial number the serial number can be found i on the product or ii online by accessing https www lg com us support repair service schedule repair continued and clicking on Find My Model Serial Number You may only opt out of the dispute resolution procedure in the manner described above that is by e mail or telephone no other form of notice will ...

Page 60: ...60 Memo ...

Page 61: ...61 Memo ...

Page 62: ...62 Memo ...

Page 63: ...63 Memo ...

Page 64: ...LG Customer Information Center Register your product Online www lg com For inquiries or comments visit www lg com or call 1 800 243 0000 U S A 1 888 542 2623 CANADA ...

Reviews: