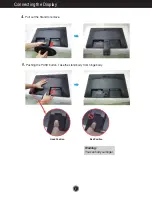
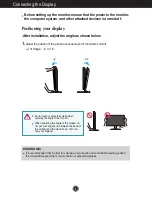
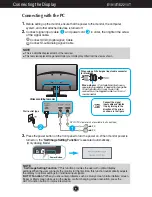
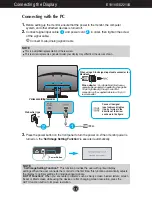
background image

www.lg.com

OWNER’S MANUAL

LCD MONITOR


LCD MONITOR MODEL

E1910T

Please  read  this  manual  carefully  before  operating your  set  and 

retain it for future reference.

ENGLISH

E2210S

E2210T

E1910S 

Summary of Contents for E1910S

Page 1: ...www lg com OWNER S MANUAL LCD MONITOR LCD MONITOR MODEL E1910T Please read this manual carefully before operating your set and retain it for future reference ENGLISH E2210S E2210T E1910S ...

Page 2: ...d Call your service technician for replacement As long as this unit is connected to the AC wall outlet it is not disconnected from the AC power source even if the unit is turned off Do not Open the Display There are no user serviceable components inside There are Dangerous High Voltages inside even when the power is OFF Contact your dealer if the display is not operating properly To Avoid Personal...

Page 3: ...x LCD permanently Do not press the LCD screen with your finger for a long time as this may cause some afterimages Some dot defects may appear as Red Green or Blue spots on the screen However this will have no impact or effect on the display performance If possible use the recommended resolution to obtain the best image quality for your LCD display If used under any mode except the recommended reso...

Page 4: ... Do not use chemicals such as benzene paint thinners or alcohol Spray water onto a soft cloth 2 to 4 times and use it to clean the front frame wipe in one direction only Too much moisture may cause staining On Repacking Do not throw away the carton and packing materials They make an ideal container in which to transport the unit When shipping the unit to another location repack it in its original ...

Page 5: ...ord 15 pin D Sub Signal Cable Tosetitup thissignalcablemaybe attachedto thisproductbefore shippingout DVI D Signal Cable Thisfeatureisnotavailableinall countries Only E1910T E2210T NOTE This accessories may look different from those shown here User must use shielded signal interface cables D sub 15 pin cable DVI D cable with ferrite cores to maintain standard compliance for the product ...

Page 6: ...ure you push it until you hear it click 3 Assemble the Stand Base Front Rear into the Stand Body in the correct direction 4 Tie down the base lock to perpendicularity direction 5 Once assembled take the monitor up carefully and face the front side Important This illustration depicts the general model of connection Your monitor may differ from the items shown in the picture Do not carry the product...

Page 7: ...lat surface 3 Change your lock on the product as it follows and turn it in the arrow direction 2 Place the monitor face Down on the cushion or soft cloth If you can t release the stand base even the locking knob is at a release position Please push the indicated knob down and retry it ...

Page 8: ...7 Connecting the Display 4 Pull out the Stand to remove 5 Pushing the PUSH button Take the stand body from hinge body Good Position Bad Position Warning You can hurt your finger ...

Page 9: ... of the panel in various ways for maximum comfort Tilt Range 5 to 15 ERGONOMIC It is recommended that in order to maintain an ergonomic and comfortable viewing position the forward tilt angle of the monitor should not exceed 5 degrees Do not touch or press the screen when adjusting the angle of the monitor When adjusting the angle of the screen do not put your finger s in between the head of the m...

Page 10: ... 2 Connect signal input cable and power cord in order then tighten the screw of the signal cable Connecting with the PC 1 2 PC PC A B Wall outlet type Mac adapter For Apple Macintosh use a separate plug adapter is needed to change the 15 pin high density 3 row D sub VGA connector on the supplied cable to a 15 pin 2 row connector When using a D Sub signal input cable connector for Macintosh Variesa...

Page 11: ...vices is turned off 2 Connect signal input cable and power cord in order then tighten the screw of the signal cable Connecting with the PC 1 2 PC A Wall outlet type Mac adapter For Apple Macintosh use a separate plug adapter is needed to change the 15 pin high density 3 row D sub VGA connector on the supplied cable to a 15 pin 2 row connector When using a D Sub signal input cable connector for Mac...

Page 12: ...e current control settings so that they cannot be inadvertently changed Press and hold the MENU button for several seconds The message OSD LOCKED should appear You can unlock the OSD controls at any time by pushing the MENU button for several seconds The message OSD UNLOCKED should appear E1910T E2210T E1910S E2210S ...

Page 13: ...on to turn the display on or off The power indicator stays white if the display is running properly On Mode If the display is in Sleep Mode Energy Saving the power indicator is blinking white Power Button Power Indicator When two input signals are connected you can select the input signal D SUB DVI you want When only one signal is connected it is automatically detected The default setting is D Sub...

Page 14: ...he use of the controls The following section is an outline of the available adjustments and selections you can make using the OSD To make adjustments in the On Screen Display follow these steps Press the discretionary Button then the main menu of the OSD appears To access a control use the corresponding Buttons Use the Buttons to adjust the image to the desired level Use the Button to select other...

Page 15: ... VERTICAL CLOCK PHASE DISPLAY To adjust the position of the screen COLOR TEMP PRESET USER GAMMA COLOR To customize the color of the screen BRIGHTNESS CONTRAST SHARPNESS PICTURE To adjust the brightness contrast and sharpness of the screen NOTE The order of icons may differ depending on the model 14 23 DSUB DVI D DSUB DVI D DSUB DSUB DSUB DVI D DSUB DVI D DSUB WIDE ORIGINAL ORIGINAL RATIO Only E221...

Page 16: ... below are the icons icon names and icon descriptions of the all items shown on the Menu Sub menus NOTE OSD On Screen Display menu languages on the monitor may differ from the manual Menu Name Icons Button Tip Exit Adjust Decrease Increase Select another sub menu Restart to select sub menu Press the MENU Button then the main menu of the OSD appears ...

Page 17: ... the screen color to fit the sRGB standard color specification WARM Set the screen to warm color temperature MEDIUM Set the screen to medium color temperature COOL Set the screen to cool color temperature RED Set your own red color levels GREEN Set your own green color levels BLUE Set your own blue color levels GAMMA Set your own gamma value 0 1 2 On the monitor high gamma values display whitish i...

Page 18: ...round The horizontal screen size will also change To adjust the focus of the display This item allows you to remove any horizontal noise and clear or sharpen the image of characters HORIZONTAL VERTICAL To move image left and right To move image up and down E1910T E2210T E1910S E2210S Exit Exit Decrease Increase Select another sub menu Restart to select sub menu ...

Page 19: ...the optimal image Activate this function when white and black colors are present in the screen Restore all factory default settings except LANGUAGE FACTORY RESET POWER INDICATOR Use this function to set the power indicator on the front side of the monitor to ON or OFF If you set OFF it will go off If you set ON at any time the power indicator will automatically be turned on NOTE If this does not i...

Page 20: ... the icons icon names and icon descriptions of the all items shown on the Menu Sub menus NOTE OSD On Screen Display menu languages on the monitor may differ from the manual Menu Name Icons Button Tip Press the MODE Button then the main menu of the OSD appears Sub menus Exit Adjust Decrease Increase Restart to select sub menu Icons E1910T E1910S E2210T E2210S ...

Page 21: ...the most general using environment MOVIE Select this when you are watching a video or movie INTERNET Select this when you are working on the document Word etc Exit Exit Move Select another sub menu When F ENGINE is not NORMAL CONTRAST can not be selected E1910T E1910S E2210T E2210S E1910T E1910S E2210T E2210S E1910T E1910S E2210T E2210S ...

Page 22: ... Main menu Sub menu Description Change the input image signal ratio to original WIDE ORIGINAL Switch to full screen mode according to input image signal This function works only if input resolution is lower than monitor ratio 16 10 Exit Exit Move Select another sub menu ...

Page 23: ...O EFFECT is not NORMAL CONTRAST can not be selected and COLOR is grey When COLOR is selected down PHOTO EFFECT is back to NORMAL and CONTRAST can be selected now PHOTO EFFECT and F ENGINE should not be unnormal at the same time NORMAL The Photo Effect function is disabled GAUSSIAN BLUR This menu changes the screen to be more colorful and smoother ...

Page 24: ... Sub menu Description Exit Exit Move Select another sub menu E1910T E1910S E2210T E2210S E1910T E1910S E2210T E2210S SEPIA This menu changes the screen to be Sepia tone brown color MONOCH ROME This menu changed the screen to be Gray tone black and white Picture ...

Page 25: ...y moving the mouse or pressing any key on the keyboard to bring up the screen Try to turn on the PC This message appears when the signal from the PC video card is out of horizontal or vertical frequency range of the display See the Specifications section of this manual and configure your display again This message appears when the signal cable between your PC and your display is not connected Chec...

Page 26: ...lay image to the ideal setting If the results are unsatisfactory decrease the horizontal bars using the PHASE icon in the on screen display Check Control Panel Display Settings and adjust the display to the recommended resolution or adjust the display image to the ideal setting Set the color setting higher than 24 bits true color IMPORTANT Check Control Panel Display Settings and see if the freque...

Page 27: ...bits true color at Control Panel Settings Check if the screen is set to interlace mode and if yes change it to the recommend resolution Do you see an Unrecognized monitor Plug Play VESA DDC monitor found message Have you installed the display driver Be sure to install the display driver from the display driver CD or diskette that comes with your display Or you can also download the driver from our...

Page 28: ...0 2 W Off Mode 0 15 W Power Consumption Operating Conditions Temperature 10 C to 35 C Humidity 10 to 80 non Condensing Storage Conditions Temperature 20 C to 60 C Humidity 5 to 90 non Condensing Environment al Conditions With Stand Width 40 89 cm 16 10 inch Height 42 95 cm 16 91 inch Depth 25 00 cm 9 84 inch Weight excl packing 2 8 kg 6 26 lb Dimensions Weight Tilt 5 to 15 Range AC 100 240 V 50 60...

Page 29: ... Mode 0 15 W Power Consumption Operating Conditions Temperature 10 C to 35 C Humidity 10 to 80 non Condensing Storage Conditions Temperature 20 C to 60 C Humidity 5 to 90 non Condensing Environment al Conditions With Stand Width 40 89 cm 16 10 inch Height 42 95 cm 16 91 inch Depth 25 00 cm 9 84 inch Weight excl packing 2 8 kg 6 26 lb Dimensions Weight Tilt 5 to 15 Range AC 100 240 V 50 60 Hz 0 8 A...

Page 30: ...0 2 W Off Mode 0 15 W Power Consumption Operating Conditions Temperature 10 C to 35 C Humidity 10 to 80 non Condensing Storage Conditions Temperature 20 C to 60 C Humidity 5 to 90 non Condensing Environment al Conditions With Stand Width 50 64 cm 19 94 inch Height 42 49 cm 16 73 inch Depth 20 99 cm 8 26 inch Weight excl packing 3 5 kg 7 87 lb Dimensions Weight Tilt 5 to 15 Range AC 100 240 V 50 60...

Page 31: ... Mode 0 15 W Power Consumption Operating Conditions Temperature 10 C to 35 C Humidity 10 to 80 non Condensing Storage Conditions Temperature 20 C to 60 C Humidity 5 to 90 non Condensing Environment al Conditions With Stand Width 50 64 cm 19 94 inch Height 42 49 cm 16 73 inch Depth 20 99 cm 8 26 inch Weight excl packing 3 5 kg 7 87 lb Dimensions Weight Tilt 5 to 15 Range AC 100 240 V 50 60 Hz 1 0 A...

Page 32: ... 1280 x 1024 1680 x 1050 31 468 31 469 37 500 37 879 46 875 48 363 60 123 67 500 63 981 79 976 65 290 70 60 75 60 75 60 75 75 60 75 60 Specifications Preset Modes Resolution Display Modes Resolution Horizontal Freq kHz Vertical Freq Hz Recommend Mode E1910T E1910S 1 2 3 4 5 6 7 8 9 10 720 x 400 640 x 480 640 x 480 800 x 600 800 x 600 1024 x 768 1024 x 768 1152 x 864 1280 x 1024 1280 x 1024 31 468 ...

Page 33: ...tisfies the specifications of the Wall mount plate or the interchange device 1 Place the monitor with its front facing downward on a soft cloth 2 Separate the stand by pushing the PUSH button Warning You can hurt your finger Good Position Bad Position ...

Page 34: ... a locking cable that can be purchased separately at most computer stores Screw Mounting Interface Dimension Hole spacing 75 mm x 75 mm 3 Install the Wall mount plate NOTE VESA compatible only with respect to screw mounting interface dimensions and mounting screw specifications Please use VESA standard as below 784 8 mm and under 30 9 inch Wall Mount Pad Thickness 2 6 mm Screw 4 0 mm x Pitch 0 7 m...

Page 35: ...rial number of the SET is located on the back or one side of the SET Record it below should you ever need service MODEL SERIAL As an ENERGY STAR Partner LGE U S A Inc has determined that this product meets the ENERGY STAR guidelines for energy efficiency ENERGY STAR is a set of power saving guidelines issued by the U S Environmental Protection Agency EPA ...

Reviews: