4
1-3. Safety information
General safety
Follow these rules to ensure general safety
· Observe good housekeeping in the area of the machines during and after maintenance.
· When lifting any heavy object
1. Ensure you can stand safely without slipping.
2. Distribute the weight of the object equally between your feet.
3. Use a slow lifting force. Never move suddenly or twist when you attempt to lift.
4. Lift by standing or by pushing up with your leg muscles
(This action removes the strain from the muscles in your back.)
· Do not attempt to lift any object weights more then 16kg(35lb) or object that you think are too heavy for you.
· Do not perform any action that causes hazards to the customer, or that makes the equipment unsafe.
· Before you start the machine, ensure that other service representatives and the customer’s personnel are
not in a hazardous position.
· Place removed covers and other parts in a safe place, away from all personnel, while you are servicing the
machine.
· Keep your tool box away from walk areas so that other people will not trip over it.
· Do not wear loose clothing that can be trapped in the moving parts of a machine. Make sure that your
sleeves are fastened or rolled up above your elbows. If your hair is long, fasten it.
· Insert the ends of your necktie or scarf inside clothing or fasten it with a nonconductive clip, approximately
8 centimeters(3 inches) from the end.
· Do not wear jewelry, chains, metal-frame eyeglasses, or metal fasteners for you clothing.
· Wear safety glasses when you are hammering, drilling, soldering, cutting wire, attaching springs, using
solvents, or working in any other conditions that might be hazardous to your eyes.
· After service, reinstall all safety shields, guards, labels, and ground wires. Replace any safety device that
is worn or defective.
· Reinstall all covers correctly before returning the machine to the customer.
Caution
Metal objects are good electrical conductors.
Ch1. Service information
Summary of Contents for F1
Page 1: ...0 Service Manual F1 LG Electronics ...
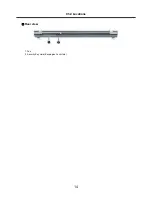
Page 15: ...14 Ch2 Locations Rear view 1 Fan 2 Security Key Hole Kensington Lock Hole ...
Page 56: ...55 Ch5 Removing and replacing a part ...
Page 58: ...57 3 Remove the Memory Module Ch5 Removing and replacing a part ...
Page 63: ...62 Ch5 Removing and replacing a part ...
Page 65: ...64 Ch5 Removing and replacing a part ...
Page 67: ...66 3 Remove the Keyboard Ch5 Removing and replacing a part ...
Page 69: ...68 3 Remove the Button Sub Board Ch5 Removing and replacing a part ...
Page 72: ...71 4 Remove the Display Module Ch5 Removing and replacing a part ...
Page 76: ...75 5 Remove the Main Board Ch5 Removing and replacing a part ...
Page 86: ...85 8 Disconnect the LCD Cable and the Inverter Connector Ch5 Removing and replacing a part ...
Page 92: ...91 NBATM NCVRB NCVRH NHDD1 NRUBS NSCR1 ...
Page 93: ...92 NODD1 NMEM1 NLAN1 NMDM1 NFAN1 ...
Page 94: ...93 NKBD1 NCPU1 NMCP1 NSPK1 NSPK1 NMLB1 NSUBU NSETR NCAPH NCABM NCAB3 NRUBR ...
Page 95: ...94 NCSEK NANTL NANTR NBRKR NSCR2 NCAB1 ...
Page 96: ...95 NSUBB NCSEB ...
Page 97: ...96 NBRKH NCSEF NHNGL NHNGR NSETR ...
Page 98: ...97 NSETF NCSER NLCD1 NNVE1 NCABN NCABL NPLTL ...
Page 99: ...98 NBRKL NBRKL NBRKL ...


