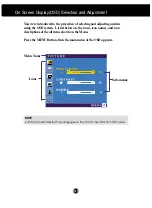
background image

FCC ID : BEJM1510SB

APPENDIX  F :

USER’S MANUAL

1 / 28

Summary of Contents for FLATRON M1710S

Page 1: ...FCC ID BEJM1510SB APPENDIX F USER S MANUAL 1 28 ...

Page 2: ...erence EN 55024 1998 Electromagnetic Immunity EN 61000 3 2 Power Line Harmonics EN 61000 3 3 Voltage Fluctuations EN 60950 Product Safety LowRadiationCompliance MPRII This monitor meets one of the strictest guidelines available today for low radiation emissions offering the user extra shielding and an antistatic screen coating These guidelines set forth by a government agency in Sweden limit the a...

Page 3: ...dants have been found in human blood and researchers fear that they can disturb fetus development Bio accumulative1 TCO 95 demands require that plastic components weighing more than 25 grams must not contain flame retardants with organically bound chlorine or bromine Lead can be found in picture tubes display screens solder and capacitors Lead damages the nervous system and in higher doses causes ...

Page 4: ... is obliged to have an environmental policy which must be adhered to in each country where the company implements its operational policy The energy requirements include a demand that the computer and or display after a certain period of inactivity shall reduce its power consumption to a lower level in one or more stages The length of time to reactivate the computer shall be reasonable for the user...

Page 5: ...raviolet light with e g increased risks of skin cancer malignant melanoma as a consequence Lead Lead can be found in picture tubes display screens solders and capacitors Lead damages the nervous system and in higher doses causes lead poisoning The relevant TCO 99 requirement permits the inclusion of lead since no replacement has yet been developed Bio accumulative is defined as substances which ac...

Page 6: ...ions before using the product Keep the User s Guide CD in an accessible place for furture reference See the label attached on the back cover and quote this information to your dealer when you require service M1510S M1710S M1910S User s Guide ...

Page 7: ... sure what type of power supply you have in your home consult with your dealer Overloaded AC outlets and extension cords are dangerous So are frayed power cords and broken plugs They may result in a shock or fire hazard Call your service technician for replacement Do not Open the Display There are no user serviceable components inside There are Dangerous High Voltages inside even when the power is...

Page 8: ... screen with your finger for a long time as this may cause some afterimages Some dot defects may appear as Red Green or Blue spots on the screen However this will have no impact or effect on the display performance If possible use the recommended resolution to obtain the best image quality for your LCD display If used under any mode except the recommended resolution some scaled or processed images...

Page 9: ... cord by holder as shown Before setting up the monitor ensure that the power to the monitor the computer system and other attached devices is turned off 1 Place the monitor with its front facing downward on a cushion or soft cloth 2 Hold down the release button inside the stand and strongly pull out the stand with your two hands The stand won t move if you don t press release button Unfolding the ...

Page 10: ...nnect the signal cable When attached tighten the thumbscrews to secure the connection PC MAC Macadapter ForAppleMacintoshuse aseparateplugadapterisneededtochange the 15pinhighdensity 3row D subVGAconnectoronthesuppliedcabletoa 15pin 2rowconnector 1 1 ...

Page 11: ... run this function once again push the AUTO SELECT button on the front panel of the monitor Otherwise you may execute the Factory reset option on the OSD adjustment menu However be aware that this option initializes all the menu items except Language 3 Touch button on the front switch panel to turn the power on When monitor power is turned on the Self Image Setting Function is executed automatical...

Page 12: ...r Button Power Indicator Use this button to enter a selection in the On Screen Display AUTO SELECT Button AUTO IMAGE ADJUSTMENT When adjusting your display settings always press the AUTO SELECT button before entering the On Screen Display OSD This will automatically adjust your display image to the ideal settings for the current screen resolution size display mode The best display mode is 15 inch ...

Page 13: ...ppear Buttons Use these buttons to select or adjust functions in the On Screen Display Lightview hot key This feature lets you easily select the best desired image condition optimized to the environment ambient illumination image types etc DAY Bright ambient illumination NIGHT Dark ambient illumination TEXT For text images Word processing etc MOVIE For animation images in videos or movies PHOTO Fo...

Page 14: ...tments and selections you can make using the OSD To make adjustments in the On Screen Display follow these steps Press the MENU Button then the main menu of the OSD appears To access a control use the or Buttons When the icon you want becomes highlighted press the AUTO SELECT Button Use the Buttons to adjust the item to the desired level Accept the changes by pressing the MENU Button Exit the OSD ...

Page 15: ...ON TRACKING AUDIO SETUP Main menu Sub menu Reference PRESET RED GREEN BLUE To adjust the position of the screen To customize the color of the screen To customize the screen status for a user s operating environment To improve the clarity and stability of the screen BRIGHTNESS CONTRAST GAMMA HORIZONTAL VERTICAL CLOCK PHASE WHITE BALANCE POWER INDICATOR FACTORY RESET LANGUAGE OSD HORIZONTAL POSITION...

Page 16: ...itor may differ from the manual You were introduced to the procedure of selecting and adjusting an item using the OSD system Listed below are the icons icon names and icon descriptions of the all items shown on the Menu Press the MENU Button then the main menu of the OSD appears Menu Name Icons Sub menus ...

Page 17: ...REEN BLUE Select the screen color 6500K Slightly reddish white 9300K Slightly bluish white Set your own red color levels Set your own green color levels Set your own blue color levels COLOR HORIZONTAL VERTICAL To move image left and right To move image up and down POSITION CLOCK PHASE To minimize any vertical bars or stripes visible on the screen background The horizontal screen size will also cha...

Page 18: ... of the OSD window on the screen LANGUAGE OSD POSITION WHITE BALANCE FACTORY RESET If the output of the video card is different the required specifications the color level may deteriorate due to video signal distortion Using this function the signal level is adjusted to fit into the standard output level of the video card in order to provide the optimal image Activate this function when white and ...

Page 19: ...ntrast If the display is in power saving mode try moving the mouse or pressing any key on the keyboard to bring up the screen Try to turn on the PC This message appears when the signal from the PC video card is out of horizontal or vertical frequency range of the display See the Specifications section of this manual and configure your display again This message appears when the signal cable betwee...

Page 20: ...isplayimagetotheidealsetting Iftheresultsareunsatisfactory decreasethe verticalbarsorstripesusingtheCLOCKiconinthe on screen display Press the AUTO SELECTbuttontoautomatically adjustyourdisplayimagetotheidealsetting Iftheresultsareunsatisfactory decreasethe horizontalbarsusingthePHASE icon in the on screen display CheckControlPanel Display Settingsand adjustthedisplaytotherecommendedresolutionor a...

Page 21: ... diskette that comes with your display Or you can also download the driver from our web site http www lge com Make sure to check if the video card supports Plug Play function Audio function Check if the audio cable is correctly connected Check the volume level Adjust the TREBLE to an appropriate level Adjust the BASS to an appropriate level Check the volume level No sound Sound is too high pitched...

Page 22: ...ode 2W Off Mode 2W Width 37 54cm 14 78inches Height 37 03cm 14 58inches Depth 22 00cm 8 66inches Net 4 4 kg 9 70 lbs Tilt 5 25 AC 100 240V 50 60Hz 0 6A Operating Conditions Temperature 10 C to 35 C Humidity 10 to 80 non Condensing Storage Conditions Temperature 20 C to 60 C Humidity 5 to 95 non Condensing Attached O Detached Attached Detached O Wall outlet type or PC outlet type Display Sync Input...

Page 23: ...ode 3W Off Mode 2W Width 41 95cm 16 52inches Height 42 31cm 16 66inches Depth 24 00cm 9 45inches Net 5 9 kg 13 00 lbs Tilt 5 25 AC 100 240V 50 60Hz 1 0A Operating Conditions Temperature 10 C to 35 C Humidity 10 to 80 non Condensing Storage Conditions Temperature 20 C to 60 C Humidity 5 to 95 non Condensing Attached O Detached Attached Detached O Wall outlet type or PC outlet type Display Sync Inpu...

Page 24: ...Mode 3W Off Mode 2W Width 45 83cm 18 04inches Height 45 77cm 18 02inches Depth 24 20cm 9 53inches Net 7 0 kg 15 43 lbs Tilt 5 25 AC 100 240V 50 60Hz 1 0A Operating Conditions Temperature 10 C to 35 C Humidity 10 to 80 non Condensing Storage Conditions Temperature 20 C to 60 C Humidity 5 to 95 non Condensing Attached O Detached Attached Detached O Wall outlet type or PC outlet type Display Sync Inp...

Page 25: ... 70 70 60 75 60 75 75 60 75 75 65 60 75 VGA VGA VGA VESA VESA VESA MAC VESA VESA MAC VESA VESA VESA 15inch 17inch Display Modes Resolution Horizontal Freq kHz Vertical Freq Hz 1 2 3 4 5 6 7 8 9 10 11 12 13 14 640 x 350 720 x 400 640 x 480 640 x 480 640 x 480 640 x 480 800 x 600 800 x 600 800 x 600 800 x 600 832 x 624 1024 x 768 1024 x 768 1024 x 768 31 468 31 468 31 469 35 000 37 861 37 500 35 156...

Page 26: ...0 11 12 13 640 x 350 720 x 400 640 x 480 640 x 480 800 x 600 800 x 600 832 x 624 1024 x 768 1024 x 768 1152 x 870 1152 x 900 1280 x 1024 1280 x 1024 31 469 31 468 31 469 37 500 37 879 46 875 49 725 48 363 60 023 68 681 61 805 63 981 79 976 70 70 60 75 60 75 75 60 75 75 65 60 75 VGA VGA VGA VESA VESA VESA MAC VESA VESA MAC VESA VESA VESA 19inch Preset Modes Resolution ...

Page 27: ...his monitor accepts a VESA compliant mounting interfacepad optional For further information refer to the VESA Wall Mounting Instruction Guide This monitor can be mounted on the VESA standrad wall mounting rack 1 Please the monitor on a piece of cloth or other soft surface with the front side facing downward and remove the rear cap 2 Separate the stand base using a screwdriver as shown in the pictu...

Page 28: ...Digitally yours ...

Reviews: