background image

34

Summary of Contents for GR-B288NSNP

Page 1: ...OWNER S MANUAL FRENCH DOOR REFRIGERATOR Please read this owner s manual thoroughly before operating and keep it handy for reference at all times P No MFL62184427 www lg com ENGLISH FRANÇAIS ESPAÑOL ...

Page 2: ...s 18 Starting 19 HOW TO USE Setting The Controls 20 Automatic Icemaker 21 Storing Foods 22 Location of Foods 23 Shelf Height Adjustment 24 Removing and Replacing Components 25 CARE AND CLEANING Cleaning the Refrigerator 29 General Information 29 TROUBLESHOOTING Before Calling for Service 30 THANK YOU Congratulations on your purchase and welcome to the LG family Your new LG French Door Refrigerator...

Page 3: ...ny other appliance DO NOT allow children to climb stand or hang on the refrigerator doors or shelves in the refrigerator They could damage the refrigerator and seriously injure themselves Keep fingers out of pinch point areas clearances between the doors and cabinet are necessarily small Be careful closing doors when children are in the area Unplug your refrigerator before cleaning or making any r...

Page 4: ...he food may be dangerous to eat Even partial thawing and refreezing reduces the quality of foods particularly fruits vegetables and prepared foods The eating quality of red meats is affected less than that of many other foods Use refrozen foods as soon as possible to save as much of their quality as you can Risk of Child Entrapment Discarded or abandoned refrigerators are dangerous even if they wi...

Page 5: ...perly grounded three prong wall outlet Do not under any circumstances cut or remove the third ground prong from the power cord Do not use an adapter plug NOTE Some models have LED interior lighting and service should be performed by a qualified technician When you are finished reconnect the refrigerator to the electrical source and reset the control Thermostat Refrigerator Control or Freezer Contr...

Page 6: ...uction DOOR ALARM A warning alarm sounds at 30 second intervals when the refrigerator or freezer door is left open for more than 60 seconds CRISPERS LG s crispers preserve humidity and help vegetables stay crisp GLIDE N SERVE Provides storage space with a variable temperature control that keeps the compartment colder than refrigerator NOTE This guide covers several different models The refrigerato...

Page 7: ...TABLE REFRIGERATOR SHELVING The refrigerator compartment shelves are adjustable to allow flexibility for storage needs GALLON STORAGE BINS Three interchangeable bins can be arranged to suit your storage needs REMOVABLE ICE STORAGE BIN The ice storage bin can be removed to fill ice buckets coolers or pitchers LED INTERIOR LAMPS Refrigerator interior is lit by the LED array FIXED DOOR BINS 1 2 3 4 5...

Page 8: ... C and 43 C If the temperature around the appliance is too low or too high cooling ability may be adversely affected If this refrigerator is installed where the temperature is above 43 C the freezing capacity is compromised and the cost of electricity used increases To reduce the risk of electric shock do not install the refrigerator in a wet or damp area Select a place where a water supply can be...

Page 9: ...when moving it Do not wiggle or walk the refrigerator when trying to move it floor damage could occur HANDLE REMOVAL NOTE Handle appearance may vary from illustrations on this page CAUTION Use special care when removing handles to prevent scratching the doors The handle could be damaged if you hit it with a hammer while removing or attaching When you assemble or disassemble a handle you must push ...

Page 10: ...gin remove food and bins from the doors If your entrance door is too narrow for the refrigerator to pass through remove the refrigerator door and move the refrigerator sideways through the doorway Place the handle on the door by aligning handle footprints to fit mounting fasteners and tighten the set screws with a 2 5 mm 3 32 Allen wrench NOTE If the handle mounting fasteners need to be tightened ...

Page 11: ...l forward Lift the door from the middle hinge pin and remove the door Place the door inside facing up on a non scratching surface 1 2 3 5 6 7 4 1 To remove the right refrigerator door Open the door Remove the top hinge cover screw 1 Use a flat blade screwdriver to lift the tabs on the front underside of the cover 2 Lift up the cover Disconnect all the wire harnesses 3 Remove the grounding screw 4 ...

Page 12: ...he left side door Lower the door onto middle hinge pin 3 Fit the top hinge 1 over the hinge lever latch 2 and into place Rotate the lever 3 counterclockwise to secure the hinge Install the grounding screw 4 and connect all the wire harnesses 5 2 3 1 2 5 4 2 Fit the top hinge 1 over the hinge lever latch 2 and into place Rotate the lever 3 clockwise to secure the hinge Install the grounding screw 4...

Page 13: ...3 ENGLISH REFRIGERATOR DOOR AND FREEZER DRAWER REMOVAL CONT FREEZER DRAWER REMOVAL CAUTION Care should be taken to avoid product or property damage when removing the freezer door It maybe necessary to have assistance with the following insturctions To avoid damage do not hold the handle when removing the door It could come off and cause and injury CAUTION When you remove the drawer do not hold the...

Page 14: ...g instructions It maybe necessary to have assistance with the following instructions WARNING Risk of Child Entrapment To prevent accidental child and pet entrapment or suffocation risk DO NOT allow them to play inside of the freezer drawer DO NOT step or sit on the freezer drawer With both hands pull out each rail simultaneously until both rails are fully extended 1 Hook door supports into rail ta...

Page 15: ... The light bulbs will turn off if door is left open for seven continuous minutes Shutting door for one second will light bulbs to come back on To Change Freezer Light 1 Unplug refrigerator power cord form outlet 2 Use a screwdriver to remove the cover screw Save the cover screw 3 Using a flat instrument gently pry the lamp cover loose in the front as shown Rotate downward to remove the rear tabs 4...

Page 16: ...e osmosis system to refill after heavy usage If the issue about water pressure from reverse osmosis remains call a licensed qualified plumber IMPORTANT Read all directions thoroughly before you begin If operating the refrigerator before installing the water connection turn the icemaker to the OFF position to prevent operation without water All installations must be in accordance with local plumbin...

Page 17: ...E A horizontal pipe will work but the following precaution must be taken drill on the top of the pipe not the bottom This will help keep water away from the drill and also keep normal sediment from collecting in the valve To determine the length of copper tubing you will need measure from the connection on the lower left rear of the refrigerator to the water pipe Add 7 ft 2 1 m to allow for moving...

Page 18: ...ews and then the kick plate Open the Freezer Drawer Once the drawer is open there is sufficient clearance to remove the screws on top of the kick plate NOTE To replace the kick plate place it into position and then insert and tighten the screws 1 Level the refrigerator by using an 11 16 inch 18mm wrench or a flat blade screw driver Turn the leveling legs CCW to raise or CW to lower the height of t...

Page 19: ...erator Thoroughly clean your refrigerator and wipe off all dust that may have accumulated during shipping Install accessories such as the ice cube bin drawers and shelves in their proper places They are packed together to prevent possible damage during shipment Adjust the desired temperature for the refrigerator and freezer see Adjusting the Temperature and Functions Let your refrigerator run for ...

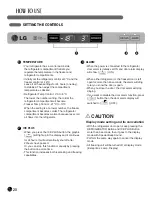
Page 20: ... it continues for 24hours It will automatically shut off after 24hours have passed Or you can stop this function manually by pressing the button one more time This function increases both icemaking and freezing capabilities ALARM When the power is connected to the refrigerator door alarm is initially set ON and door alarm display will show ON When either refrigerator or the freezer door is left op...

Page 21: ... will stop producing ice It is normal for several cubes to be stuck together If ice is not used frequently old ice cubes will become cloudy taste stale and shrink When you should set the icemaker power switch to O off When the water supply will be shut off for several hours When the ice storage bin is removed for more than a minute or two When the refrigerator will not be used for several days Nor...

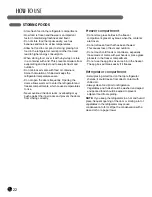
Page 22: ... overloading may push against the inner racks and prevent the doors from closing correctly Freezer compartment Do not store glass bottles in the freezer compartment glass may break when the contents are frozen Do not refreeze food that has been thawed This causes loss of flavor and nutrition Do not touch cold foods or containers especially those made of metal with wet hands or place glass products...

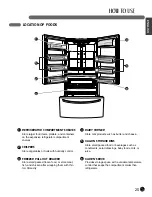
Page 23: ...AWER Store small packed frozen food or store meat fish and chicken after wrapping them with thin foil Store dry DAIRY CORNER Store milk products such as butter and cheese GALLON STORAGE BINS Store small packed food or beverages such as condiments salad dressings baby foods milk or juice GLIDE N SERVE Provides storage space with a variable temperature control that keeps the compartment colder than ...

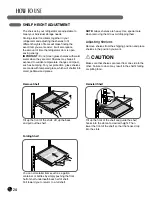
Page 24: ...mall pebble sized pieces NOTE Glass shelves are heavy Use special care when removing them to avoid dropping them Adjusting Shelves Remove shelves from the shipping position and place shelves in the position you want CAUTION Make sure that shelves are level from one side to the other Failure to do so may result in the shelf s falling or spilling food Remove Shelf Reinstall Shelf Tilt up the front o...

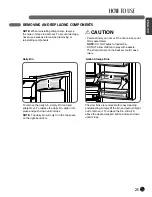
Page 25: ...o play with baskets The sharp corners on the baskets could cause injury ENGLISH Dairy Bin Gallon Storage Bins To remove the dairy bin simply lift it and pull straight out To replace the dairy bin slide it into place and push down until it stops NOTE The dairy bin will only fit in the top space on the right hand door The door bins are removable for easy cleaning and adjusting Simply lift the bin an...

Page 26: ... shelf over the crisper is not firmly secured Be careful when tilting MEAT DELI PRODUCE TEMP SELECTOR LOW HIG H LOW LOW HIGH Removing crisper To remove pull the drawer out to full extension Lift the front of the crisper up then pull it straight out To install slightly tilt up the front and insert the drawer into the frame and push it back into place LOW HIG H LOW Glide N Serve The Glide N Serve pr...

Page 27: ... pull the drawer out to full extension Lift the front of the drawer up then pull it straight out To install slightly tilt up the front and insert the drawer into the frame and push it back into place NOTE Removing the fixed door bin is recommended to reduce the risk of door bin scratches LOW 1 To remove the glass Lift up the glass under the crisper cover Pull the glass up and out LOW HIG H LOW ...

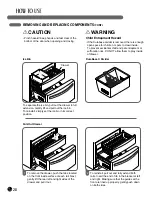
Page 28: ...rawer Ice Bin DuraBase Divider To separate the ice bin pull out the drawer to full extension Gently lift and pull out the ice bin To reinstall simply set the ice bin in its correct position Pull Out Drawer To remove the drawer push the tabs located on the front inside surface of each rail Next gently lift the rear left and right sides of the drawer and pull it out 1 To reinstall pull out and fully...

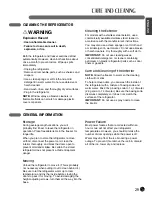
Page 29: ...ll not stick To help remove odors you can wash the inside of the refrigerator with a mixture of baking soda and warm water Mix 2 tbsp baking soda to 1 qt of water 26 g soda to 1 L of water Be sure the baking soda dissolves completely so it does not scratch the surfaces of the refrigerator IMPORTANT Do not use a spray nozzle to clean the interior GENERAL INFORMATION Storage During average length va...

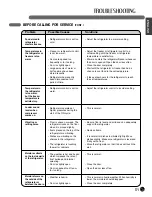
Page 30: ... cracked or poorly fitted The thermostat is keeping the refrigerator at a constant temperature Freezer control is set too cold Refrigerator control is set too cold This is normal for a fully automatic defrosting refrigerator The defrost cycle occurs periodically Make sure the plug is tightly pushed into the outlet Call the local electric company This is normal Larger more efficient units run longe...

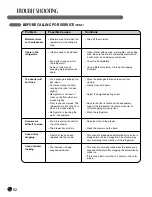
Page 31: ...n the shelves in the refrigerator The refrigerator is touching the wall or cabinets The weather is hot and humid which increases the rate of frost buildup and internal sweating Door is slightly open Door is opened too often or for too long Weather is humid Door is slightly open Adjust the refrigerator to a warmer setting Adjust the freezer or refrigerator control to a colder setting until the free...

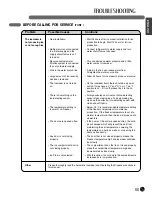
Page 32: ...er track is dirty A batch of ice has been released into the ice bin The icemaker is being supplied with water Wipe off the moisture Clean interior with sponge warm water and baking soda Be sure the soda is completely dissolved so it will not act as an abrasive compound Cover food completely Use a different container or brand of wrapping materials Move the packages that keep the door from closing G...

Page 33: ...llow 24 hours for ice maker to produce more ice On the icemaker itself there should be a power switch It may have an I and O on it The I position is on If it is off please flip it to the on position Foreign substance or frost on theIce detecting sensor stops making ices To keep making ice clean up the surface of Ice detecting sensor with clean and soft fabric Below 18 C is recommended temperature ...

Page 34: ...34 ...

Page 35: ...ENGLISH 35 ...

Page 36: ......

Page 37: ...Printed in Korea ...

Reviews: