17
EN
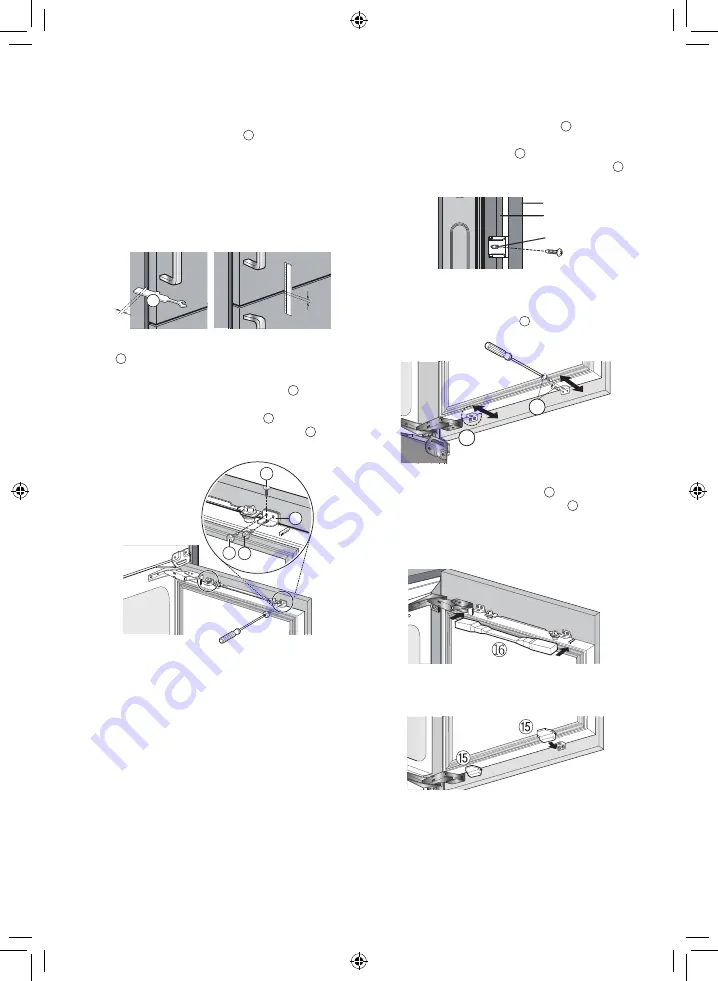
Fix the bracket to the cabinet door. Loosely
tighten the upper bracket
13
to the cabinet
door.
Adjust the gap between front of the
appliance door and back of the cabinet door
to 4 mm. Adust the gap between bottom of
the fridge door and top of the freezer door to
5 mm. Fasten them with the height adjusting
nut.
5 mm
4 mm
g
•
Check the dimension by using the spanner
g
.
Apply the depth adjusting bracket
4
(2
places) to the cabinet door and fasten using
the top bracket bolting screw
c
(4 places).
Fasten using the hinge bolting screw
e
(2
places) to the appliance door.
e
4
c c
Fix the depth adjusting bracket
2
(2 places)
to the side hole of the refrigerator door using
the door bolting screw
f
(2 places). Install
the side cover of depth adjusting bracket
14
(2 places).
ྚ
྄
Cabinet door
Cabinet door
Appliance door
Appliance door
Adjust the 4 mm gap between the appliance
door and the cabinet door and fasten using
the wood bolting screw
b
(4 places).
b
b
Gap
Gap
Install the top bracket cover
16
and front
cover of depth adjusting bracket
15
(2
places).
Topside of the Fridge Door
Underside of the Fridge Door
EN
21
Install the top bracket cover
16
and front
cover of depth adjusting bracket
15
(2
places).
Topside of the Freezer Door
Underside of the Freezer Door
Work Related to the Fridge
Door
22
Hang the cabinet door at the height
adjusting screw. Loosely tighten the height
adjusting nut
d
(2 places).
d
Height adjusting screw
Height adjusting screw
CAUTION
•
Be careful when installing the cabinet door. If
the cabinet is not securely fixed to the holes,
the cabinet door may drop, causing injury and
appliance damage.
23
Ensure the cabinet door and the fridge door
are parallel. If they are not parallel, adjust
the height adjusting nut.
Move the cabinet door to the left or right and
adjust the left and right interval uniformly.
d
g
24
Mark the line to the position. Fixing the
bracket on the cabinet.
Y
XZ
Side hole
Side hole
Marking line
Marking line
25
Remove the cabinet door. Align the depth
adjusting bracket
2
(2 places) with the
marked line and using wood bolting screw
b
(4 places).
b
Y
XZ
26
27
28
29
30
Summary of Contents for GR-N266LLR
Page 20: ...Notas ...
Page 40: ...Memo ...


