background image

ENGLISH

Function

25

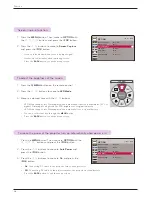
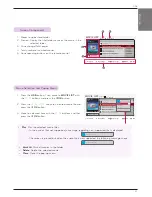
Adjusting Speaker Balance

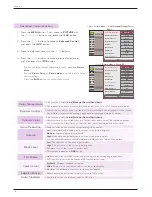
Adjusting Treble

AUDIO

FM Wireless Audio 

: Off


• Frequency 

  88.5 MHz

Volume 


50

Balance 


0

Treble 


0

L

R

AUDIO

FM Wireless Audio 

: Off


• Frequency 

  88.5 MHz

Volume 


50

Balance 


0

Treble 


0

L

R

1 .   Press the 

MENU

 button. Then, move to 

AUDIO

 with the 

 buttons and press the 

OK 

button.

2 .   Press the 

∨ 

buttons to move to 

Treble 

and press 

the 

OK

 button.

3 .   Press the 

 buttons to adjusting audio treble


and 

press the 

OK

 button.

•   If 

FM Wireless Audio

 is 

On

, it does not function. Adjust with FM receiver.

•   Press the 

BACK

 button to exit the menu screen.

1 .   Press the 

MENU

 button. Then, move to 

AUDIO

 with the 

 buttons and press the 

OK 

button.

2 .   Press the 

∨ 

buttons to move to 

Balance 

and press 

the 

OK

 button.

3 .   Press the 

 buttons to adjusting audio balance


and 

press the 

OK

 button.

•   If 

FM Wireless Audio

 is 

On

, it does not function. Adjust with FM receiver.

•   Press the 

BACK

 button to exit the menu screen.

* Adjust the treble your taste and room situations. 

* Adjust the left/right sound of speaker to suit your taste and room situations.

Move   

OK

Move   

OK

Summary of Contents for HX301

Page 1: ...OWNER S MANUAL DLP PROJECTOR HX300G HX301G Please read this manual carefully before operating your set and retain it for future reference www lg com P NO MFL63282806 1008 REV02 ...

Page 2: ...This equipment generates uses and can radiate radio frequency energy and if not installed and used in accordance with the instructions may cause harmful interference to radio communications However there is no guarantee that interference will not occur in a particular installation If this equipment does cause harmful interference to radio or television reception which can be determined by turning ...

Page 3: ...et Top Box 16 Function PICTURE Menu Options Picture mode 17 Adjusting Picture Mode 17 Advanced Control Function 18 Color Temperature Function 19 Picture Reset Function 19 SCREEN Menu Options To Change PJT Mode 20 Using Aspect Ratio Function 20 Using Keystone Function 20 Auto Configure Function 21 RGB Config Function 21 Using the Still Function 21 AUDIO Menu Options What is FM Wireless Audio HX300G...

Page 4: ...t to avoid a fire hazard This may cause a fire hazard or damage the unit Do not place heavy objects on the power cord This may cause a fire or an electric shock hazard Do not place the projector close to sources of steam or oil such as a humidifier This may create a fire hazard or an electric shock hazard Do not place the projector where it might be exposed to dust This may cause a fire hazard or ...

Page 5: ...o not touch metal parts during or soon after operation since the vents will remain very hot Power WARNING Power NOTES Do not plug in too many items into one power outlet It may result in overheating of the out let and create a fire hazard Never touch the power plug with a wet hand This may cause an electric shock hazard Prevent dust from collecting on the power plug pins or outlet This may cause a...

Page 6: ...l outlet and contact your dealer or service center This may cause a fire or an electric shock hazard or damage to the unit Use an air spray or soft cloth that is moist with a neutral detergent and water for removing dust or stains on the projection lens Others WARNING Do not attempt to service the projector yourself Contact your dealer or service center This may cause damage to the projector and c...

Page 7: ...nufacturing process and does not always indicate a malfunction Control panel Exhaustion Direction High heat is generated so do not get near the exhaustion direction during the use Focus ring Speaker Control Panel MENU Button Displays or closes menus POWER Button Turns ON OFF the projector Button Adjusts functions of menus OK Button Checks present mode and saves the change of functions Do not touch...

Page 8: ... the IR port for normal operation of remote control When using HDMI USB connector if the size of the jack connecting to the connector is too big they may not be connected Please use standard size jack RGB IN AUDIO IN DC IN Kensington Security System Connector Refer to page 13 VIDEO IN HDMI ...

Page 9: ...D BATTERIES ACCORDING TO THE INSTRUCTIONS MUTE Button BACK Button OK Button STILL Button Functions as the STILL button in any mode other than DivX BLANK Button USB Button Q MENU Button POWER Button Open the battery compartment cover on the back of the remote control Insert the specified type of batteries with correct polarity match with and match with Install two 1 5V AAA batteries Don t mix used ...

Page 10: ...mote control under 3 m distance and 30 left right when the cables are connected in the back outputs When you carry the remote control in the portable bag make sure that the buttons on the remote control are not pressed by the projector cables documents or any other accessories in the bag Otherwise it may reduce the battery life significantly Remote Control AAA Battery Owner s manual Power Cord Com...

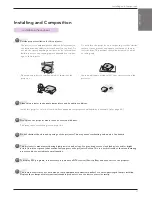
Page 11: ... Box and connect it to the projector Installation Precautions The remote control may not work when a lamp equipped with electronic ballast or a three wavelength lamp is installed Replace those lamps with international standard products to use the remote control normally Do not obstruct the slots and openings of the projector This may cause overheating and create a fire hazard The projector is equi...

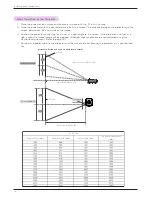
Page 12: ... set at a right angle the screen image will be crooked Although slight angles can be counteracted using the Keystone adjustement Refer to page 20 4 Connect the power cable to the projector and the wall outlet after placing the projector in its desired loca tion projection distance based on the picture format Projection distance D Projection offset ratio 110 38 6 mm Projection distance D Basic Oper...

Page 13: ...h as notebook PCs or projectors The Kensington Security System is an optional item Kensington Security System You can install this projector using a tripod for the camera You can assemble the projector instead of the camera on camera tripod When stabilizing the tripod we recommend using the locking bolt of the standard size 4 5 mm or less The maximum size allowed for the locking bolt is 6 5 mm If ...

Page 14: ...n the remote control The light on the control panel will be turned on Press the INPUT button on the remote control to select the input signal you want When you press the POWER button on the remote control or the POWER button on the control panel when you turn on the projector the lights for all buttons on the control panel will be turned on Check if the lens door is open before turning on the powe...

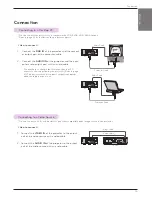
Page 15: ... have to change the resolution that your PC exports to one supported by the projector Refer to page 41 This projector may not support output from laptops when the laptop screen is on Connecting to a Video Source How to connect 1 Connect the VIDEO IN of the projector to the output jack of the video source with a video cable 2 Connect the AUDIO IN of the projector to the output jack of the audio sou...

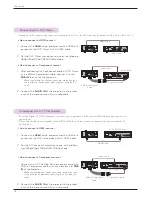
Page 16: ...Connecting to a D TV Set Top Box How to connect a HDMI source 1 Connect the HDMI of the projector and the HDMI out put port of the DTV set top box with an HDMI cable 2 Set the DTV receiver s resolution to one of the follow ing 480p 576p 720p 1080i 1080p mode To receive Digital TV D TV programs it is necessary to purchase a D TV receiver Set Top Box and connect it to the projector Please refer to t...

Page 17: ...nu screen Adjusting Picture Mode Function The On Screen Display OSD in this manual may be slightly different from your projector This operating guide explains operation of RGB PC mode mainly 1 Press the Q MENU button on the remote control 2 Press the buttons to move to Picture mode 3 Press the button to toggle through the preset picture settings Picture mode Use the Picture mode function to set th...

Page 18: ...m to enhance hotter colors such as red or set to cool to make picture bluish Dynamic Contrast ꔈAdjusts the contrast to keep it at the best level according to the brightness of the screen The picture is improved by making bright parts brighter and dark parts darker Dynamic Color This function enables Vivid Standard Cinema Sport Game ꔈ Adjusts screen colors so that they look livelier richer and clea...

Page 19: ...video signal and can be set among 5 10 15 95 100 You can adjust Red Green or Blue according to each setting Red Green Blue The adjustment range is 50 50 Color Management System This function enables Expert 1 2 ꔈ As the tool used by the experts to make adjustments by using the test patterns this does not affect other colors but can be used to selectively adjust the 6 color areas Red Green Blue Cyan...

Page 20: ...unction through the MENU button Press the BACK button to exit the menu screen ꔗ 4 3 ꔃ ꔗ Just Scan ꔃ ꔗ Set By Program ꔃ ꔗ Cinema Zoom1 ꔃ ꔗ Zoom ꔃ ꔗ 16 9 ꔃ 1 Press the KEY Sꔌ KEY Sꔍ button of remote control 2 Press the KEY Sꔌ KEY Sꔍ button to adjust the screen condition as you want Keystone can be adjusted from 40 to 40 You can use this function through the MENU button Press the BACK button to exit ...

Page 21: ...o Config function for a still image You can use this function through the MENU button Auto Configure Function This function assures you of getting the best video quality by automatically adjusting the horizontal size and synchronization of the image Auto Tracking function works in RGB PC input only Auto config 1 Press the MENU button Then move to SCREEN with the buttons and press the OK button 2 P...

Page 22: ... What is FM Wireless Audio HX300G only The recommended use range of FM receiver Install projector and FM receiver without any abstacles as shown on the figure below A FM receiver can be reached 1 5 m when the antenna length and direction are good The recommended length of FM receiver Antenna We recommend to use a rod antenna 0 8 m 1 5 m for better sound quality since audio noise can be detected wh...

Page 23: ... FM transmitter equipment is working near at the same frequency If there is a radio broadcast on air at the same frequency If working in the dusty humid or high temperature environment Installing Instructions HX300G only Please adjust the antenna of FM receiver or move the location of FM receiver If there is no Audio signal or low reception within 55 seconds the FM Wireless Audio function will shu...

Page 24: ... 3 Press the buttons to move to On and press the OK button 4 Press the buttons to move to Frequency and press the OK button 5 Press the buttons to adjusting frequency and press the OK button 6 Set the frequency of FM receiver to the frequency of the set projector Setting FM Wireless Audio as On disables Mute Volume Balance Treble functions There may be differences in the reception distance and the...

Page 25: ...press the OK button If FM Wireless Audio is On it does not function Adjust with FM receiver Press the BACK button to exit the menu screen 1 Press the MENU button Then move to AUDIO with the buttons and press the OK button 2 Press the buttons to move to Balance and press the OK button 3 Press the buttons to adjusting audio balance and press the OK button If FM Wireless Audio is On it does not funct...

Page 26: ...IME Menu Options 1 Press the MENU button Then move to TIME with the buttons and press the OK button 2 Press the buttons to move to Auto Off and press the OK button 3 Move to a desired item with the buttons and then press the OK button Press the BACK button to exit the menu screen This function turns the projector off automatically after the preset time is passed when there is no signal ꔗ Off ꔃ ꔗ 1...

Page 27: ...n as this could cause the objects to become heated and deformed or even cause a fire Using Blank Function This function may be effective if you need to get the attention of the audience during presentations meetings or briefings 1 Press the MENU button Then move to OPTION with the buttons and press the OK button 2 Press the buttons to move to Blank Image and press the OK button 3 Move to a desired...

Page 28: ... Mode 3 Move to a desired item with the buttons LED Mode changes into Dimming mode automatically at specific temperatures 37 C or higher Dimming mode gets about 90 brightness of original led mode LED Mode changes into Dimming mode automatically if use a optical battery You can use this function through the MENU button Press the BACK button to exit the menu screen To adjust the brightness of the sc...

Page 29: ...CK button to exit the menu screen 1 Press the MENU button Then move to OPTION with the buttons and press the OK button 2 Press the buttons to move to Initial Setting and press the OK button 3 Move to a desired item with the buttons and then press the OK button Set as Home Use when used in homes Press the BACK button to exit the menu screen OPTION Menu Language English Blank Image Blue Screen Captu...

Page 30: ... the USB jack on the back of the set 2 It turns automatically to DivX Home Menu Select Eject in order to eject a USB device Eject USB USB memory stick PHOTO LIST MUSIC LIST MOVIE LIST FILE VIEWER 1 Press the Q MENU button on the remote control 2 Press the buttons to move to USB Device 3 Press the OK button on the remote control After Eject USB USB memory cannot be read Remove USB memory and connec...

Page 31: ...red by USB maker If connected with cable is not offered by USB maker or an excessively long cable the device may not be recognized Some USB storage devices may not be supported or operated smoothly If the name of a folder or file is too long it will not be displayed or recognized File alignment method of USB storage device is similar to Window XP and filename can recognize up to 100 English charac...

Page 32: ...mote control 1 Press the USB button Then move to PHOTO LIST with the buttons and press the OK button 2 Press the buttons to move to a desired photo file and press the OK button 3 Move to a desired item with the buttons and then press the OK button If the picture file is damaged it may not be displayed properly High resolution pictures may take longer time to display on the entire screen Page 1 1 N...

Page 33: ...on Hide Use button to select the previous or next photo Slideshow Selected photos are displayed during the slide show If no photo is selected all photos in the current folder are displayed during slide show Set the time interval of the slide show in Option BGM Listen to music while viewing photos in full size Set the BGM device and album in Option Rotate Rotate photos Delete Delete photos Option S...

Page 34: ...h the buttons and then press the OK button Page 1 1 No Marked MUSIC LIST Up Folder ꔛ 00 00 05 42 Drive 1 Arirang Up Folder Good Bye Arirang 05 30 04 12 i 3945 KB 128 Kbps Play Play with Photo Mark All Delete Close Play Once a song finishes playing the next selected one will be played When there are no selected music to play the next one in the current folder will be played If you go to a different...

Page 35: ...10 beta 1 Xvid 1 10 beta 2 H 264 AVC Dolby Digital HEAAC AAC MPEG MP3 LPCM avi MPEG 2 MPEG 4 SP MPEG4 ASP Divx 3 11 Divx 4 Divx 5 Divx 6 Xvid 1 00 Xvid 1 01 Xvid 1 02 Xvid 1 03 Xvid 1 10 beta 1 Xvid 1 10 beta 2 H 264 AVC Dolby Digital HEAAC AAC MPEG MP3 LPCM mkv H 264 AVC MPEG 1 MPEG 2 MPEG 4 SP MPEG4 ASP Dolby Digital HEAAC AAC MPEG MP3 LPCM divx MPEG 2 MPEG 4 SP MPEG4 ASP Divx 3 11 Divx 4 Divx 5...

Page 36: ...e screen may suffer temporary interruptions image stoppage faster playback etc when the audio language is changed Movie files other than the specified types and formats may not work properly Max bitrate of playable movie file is 20Mbps Files encoded with GMC Global Motion Compensation may not be played When you are watching the movie by Movie List function user setup for each image mode does not o...

Page 37: ...ton Then move to MOVIE LIST with the buttons and press the OK button 2 Press the move to a desired movie file and press the OK button 3 Move to a desired item with the buttons and then press the OK button Play Play the selected movie titles In the case of files not supported a message regarding non supported file is displayed The screen is played but when the audio file is not supported the follow...

Page 38: ...guage Group of the subtitle during movie play Subtitle language option can be differ according to choice of the language for menu Sync When the video is not synchronized with the caption it can be adjusted by the unit of 0 5 second Position Move the location of the subtitle Picture Size Picture Mode Audio Language Subtitle Language Sync Position ꔗ Full ꔃ Standard Latin1 0 0 Close Full Option Subti...

Page 39: ...rchased at www divx com vod Deactivation Function 1 Press the MENU button Then move to USB with the buttons and press the OK button 2 Press the buttons to move to Deactivation and press the OK button 3 Move to a desired item with the buttons and then press the OK button DRM Digital Rights Management function These are the technology and the service that prevents the illegal use of digital contents...

Page 40: ...lower during the realigning process If the document volume is big or it has many pages the loading may take long time For some fonts that are not supported they may be replaced with other fonts View File 1 Press the USB button Then move to FILE VIEWER with the buttons and press the OK button 2 Press the move to a desired file and press the OK button Menu Go Page Zoom Hide Use Page button to move t...

Page 41: ...s Use an air spray or cleaning cloth for product exterior provided with the product to lightly clean the product Please use a recommended air spray or lens cleaning product To clean lens small amount of cleaning agent on a swab or a soft cloth and rub on the lens Please be aware that liquid may flow pass through the lens if the product is sprayed on lens directly Cleaning the Projector Case To cle...

Page 42: ...N PAL 60 AC DC Adapter LG PA 1121 04 19 5 V 6 15 A LG SD B191A 19 5 V 5 64 A Audio Output 1W 1W Height mm 57 5 without foot 61 0 with foot Width mm 160 Length mm 135 5 Weight g 786 USB Device 5 V 0 5 A max Operating Condition Temperature In operation 0 C 40 C presentation mode 0 C 37 C In storage and transit 20 C 60 C Humidity In operation 0 80 relative humidity Not in operation 0 85 relative humi...

Page 43: ...omas G Lane libpng copyright 2004 Glenn Randers Pehrson OSSP str String Handling copyright 1999 2005 Ralf S Engelschall rse engelschall com copyright 1999 2005 The OSSP Project http www ossp org random number generator copyright 1990 1993 The Regents of the University of California Standard C functions copyright 1998 Softweyr LLC copyright 1988 1993 The Regents of the University of California tiny...

Page 44: ...ojector is located on the back or one side of the projector Record it below should you ever need service MODEL SERIAL LG Customer Information Center 1 800 243 0000 1 888 865 3026 1 888 542 2623 USA Consumer User USA Commercial User CANADA ...

Reviews: