10
a
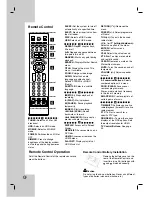
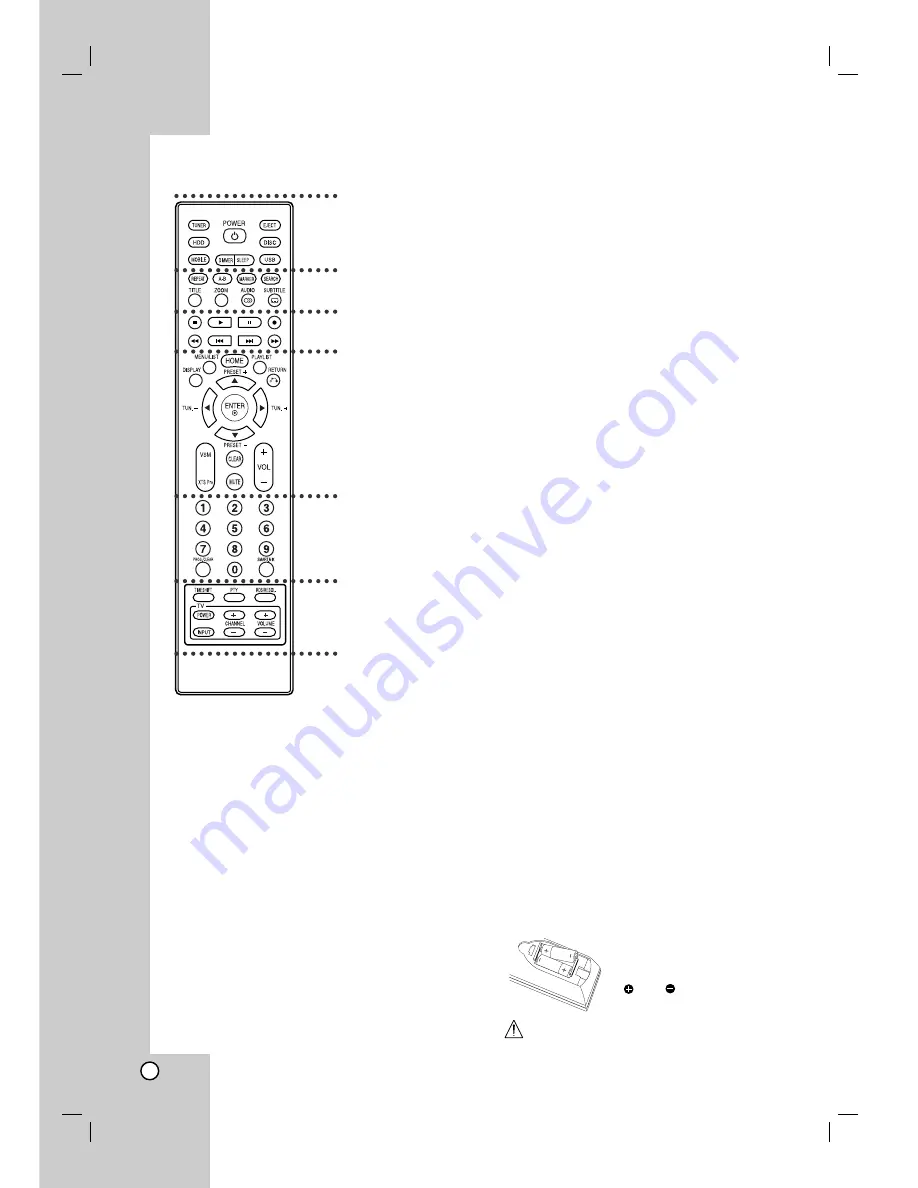
TUNER:
Selects an FM or AM
broadcast.
HDD:
Selects an HDD mode.
MOBILE:
Selects a MOBILE
mode.
POWER:
Switches the unit ON or
OFF.
DIMMER:
Press to change
brightness of the display window
on the top panel during power-on
status.
SLEEP:
Set the system to turn off
automatically at a specified time.
EJECT:
Ejects or inserts disc from
the slot loader.
DISC:
Selects a DISC mode.
USB:
Selects an USB mode.
b
REPEAT:
Repeat chapter, track,
title or all.
A-B:
Repeats sequence between
two points (A and B)
MARKER:
Marks any point during
playback.
SEARCH:
Displays Marker Search
menu.
TITLE:
Displays the disc’s Title
menu, if available.
ZOOM:
Enlarges video image.
AUDIO:
Selects an audio
language or audio channel.
Selects STEREO or MONO
(Radio).
SUBTITLE:
Selects a subtitle
language.
c
x
(STOP):
Stops playback or
recording.
B
(PLAY):
Starts playback.
X
(PAUSE) :
Pause playback
temporarily.
z
(REC):
Starts recording.
m
/
M
(SCAN):
Search
backward or forward.
.
/
>
(SKIP):
Go to next or
previous chapter or track.
d
DISPLAY:
Accesses On-Screen
Display.
MENU/LIST:
Accesses menu on a
DVD disc.
HOME:
Accesses or removes the
HOME menu.
PLAYLIST:
Displays playlists of
HDD Music List.
RETURN (
O
):
Removes the
menu.
/-):
Select programme
of Radio.
TUN.(+/-):
Tunes in the desired
radio station.
b
/
B
/
v
/
V
(left/right/up/down):
Selects an option in the menu.
ENTER:
Confirms menu
selections.
VSM:
Selects the virtual sound.
XTS Pro:
To enjoy more natural
and realistic sound.
CLEAR:
Removes a mark on the
Marker Search menu.
MUTE:
Turns the sound on and off
temporarily.
VOLUME (+/-):
Adjusts speaker
volume.
e
0-9 numerical buttons:
Selects
numbered options in a menu.
PROG./CLEAR:
Accesses or
removes program menu.
Stores a radio station’s frequency
in the tuner’s memory.
SMART. MIX:
Creates playlists of
certain genre of music.
f
TIMESHIFT:
Activates pause live
radio/playback (timeshift) for a live
radio program.
PTY:
To start a search for a
specific PTY type.
RDS/RESOL.:
To view the various
displays of the RDS options. Sets
the output resolution for HDMI.
TV Control Buttons:
See page
35.
Remote Control
a
b
c
d
e
f
Remote Control Operation
Point the Remote Control at the remote sensor and
press the buttons.
Remote Control Battery Installation
Remove the battery cover on the
rear of the Remote Control, and
insert two (size AA) batteries with
and matched
correctly.
Caution
Do not mix old and new batteries. Never mix different
types of batteries (standard, alkaline, etc.).


