background image

2020/07/23                                                                                                                                              page 11


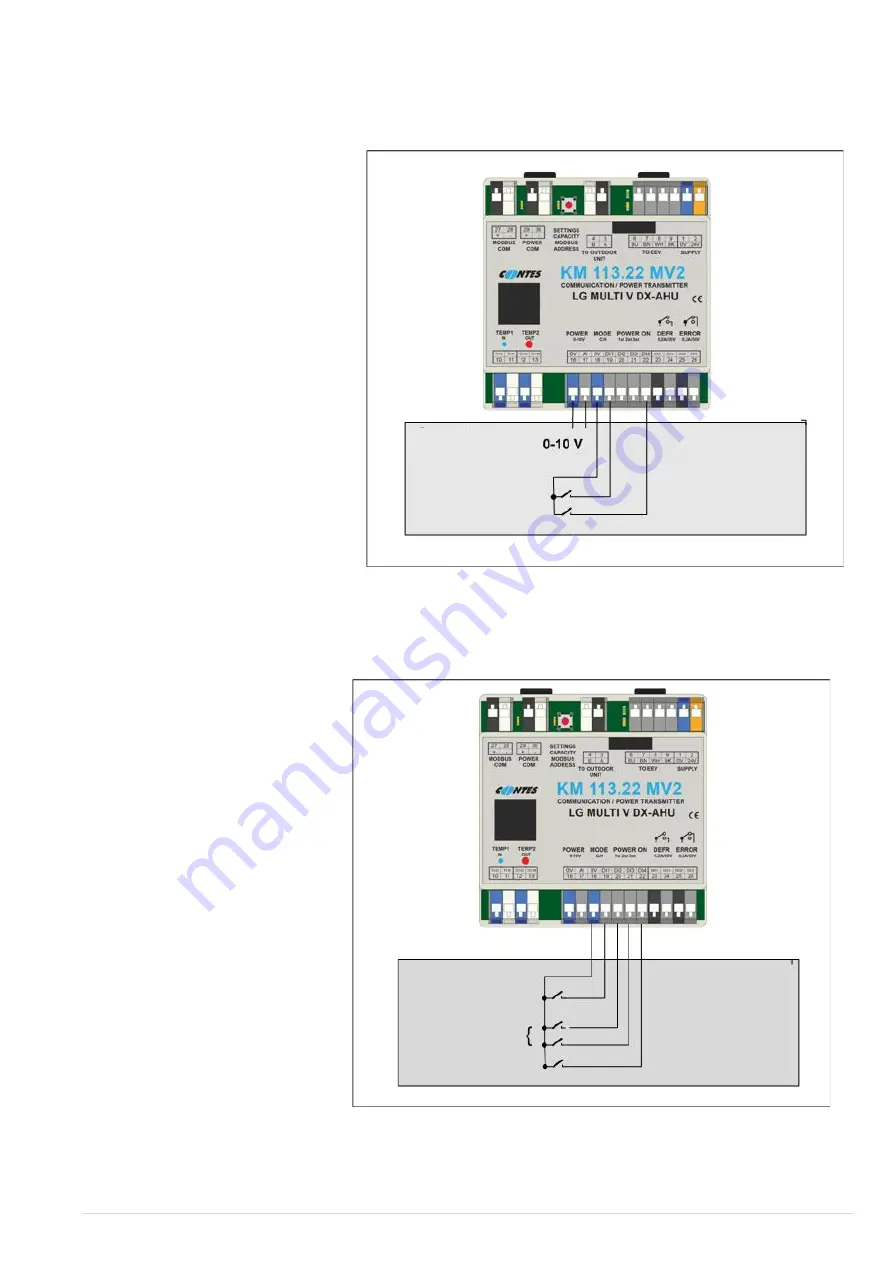
“POWER LEVEL REQUEST”


Fig.4 

Control diagram 

 Power request for analogue input


(Operational mode through logic input)


A  request  for  power  level  may  be 
executed  through  an  analogue  signal 

0…10VDC  or  through  3  logic  inputs 

(voltage free contacts). 
To  directly  influence  the  output 
(change of evaporating temperature in 
cooling  mode/change  of  condensing 
temperature  in  heat  pump  mode) it is 
necessary  to  install  a  capacity 
limitation module at the same time. 


1.


Input  terminals  “POWER  0…10V“ 

(terminals  16+17) 

  analogue 

signal  0…10V  (0

  V  =  no  request 

for power level, 10 V = maximum 
power  level  request).  The  current 
power  request  is  shown  on  the 
right  side  of  the  display  module 

using 8 codes (“C0…C7“ or rather 
“H0…H7“).


The  power  request  algorithm  requires 
at  least  "C1"/"H1"  code  (i.e.  at  least 
1.5V) to activate the compressor unit.


The  power  request  algorithm  requires  at  least  "C0"/"H0"  code  (that  means  maximum  1.3V)  to  stop  the 
compressor unit


Fig.5

 -

 Logic input control diagram 

 free contact type 

2.


Input 

terminals 

“POWER 

1ST,2ST,3ST“  –

  logic  inputs 

(voltage free contacts): 
 

no  contact  closed  =  no 
power request 


contact  POWER  1st  closed 
(terminals  18+20)  =  low 
power request 


contact  POWER  2st  closed 
(terminals  18+21)  =  higher 
power request


both 

contacts 

POWER 

1ST+2ST  closed  (terminals 
18+20+21)  = 

maximum 

power request


the current power demand is 

displayed  on  the  right  position 
of  the  module  display  via  4 

codes  (“C0,  C1,  C3,  C7,  “  or 
“H0, H1, H3, H7”)


Power control 
Level 1 to 7 

Cool / Heat 

Start / Stop 

I&C 

Cool / Heat 


Power level 

0,1,4,7 


Stop / Start 

I&C 

Summary of Contents for KM113.22MV2

Page 1: ...ons Installation Operation 2xRS485 KM113 22MV2 A SET FOR THE APPLICATION OF AN OUTDOOR COMPRESSOR CONDENSATION UNIT FOR A NON ORIGINAL EVAPORATION HVAC UNIT DESIGNED FOR OUTDOOR UNITS LG Electronics model series ARUM ARUN ARUB ARWN ARWB Version 2020 07 23 ...

Page 2: ...temperature sensors 8 4 5 Connection to an outdoor compressor unit 9 4 6 MOV MV power limitation module connection accessories 9 5 CONNECTION TO SUPERIOR I C HVAC SYSTEM 10 5 1 Control descriptions priorities 10 5 2 Inputs for external control digital analogue 10 Control diagram Power request for analogue input fig 4 11 Logic input control diagram fig 5 11 5 3 Outputs information about the operati...

Page 3: ... Power supply 230 V AC 10 50 Hz e g from the connected outdoor unit Overvoltage category II Recommended cable CYKY J 3x1 5 Power input Max 30 W Power supply of separate module KM113 22 24 V DC 10 max 800 mA The source must be separated by double insulation SELV Other connected devices Must be separated by double insulation SELV Communication properties with an outdoor unit Two wires at RS485 safe ...

Page 4: ...EX5 U21 EX6 M21 In applications where the compressor unit is used as a heat source or as a source for several air handling units exchangers it is necessary to use expansion valves with bidirectional flow i e EX4 U31 EX5 U31 EX6 M31 The KM113 27UU module has 1 analogy input 4 digital inputs 2 digital outputs and 2 communication ports RS485 for controlling the compressor unit The MODBUS input output...

Page 5: ...correct amount of refrigerant in the system with regard to the length of the piping and the size of the heat exchanger in the HVAC 5 Air temperature in front of the heat exchanger Permitted operating air temperature ranges see the documentation of the respective compressor unit usually 18 to 35 C in cooling mode and 10 to 24 C in heat pump mode 6 Function of the I C system the request for cooling ...

Page 6: ...tion MODBUS I C I C system for HVAC Air inlet HVAC unit Air outlet Temperature sensors on refrigerant piping R410A R32 refrigerant piping Outdoor unit ARUM Module MOV MV Power supply KM113 22MV2 Communication KM113 22MV2 ARUM EEV EX Communication I O I C Communication MOV MV KM113 22MV2 ARUM APPLICATION OVERVIEW DIAGRAM KM113 22MV2 ARUM HVAC I C Supply Temp sensor IN Temp sensor OUT POWER control ...

Page 7: ...erminals of the communication module and the power supply source Have cable glands suitable for your intended application ready Attach the communication box to a suitable vertical plane use the holes and covers at the rear of the box 4 2 CONNECTION TERMINALS OVERVIEW Connect a suitable power cable e g CYKY J 3x1 5 to the power supply terminals of the communication box auxiliary terminals 1 2 3 ter...

Page 8: ... in the HVAC system The blue sensor is designed for input of the refrigerant into the heat exchanger that is the small diameter pipes and the red sensor is designed for output of the refrigerant from the heat exchanger large diameter pipes To properly attach sensors to Cu pipes use for example fastening clamps to ensure proper heat transfer to the sensor see Fig After the sensors are attached make...

Page 9: ...e given unit and the supply terminals in the communication box terminal block no 1 L 2 N PE Connect suitable shielded communication cable between the outdoor compressor unit terminals IDU and OUT COMM box terminals terminal block X1 no 3 A 4 B Attention the polarity must be followed marked A B 4 6 MOV MV POWER LIMITATION MODULE CONNECTION ACCESSORIES Make sure that the compressor unit is without v...

Page 10: ...tly at the terminals of the communication module KM113 22 MODBUS PROTOCOL CONTROL MONITORING see separate section for description 5 2 INPUTS FOR EXTERNAL CONTROL digital analogue OPERATION ACTIVATION ON OFF Input terminals ON Logic input voltage free contact When the contact 0V D4 is closed terminals 18 22 the operation of the device is allowed when it is opened the operation is stopped The curren...

Page 11: ...e of the display module using 8 codes C0 C7 or rather H0 H7 The power request algorithm requires at least C1 H1 code i e at least 1 5V to activate the compressor unit The power request algorithm requires at least C0 H0 code that means maximum 1 3V to stop the compressor unit Fig 5 Logic input control diagram free contact type 2 Input terminals POWER 1ST 2ST 3ST logic inputs voltage free contacts n...

Page 12: ... also shown on the module display using the variable communicated by the MODBUS Defects identified by the communication module Er 2 thermometer error blue Er 6 thermometer error red Er 99 Modbus communication error Er 5 Communication error with the outdoor unit Er XX outdoor unit errors List of error codes of the outdoor unit see the servicing manual of the applied LG equipment If more than one er...

Page 13: ...DING REGISTRIES Name Address decadically Properties description VERSION 4096 Software version ERROR 4097 Errors according to the device s self diagnostics see the service manual of the LG device error 99 Modbus communication error TEMP1 4098 Refrigerant input temperature to the exchanger 15 C blue sensor smaller diameter TEMP2 4099 Refrigerant output temperature to the exchanger 15 C red sensor bi...

Page 14: ...epeated the situation will be considered as a MODBUS communication error error Er 99 Notice If an error is active ER the registers are automatically set to 0 Reading the values of the read registers is possible at any time without time limit and does not affect the control by HW signals 6 CONFIGURATION AND CONNECTION CHECK 6 1 SETTING THE POWER CODE AND MODBUS COMMUNICATION ADDRESS Power code and ...

Page 15: ...button for 5 s to return to point 2 If you do not press the SETTINGS button for 10 seconds the last set value is automatically saved the setting mode is exited and the initial information sequence appears on the display Attention After changing the settings it is necessary to restart the outdoor unit restore power If the outdoor compressor unit is not restarted the changes are not accepted by the ...

Page 16: ...cted to one outdoor compressor unit each module must have a different address The address of the communication module s for internal communication between the outdoor unit and the modules is assigned automatically during the auto addressing process the process is activated from the outdoor unit ADDRESS OF COMMUNICATION MODULE FOR COMMUNICATION WITH COMPRESSOR UNIT The address of the communication ...

Page 17: ...sor unit is not enabled contact ON is open the device will not be activated If the operation of the compressor unit is blocked but at the same time the power demand is active this state can be recognized by the case of the operation request letter on the display e g C4 cooling request operation enabled c4 cooling request operation not allowed 3 The analog input test is performed by applying a DC v...

Page 18: ... and visually check its tightness 6 3 INSPECTION OF SETTINGS DURING OPERATION During operation without deactivating the supply voltage the pressure status of the system if a pressure sensor is installed the set power code the address for central control MODBUS and the last 10 error states of the device can be verified 1 After a short press of the SETTINGS button the display shows the pressure in b...

Page 19: ...mber Date of sale Seller Installation date Installation performed by The manufacturer provides a 24 month warranty covering the quality of the product starting on the day of sale The warranty covers defects of the purchased product which appear during the warranty period In order to keep your warranty valid the installation must be performed by an authorized person and the Warranty form must be pr...

Reviews: