background image

M

ake sure to read the 

Important Precautions

before using the product. 

Keep the User's Guide(CD) in an accessible place for future reference.

S

ee the label attached on the product and give the information to your

dealer when you ask for service.

L1942H

User’s Guide

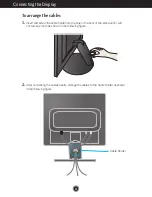
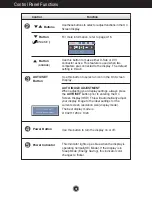
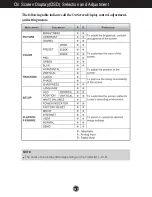
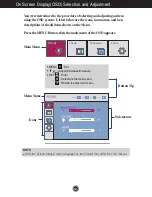
Summary of Contents for L1942H-BF

Page 1: ...nt Precautions before using the product Keep the User s Guide CD in an accessible place for future reference See the label attached on the product and give the information to your dealer when you ask for service L1942H User s Guide ...

Page 2: ...ower cords and broken plugs They may result in a shock or fire hazard Call your service technician for replacement Do not Open the Display There are no user serviceable components inside There are Dangerous High Voltages inside even when the power is OFF Contact your dealer if the display is not operating properly To Avoid Personal Injury Do not place the display on a sloping shelf unless properly...

Page 3: ...es Some dot defects may appear as Red Green or Blue spots on the screen However this will have no impact or effect on the display performance If possible use the recommended resolution to obtain the best image quality for your LCD display If used under any mode except the recommended resolution some scaled or processed images may appear on the screen However this is characteristic of the fixed res...

Page 4: ...to the monitor the computer system and other attached devices is turned off Unfolding the stand base 1 Place the monitor with its front facing downward on a soft cloth 2 Hold the stand base and lift it up following the sequence as shown in the picture 3 Pull the stand base down at the same spot shown in the picture and the stand will be unfolded 4 Place the monitor upright and adjust the stand bas...

Page 5: ...and comfortable viewing position the forward tilt angle of the monitor should not exceed 5 degrees 1 Face the front of the monitor dislpay Then gently push the monitor backwards following the sequence shown in the picture below Tilt range 1 Make sure that the angle of the panel is set for your comfort Tilt Range 0 30 ...

Page 6: ...A5 Connecting the Display To adjust the height Scope of adjusting the height maximum 4 16 inches 105 7 mm 105 7 mm ...

Page 7: ...screen flicker or tilted screen while using the device or after changing screen resolution press the AUTO SET function button to improve resolution NOTE This is a simplified representation of the rear view This rear view represents a general model your display may differ from the view as shown User must use shielded signal interface cables D sub 15 pin cable DVI cable with ferrite cores to maintai...

Page 8: ...rt and screw the cable holder into the hole in the back of the stand until it will not turn any more as shown in the following figure 2 After connecting the cables neatly arrange the cables to the Cable Holder as shown in the following figure Cable Holder ...

Page 9: ...lock the current control settings so that these settings are not inadvertently changed To lock the OSD settings press and hold the MENU button for several seconds The message OSD LOCKED appears You can unlock the OSD settings at any time by pushing the MENU button for several seconds The message OSD UNLOCKED appears Front Panel Controls MENU AUTO SET ENGINE SOURCE ...

Page 10: ...our display settings always press the AUTO SET button prior to entering the On Screen Display OSD This will automatically adjust your display image to the ideal settings for the current screen resolution size display mode The best display mode is L1942H 1280 x 1024 Buttons Use these buttons to select or adjust functions in the On Screen Display For more information refer to page A16 Use this butto...

Page 11: ...ke using the OSD To make adjustments in the On Screen Display follow these steps Press the MENU Button then the main menu of the OSD appears To access a control use the or Buttons When the icon you want becomes highlighted press the AUTO SET Button Use the Buttons to adjust the image to the desired level Use the AUTO SET Button to select other sub menu items Push the MENU Button once to return to ...

Page 12: ...NOTE The order of icons may differ depending on the model A11 A16 On Screen Display OSD Selection and Adjustment The following table indicates all the On Screen Display control adjustment and setting menus ...

Page 13: ... of selecting and adjusting an item using the OSD system Listed below are the icons icon names and icon descriptions of the all items shown on the Menu Press the MENU Button then the main menu of the OSD appears Menu Name Main Menu Button Tip PICTURE COLOR TRACKING SETUP MENU Exit Adjust Decrease Increase SET Enter Select another sub menu Restart to select sub menu Sub menus Icons ...

Page 14: ...splay whitish images and low gamma values display high contrast images PICTURE PRESET RED GREEN BLUE sRGB Set the screen color to fit the SRGB standard color specification 6500K Slightly reddish white 9300K Slightly bluish white Set your own red color levels Set your own green color levels Set your own blue color levels COLOR PICTURE COLOR MENU Exit Decrease Increase SET Select another sub menu ME...

Page 15: ...ckground The horizontal screen size will also change To adjust the focus of the display This item allows you to remove any horizontal noise and clear or sharpen the image of characters To adjust the clearness of the screen TRACKING TRACKING MENU Exit Decrease Increase SET Select another sub menu HORIZONTAL VERTICAL To move image left and right To move image up and down ...

Page 16: ...on the screen LANGUAGE OSD POSITION WHITE BALANCE FACTORY RESET If the output of the video card is different the required specifications the color level may deteriorate due to video signal distortion Using this function the signal level is adjusted to fit into the standard output level of the video card in order to provide the optimal image Activate this function when white and black colors are pr...

Page 17: ... under normal operating conditions This is just for advertising to customer in the shops It s setting is same with Movie mode and screen is divided by half This feature lets you easily select the best desired image condition optimized to the environment ambient illumination image types etc User You can manually adjust brightness ACE or RCM You can save or restore the adjusted value even when using...

Page 18: ...trast If the display is in power saving mode try moving the mouse or pressing any key on the keyboard to bring up the screen Try to turn on the PC This message appears when the signal from the PC video card is out of horizontal or vertical frequency range of the display See the Specifications section of this manual and configure your display again This message appears when the signal cable between...

Page 19: ...the CLOCK icon in the on screen display Press the AUTO SET button to automatically adjust your display image to the ideal setting If the results are unsatisfactory decrease the horizontal bars using the PHASE icon in the on screen display Check Control Panel Display Settings and adjust the display to the recommended resolution or adjust the display image to the ideal setting Set the color setting ...

Page 20: ...iver from our web site http www lge com Make sure to check if the video card supports Plug Play function Display image is incorrect The screen color is mono or abnormal The screen blinks Check if the signal cable is properly connected and use a screwdriver to fasten if necessary Make sure the video card is properly inserted in the slot Set the color setting higher than 24 bits true color at Contro...

Page 21: ...D Sub Connector DVI D connector Digital Input Form RGB Analog 0 7 Vp p 75 ohm Digital Max Analog VESA 1280 x 1024 75 Hz Digital VESA 1280 x 1024 60 Hz Recommend VESA 1280 x 1024 60 Hz DDC 2B Digital DDC 2AB Analog On Mode 34 W Typ Sleep Mode 1 W Off Mode 1 W Width x Height x Depth 1 40 63 cm 16 00 inches x 46 37 cm 18 26 inches x 23 75 cm 9 35 inches 2 40 63 cm 16 00 inches x 35 80 cm 14 09 inches...

Page 22: ...800 x 600 800 x 600 832 x 624 1024 x 768 1024 x 768 1152 x 870 1152 x 900 1280 x 1024 1280 x 1024 31 469 31 468 31 469 37 500 37 879 46 875 49 725 48 363 60 123 68 681 61 805 63 981 79 976 70 70 60 75 60 75 75 60 75 75 65 60 75 Indicator On Mode Sleep Mode Off Mode blue flicker Off LED Color MODE Preset Modes Resolution Recommend Mode Only Analog Mode ...

Page 23: ...hold Cover Hinge Cap with hands as shown in the picture Then lift it up and separate from the body 2 Separate the stand base by using a screwdriver 3 Install the Wall mount plate Wall mount plate Separate purchase This is stand type or wall mount type and is connectable with Wall mount plate Please refer to the installation guide for more details which is provided when Wall mount plate is purchase...

Page 24: ...Installing the Wall mount plate A23 Kensington Security Slot Connected to a locking cable that can be purchased separately at most computer stores ...

Page 25: ...Digitally yours ...

Reviews: