background image

Please read this instruction booklet carefully and completely
before connecting, operating or adjusting this product.

Car CD/MP3 Receiver

OWNER’S MANUAL
MODEL : LAC-M0510R

LAC-M0510R_ENG_LGEMC-MFL37340958

Summary of Contents for LAC-M0510R

Page 1: ...Please read this instruction booklet carefully and completely before connecting operating or adjusting this product Car CD MP3 Receiver OWNER S MANUAL MODEL LAC M0510R LAC M0510R_ENG_LGEMC MFL37340958 ...

Page 2: ...Adjusting the volume 10 Checking the clock 10 SOUND Adjustment 11 RDS Operation 12 13 RDS Display Options 12 RDS AF REG FUNCTION 12 LOCAL DX selection in EON TA mode 12 PROGRAM TYPE FUNCTION 12 RDS MODE Adjustment 13 Radio Operation 14 Listening to radio stations 14 Auto Search Memory 14 Storing and recalling broadcast frequencies 14 Operation with Audio CD MP3 15 16 Playing an Audio CD and MP3 Di...

Page 3: ...UTION This unit employs a Laser System To ensure proper use of this product please read this owner s manual carefully and retain for future reference Should the unit require maintenance contact an authorized service location see service procedure Use of controls adjustments or the performance of procedures other than those specified herein may result in hazardous radiation exposure To prevent dire...

Page 4: ...r amperage may cause serious damage to the unit Periodically wipe the contacts on the back of the front panel with a cotton swap moistened with alcohol Notes on Discs Handling Discs Do not touch the playback side of the disc Hold the disc by the edges so that fingerprints do not get on the surface Never stick paper or tape on the disc Storing Discs After playing store the disc in its case Do not e...

Page 5: ... front panel 2 Grip the left side of the front panel and pull it gently outward Take care not to grip it tightly or to drop it 3 Put the front panel into the protective case provided for safe keeping Attaching the front panel Align the left side of the panel with the stopper and then push the right side or the panel into the unit until it clicks Protective case Front panel RELEASE 1 2 ...

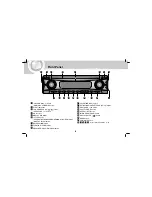
Page 6: ...SPLAY DISP button RELEASE button FUNCTION FUNC button EQUALIZER XDSS EQ XDSS button SELECTION SEL button AUTO STORE PRESET SCAN AS PS button MP3 TRACK 10 button SHUFFLE SHF button REPEAT RPT button INTRO SCAN SCAN button CD PLAY PAUSE button BAND button PWR MUTE button Preset Station buttons 1 6 16 15 14 13 12 18 17 16 15 14 13 12 11 10 9 8 7 6 5 4 3 2 1 3 10 2 11 17 16 15 14 13 12 5 6 1 4 18 7 8 ...

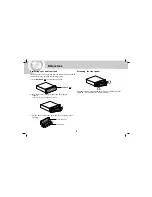
Page 7: ...emoved When removing the unit from the mounting sleeve If you need to remove the unit from the mounting sleeve proceed as follows 1 Remove the rear support from the unit 2 Remove the front panel and trim ring from the unit 3 Insert the lever into the hole on one side of the unit Perform the same operation on the other side and pull the unit out from the mounting sleeve ISO DIN Installation 1 Slide...

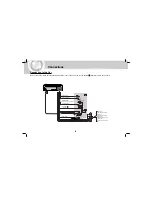
Page 8: ... RED 3 DIMMER PINK 2 PHONE ORANGE BATTERY A C B 5 TO BATTERY YELLOW 1 2 3 4 5 6 7 8 1 2 3 4 5 6 7 8 WHITE FL WHITE BLACK STRIPE FL GRAY FR GRAY BLACK STRIPE FR GREEN RL GREEN BLACK STRIPE RL VIOLET RR VIOLET BLACK STRIPE RR Connecting to the Car Before connecting make sure that the ignition switch is set to OFF and remove the battery terminal to avoid short circuits ...

Page 9: ...the Dimmer line connection 4 RED This lead is for connection to the power supply terminal when the ignition switch is set to ACC 5 YELLOW This lead is for connection to the Battery back up terminal from which power is always supplied 6 BLUE This lead is for the power antenna connection 7 BLUE WHITE STRIPE This lead is for the remote amplifier on connection Speaker Connections L FRONT REAR R L R C ...

Page 10: ...r NOTE When you turn the unit off the current volume level is automatically memorized Whenever you turn the unit back on it will operate at the memorized volume level Adjusting the volume Use VOLUME to adjust the sound level Press VOLUME VOL button on the front panel to increase or decrease the volume Checking the clock You can see the clock by pressing DISP for more than 1 second NOTES If the uni...

Page 11: ...cancel it press PWR MUTE again SELECTION SEL Button 1 Press the SELECTION SEL button repeatedly to select the mode you want to adjust from volume bass treble balance and fader The mode indicator lights up in the following order 2 Press CONTROL UP VOL or DOWN VOL to adjust the sound quality NOTE The unit cannot adjust the bass and treble in the EQ XDSS mode XDSS Extreme Dynamic Sound System Press a...

Page 12: ...ion in EON TA mode In the EON TA mode pressing the TA button for more than 2 sec onds causes only local and strong stations to be received When the TA button is pressed for more than 2 seconds it receives all stations including distant and weak ones It is recommended to set the TA button to the local position to receive local stations with good sound quality PROGRAM TYPE FUNCTION To select a certa...

Page 13: ...ned station has no TP information for 5 sec a double beep sound is ouput PI SOUND mode If the sound of a station with different PI is heard intermittently the receiver mutes the sound after 1 second PI MUTE mode If the situation described above is repeated the receiver instantly mutes the sound RETUNE L mode The waiting time for starting TA search or PI search is programmable Retune time is set to...

Page 14: ...n 6 stations have been preset or the receivable frequencies have been scanned once NOTES The presetting is not performed if there is no station to be tuned in When automatic presetting is performed the previous preset stations are automatically erased To stop the automatic presetting press the BAND or the AS PS button Storing and recalling broadcast frequencies You can easily store up to six broad...

Page 15: ...yback press PLAY PAUSE B B X again Moving to another Track Press the briefly during playback to go to the next track or to return to the beginning of the current track Press twice briefly to step back to the previous track If playing times is less then 3 seconds this function is not operated Search Press and hold the for about 1 second during playback and then release at the point you want CD MP3 ...

Page 16: ... press a button to not repeat the previous track MP3 TRACK 10 10 Durning playback press the 10 button to go back to the previous 10th track and press 10 button to go forward to the next 10th track Intro scan 1 Press SCAN The SCAN appears in the display window The first 10 seconds of all of the songs on the disc is played 2 Press SCAN again The SCAN disappears in the display window The intro scan i...

Page 17: ... Be very sure to install the correct fuse with the same rate Turn the unit off and then on Clean disc Check what type the disc is Connect the cables correctly Adjust the volume Secure this unit firmly Cause Leads and connectors are not properly connected The fuse is blown Noise and other factors are causing the built in microprocessor to operate incorrectly The disc is dirty The loaded disc is of ...

Page 18: ...et Our company has no right to grant such permission Permission should always be sought from the copyright owner General Output Power 50W x 4CH Max Power Source DC 12 V Speaker impedance 4 Ω Ground System Negative type Dimensions W x H x D 182 x 51 x 173 mm Without Front Panel Net Weight approx 1 8 kg FM tuner Frequency Range 87 5 107 9MHz or 87 5 108 MHz or 65 74 MHz 87 5 108 MHz S N Ratio 55 dB ...

Reviews: