background image

ENGLISHENGLISH

ESPAÑOL

FRANÇAIS

www.lg.com

USER’S GUIDE & INSTALLATION INSTRUCTIONS

CERAMIC-GLASS
RADIANT COOKTOP

Please read this guide thoroughly before operating and
keep it handy for reference at all times.

LCE3081ST

LCE3681ST

MFL54169101

Summary of Contents for LCE3010

Page 1: ...AÑOL FRANÇAIS www lg com USER S GUIDE INSTALLATION INSTRUCTIONS CERAMIC GLASS RADIANT COOKTOP Please read this guide thoroughly before operating and keep it handy for reference at all times LCE3081ST LCE3681ST MFL54169101 ...

Page 2: ...NSTRUCTIONS Before Using the Cooktop 12 Setting the Controls 12 14 Using the Warming Zones 14 Using the Bridge cooking zones 15 Using the Triple cooking zones 16 Using the Dual cooking zones 16 Using the Child lock 17 Other Functions 17 TROUBLESHOOTING Before Calling for Service 29 30 WARRANTY Warranty for customers in the U S A 31 Warranty for customers in Canada 32 Product Registration Informati...

Page 3: ...e such as removal of panels wire covers or any other permanent part of the product Storage on appliance Flammable materials should not be stored near or on the cooking surface This includes paper plastic and cloth items such as cookbooks plasticware and towels as well as flammable liquids Do not store explosives such as aerosol cans on or near the appliance Flammable materials may explode and resu...

Page 4: ... installation in suitable cabinets and workplaces which conform to the relevant standards This ensures sufficient protection against electric shock as required by certification agencies If your appliance malfunctions or fractures switch off all cooking zones and contact Service Center CHILD SAFETY READ ALL INSTRUCTIONS BEFORE USE WARNING If the surface is cracked switch off the appliance to avoid ...

Page 5: ...act and may result in ignition of clothing Proper relationship of utensil to burner will also improve efficiency If pan is smaller than element a portion of the element will be exposed to direct contact and could ignite clothing or potholder Do not place any object on or near the control keypad area in order to prevent accidental activation of the cooktop controls Utensil Handles Should Be Turned ...

Page 6: ...e correct surface unit Use only dry potholders Moist or damp pot holders on hot surfaces may results in burns form steam Do not let the pot holder touch hot heating elements Do not use a towel or other bulky cloth SAFETY WHEN CLEANING Always switch off the appliance before cleaning For safety reasons do not clean the appliance with a steam jet or high pressure cleaner Clean the cooktop in accordan...

Page 7: ...metal or glass across the cooktop surface Keep meltable objects or materials away from the ceramic glass surface for example plastic utensils aluminum foil or cooking wraps If any materials or foodstuffs melt on the ceramic glass surface these should be cleaned up immediately NOTE There is a risk of burning yourself when the glass scraper is used on a hot cooking zone Do not use cookware with any ...

Page 8: ...e rough and or have burrs on them Scratches can occur if they are slid across the surface When cold pot bases are normally bowed slightly in wards concave They should never be bowed outwards convex If you wish to use a special type of pan e g a pressure cooker simmering pan wok please follow the manufacturer s instructions and do not use a very thin pan USE FLAT BOTTOMED COOKWARE Cookware must ful...

Page 9: ...w the recommendations for proper cookware type and size In addition Do not use dirty pans with grease buildup Always use pans that are easy to clean after cooking and make sure that the bottoms of the pans are clean and dry When cooking with large amounts of liquid use large pots so that nothing can boil over Do not let pans boil dry This may cause permanent damage in the form of breakage fusion o...

Page 10: ... 152 mm 3000 2200 1100 W Warming Zone 6 152 mm 100 W Dual Cooking Zone 9 6 229 152 mm 3000 1400 W Electronic touch controls Bridge Cooking Zone 4400 W LCE3081ST Radiant Cooktop LCE3681ST Radiant Cooktop Dual Cooking Zone 8 5 203 127 mm 1900 950 W Single Cooking Zone 7 178 mm 1500 W Single Cooking Zone 6 152 mm 1200 W Warming Zone 6 152 mm 100 W Dual Cooking Zone 9 6 229 152 mm 3000 1400 W Electron...

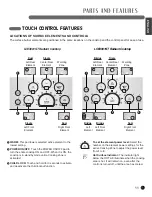
Page 11: ...ing Zone to adjust the power level from 1 to 9 Hot Surface Indicator The indicator light below the HOT will illuminate when the cooking area is hot It will remain on even after the control is turned off until the area has cooled LOCATIONS OF SURFACE ELEMENTS AND CONTROLS The surface burner elements are positioned in the same locations on the cooktop and the control panel for ease of use 1 3 2 Brid...

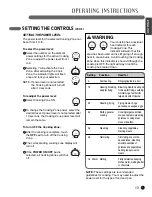
Page 12: ...mately 2 seconds The indicator above the pad will light To turn OFF the cooktop touch the POWER ON OFF pad The indicator light above the pad will turn off NOTE After turning on the cooktop with the POWER ON OFF pad you must select one of the Cooking Zones within 15 seconds using the Cooking Zone ON pad s If no selection is made the cooktop will turn off for safety SELECTING THE COOKING ZONE To sel...

Page 13: ...9 To select the power level Select the number on the element power settings for the active Cooking Zone to adjust the power level from 1 to 9 Selecting 7 will activate the Cook Zone After activating the Cook Zone the indicator lights will flash once and lock your selection NOTE If power level is not selected the Cooking Zone will turn off after 10 seconds To readjust the power level Select Cooking...

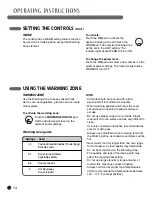
Page 14: ...d with a lid or aluminum foil to maintain food quality When warming pastries and bread the cover should have an opening to allow moisture to escape Do not use plastic wrap to cover foods Plastic may melt on to the surface and be very difficult to clean Use only cookware and dishes recommended as safe for cooktop use Always use potholders when removing food from the Warming Zone as cookware and pla...

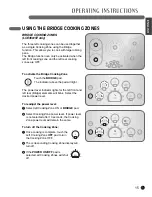
Page 15: ...he indicator above the pad will light The power level indicator lights for the left front and left rear Bridge elements will blink Select the desired power level To readjust the power level Select left Cooking Zone ON or BRIDGE pad Select Cooking Zone power level If power level is not selected after 10 seconds the Cooking Zone power level will remain the same To turn off the Cooking Zone Once cook...

Page 16: ...uch the ON pad again to activate the entire element Triple Element The indicator light below the the D Dual and T Triple will turn on Select the desired power level The Dual Element located in the right front position offers two different size elements to accommodate different pan sizes Use one or two sections of the element to accommodate different pan sizes To Activate the Dual Cooking Zone Touc...

Page 17: ...e the CHILD LOCK pad will turn on to indicate that the cooktop is locked CANCELING CHILD LOCK To turn off CHILD LOCK touch and hold the CHILD LOCK pad for 3 seconds The indicator light above the pad will go off and the cooktop can now be used normally OTHER FUNCTIONS AUTOMATIC SHUTOFF If a Cooking Zone is in constant use for more than 17 hours and the control setting is not changed the Cooking Zon...

Page 18: ...n each burner area and work the cleaning cream over the cooktop surface with a damp paper towel as if you were cleaning a window NOTE Approved cleaner Weiman CookTop Cleaning Cream www weiman com Cerama Bryte www ceramabryte com Hope s Cooktop Cleaning Cream www camden industrial com Easy Off 3 in 1 Glass Top Cleaner Spray www easyoff com Step 3 As a final step clean with clear water and wipe the ...

Page 19: ...nd Installation Instructions for future reference NOTE This appliance must be properly grounded Damage caused by failure to follow these instructions is not covered by the cooktop warranty UNPACKING THE COOKTOP Unpack and visually inspect the cooktop for any damage or missing components Be sure the bottle of cleaner and conditioner packed in the literature bag is left where the user can find it ea...

Page 20: ...240 208 VAC 60 Hz 32 1A 27 9 A Maximum connected power load 7700 W 5800 W COOKTOP DIMENSIONS Width 36 11 16 932 mm Depth 22 559 mm Height 4 101 6 mm COOKING ZONES Position Diameter Power Front Left 7 178 mm 1800 W Bridge Front Right 9 6 229 152 mm 3000 1400 W Rear Left 7 178 mm 1800 W 800 W Bridge Rear Right 6 152 mm 100 W Warm Center 12 9 6 305 229 152 mm 3000 2200 1100 W COUNTERTOP CUTOUT DIMENS...

Page 21: ...by the cooktop A B I C D H E F G K L J 30 Min 762 mm Do not obstruct these areas All dimensions are stated in inches and millimeters mm Allow 2 50 mm space below the armored cable opening to clear the electric cable and allow space for installation of the junction box on the wall at the back of the cooktop 30 inch Radiant Cooktop LCE3081ST Radiant Cooktop 4 X 8 102 mm x 203 mm opening to route arm...

Page 22: ...N It is very important to keep 23 4 70 mm distance between the cooktop and the oven Overhead cabinet should not exceed a maximum depth of 13 330 mm Min from edge of cooktop to nearest combustible wall either side of unit Empty space is needed underneath the cooktop for installation purposes Approximate location of junction box 12 305 mm 10 254 mm 18 457 mm 36 Min 914 mm 24 610 mm Min recommended d...

Page 23: ... by the cooktop A B I C D H E F G K L J 30 Min 762 mm Do not obstruct these areas All dimensions are stated in inches and millimeters mm Allow 2 50 mm space below the armored cable opening to clear the electric cable and allow space for installation of the junction box on the wall at the back of the cooktop 36 inch Radiant Cooktop LCE3681ST Radiant Cooktop 4 X 8 102 mm x 203 mm opening to route ar...

Page 24: ... 457 mm 36 Min 914 mm 24 610 mm Min recommended distance between rear edge of cutout and nearest combustible surface CAUTION To eliminate the risk of burns or fire by reaching over heated surfaces cabinet storage space located above the cooktop should be avoided If cabinet storage is provided risk can be reduced by installing a range hood that projects horizontally a minimum of 5 127 mm beyond the...

Page 25: ...Amp circuit breaker with wire guage 8 AWG must be used 30 Radiant cooktop can consume up to 7700W at 240 VAC A 40 Amp circuit breaker with wire guage 8 AWG must be used NOTE Wire sizes and connections must conform with the fuse size and rating of the appliance in accordance with the National Electrical Code ANSI NFPA No 70 latest edition and local codes and ordinances The appliance should be conne...

Page 26: ...T connect to electrical power supply until appliance is permanently grounded Connect the ground wire before turning on the power WARNING This appliance is equipped with a copper conductor flexible cable If connection is made to aluminum house wiring use only special connectors which are approved for joining copper and aluminum wires in accordance with the National Electrical Code and local codes a...

Page 27: ...RANCH CIRCUIT INSTALLATION 1996 NEC MOBILE HOME RECREATIONAL VEHICLE OR WHERE LOCAL CODES DO NOT PERMIT GROUNDING TO THE NEUTRAL WHITE WIRE 4 WIRE GROUNDED JUNCTION BOX Cable from power supply Black wires White wire no connection Red wires Junction box UL listed conduit connector Cable from cooktop Green wire ground Ground Wire COOKTOP INSTALLATION Visually inspect the cooktop for damage Make sure...

Page 28: ...ION Do not touch cooktop glass or Cooking Zones They may be hot enough to cause burns Install the retainer brackets to the bottom of the cooktop then snug the bolts against the bottom of the countertop as shown NOTE The retainer brackets MUST be installed to meet local codes or in their absence with the National Electrical Code ANSI NFPA No 70 latest edition Retainer brackets Cooktop Bolt Retainer...

Page 29: ...ktop Cooktop inner temperature too High Touch controls may not be set properly Cookware may not be shape or flat or the correct size Cooktop inner temperature is High See USING CHILD LOCK to turn off the CHILD LOCK feature Reset the circuit breaker Check house lights to confirm power outage Contact the installer or dealer Make sure the correct control is ON for the Cooking Zone being used See Cook...

Page 30: ...OFF Turn cooktop back on using the Power ON OFF Clean the surface Remove object from the touch pad If any one of the keys is touched for more than 10 seconds continuously this error will be displayed If water or a metal object is placed on the touchpad this error will be displayed Turn the cooktop off using the Power ON OFF Turn cooktop back on using the Power ON OFF Turn the cooktop off using the...

Page 31: ...nt alteration misuse abuse fire flood improper installation acts of God or use of products not approved by LG Corporation 5 Repairs to parts or systems resulting from unauthorized modifications made to the appliance 6 Replacement parts or repair labor costs for units operated outside the United States 7 Any labor costs during the limited warranty period This warranty is extended to the original pu...

Page 32: ...or use of products not approved by LG Corporation 5 Repairs to parts or systems resulting from unauthorized modifications made to the appliance 6 Replacement parts or repair labor costs for units operated outside the United States 7 Any labor costs during the limited warranty period This warranty is extended to the original purchaser owner for products purchased for home use within Canada Some pro...

Page 33: ...ed in Korea Impreso en Korea Imprimé en Corée www lg com Register your product Online LG Customer Information Center 1 800 243 0000 1 888 865 3026 1 888 542 2623 USA Consumer User USA Commercial User CANADA ...

Reviews: