background image

33

CARE AND CLEANING

ENGLISH

Cooktop Surface

To avoid burns, do not clean the cooktop surface until it has 
cooled. Foods with high acid or sugar content could cause a 
dull spot if allowed to set. Wash and rinse when the surface 
has cooled. For other spills such as oil/grease spattering, etc., 
wash with soap and water when the surface has cooled. Then 
rinse and polish with a dry cloth.

 NOTE

Do not lift the cooktop surface. Lifting the cooktop  
surface can lead to damage and improper operation of the 
range.

Stainless Steel Surfaces

To inquire about purchasing stainless steel appliance cleaner 
or polish, or to find the location of a dealer nearest you, 
please call our toll-free customer service number:  

1-800-243-0000

 or visit our website at: 

us.lgservice.com

Oven air vents

Air openings are located at the rear of the cooktop, at the top 
and bottom of the oven door, and at the bottom of the range.

 NOTE

Do not block the vents and air openings of the range. 
They provide the air inlet and outlet that are necessary for 
the range to operate properly with correct combustion.

Control Panel

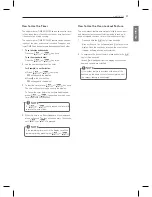
To prevent activating the control panel during cleaning, un-
plug the range. Clean up splatters with a damp cloth using a 
glass cleaner. Remove heavier soil with warm, soapy water. 
Do not use abrasives of any kind.

Front manifold panel and knobs

It is best to clean the manifold panel after each use of the 
oven. For cleaning, use a damp cloth and mild soapy water or 
a 50/50 solution of vinegar and water. For rinsing, use clean 
water and polish dry with a soft cloth.

 NOTE


y

Do not use abrasive cleansers, strong liquid cleaners, 
plastic scouring pads or oven cleaners on the manifold 
panel. Doing so will damage the finish.


y

Do not try to bend the knobs by pulling them up or 
down or by hanging a towel or other objects on them. 
This can damage the gas valve shaft.


y

The control knobs may be removed for easy cleaning.


y

To clean the knobs, make sure that they are in the 
“OFF” position and pull them straight off the stems.


y

To replace the knobs, make sure the knob has the 
“OFF” position centered at the top, and slide the knob 
directly onto the stem.

 NOTE

To prevent scratching, do not use abrasive cleaners on 
any of these materials.

 NOTE


y

Do not use a steel wool pad; it will scratch the surface.


y

To clean the stainless steel surface, use warm sudsy 
water or a stainless steel cleaner or polish.


y

Always wipe in the direction of the metal surface finish.

Summary of Contents for LDG3011ST

Page 1: ... MANUAL GAS DOUBLE OVEN RANGE LDG3011ST Please read this guide thoroughly before operating and keep it handy for reference at all times P No MFL33029610 www lg com ENGLISH ESPAÑOL Printed on 100 Recycled Paper ...

Page 2: ... TIMED COOK Upper Lower Oven 27 DELAYED TIMED COOK Upper Lower Oven 28 Special Features 28 PIZZA Upper Oven 28 WARM Upper Lower Oven 29 PROOF Lower Oven 30 SABBATH Upper Lower Oven 31 CARE AND CLEANING 31 Gas Surface Burner 31 Removing and Replacing the Gas Surface Burner 31 Burner Heads Caps 32 Burner Grates 33 Cooktop Surface 33 Stainless Steel Surfaces 33 Oven Air Vents 33 Control Panel 33 Fron...

Page 3: ...n quickly bring a pot of water to a boil MULTIPLE GAS BURNER SIZES Choose a burner to fit the size of your cookware Cooking multiple items at once is possible by using different burners at the same time UPPER OVEN LOWER OVEN Separate upper and lower ovens Choose to use either oven or both depending on the size of your food SELF CLEAN Good for easy cleaning ...

Page 4: ...ED WITH RANGE y SEE INSTALLATION INSTRUCTIONS y DO NOT step or sit on the door Install the Anti Tip Bracket packed with this range The range could be tipped and injury might result from spilled hot liquid food or the range itself If the range is pulled away from the wall for cleaning service or any other reason ensure that the Anti Tip Device is properly reengaged when the range is pushed back aga...

Page 5: ... attempt to repair or replace any part of your range unless it is specifically mentioned in this manual All other ser vices should be referred to a qualified technician y Make sure that all packaging materials are removed from the range before operating it to prevent fire or smoke damage should the packaging material ignite y Make sure your range is properly adjusted by a qualified service technic...

Page 6: ...of combustion and ventilation air by blocking the oven vent or air intakes Doing so restricts air to the burner and may result in carbon monoxide poisoning y Large scratches or impacts to glass doors can lead to broken or shattered glass y Stepping leaning or sitting on the doors or drawers of this range can result in serious injuries and also cause damage to the range Do not allow children to cli...

Page 7: ...tems on the cooktop The hot air from the vent may ignite flammable items and will increase pressure in closed containers which may cause them to burst y Carefully watch foods being fried at a high flame setting y Always heat fat slowly and watch as it heats y If frying combinations of oils and fats stir together before heating y Use a deep fat thermometer if possible to prevent overheating fat bey...

Page 8: ...cause burns to hands face and eyes WARNING NEVER block any slots holes or passages in the oven bottom or cover an entire rack with materials such as aluminum foil Doing so blocks air flow through the oven and may cause carbon monoxide poisoning Aluminum foil linings may also trap heat causing a fire hazard y DO NOT heat food in closed containers Pressure inside the container could increase and bur...

Page 9: ...p the oven door closed to contain fire until it burns out y For safety and better cooking performance always bake and broil with the oven door closed Open door baking or broiling can cause damage to the knobs or valves DO NOT leave the oven door open during cooking or cool down READ ALL INSTRUCTIONS BEFORE USING THE APPLIANCE SAVE THESE INSTRUCTIONS ...

Page 10: ...The images in this guide may be different from the actual components and accessories and are subject to change by the manufacturer without prior notice for product improvement purposes BEFORE USE Accessories Make sure that all parts are included after purchasing this product Gas double oven range Racks 2 Offset rack 1 Owner s manual Installation manual Cooktop nozzles 4 Oven nozzles 3 Installation...

Page 11: ...atures and appearance may vary depending on your model NOTE y The model and serial tag is located behind the control panel Anti tip bracket Grates Small burner Extra large burner Self clean latch Rack Upper oven door Rack Lower oven door Control panel Oven vent Medium burner Large burner Knobs 4 Automatic oven light switch ...

Page 12: ...kware to absorb the heat Make sure the burners and grates are cooled down before you place your hand pot holder cleaning cloth or other materials on burners and grates Touching grates before cooling down may cause burns CAUTION WHAT TO DO IF YOU SMELL GAS 1 Open windows 2 DO NOT try to light any appliance 3 DO NOT touch any electrical switch 4 DO NOT use any phone in your building 5 Immediately ca...

Page 13: ...to a boil It can be used with cookware 10 inches or larger in diameter Using the gas surface burners 1 Be sure that all of the surface burners are placed in the correct positions 2 Put cookware on the burner Example pot frying pan etc 3 Push and turn the control knob to the u position You will hear a clicking noise from the electric spark ignition system 4 Turn the control knob to control the flam...

Page 14: ...e Under some conditions the enamel of this cookware may melt Follow cookware manufacturer s recommendations for cooking methods Glass There are two types of glass cookware those for oven use only and those for top of range cooking Heatproof Glass Ceramic Can be used for either surface or oven cooking It conducts heat very slowly and cools very slowly Check cookware manufacturer s directions to be ...

Page 15: ...he oven temperature setting time setting and recipe for best results CAUTION WHAT TO DO IF YOU SMELL GAS 1 Open windows 2 DO NOT try to light any appliance 3 DO NOT touch any electrical switch 4 DO NOT use any phone in your building 5 Immediately call your gas supplier from a neighbor s phone Follow the gas supplier s instructions 6 If you cannot reach your gas supplier call the fire department Ch...

Page 16: ... failure occurs the oven burner shuts off and cannot be re lit until power is restored Once power is restored you will need to reset the oven or broil function CAUTION DO NOT attempt to operate the electric ignition during an electrical power failure NOTE PF Power Failure Message The PF message will appear if the appliance has a power interruption To clear the PF message press or control key to re...

Page 17: ... Cooks pizza Refer to PIZZA in the How To Use section 5 UPPER LIGHT Turns on off the upper oven light 6 UPPER SELF CLEAN Cleans the inside of the UPPER OVEN automatically Refer to SELF CLEAN in the How To Use section 7 UPPER TIMER ON OFF Sets starts or cancels the timer function of the UPPER OVEN Refer to How to use the timer in the Operating Instructions section 8 UPPER CLEAR OFF Stops cooking or...

Page 18: ...mer To activate OVEN LOCK press and hold for three seconds Lower Oven Name Description 9 BAKE Traditional bake function Refer to BAKE in the Operating Instructions section PROOF To proof a piece of bread Refer to PROOF in the Operating Instructions section q WARM Warms food in the oven Refer to WARM in the Operating Instructions section w LOWER LIGHT Turns on off the lower oven light e LOWER SELF ...

Page 19: ...ed Press the M or Q key to turn the oven lights on or off How to Adjust the Beeper Volume 1 Press the key until j will display 2 Press the 1 key continuously to scroll through the volume options m l S 3 Press the q key to accept the change CAUTION DO NOT use thermometers such as those found in grocery stores to check the temperature setting of your oven These thermometers may vary 20 40 degrees NO...

Page 20: ...s after you press the U key the display reverts to the original setting If this happens press the U key and reenter the time of day y If the display time is blinking you may have experienced a power failure Reset the time FEATURE MIN TEMP TIME MAX TEMP TIME DEFAULT CLOCK TIME 12 Hr 1 00 Hr Min 11 59 Hr Min 24 Hr 0 00 Hr Min 23 59 Hr Min KITCHEN TIMER 12 Hr 0 01 Min 11 59 Hr Min 24 Hr 0 01 Min 11 5...

Page 21: ...would like to cancel 4 When the time is up k will appear on the display and a tone will sound The tone will sound every 15 seconds until P or T is pressed How to Use the Oven Lockout Feature The oven lockout feature automatically locks the oven door and prevents most oven controls from being turned on It does not disable the clock timer or the interior oven light 1 Press and hold the q key for thr...

Page 22: ...en CAUTION y Replace the oven rack before turning the oven on to prevent burns y DO NOT cover the rack with aluminum foil or any other material or place anything on the bottom of the oven Doing so will result in poor baking and may damage the oven bottom y Only arrange oven racks when the oven is cool To Replace Racks 1 While wearing oven mitts place the end of the rack on the support 2 Tilt the f...

Page 23: ...eys ex press 3 7 5 3 Press the q key As the oven preheats the temperature is displayed and rises in 5 degree increments Once the oven reaches the desired temperature a tone will sound and the oven light will blink on and off 4 When cooking is complete press the or key 5 Remove food from the oven NOTE y Preheating is necessary for better cooking re sults Place the food in the oven after preheating ...

Page 24: ... 2 Rack B A E D C B A Baking chart This chart is only for reference and can be used for both the upper and lower ovens Adjust the cook time according to your recipe Food Oven Temperature Shelf position baking time Baking time Minutes Upper oven Lower oven Cakes Layer cake Bundt cake Cup cakes Pound cake Carrot cake from scratch 350 F 177 C 350 F 177 C 350 F 177 C 350 F 177 C 350 F 177 C A A A A A ...

Page 25: ...id Oil can cause a grease fire y DO NOT cover the grid and broiler pan with aluminum foil Doing so will cause a fire NOTE y Use a m broil to broil foods such as poultry and thick cuts of meat y Remove the pan from the oven to cool down for easy cleaning y For best results use a pan designed for broiling as shown below The broiler pan will catch grease spills and the grid will help prevent grease s...

Page 26: ...es precooked 1 2 thick A 6 7 2 3 Increase time 5 to 10 minutes pre side for 11 2 thick or home cured ham Pork chops Well Done 1 1 2 thick A 4 6 3 5 Slash fat 2 1 thick about 1lb A 7 9 5 7 Lamb Chops Slash fat Medium 2 1 thick about 10 to 12 oz A 7 8 2 3 Well Done A 8 9 3 4 Medium 2 1 2 thick about 1lb A 6 7 2 3 Well done A 7 8 3 4 Salmon Steaks 2 1 thick A 7 9 3 5 Grease pan Brush steaks with melt...

Page 27: ...change the cook time from 30 minutes to 1 hour 30 minutes 1 Press the key 2 Use the number keys to change the baking time ex press 1 3 0 3 Press q to accept the change y k and the time of day will show in the display y The cook end indicator tone will sound every 60 seconds until the or key is pressed y When WARM function is set warm function is acti vated after cooking for the set time NOTE If op...

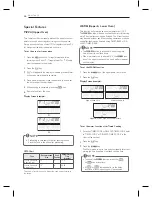
Page 28: ... may be used without any other cooking operations or can be used after cooking has finished using TIMED BAKE or DE LAYED TIMED BAKE NOTE y The WARM function is intended to keep food warm Do not use it to cool food down y When the lower oven is above 475 F the WARM func tion of the upper oven cannot be used w will appear on the display To set the WARM function 1 Press the C key of the upper and or ...

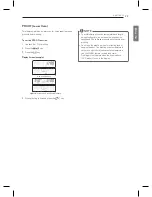
Page 29: ...er oven at the same time Display Screen example NOTE y To avoid lowering the oven temperature and length ening proofing time do not open the oven door un necessarily Check bread products early to avoid over proofing y Do not use the proofing mode for warming food or keeping food hot The proofing oven temperature is not hot enough to hold foods at safe temperatures Use the WARM feature to keep food...

Page 30: ... NOTE y IF the oven light is turned ON and the SABBATH mode is active the oven light will remain ON until the SAB BATH mode is turned OFF If the oven light needs to be OFF be sure to turn the oven light OFF before activating the SABBATH mode y SABBATH mode can only be used while baking BAKE mode in either the top bottom or both ovens y You can use TIMED COOK in another oven while either the upper ...

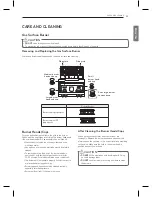
Page 31: ...he burners will not operate properly if the burner ports or electrodes are clogged or dirty y Burner caps and heads should be cleaned routinely especially after bad spillovers y Burners will not light if the cap is removed Shake out any excess water and then let them dry thoroughly Replace the burner heads and caps over the electrodes on the cooktop in the correct locations according to their size...

Page 32: ... without cookware on the grate The finish on the grate may chip with out cookware to absorb the heat y Do not lift the grates out until they have cooled y Grates should be washed regularly and after spillovers y Wash the grates in hot soapy water and rinse with clean water y The grates are dishwasher safe y After cleaning the grates let them dry completely and securely position them over the burne...

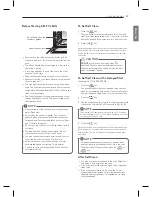
Page 33: ...trol panel during cleaning un plug the range Clean up splatters with a damp cloth using a glass cleaner Remove heavier soil with warm soapy water Do not use abrasives of any kind Front manifold panel and knobs It is best to clean the manifold panel after each use of the oven For cleaning use a damp cloth and mild soapy water or a 50 50 solution of vinegar and water For rinsing use clean water and ...

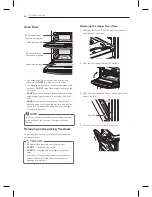
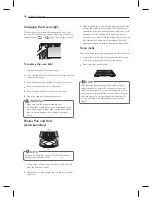
Page 34: ...age or remove this gasket NOTE Do not use cleaners or harsh abrasive cleaning materials on the outside of the oven door Doing so can cause damage Removing and replacing the doors Do not close the oven door until all of the oven racks are completely in place CAUTION y Be careful when removing and lifting the door y DO NOT lift the door by the handle y DO NOT hit the glass with pots pans or any othe...

Page 35: ...ed approximately 30 3 Fully open the door Push the hinge locks down onto the hinge 4 Close the oven door Removing the Lower Oven Door 1 Fully open the door Lift up the hinge locks toward the oven frame until they stop 2 Close the door to the removal position approximately five degrees 3 Lift the door up and out until the hinge arm is clear off of the slot Put the door on the floor Hinge arm Bottom...

Page 36: ...es given off during the self cleaning cycle of any range y DO NOT wrap the oven walls racks bottom or any other part of the range with aluminum foil or any other material Doing so will destroy the heat distribution produce poor baking results and cause permanent damage to the interior of the oven aluminum foil will melt to the interior surface of the oven y DO NOT force the door open This can caus...

Page 37: ...e extremely hot Do not touch the oven door until it has cooled down y You may see some smoke and smell an odor the first few times the oven is cleaned This is normal y As the oven heats you may hear sounds of metal parts expanding and contracting This is normal y A self clean cycle cannot be started if the Oven Lock out feature is active After Self Clean y You may notice some white ash in the oven...

Page 38: ...uring pad If food has burnt on sprinkle the grid with cleaner while hot and cover it with wet paper towels or a dishcloth Soaking the pan will remove burnt on foods Both the broiler pan and grid may be cleaned with a commercial oven cleaner Both the broiler pan and grid can also be cleaned in a dishwasher Oven racks Remove the oven racks before operating the self clean cycle 1 Food spilled into th...

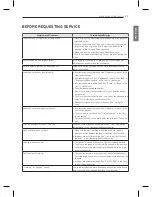
Page 39: ... set the clock and the timer in the Operating Instructions section y Aluminum foil used improperly in the oven See Using the oven Food does not broil properly in the oven y Incorrect oven control settings See Using control panel in the How to Use section y The oven door is not closed See Using the oven in the How to Use section y Aluminum foil used on the broiling pan and grid is not fitted prop e...

Page 40: ...r y Check the main gas shut off valve or the oven gas shut off valve and call for service y Remove the power from the range for five minutes and then reconnect the power If the function error code repeats call for service The oven racks were cleaned in a self clean cycle Apply a small amount of vegetable oil to a paper towel and wipe the edges of the oven racks Do not use lubricant sprays Clock is...

Page 41: ...NCIDENTAL DAMAGES OF ANY KIND INCLUDING LOST REVENUES OR PROFITS IN CONNECTION WITH THE PRODUCT SOME STATES DO NOT ALLOW LIMITATION ON HOW LONG AN IMPLIED WARRANTY LASTS OR THE EXCLUSION OF INCIDENTAL OR CONSEQUENTIAL DAMAGES SO THE ABOVE LIMITATIONS OR EXCLUSIONS MAY NOT APPLY TO YOU THIS LIMITED WARRANTY DOES NOT APPLY TO 1 Service calls to correct the installation of your appliance to instruct ...

Page 42: ...MEMO ...

Page 43: ...nted in Mexico www lg com Register your product Online LG Customer Information Center 1 800 243 0000 1 888 865 3026 1 888 542 2623 USA Consumer User USA Commercial User CANADA Printed on 100 Recycled Paper ...
Reviews: