background image

14

INSTRUCCIONES DE INSTALACIÓN

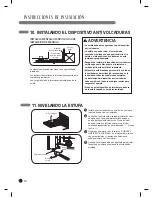
Instale los estantes del horno en el horno y coloque 

la estufa donde va a ser instalada.
Verifique si la estufa está nivelada al colocar un nivel 

de agua o una taza, parcialmente llena de agua, 

en uno de los estantes del horno. Si usa un nivel 

de agua, tome dos lecturas, primero con el nivel 

colocado diagonalmente en una dirección - 

 y luego 

la otra - 

.

Quite la puerta inferior. Ver la sección “CUIDADO Y 

LIMPIEZA DE LA ESTUFA” en el manual del usuario. 

Las patas frontales y traseras de nivelación se 

pueden ajustar en el lado inferior.
Use una llave inglesa abierta o ajustable para ajustar 

las patas de nivelación hasta que la estufa quede 

nivelada.

11. NIVELANDO LA ESTUFA

Nivel de agua

A

C

D

B

10. INSTALANDO EL DISPOSITIVO ANTI VOLCADURAS

La ménsula anti volcaduras viene con una plantilla de 

instalación.
Las instrucciones incluyen la información necesaria para 

completar la instalación.
Lea y siga la hoja de instrucciones de instalación de la 

estufa.

Ménsula 

Anti vo lcaduras

El tornillo debe  

entrar en madera o 

concreto

Placa de 

pared

INSTALE LA MÉNSULA USANDO LA HOJA DE 

INSTALACIÓN DE MÉNSULA


ADVERTENCIA


La estufa debe ser asegurada con un dispositivo 

anti volcaduras.

La estufa se puede volcar al estar parada, 

asentada o inclinada en una puerta abierta si la 

estufa o el dispositivo anti volcaduras no está 

instalado apropiadamente.

Después de instalar el dispositivo anti volcaduras, 

verifique que esté bien puesto al intentar con 

cuidado inclinar la estufa hacia adelante.

Esta estufa está diseñada para cumplir con todos 

los estándares de inclinación reconocidos en la 

industria en todas las condiciones normales.

La instalación del dispositivo anti volcaduras 

debe cumplir con todos los códigos locales para 

asegurar el aparato.

El uso de este dispositivo no impide la volcadura 

de la estufa cuando no está bien instalado.

Nivelador de pata

Elevar

estufa

Bajar

estufa

Summary of Contents for LDG3011ST

Page 1: ...MANUAL GAS DOUBLE OVEN RANGE LDG3017ST LDG3016ST LDG3015ST SB SW LDG3011ST LDG3037ST LDG3036ST LDG3035ST SB SW LDG3031ST Please read this guide thoroughly before installation www lge com ENGLISH ESPAÑOL MFL62177703 ...

Page 2: ...should follow You will find these precautions in the lmportant Safety Information section in your User s Guide Read them carefully IMPORTANT Save these instructions for local electrical inspector s use IMPORTANT Observe all governing codes and ordinances Note to Installer Leave these instructions with the appliance after installation is completed Note to Consumer Keep the User s Guide and Installa...

Page 3: ...t can kill or hurt you and others All safety messages will follow the safety alert symbol and either the word WARNING or CAUTION This symbol will alert you to hazards or unsafe practices which could cause bodily injury or property damage WARNING CAUTION READ ALL INSTRUCTIONS BEFORE INSTALLATION WHAT TO DO IF YOU SMELL GAS DO NOT try to light any appliance DO NOT touch any electrical switch DO NOT ...

Page 4: ...sheet metal not less than 0 0122 thick Install above the cooktop with a clearance of not less than 1 4 between the hood and the underside of the combustible material or metal cabinet The hood must be at least as wide as the appliance and centered over the appliance Clearance between the cooking surface and the ventilation hood surface MUST NEVER BE LESS THAN 24 INCHES EXCEPTION Installation of a l...

Page 5: ...ETTS Phillips screwdriver Flat blade screwdriver Pencil and ruler Pipe wrench 2 one for support Open end or adjustable wrench Level If a 30 clearance between cooking surface and overhead combustible material or metal cabinets cannot be maintained protect the underside of the cabinets above the cooktop with not less than 1 4 insulating millboard covered with sheet metal not less than 0 0122 thick C...

Page 6: ...range may be placed with 0 clearance flush at the back wall DIMENSIONS AND CLEARANCES DIMENSIONS Height Depth with door open Depth with door closed includes door handle INSTALLATION CLEARANCES Minimum to cabinets on either side of the range 18 5 30 30 5 36 1 4 13 0 Minimum clearance to left wall Minimum clearance to right wall Front edge of the range side panel forward from cabinet To cabinets bel...

Page 7: ...not be installed with a ventilation system that blows air downward toward the range This type of ventilation system may cause ignition and combustion problems with the gas cooking appliance resulting in personal injury or unintended operation When the floor covering ends at the front of the range the area that the range will be installed on should be built up with plywood to the same level or high...

Page 8: ... be between 10 and 13 of water column When checking for correct operation of the regulator the inlet pressure must be at least 1 more than the operating manifold pressure as given above The pressure regulator located at the inlet of the range must remain in the supply line regardless of which type of gas is being used A flexible metal appliance connector used to connect the range to the gas supply...

Page 9: ...ng to prevent damage Connect a flexible metal appliance connector to the adapter on the range Position range to permit connection at the shut off valve When all connections have been made be sure all range controls are in the off position and turn on the main gas supply valve Gas leaks may occur in your system and result in a dangerous situation Gas leaks may not be detected by smell alone Check a...

Page 10: ...by the consumer The National Electrical Code requires the use of GFCI s in kitchen receptacles installed to serve countertop surfaces Performance of the range will not be affected if operated on a GFCI protected circuit but occasional nuisance can occur DO NOT use an adapter plug because disconnecting of the power cord places undue strain on the adapter and leads to eventual failure of the adapter...

Page 11: ...ite within 4 seconds After burner ignites rotate knob out of the LITE position Try each burner in succession until all burners have been checked QUALITY OF FLAMES The combustion quality of burner flames needs to be confirmed visually A Yellow flames Call for service B Yellow tips on outer cones It is normal for LP gas C Soft blue flames It is normal for natural gas With LP gas some yellow tipping ...

Page 12: ... until the flame reaches the desired size 5 Replace the knob Note Hold the valve shaft with one hand while turning the screw for adjustment with the other 6 Test the flame stability Test 1 Turn the knob from HI to LO quickly If the flame goes out increase the flame size and test again Test 2 With the burner on a LO setting open and close the oven door quickly If the flame is extinguished by the ai...

Page 13: ...s closed 3 Press Start It may take between 30 and 90 seconds for the burner to start heating NOTE Do not try and light either the bake or broil burners during a power outage The range has an electrical ignition system and can not be used without power 8 CHECK OPERATION OF BAKE BROIL BURNERS The range comes from the factory with air shutters adjusted for proper air flow for natural gas If converted...

Page 14: ... with an installation template The instructions include necessary information to complete the installation Read and follow range installation instruction sheet Anti tip bracket Screw must enter wood or concrete Wall plate INSTALL THE BRACKET USING THE BRACKET INSTALLATION SHEET WARNING Range must be secured with an approved Anti Tip device The range could be tipped by standing sitting or leaning o...

Page 15: ...his range leaves the factory set for use with natural gas The conversion to LP gas must be performed by a qualified LP gas installer when converting to LP gas The conversion instructions and LP orifices can be found attached to the range on the back Keep these instructions and the orifices in case you want to convert back to natural gas CONVERTING TO LP GAS OR CONVERTING BACK TO NATURAL GAS FROM L...

Page 16: ...Memo ...

Page 17: ...NUAL DE INSTALACIÓN ESTUFA A GAS DE DOBLE HORNO LDG3017ST LDG3016ST LDG3015ST SB SW LDG3011ST LDG3037ST LDG3036ST LDG3035ST SB SW LDG3031ST Por favor lea esta guía completamente antes de la instalación www lge com ESPAÑOL ...

Page 18: ...auciones en la sección de Información importante de seguridad en su Guía del usuario Lea estas precauciones cuidadosamente IMPORTANTE Guarde estas instrucciones para uso del inspector de electricidad local IMPORTANTE Observe todos los códigos y ordenanzas regulatorias Nota para el instalador Deje estas instrucciones junto al aparato después de terminar la instalación Nota para el consumidor Guarde...

Page 19: ...ionar a usted y a otras personas Todos los mensajes de seguridad seguirán al símbolo de alerta de seguridad con la palabra ADVERTENCIA o PRECAUCIÓN Este símbolo le alertará sobre riesgos o prácticas inseguras que pueden causar lesiones corporales graves o daños en propiedad ADVERTENCIA PRECAUCIÓN LEA TODAS LAS INSTRUCCIONES ANTES DE LA INSTALACIÓN QUÉ HACER SI HUELE A GAS No intente encender ningú...

Page 20: ...ale arriba de la parrilla con un claro mínimo de 1 4 entre la campana y el lado inferior del gabinete metálico o material combustible La campana debe estar centrada y ser mínimo del mismo ancho que el aparato El claro entre la superficie para cocinar y la superficie de la campana NUNCA DEBE SER MENOR DE 24 PULGADAS EXCEPCIÓN La instalación de un horno de microondas o aparato de cocina arriba de la...

Page 21: ...E MASSACHUSETTS Desarmador Phillips Desarmador plano Pencil and ruler Llave para tubos 2 una para soporte Llave inglesa o ajustable Nivel En caso de no poder mantener un claro de 30 entre la superficie para cocinar y el gabinete metálico o material combustible arriba proteja el lado inferior del gabinete de arriba de la campana con una cartulina aislante de 1 4 mínimo cubierta con hoja metálica de...

Page 22: ...ede colocar con un claro de 0 al ras de la pared posterior DIMENSIONES Y CLAROS DIMENSIONES Altura Profundidad con puerta abierta Profundidad con puerta cerrada incluye manivela de la puerta CLAROS DE INSTALACIÓN Mínimo para gabinetes de cada lado de la estufa 18 5 30 30 5 36 1 4 13 0 Claro mínimo a la pared izquierda Claro mínimo a la pared derecha Borde frontal del lado de la estufa adelante del...

Page 23: ... con un sistema de ventilación que circule aire hacia la parte baja trasera de la estufa Este tipo de sistema de ventilación puede causar problemas de ignición y combustión en el equipo de gas pudiendo resultar en lesiones y funcionamiento inadecuado Cuando el revestimiento de piso termina al frente de la estufa el área donde la estufa va a ser instalada debe estar hecha de madera laminada al mism...

Page 24: ...a Al verificar que el regulador funcione correctamente la presión de la toma debe ser de al menos 1 mayor a la presión operativa distribuidor arriba indicada El regulador de presión ubicado en la toma de la estufa debe permanecer en la línea de suministro independientemente del tipo de gas utilizado Un conector metálico flexible de aparato usado para conectar la estufa a la línea de suministro de ...

Page 25: ... para evitar daños Conecte un conector metálico flexible de aparato al adaptador en la estufa Coloque la estufa de manera que permita la conexión con la válvula de cierre Al realizar todas las conexiones asegúrese que los controles de la estufa estén en posición de apagado y luego abra la válvula de suministro de gas principal Puede haber fugas de gas en su sistema y resultar en una situación de r...

Page 26: ...reajustarse manualmente por el usuario El Código Eléctrico Nacional requiere el uso de GFCI en tomacorrientes de cocina instalados para servicio a superficies de mostradores El desempeño de la estufa no se ve afectado si funciona con un circuito protegido por GFCI pero pueden causar molestias ocasionales No use un enchufe adaptador porque al desconectar el cable de energía pone una tensión indebid...

Page 27: ...el quemador gire la perilla fuera de la posición LITE Intente con cada quemador sucesivamente hasta verificar todos los quemadores CALIDAD DE LAS FLAMAS La calidad de la bombustión de las Ilamas del quemador precisa determinarse visualmente A Llamas amarillas Solicite servicio B Puntas amarillas en los conos exteriores Es normal en gas LP C Llamas azules claras Es normal en gas natural Con gas LP ...

Page 28: ...o deseado 5 Vuelva a poner la perilla Nota Sostenga el eje de la válvula con una mano mientras gira el tornillo para ajustarlo con la otra mano 6 Pruebe la estabilidad de la flama Prueba 1 Gire la perilla de la posición HI hacia LO rápidamente Si la llama se apaga aumente el tamaño de la flama y haga la prueba nuevamente Prueba 2 con el quemador en posición LO abra y cierre la puerta del horno ráp...

Page 29: ...t iniciar Puede tomar entre 30 y 90 segundos para que el quemador comience a calentar NOTA No intente encender los quemadores de hornear o de asar durante una falla de energía eléctrica La estufa tiene un sistema de encendido eléctrico y no se puede usar sin energía eléctrica 8 VERIFIQUE LA OPERACIÓN DE LOS QUEMADORES DE HORNEADO ASADO La estufa viene de fábrica con compuertas de aire ajustadas pa...

Page 30: ...ncluyen la información necesaria para completar la instalación Lea y siga la hoja de instrucciones de instalación de la estufa Ménsula Anti vo lcaduras El tornillo debe entrar en madera o concreto Placa de pared INSTALE LA MÉNSULA USANDO LA HOJA DE INSTALACIÓN DE MÉNSULA ADVERTENCIA La estufa debe ser asegurada con un dispositivo anti volcaduras La estufa se puede volcar al estar parada asentada o...

Page 31: ... está ajustada de fábrica para usarla con gas natural La conversión a gas LP debe ser realizada por un técnico calificado en gas LP al momento de convertirla a gas LP Las instrucciones de conversión y orificios para gas LP se pueden encontrar adjuntas a la estufa en el lado posterior Conserve estas instrucciones y los orificios en caso que desee convertir de nuevo a gas natural CONVERTIENDO A GAS ...

Page 32: ...Printed in Mexico www lg com Register your product Online LG Customer Information Center 1 800 243 0000 1 888 865 3026 1 888 542 2623 USA Consumer User USA Commercial User CANADA ...

Reviews: