background image

RDS Function - OPTIONAL

12

About RDS

This unit is equipped with RDS (Radio Data System),
which brings a wide range of information from FM radio.
RDS is a system for transmitting station call signs or
network information, a description of station programme
type text message about the station or specifics of
musical selection and the correct time. 

RDS Tuning

When a FM station containing RDS data is tuned in, 
the unit will automatically display the station’s call sign
and the RDS indicator will light in the Display Window 
as well as indicators for the programme type recognition
(PTY), Radio Text (RT), Clock Time (CT) and RDS 
services programme (PS) if transmitted by the station.

RDS Display Options

The RDS system is capable of transmitting a wide 
variety of information in addition to the initial call sign
that appears when a station is first tuned. In normal
RDS operation the display will indicate the station
name, broadcast network or call letters. Pressing 

RDS

on the front panel enables you to cycle through the vari-
ous data types in the sequence:

(FREQUENCY

t

PTY

t

RT 

t

CT 

t

PS)

PTY (Programme type recognition)-

The pro-

gramme type is shown on the display window.

RT (Radio text recognition)-

The radio station’s

name is displayed on the display window.

CT (Time controlled by the channel)-

Enable the

unit to receive the actual time and show it on the 
display window.

PS (Programme Service  name)-

The programme

title is displayed on the display window.

ote 

Some RDS stations may not choose to include some of
these additional features. If the data required for the
selected mode is not being transmitted, the Display
Window will show a 

PTY NONE, RT NONE, CT NONE,

PS NONE

message.

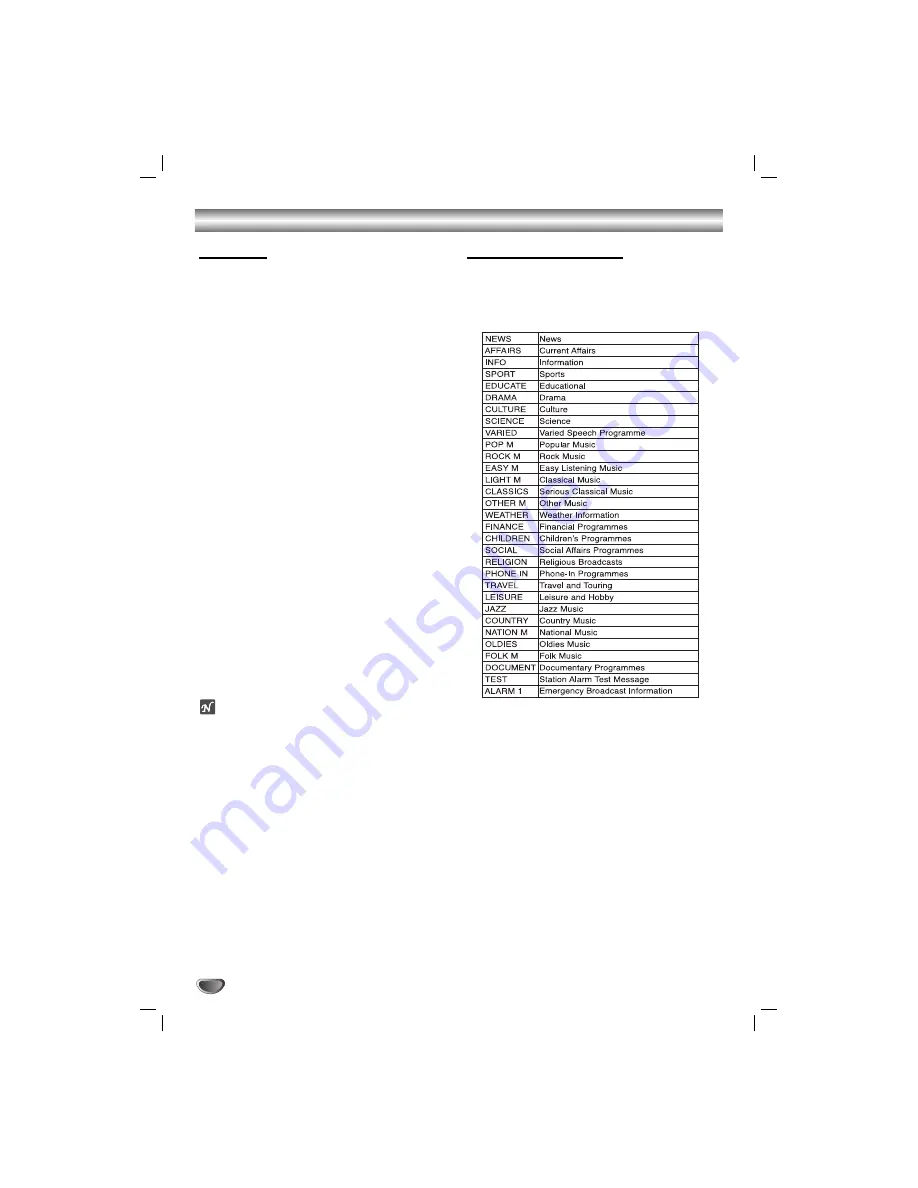
Programme Search (PTY)

A major benefit of RDS is its ability to encode broad-
casts with Programme Type (PTY) codes that indicate
the type of material being broadcast. The following list
shows the abbreviations used to indicate each PTY
along with an explanation of the PTY.

You may search for a specific Programme Type (PTY)
by following these steps:

11

Press TUNER (or FUNCTION) to select FM
mode.

2

2

Press the RDS to select PTY mode.

3

3

Select a desired station by pressing 
TUNING UP/ DOWN buttons.

When the RDS transmission is received, the 
display shows the program service name (PS) after
RDS indicator appears.

4

4

To search for a different PTY, press the PRESET
UP/DOWN buttons while the last PTY in use is
still displayed to scroll through the list of 
available PTY types.

5

5

When the PTY is selected, pressing 
TUNING UP/ DOWN buttons within 5 seconds.

The unit will go into an automatic search mode and
attempt to find the next station with acceptable 
signal strength that matches the desired PTY type.

Summary of Contents for LM-U360

Page 1: ...bject to change without notice for improvement ALMATY_LM U1560 U1060 U560 U365 U360_ENG_MFL35767806 MINI HI FI System OWNER S MANUAL MODEL LM U1560 LM U1560A D X LMS U1560W LMS U1560 LM U1060 LM U1060A D X LMS U1060 LM U560 LM U560A D X LMS U560 LM U365 LM U365A D X LMS U365 LM U360 LM U360A D X LMS U360 CD R RW CD R RW USB ...

Page 2: ...ppliance and has no additional outlets or branch circuits Check the specification page of this owner s manual to be certain Do not overload wall outlets Overloaded wall outlets loose or damaged wall outlets extension cords frayed power cords or damaged or cracked wire insulation are dangerous Any of these conditions could result in electric shock or fire Periodically examine the cord of your appli...

Page 3: ...adio 13 Operation with TAPE 14 Basic Playback 14 To Stop Play 14 To Play Rewind or Fast Forward 14 Dubbing 14 Recording 14 Basic Setting 14 Recording from Radio CD or Auxiliary source 14 CD to Tape Synchronized Recording 14 CD Playback 15 16 Basic Playback 15 To Pause Play 15 To Stop Play 15 To Skip a Track 15 To Search a Track 15 To Go to the next discs 15 To Select a disc directly 15 To Replace ...

Page 4: ...ight or sources of heat or leave it in a parked car exposed to direct sunlight as there may be a considerable temperature increase inside the car Cleaning discs Fingerprints and dust on the disc can cause sound dis tortion Before playing clean the disc with a clean cloth Wipe the disc from the center out Do not use strong solvents such as alcohol benzine thinner commercially available cleaners or ...

Page 5: ...MEMO button STEREO MONO ST MONO HIGH DUBBING HI DUBB button CD SYNCHRO RECORDING CD SYNC NORMAL DUBBING NOR DUBB button SET CD RDS OPTIONAL button XDSS plus button XTS Pro button EQ master button VOLUME CONTROL KNOB DISC SELECT buttons DISC1 DISC2 DISC3 DISC SKIP button FRONT R 4 FRONT L 4 AUXIN 1 3 4 5 6 7 8 9 10 11 12 2 14 16 15 13 WOOFER 3 FRONT R 4 FRONT L 4 AUXIN 9 TUNER function button TAPE ...

Page 6: ...ns FORWARD PLAY B B button REVERSE PLAY b b button OPTIONAL FAST FORWARD M M button REWIND m m button TAPE 1 2 SELECT buttons RECORD RECORD PAUSE z z button TAPE STOP x x button 8 NUMBER buttons 9 MP3 file information display INFO button 10 EQ master button XDSS plus button XTS Pro button RANDOM button 11 PROGRAM MEMO button 12 SLEEP button 13 VOLUME CONTROL button 14 USB button FUNCTION button 15...

Page 7: ...ent You can use VCR or other unit connected to the AUX connector This unit receives the analog signal from auxiliary equipment AUXIN WOOFER 3 FRONT R 4 FRONT L 4 To AUDIO IN VIDEO OUT IN AUDIO L AUDIO R To AUDIO OUT VCR or Auxiliary Device etc 1 1 Connect a VCR or auxiliary device etc to the AUX connector 2 2 Press the AUX button on the front panel or FUNCTION button on the remote control until th...

Page 8: ...ound adjust the speaker parameters distance level etc otes Be sure to match the speaker cord to the appropriate terminal on the components to and to If the cords are reversed the sound will be distorted and will lack base If you use front speakers with low maximum input rating adjust the volume carefully to avoid excessive output on the speakers Connect the Front Left Right speaker correctly If it...

Page 9: ...inutes 2 2 Each time you press SLEEP the setting changes in the following order SLEEP 180 150 120 90 80 70 60 50 40 30 20 10 OFF No display SLEEP 180 3 3 To check the remaining time until the power is turned off While the sleep function is active press SLEEP briefly The time remaining until the unit turns off is displayed for about 5 seconds ote If you press SLEEP while the sleep time is displayed...

Page 10: ...ars 2 When you select CD USB or TAPE function ON TIME indicator appears for about 0 5 seconds in the display window and then disappears 5 5 Set the hour to switch on by turning MULTI JOG on the front panel 6 6 Press SET CD to confirm the turn on hour time 7 7 Set the minute to switch on by turning MULTI JOG on the front panel 8 8 Press SET CD to confirm the turn on min utes time OFF TIME indicator...

Page 11: ... the front panel DEMO Press DEMO in power off state to demonstrate the function in the display window To cancel press POWER STANDBY ON or DEMO again XDSS plus Extreme Dynamic Sound System You can improve the sound quality during playback Press XDSS plus repeatedly on the remote control NORMAL y XDSS ON NORMAL XDSS ON MP3 OPT ON MUTE Press MUTE to mute your unit You can mute your unit in order for ...

Page 12: ...e display window CT Time controlled by the channel Enable the unit to receive the actual time and show it on the display window PS Programme Service name The programme title is displayed on the display window ote Some RDS stations may not choose to include some of these additional features If the data required for the selected mode is not being transmitted the Display Window will show a PTY NONE R...

Page 13: ... will appear in the display window for a moment and then a preset number will blink To change the preset number follow the steps 4 5 To recall presets Press and hold PRESET UP DOWN buttons on the front panel or PRESET FOLDER on the remote control until the desired preset number appears or press it repeatedly Listening to the radio 1 1 Press FUNCTION on the remote control to show either FM or AM in...

Page 14: ...n After the cassette of TAPE 1 or 2 plays front or reverse backward play side stops automatically After the cassette of TAPE 1 or 2 plays front and reverse side stops automatically After the cassette of TAPE 1 or 2 plays six times repeatedly front and reverse side stops automatically Recording Basic Setting 1 1 Select a function you want to record except tape function 2 2 Open the cassette deck TA...

Page 15: ...ront panel and then press once more at the point you want or hold the m m M M buttons on the remote control during playback then release at the point you want ote This function is not available to play a MP3 WMA file To Go to the next discs Press DISC SKIP on the front panel or D SKIP on the remote control during playing or stopping To Select a disc directly Press DISC 1 DISC 2 or DISC 3 during pl...

Page 16: ...the tracks on the discs and create your own program The program can contain up to 20 tracks 1 1 Press PROG MEMO on the front panel or PROGRAM MEMO on the remote control in the stop mode 2 2 Press DISC SKIP or DISC DIRECT PLAY DISC1 2 3 on the front panel or D SKIP on the remote control to select the disc 3 3 Press CD SKIP SEARCH MULTI JOG on the front panel or m m M M on the remote control to sele...

Page 17: ...3 player or memory card Press D SKIP on the remote control during playing or stop ping otes Don t remove a MP3 player or memory card while playing the USB Don t add or remove the memory card when playing the USB by using a multi card reader Numbers of file available are maximum 999 EA Be sure to save file in the memory card after formatting No cladding hard disc is supported The MP3 player requiri...

Page 18: ...m Remove the obstacle Replace the batteries with new ones About MP3 An MP3 file is audio data compressed by using the MPEG1 audio layer 3 file coding scheme We call files that have the mp3 file extension MP3 files The unit can not read an MP3 file that has not mp3 file extension About WMA An WMA file is a Microsoft audio compression technology WMA Windows Media Audio offers double the audio compre...

Page 19: ...r consumption Refer to the back panel of the unit Net Weight 6 2 kg External dimensions W x H x D 273 x 321x 359 mm Frequency response 40 20000 Hz Signal to noise ratio 75 dB Dynamic range 75 dB Tuning Range 87 5 108 0 MHz or 65 74 MHz 87 5 108 0 MHz Intermediate Frequency 10 7 MHz Signal to Noise Ratio 60 55 dB Frequency Response 50 10000 Hz Tuning Range 522 1620 kHz or 520 1720 kHz Intermediate ...

Page 20: ...P NO MFL35767806 ...

Reviews: