17
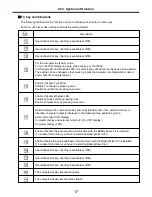
Fn key combinations
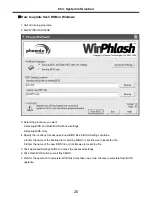
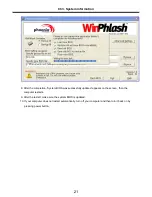
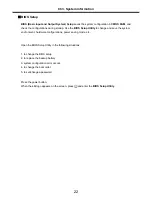
The following table shows the function of each combination of Fn with a function key.
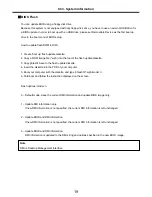
Function of Fn keys has nothing to do with Operating System.
User-defined Hot key. (Setting is available at OSD)
Enable / Disable Wireless LAN.
Disable Wireless LAN by pressing once.
Enable Wireless LAN by pressing once more.
The computer display becomes less bright.
The computer display becomes brighter.
User-defined Hot key. (Setting is available at OSD)
User-defined Hot key. (Setting is available at OSD)
Enable Disable the auto brightness control function with the Battery Miser if it is installed.
(To enable this function, you have to install the Battery Miser first.)
Enable / Disable the auto sound control function with the Battery Miser if it is installed.
(To enable this function, you have to install the Battery Miser first.)
Switch between the computer display and an external monitor. If an external monitor is
attached, computer output is displayed in the following three patterns by turns:
External monitor (CRT display)
Computer display and external monitor (LCD + CRT display)
Computer display (LCD)
Enable / Disable TouchPad.
Disable TouchPad by pressing once.
Enable TouchPad by pressing once more.
Put the computer in standby mode.
To turn the LCD display on again, press any key or TouchPad.
(In Windows XP and Windows 2000, this combination of buttons functions as a sleep button.
The setting can be changed so that pressing it puts the computer into hibernation mode or
even shuts the computer down.)
User-defined Hot key. (Setting is available at OSD)
User-defined Hot key. (Setting is available at OSD)
User-defined Hot key. (Setting is available at OSD)
Description
+
Ch3. System information
Summary of Contents for LM40
Page 1: ...0 Service Manual LM40 50 LG Electronics ...
Page 16: ...15 Model Configuration Ch3 System information ...
Page 17: ...16 System Block Diagram Ch3 System information ...
Page 56: ...55 3 Disconnect the keyboard connector Ch5 Removing and replacing a part ...
Page 59: ...58 Ch5 Removing and replacing a part ...
Page 79: ...78 8 Hold M B with your both hand and pull it up to remove Ch5 Removing and replacing a part ...
Page 88: ...87 6 Remove LCD from the LCD rear panel Ch5 Removing and replacing a part ...
Page 107: ...MKD01 MKM33 MKM31 ODD MKM32 MKD04 MKM39 MKD03 106 ...
Page 109: ...108 MKC08 MKM08 MKM32 MKM30 MKM09 MKM10 MKM11 MKM32 MKM06 15 0 MKM07 14 1 MKM30 ...
Page 112: ...111 MKC06 MKM05 MKM30 MKM28 MKM33 MKM33 MKM33 MKM34 MKM33 MKM19 MKM30 MKC01 MKC11 MKC13 ...


