background image

ELECTRIC RANGE

OWNER'S MANUAL & COOKING GUIDE

PLEASE READ THIS OWNER'S MANUAL THOROUGHLY BEFORE OPERATING.

LRE30755SW/SB/ST

Printed in Korea

P/NO.:3828W5A8237

Website: http://www.us.lge.com

Summary of Contents for LRE30755SB - 30in Electric Range

Page 1: ...ELECTRIC RANGE OWNER S MANUAL COOKING GUIDE PLEASE READ THIS OWNER S MANUAL THOROUGHLY BEFORE OPERATING LRE30755SW SB ST Printed in Korea P NO 3828W5A8237 Website http www us lge com ...

Page 2: ...ence We also suggest that you record the details of any contact with LG LG Electronics USA Inc concerning this unit Staple your receipt here to verify your retail purchase Model No Serial No Dealer Dealer Phone No Customer Relations LG Electronics U S A Inc Service Division Bldg 3 201 James Record Rd Huntsville AL 35824 0126 Thank you for purchasing an LG electric oven Setting bake 17 Setting time...

Page 3: ...torage in or on Appliance Flammable materials should not be stored in an oven or near surface units Be sure all packing materials are removed from the appliance before operating it Keep plastics clothes and paper away from parts of the appliance that may become hot Wear Proper Apparel Loose fitting or hanging garments should never be worn while using the appliance Do Not Use Water on Grease Fires ...

Page 4: ...h they are dark in color Interior surfaces of an oven become hot enough to cause burns During and after use do not touch or let clothing or other flammable materials contact heating elements or interior surfaces of oven until they have had sufficient time to cool Other surfaces of the appliance may become hot enough to cause burns Among these surfaces are oven vent openings and surfaces near these...

Page 5: ...uld not be allowed to accumulate on hood or filter When flaming foods under the hood turn the fan on GLASS CERAMIC COOKING SURFACES DO NOT TOUCH SURFACE UNITS OR AREAS NEAR UNITS Surface units may be hot even though they are dark in color Areas near surface units may become hot enough to cause burns During and after use do not touch or let clothing or other flammable materials contact surface unit...

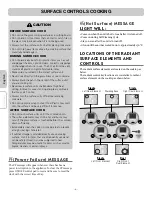
Page 6: ...astic items such as salt and pepper shakers spoon holders or plastic wrappings on the range when it is in use The hot air from the vent could melt plastics or ignite flammable items Make sure you turned on the correct surface unit Never cook directly on the glass Always use cookware Always place the pan in the center of the surface unit you are cooking on Never leave surface units unattended at hi...

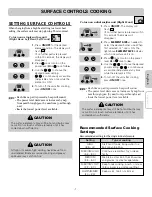
Page 7: ... the unit after cooking press ON OFF once To turn on a dual surface unit Right Front Recommended Surface Cooking Settings Recommended setting for the single dual elements Each time a pad is pressed a beep will sound The power level decreases or increases by 0 5 from 9 0 through 3 0 by 0 2 from 3 0 through 1 0 Lo is the lowest power level available Note Each time a pad is pressed a beep will sound ...

Page 8: ...ratches To prevent scratching or damaging to the glass ceramic top do not leave sugar salt or fats on the cooking area Wipe the cooktop surface with a clean cloth or paper towel before using Do not slide heavy metal pans across the surface since these may scratch To Prevent Stains Do not use a soiled dish cloth or sponge to clean the cooktop surface A film will remain which may cause stains on the...

Page 9: ...ke and odor the first few times the cooktop is used This is normal Smoothtop cooktops retain heat for a period of time after the elements are turned off Turn the elements off a few minutes before food is completely cooked and use the retained heat to complete cooking When the hot surface light turns off the cooking area will cool down enough to touch Because of the way they retain heat the smootht...

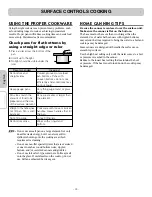
Page 10: ...or ruler 1 Place a ruler across the bottom of the pan 2 Hold it up to the light 3 No light should be visible under the ruler Do not use a small pan on a large element Not only does this waste energy but it can also result in spillovers burning onto the cooking area which requires extra cleaning Do not use non flat specialty items that are oversized or uneven such as round bottom woks rippled botto...

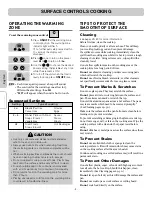
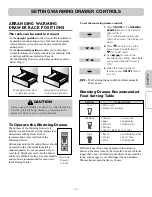
Page 11: ...food may be placed in the warming drawer at the same time For best results do not hold foods longer than 1 hour For smaller quantities or heat sensitive foods such as eggs do not hold longer than 30 minutes The maximum operating time is 3 hours 1 Press ON OFF at the WARMING DRAWER position The indicator light will flash If no further pads are pressed within 25 seconds the display will clear 2 Pres...

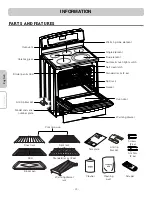
Page 12: ... plate Roast rack Grid Broiler pan Split rack Standard racks 2 ea Warming drawer rack Common use Warming drawer Oven door Gasket Split rack Standard racks 2 ea Self clean latch Automatic oven light switch Dual element Single element Warming zone element Template Cleaner Cleaning pad Scraper Screws 2 ea Anchors 2 ea Anti tip bracket ...

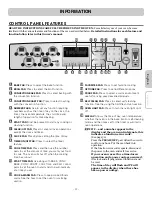
Page 13: ...o set any function requiring numbers such as the time of day on the clock the timer the oven temperature the start time and length of operation for timed baking START PAD Must be pressed to start any cooking or cleaning function CLEAR OFF PAD Press to cancel all oven operations except the clock and timer CLOCK PAD Press before setting the time of day TIMER ON OFF PAD Press to select the timer feat...

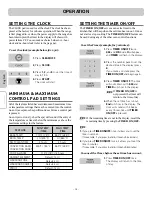
Page 14: ...time will count down with 5 00 and TIMER will show in the display 4 When the set time has run out End will show in the display The clock will sound with 3 beeps every 15 seconds until TIMER ON OFF is pressed 1 Press TIMER ON OFF once The display will return to the time of day To set the Timer example for 5 minutes To cancel the Timer before the set time has run out SETTING THE TIMER ON OFF The TIM...

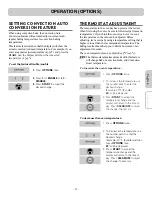
Page 15: ...e 20 F 2 and 0 20 will be displayed 3 Press START to accept the temperature change and the display will return to the time of day Press CLEAR OFF to reject the change if necessary To increase the oven temperature 1 Press OPTIONS twice 2 To decrease the temperature use the number pads to enter the desired change Example 20 F 2 and 0 and then press OPTIONS once 20 will be displayed 3 Press START to ...

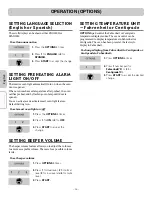
Page 16: ...t end by flashing oven lamp until door is opened You can activate or deactivate smart oven light feature Default Setting is on 1 Press the OPTIONS 3 times 2 Press 1 for ENGLISH or 2 for SPANISH 3 Press START to accept the change To set language option SETTING LANGUAGE SELECTION English or Spanish The scroll display can be shown either ENGLISH or SPANISH 1 Press OPTIONS 6 times 2 Press 1 number pad...

Page 17: ...rge roaster on the lower rack The removable section of the Split Rack can be used as a roasting rack in the broiling pan Be careful when removing cooked food from the split rack to avoid burns To remove racks 1 Pull the rack straight out until it stops 2 Lift up the front of the rack and pull it out To replace racks 1 Place the end of the rack on the support 2 Tilt the front end up and push the ra...

Page 18: ...mmediately and cook for a selected length of time At the end of the cooking time the oven will turn off automatically 1 END OF CYCLE and the time of day will show in the display The oven will shut off automatically 2 The control will continue to beep 3 times every minute until CLEAR OFF is pressed Use caution with the TIMED BAKE or DELAYED TIMED BAKE features Use the automatic timer when cooking c...

Page 19: ...8 Press START At the set time a short beep will sound The oven will begin to Bake When the oven has reached the desired temperature a long beep will sound 5 times and oven lamp will flash The display will show 300 and BAKE To program the oven for a Delay Start and to shut off automatically example for baking at 300 F for 30 minutes and starting at 4 30 SETTING DELAYED TIMED BAKE The BAKE COOK TIME...

Page 20: ...h before browning Pan frying is recommended Slash fat Broil skin side down first Cut through back of shell Spread open Brush with melted butter before broiling and after half of broiling time Handle and turn very carefully Brush with lemon butter before and during cooking if desired Increase time 5 to 10 minutes per side for 11 2 thick or home cured ham Slash fat Slash fat Grease pan Brush steaks ...

Page 21: ...on the amount and type of food to be cooked Cookies and biscuits should be baked on pans with no sides or very low sides to allow heated air to circulate around the food Food baked on pans with a dark finish will cook faster When using Convection Bake with a single rack place oven rack in position D If cooking on multiple racks place the oven racks in positions B and D for 2 racks Place in positio...

Page 22: ...he convection fan and element to roast meats and poultry Preheating is not necessary for meats and poultry Heated air circulates around the food from all sides sealing in juices and flavors Foods are crispy brown on the outside while staying moist on the inside Convection Roast is especially good for large tender cuts of meat uncovered Press CLEAR OFF to cancel this mode at any time OPERATION To p...

Page 23: ...set Cook Warm feature after timed cooking 1 Place the food in the oven 2 Press FAVORITES once for Bread twice for Meat and 3 times for Chicken Default temperature will appear and COOK will flash 3 Press the number pads to set the desired oven temperature within 25 seconds This temperature will be stored and be recalled from next times 4 Press START A long beep will sound 3 times when the temperatu...

Page 24: ...HT pad 1 Press and hold START for 3 seconds 2 2 beeps will sound LOCKING will appear DOOR LOCKED will flash in the display Once the oven door is locked the DOOR LOCKED indicator will stop flashing and remain on along with the lock icon light To activate the Oven Lockout feature 1 Press and hold START for 3 seconds A beep will sound 2 times The DOOR LOCKED will continue to flash until the oven door...

Page 25: ...ll ventilated to get rid of normal odors associated with cleaning Before a Self Clean Cycle We recommend venting your kitchen with an open window or using a ventilation fan or hood during the first self clean cycle Remove the oven racks broiler pan broiler grid all cookware and any aluminum foil from the oven Wipe up heavy soil on the oven bottom Do hand clean door Don t hand clean oven door gaske...

Page 26: ...ive smoke or fire in the oven Stopping or Interrupting a Self Clean cycle IMPORTANT NOTES when using the Self Clean feature A Self Clean cycle cannot be started if Oven Lockout feature is active If your clock is set for normal 12 hours display mode the Delayed Self Clean can never be set to start more than 12 hours in advance To set for a delayed Self Clean cycle 12 24 hours in advance see page 24...

Page 27: ... to the front of the chassis glide 3 Align the glide on each side of the drawer with the glide slots on the range 4 Push the drawer into the range until levers click approximately 2 inches Pull the drawer open again to seat bearing glides into position If you do not hear the levers click or the bearing glides do not feel seated remove the drawer and repeat steps 2 4 This will minimize possible dam...

Page 28: ...ling remove the broiler pan from the oven Remove the grid from the pan Carefully pour out the grease from the pan into a proper container Wash and rinse the broiler pan and grid in hot water with a soap filled or plastic scouring pad If food has burned on sprinkle the grid with cleaner while hot and cover with wet paper towels or a dishcloth Soaking the pan will remove burned on foods Both the bro...

Page 29: ...leaner or included cleaner This helps protect the top and makes cleanup easier 2 Daily use of Ceramic Cooktop Cleaner or included cleaner will help keep the cooktop looking new 3 Shake the cleaning cream well Apply a few drops of Cleaner directly to the cooktop 4 Use a paper towel or Cleaning Pad for Ceramic Cooktops to clean the entire cooktop surface 5 Use a dry cloth or paper towel to remove al...

Page 30: ...re heating again or the discoloration may be permanent Cooktop Seal To clean the cooktop seal around the edges of the glass lay a wet cloth on it for a few minutes then wipe clean with nonabrasive cleaners Glass surface potential for permanent damage Sugary spillovers such as jellies fudge candy syrups or melted plastics can cause pitting of the surface of your cooktop not covered by the warranty ...

Page 31: ...ated into the bottom of the slot Step 3 Open the door fully If the door will not open fully the indentation is not seated correctly in the bottom edge of the slot Step 4 Push the hinge locks up against the front frame of the oven cavity to the locked position Step 5 Close the oven door DOOR CARE INSTRUCTIONS Most oven doors contain glass that can break Read the following recommendations 1 Do not c...

Page 32: ... Replace the fuse or reset the circuit breaker Cooktop controls improperly set Check to see the correct control is set for the surface unit you are using This is normal The unit is still on and hot Food spillovers not cleaned before next use See Cleaning the glass cooktop section Hot surface on a model with a light colored cooktop This is normal The surface may appear discolored when it is hot Thi...

Page 33: ...oo close to the element Reposition the rack to provide proper clearance between the meat and the element Preheat broil element for searing Meat not properly prepared Remove excess fat from meat Cut remaining fatty edges to prevent curling but do not cut into lean Insert on broiler pan wrong side up and grease not draining Always place grid on the broiler pan with ribs up and slots down to allow gr...

Page 34: ...INTENANC section page 29 Mineral deposits from water and food Remove using a ceramic glass cooktop cleaning creme Use cookware with clean dry bottoms The oven temperature is too high to set a self clean operation Allow the range to cool and reset the controls Oven controls improperly set See the using the self cleaning oven section A Self Clean cycle cannot be started if Oven Lockout feature is ac...

Page 35: ... amount of visible steam will increase This is normal This is normal in a new oven and will disappear in time To speed the process set a self clean cycle for a minimum of 3 hours See the Self Clean section page 25 A convection fan may automatically turn on and off This is normal The shiny silver colored racks were cleaned in a self clean cycle Apply a small amount of vegetable oil to a paper towel...

Page 36: ...s to parts or systems resulting from unauthorized modifications made to the appliance 7 Replacement parts or repair labor costs for units operated outside the united states 8 Any labor costs during the limited warranty period This warranty is extended to the original purchaser and any subsequent owner for products purchased for home use within the USA In Alaska the warranty excludes the cost of sh...

Reviews: