7-0
FAILURE CODES
“F” (Failure) DISPLAY CODES
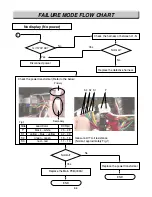
Before doing any action, perform the following step1~3.
Step1.
Unplug range or disconnect power.
Step2.
Check if connector is fully seated or not.
Note:
All units in the first few days of use should be
checked for mis-wiring or loose connections.
WARNING
• Disconnect power supply cord from the outlet
before servicing
• Replace all panels and parts before operating.
• Reconnect all grounding devices
Failure to do so can result in death or electrical
shock
!
DISPLAY
SHOWS
CAUSE
CORRECTIVE ACTION
A. Perform step 1 through 2 above
B. Replace keypad or keypad assembly
(if F code recur, go to C after unplugging
or disconnecting)
C. Replace Control (PCB) assembly
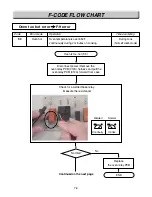
A. Perform step 1 through 2 above
B. Check wire and connections from control to latch
C. If motor operate, check integrity of latch mechanism
- check the micro-switch (refer to
component test section)
- check integrity of door locking mechanism
D. If motor didn’t operate, check continuity of
the latch motor and electrical connections
- if the wiring is bad, replace the harness
- if the wiring is good, replace the door
motor assembly
- if F code recur, replace control
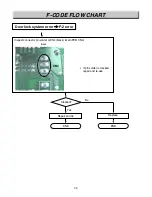
A. Perform step 1 through 2 above
B. Open the back panel and check continuity of
the sensor and Control (PCB)
C. Disconnect sensor from harness
D. - Measure
Ω
value between connector pins :
Approximately 1090
Ω
(at room temperature:
77F/25°C)
- Measure value between sensor chassis
and any connector pins
:
Ω
value should read OPEN
=> if there is any problem, Replace oven sensor
E. If you couldn’t find any problem, Replace
Control (PCB)
A. Perform step 1 through 2 above
B. Open the back panel and check continuity
of the sensor and Control (PCB)
C. Disconnect sensor from harness
D.- Measure
Ω
value between connector pins
:Approximately 50k
Ω
(at room temperature
77F/25°C)
- Measure value between sensor chassis
and any connector pins
:
Ω
value should read OPEN
=> if there is any problem, Replace
warming drawer sensor
E. If you couldn’t find any problem, Replace
Control(PCB)
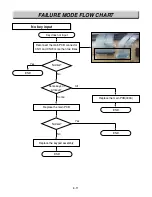
Key held
down too
long or
shorted
key
Door
Locking
system
don’t
operate
Main oven
Sensor
opened
Main oven
Sensor
shorted
Warming
drawer
Sensor
shorted
Warming
drawer
Sensor
open
F1
F2
F3
F4
F5
F6
DISPLAY
SHOWS
CAUSE
CORRECTIVE ACTION
A. Perform step 1 through 2 above
B. Open the back panel and check continuity of the
sensor, heater (bake, broil) and Control(PCB)
C. Check the bake and broil heater(refer to
component test)
D. Disconnect sensor from harness
- Measure
Ω
value between connector
pins of oven sensor
- Measure
Ω
value between sensor
chassis and any connector pins
:
Ω
value should read OPEN
=> if there is any problem, Replace oven sensor
E. If you couldn’t find any problem, Replace
Control(PCB)
A. Perform step 1 through 2 above
B. Open the back panel and Disconnect
sensor from harness
- Measure
Ω
value between connector pins
:approximately 1090
Ω
(at room temperature
:77F/25°C)
=> if there is any problem, Replace oven sensor
C. Check the bake and broil relay (refer to the strip
circuit section) STRIP CIRCUITS
D. If there is any problem, Replace Control (PCB)
Main oven
heating
error
Oven is
too hot;
Bad oven
sensor;
Bad
control
(PCB)
F7
F9

