background image

OPERATING INSTRUCTIONS

25

ENGLISH

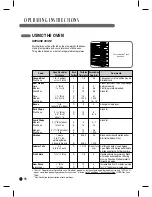
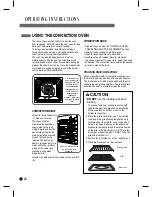
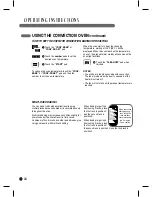
USING THE CONVECTION OVEN

(continued)

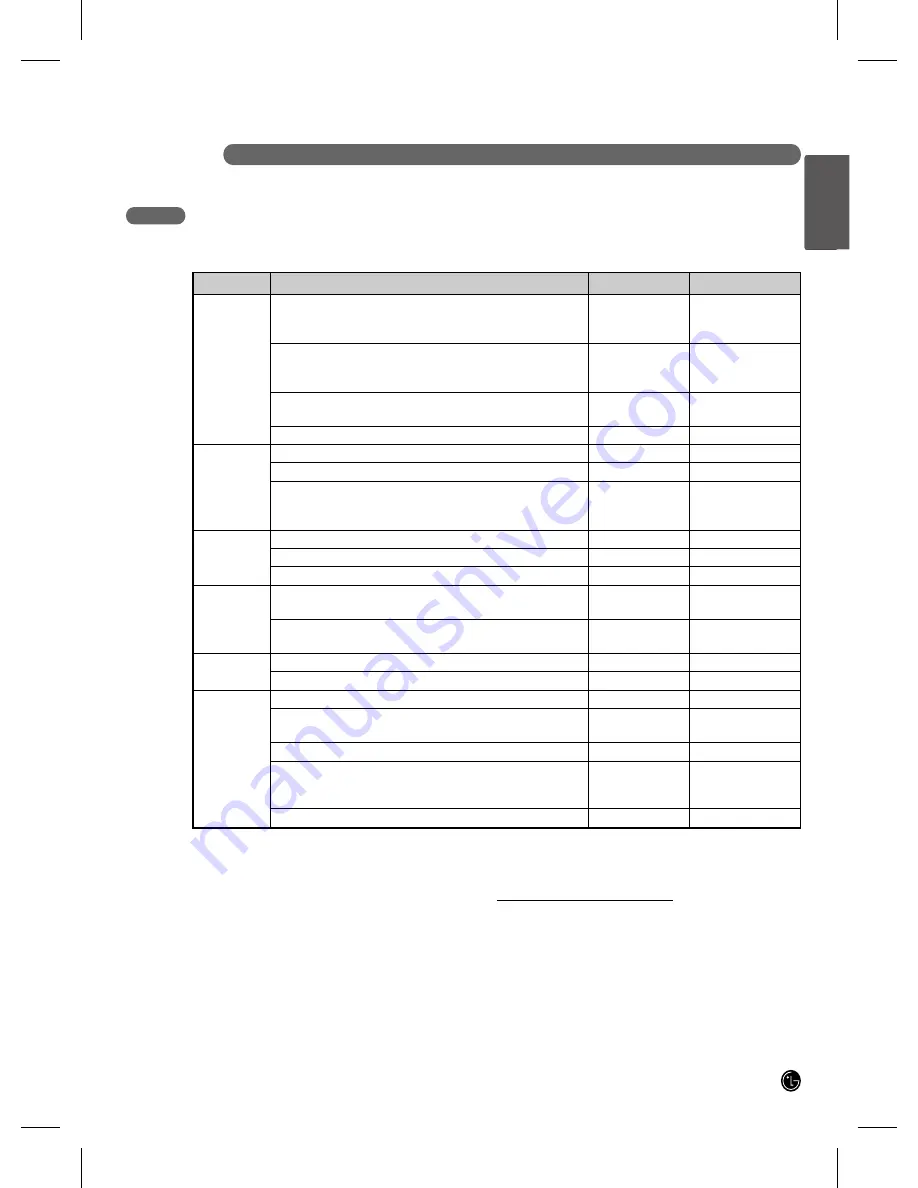
CONVECTION ROASTNG CHART

Meats

Minutes/Lb.

Oven Temp.

Beef

Pork

Ham

Lamb

Seafood

Poultry

Rib (3 to 5 lbs.)

Rare 

Medium 

Well

Boneless Rib, Top Sirloin

Rare 

Medium

Well

Beef Tenderloin

Rare 

Medium

Pot Roast (2

1

2

to 3 lbs.) chuck, rump

Bone-in (3 to 5 lbs.)
Boneless (3 to 5 lbs.)
Pork Chops (

1

2

to 1” thick)

2 chops

4 chops

6 chops

Canned (3 lbs. fully cooked)
Butt (5 lbs. fully cooked)
Shank (5 lbs. fully cooked)
Bone-in (3 to 5 lbs.)

Medium

Well

Boneless (3 to 5 lbs.)

Medium

Well

Fish, whole (3 to 5 lbs.)
Lobster Tails (6 to 8 oz. each)
Whole Chicken (2

1

2

to 3

1

2

lbs.)

Cornish Hens Unstuffed (1 to 1

1

2

lbs.)

Cornish Hens Stuffed (1 to 1

1

2

lbs.)

Duckling (4 to 5 lbs.)
Turkey, whole*

Unstuffed (10 to 16 lbs.)

Unstuffed (18 to 24 lbs.)
Turkey Breast (4 to 6 lbs.)

20–24

24–28

28–32
20–24

24–28

28–32
10–14

14–18
35–45
23–27
23–27

30–35 total

35–40 total

40–45 total

14–18
14–18
14–18
17–20

20–24
17–20

20–24

30–40 total
20–25 total

24–26

50–55 total

55–60 total

24–26

8–11

7–10

16–19

325°F(160°C) 

325°F(160°C)

325°F(160°C)
325°F(160°C)

325°F(160°C)

325°F(160°C)
325°F(160°C)

325°F(160°C)
300°F(150°C)
325°F(160°C)
325°F(160°C)
325°F(160°C)

325°F(160°C)

325°F(160°C)
325°F(160°C)
325°F(160°C)
325°F(160°C)
325°F(160°C)

325°F(160°C)
325°F(160°C)

325°F(160°C)
400°F(205°C)
350°F(175°C)
350°F(175°C)
350°F(175°C)

350°F(175°C)
325°F(160°C)

325°F(160°C)

325°F(160°C)
325°F(160°C)

* Stuffed birds generally require 30–45 minutes additional roasting time. Shield legs and breast with foil to prevent overbrowning

and drying of skin.

† The U.S. Department of Agriculture says “Rare beef is popular, but you should know that cooking it to only 140˚F(60˚C). 

means some food poisoning organisms may survive.” (Source: Safe Food Book, Your Kitchen Guide, USDA Rev. June 1985.)

ENGLISH

ENGLISH

Summary of Contents for LRG3095S

Page 1: ... Sheets NOTES 1 The part should not contain prohibited substances Pb Cd Hg Cr 6 PBB PBDE and should comply with standard LG 61 A 9101 Folding procedure must be according to the order that shows below and it should be seen front Printing side of P N 1 2 3 4 5 The specification must be the same according to First Parts Approval FPA Quality must not be modified 2 CAMARO EXTRA BEST LGEUS LG Gas Range ...

Page 2: ...MFL33029602 www lg com USER S GUIDE GAS RANGE Please read this manual carefully before operating your range and retain it for future reference LRG3097ST LRG3095ST LRG3095SB LRG3095SW ENGLISH ESPAÑOL ...

Page 3: ...ing the Oven 15 18 Using the Clock and Timer 19 20 Using the Timed Baking and Roasting Features 20 21 Using the Convection Oven 22 25 Using the Timed Convection Baking or Roasting Features 26 27 Using the Favorite Feature 28 Setting the Warm Feature 28 Setting the Proof Feature 29 Special Features of Your Oven Control 30 32 Using the Electric Warming Drawer on some models 33 34 Using the Self Clea...

Page 4: ...ential hazards that can kill or hurt you and others All safety messages will follow the safety alert symbol and either the word WARNING or CAUTION This symbol will alert you to hazards or unsafe practices which could cause bodily injury or property damage WARNING CAUTION WHAT TO DO IF YOU SMELL GAS Open windows DO NOT try to light any appliance DO NOT touch any electrical switch DO NOT use any pho...

Page 5: ... National Electrical Code Do not use an extension cord with this range DO NOT use an adapter plug an extension cord or remove grounding prong from electrical power cord to prevent fire hazard or electrical shock Failure to follow this warning can cause serious injury fire or death To prevent poor air circulation place the range out of kitchen traffic path and out of drafty locations DO NOT attempt...

Page 6: ...en or lower oven drawer can be smothered completely by closing the oven door or drawer and turning the control to off or by using a multi purpose dry chemical or foam type fire extinguisher DO NOT use the oven or the drawer for storage Let the burner grates and other surfaces cool before touching them NEVER block the vents air holes of the range They provide the air inlet and outlet that are neces...

Page 7: ...at is placed over the burner grate to support the wok This ring acts as a heat trap which may damage the burner grate and burner head Also it may cause the burner to work improperly This may cause a carbon monoxide level above that allowed by current standards resulting in a health hazard Foods for frying should be as dry as possible Frost or moisture on foods can cause hot fat to bubble up and ov...

Page 8: ...s an excellent heat insulator and will trap heat beneath it This will upset the performance of the drawer and it could damage the interior surface SELF CLEANING OVEN Make sure to wipe off excess spillage before self cleaning operation DO NOT use oven cleaners No commercial oven cleaner or oven liner protective coating of any kind should be used in or around any part of the oven Residue from oven c...

Page 9: ...When using cooking or roasting bags in the oven follow the manufacturer s directions Use only glass cookware that is recommended for use in gas ovens Always remove the broiler pan from the range after you finish broiling Grease left in the pan can catch fire if oven is used without removing the grease from the broiler pan When broiling if meat is too close to the flame the fat may ignite To preven...

Page 10: ... Oven door Oven vent Grates Small burner Extra large burner Automatic oven light switch Self clean latch Heavy rack Heavy rack Roast rack Template Anchors 6 ea Screws 6 ea Anti tip Roast rack only for LRG3097S Dual Purpose Split rack only for LRG3097S Heavy rack 2ea only for LRG3097S Grid Warming drawer rack only for LRG3097S Standard racks 2ea only for LRG3095S Broiler pan ENGLISH ENGLISH Griddle...

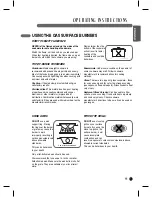
Page 11: ...Use extreme caution when lighting burners this way Surface burners in use when an electrical power failure occurs will continue to operate normally SEALED GAS BURNERS Your gas range cooktop has five sealed gas burners They offer convenience cleanability and flexibility to be used in a wide range of cooking applications The smallest burners are in the right rear position This burner can be turned d...

Page 12: ...re Under some conditions the enamel of some cookware may melt Follow cookware manufacturer s recommendations for cooking methods Glass There are two types of glass cookware those for oven use only and those for top ofrange cooking saucepans coffee and teapots Glass conducts heat very slowly Heatproof Glass Ceramic Can be used for either surface or oven cooking It conducts heat very slowly and cool...

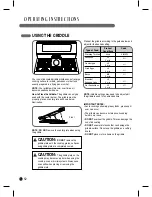
Page 13: ...RTANT NOTES Avoid cooking extremely greasy foods grease spill over can occur The griddle can become hot when surrounding burners are in use DO NOT overheat the griddle This can damage the non stick coating DO NOT use metal utensils that can damage the griddle surface Do not use the griddle as a cutting board DO NOT place or store items on the griddle CAUTION DO NOT remove the griddle plate until t...

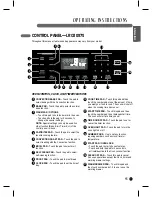
Page 14: ...pad to proof bread CLOCK PAD Touch the pad to set the time of day COOK TIME PAD Touch this pad and then touch the number pads to set the amount of time you want your food to cook The oven will shut off when the cooking time has run out START TIME PAD Touch this pad and then touch the number pad to set delayed start time The oven will start at a time you set TIMER ON OFF PAD Touch the pad to set or...

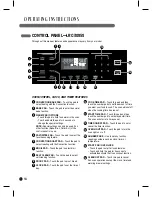
Page 15: ... Touch this pad and then touch the number pads to set the amount of time you want your food to cook The oven will shut off when the cooking time has run out START TIME PAD Touch this pad and then touch the number pad to set delayed start time The oven will start at a time you set TIMER ON OFF PAD Touch the pad to set or cancel the timer function OVEN LIGHT PAD Touch the pad to turn the oven light ...

Page 16: ...eed to restart the oven or broil function OVEN LIGHT The oven light automatically turns ON when the door is opened The oven light may also be manually turned ON or OFF by touching the OVEN LIGHT pad NOTE The oven light can not be turned on during a self clean cycle The oven light can not be turned on until the oven temperature has cooled below 500 F 260 C after a self clean cycle is complete A B C...

Page 17: ...t the new temperature Check food for doneness at minimum time on recipe Cook longer if necessary Touch the CLEAR OFF pad when cooking is complete Type of Food Rack Position Frozen pies on cookie sheet Angel food cake bundt or pound cakes cupcakes layer cakes pies Casseroles Roasting B or C C D D A BAKING TIP THE TYPE OF MARGARINE WILL AFFECT BAKING PERFORMANCE Most recipes for baking have been dev...

Page 18: ...ing Place the food on the grid of the broiler pan Follow suggested rack positions in the Broiling Guide The oven door must be closed to begin broiling The oven door must be closed during broiling Touch the BROIL pad once for Hi and twice for Lo Touch the START pad When broiling is finished touch the CLEAR OFF pad NOTE If the oven door remains open for more than 15 seconds during broil the burner w...

Page 19: ...ead open Brush with melted butter before broiling and after half of broiling time Handle and turn very carefully Brush with lemon butter before and during cooking if desired Preheat broiler to increase browning Increase time 5 to 10 minutes per side for 11 2 thick or home cured ham 1 lb 4 patties 1 2 to 3 4 thick 1 thick 1 to 11 2 lb 11 2 thick 2 to 21 2 lb 1 2 lb about 8 thin slices 2 1 2 thick 2...

Page 20: ...4 hour time clock follow the steps below Touch the CLOCK pad for 3 seconds Touch the number 1 pad for 12 hour 2 pad for 24 hour Touch the START pad to accept the desired change HOW TO SET THE TIMER The timer does not control oven operations The maximum setting on the timer is 11 hours and 59 minutes Touch the TIMER ON OFF pad once for minutes and seconds touch the pad twice for hours and minutes T...

Page 21: ...hough the oven turns off automatically food left in the oven will continue cooking after the oven turns off USING THE CLOCK AND TIMER continued HOW TO SET AN IMMEDIATE START AND AUTOMATIC STOP The oven will turn on immediately and cook for a selected length of time At the end of the cooking time the oven will turn off automatically Touch the BAKE pad Touch the number pads to set the desired oven t...

Page 22: ... OFF pad to clear the display Remove the food from the oven Remember although the oven turns off automatically food left in the oven will continue cooking after the oven turns off HOW TO SET A DELAYED START AND AUTOMATIC STOP The oven will turn on at the time of day you set cook for a specific length of time and then turn off automatically Be sure the clock shows the correct time of day Touch the ...

Page 23: ...has completed you will hear the fan run until the burner comes back on This is NORMAL A B C D E F G Roasts or poultry should be cooked on rack position A In a convection oven a fan circulates hot air around the food This circulating hot air is evenly distributed throughout the oven cavity As a result foods are evenly cooked and browned often in less time than with regular bake CONVECTION BAKE Preh...

Page 24: ...nd use the temperature for regular baking on the package NOTE If a food manufacturer gives specific convection baking package instructions program the AUTO CONVERSION temperature so that the preheated oven temperature reads the same as the temperature on the package instructions COOKWARE FOR CONVECTION COOKING Check to see if your cookware leaves room for air circulation in the oven before using y...

Page 25: ...When convection baking with only 1 rack follow the rack positions recommended in the Using the Oven section MULTI RACK BAKING HOW TO SET THE OVEN FOR CONVECTION BAKING OR ROASTING Touch the CONV BAKE or CONV ROAST pad Touch the number pads to set the desired oven temperature Touch the START pad To change the oven temperature touch the CONV BAKE or CONV ROAST pad and then the number to set the new ...

Page 26: ...o 6 lbs 20 24 24 28 28 32 20 24 24 28 28 32 10 14 14 18 35 45 23 27 23 27 30 35 total 35 40 total 40 45 total 14 18 14 18 14 18 17 20 20 24 17 20 20 24 30 40 total 20 25 total 24 26 50 55 total 55 60 total 24 26 8 11 7 10 16 19 325 F 160 C 325 F 160 C 325 F 160 C 325 F 160 C 325 F 160 C 325 F 160 C 325 F 160 C 325 F 160 C 300 F 150 C 325 F 160 C 325 F 160 C 325 F 160 C 325 F 160 C 325 F 160 C 325 ...

Page 27: ...e door is opened but the heat will not turn off The fan will not start until the preheat temperature is reached DO NOT leave foods that spoil easily such as milk eggs fish stuffings poultry and pork more than 1 hour before or after cooking Room temperature promotes the growth of harmful bacteria Be sure that the oven light is off because the heat from the bulb will speed harmful bacteria growth Th...

Page 28: ...om the oven Remember even though the oven turns off automatically food left in the oven will continue cooking after the oven turns off USING THE TIMED CONVECTION BAKING OR ROASTING FEATURES continued HOW TO SET A DELAYED START AND AUTOMATIC STOP The oven will turn on at the time of day you set cook for a specific length of time and then turn off automatically Be sure the clock shows the correct ti...

Page 29: ...RM feature will maintain an oven temperature of 170 F 77 C This feature should not be used to reheat cold foods The Warm feature will keep cooked food warm for serving up to 3 hours after cooking has finished After 3 hours the WARM feature will shut the oven OFF automatically The Warm feature may be used without any other cooking operations or can be used after cooking has finished using TIMED BAK...

Page 30: ...e WARM feature to keep food warm Proofing will not operate when oven is above 125 F 52 C Oven is Hot will show in the display The Proof feature maintains a warm environment for rising yeast leavened products before baking Place the covered dough in a dish in the oven on rack B or C NOTE For best results cover the dough with a cloth or with plastic wrap the plastic may need to be anchored underneat...

Page 31: ...ed change SPECIAL FEATURES OF YOUR OVEN CONTROL Your new touch pad control has additional features that you may choose to use The following pages describe these features and how you may activate them The special feature modes can only be activated while the display is showing the time of day They remain in the control s memory until the steps are repeated When the display shows your choice touch t...

Page 32: ...RM pad for 3 seconds Then touch the WARM pad once and Adj will display Using the number pad enter the temperature amount you wish to increase For example to increase the oven temperature 15 touch 1 and 5 Touch the START pad to set the increased temperature To decrease temperature adjustment Touch and hold the WARM pad for 3 seconds Then touch the WARM pad once and Adj will display Using the number...

Page 33: ...ad 3 times and PrE will display Touch the number 1 pad for ON or 2 pad for OFF Touch the START pad to accept the change HOW TO ADJUST BEEPER VOLUME The beeper volume feature allows you to adjust the volumes to a more acceptable volume There are four possible volume levels loud normal low and mute Touch and hold the WARM pad for 3 seconds Then touch the WARM pad 4 times and BEEP will display Touch ...

Page 34: ...er and could damage the interior finish Allow approximately 25 minutes for the warming drawer to preheat DO NOT leave liquid or water in the warming drawer For moist foods cover them with a lid or aluminum foil For crisp foods leave them uncovered Food should be kept hot in its cooking container or transferred to a heat safe serving dish Remove serving spoons etc before placing containers in warmi...

Page 35: ...cover some of the cooked food items DO NOT use plastic containers or plastic wrap TO CRISP FOOD ITEMS Place food in a low sided dish or pan Preheat on 1 Low setting Check crispness after 45 minutes Add time if needed TO WARM SERVING BOWLS AND PLATES To warm serving bowls and plates set the control on 1 Low Use only heat safe dishes To heat fine china please check with the manufacturer of the dishe...

Page 36: ...F CLEANING OVEN BEFORE A CLEAN CYCLE When running a self clean cycle it is recommended that a kitchen window be opened or the use of ventilation fan or hood be used Remove the oven racks broiler pan broiler grid all cookware and any aluminum foil from the oven they cannot withstand the high cleaning temperatures IMPORTANT The health of some birds is extremely sensitive to the fumes given off durin...

Page 37: ...remain remove them with a soap filled scouring pad and rinse thoroughly with a vinegar and water mixture These deposits are usually a salt residue that cannot be removed by the clean cycle If the oven is not clean after one clean cycle repeat the cycle You cannot set the oven for cooking until the oven is cool enough for the door to unlock While the oven is self cleaning you can touch the CLOCK pa...

Page 38: ...y result Turn all controls OFF before removing the burner parts The burner grates caps and burner heads can be lifted off making them easy to clean The electrodes are not removable Burner Grate Burner Cap Electrode Cooktop Burner Head SEALED BURNER ASSEMBLIES The oval burner assembly can be lifted off making it easy to clean The burner electrode is not removable OVAL BURNER ASSEMBLY The burner hea...

Page 39: ...ly lift them off the range for cleaning For even and unhampered flame the slits in the burner heads must be kept clean at all times Clogged or dirty burner ports or electrodes will not allow the burner to operate properly Any spill on or around an electrode must be carefully cleaned Take care to not hit an electrode with anything hard or it could be damaged You should clean the burner caps and hea...

Page 40: ...id such as tomatoes sauerkraut fruit juices etc or foods with high sugar content could cause a dull spot if allowed to set Wash and rinse when the surface has cooled For other spills such as fat spatterings etc wash with soap and water once the surface has cooled Then rinse and polish with a dry cloth NOTE DO NOT lift the cooktop Lifting the cooktop can lead to damage and improper operation of the...

Page 41: ...warming drawer CONTROL PANEL Clean up splatters with a damp cloth You may also use a glass cleaner Remove heavier soil with warm soapy water Do not use abrasives of any kind NOTE To prevent activating the control panel during cleaning unplug the range FRONT MANIFOLD PANEL AND KNOBS It s better to clean the manifold panel after each use of the oven Use a damp cloth to clean or rinse For cleaning us...

Page 42: ...ovable but it is heavy You may need help removing and replacing the door TO CLEAN THE INSIDE OF THE DOOR DO NOT allow excess water to run into any holes or slots in the door Because the area inside the gasket in front of the cavity is cleaned during the self clean cycle you do not need to clean this by hand The area outside the gasket can be cleaned with a soap filled plastic scouring pad TO CLEAN...

Page 43: ...pan or grid in a self cleaning oven Grid Pan BROILER PAN AND GRID OVEN BOTTOM The oven bottom has a porcelain enamel finish To make cleaning easier protect the oven bottom from excessive spillovers by placing a cookie sheet on the rack below the rack you are cooking on This is especially important when baking a fruit pie or other foods with a high acid content Hot fruit fillings or other foods wit...

Page 44: ...T to turn ON or OFF It will not work during the Self Clean cycle OVEN LIGHT REPLACEMENT WARNING Before replacing your oven light bulb DISCONNECT the electrical power to the range at the main fuse or circuit breaker panel Failure to do so can result in severe personal injury death or electrical shock Make sure oven and bulb are cool completely TO REPLACE Make sure oven and bulb are cool Unplug rang...

Page 45: ...de lever on each side of drawer push down on the left glide lever and pull up on the right glide lever Pull the Warming Drawer away from the range TO REPLACE THE DRAWER Pull the bearing glides to the front of the chassis glide Align the glide on each side of the drawer with the glide slots on the range Push the drawer into the range until levers click approximately 2 inch Pull the drawer open agai...

Page 46: ...lly been moved during cleaning or moving Improper oven controls setting Incorrect rack position Incorrect cookware or cookware of improper size being used Oven thermostat needs adjustment Clock not set correctly Aluminum foil used improperly in the oven Make sure the electrical plug is inserted into a live properly grounded outlet Remove the burners and clean them Check the electrode area for burn...

Page 47: ...erature is too high to set a self clean operation Improper oven controls setting This is the sound of the metal heating and cooling during both the cooking and cleaning functions Too much soil Make sure you touch the BROIL HI LO pad See the USING THE OVEN section See the BROILING GUIDE Use the broiling pan and grid that came with your range Make sure it is cool Use the broiling pan and grid that c...

Page 48: ...ion fan may turn on and off automatically Allow the oven to cool below locking temperature This can take up to 1 hr after the cycle is complete See the Using the USING THE SELF CLEANING OVEN section Clean up heavy spillovers before beginning the self clean cycle Heavily soiled ovens may need to self clean again or for a longer period of time Close the oven door Touch the CLEAR OFF pad Allow the ov...

Page 49: ...ached This is normal Fully extend the drawer and push it all the way in See the Care and Cleaning of the Range section Reduce weight Redistribute drawer contents Replace the fuse or reset the circuit breaker Wait for the self clean cycle to finish and the oven to cool See the Using the Electric Warming Drawer section Remove liquid Cover food with lid or aluminum foil Reduce temperature setting Cov...

Page 50: ...on misuse abuse fire flood improper installation acts of God or use of products not approved by LG Corporation 5 Repairs to parts or systems resulting from unauthorized modifications made to the appliance 6 Replacement parts or repair labour costs for units operated outside the united states 7 Any labour costs during the limited warranty period This warranty is extended to the original purchaser f...

Page 51: ...NOTAS ...
Page 52: ...DEL PROPIETARIO ESTUFA DE GAS Lea detenidamente estas instrucciones antes utilizar y guárdelas como referencia para el futuro Modelos LRG3097ST LRG3095ST LRG3095SB LRG3095SW P No MFL33029602 www lg com ESPAÑOL ...

Page 53: ...de Autolimpieza del Horno 35 36 CUIDADOS Y LIMPIEZA DE LA ESTUFA DE GAS Cuidado y Limpieza 37 Tapas y Cabezas de los Quemadores 38 Rejillas 39 Superficie de la Estufa 39 Superficies de Acero Inoxidable 40 Conductos de Ventilación de Aire del Horno 40 Panel de Control 40 Panel Frontal y Perillas Múltiples 40 Puerta del Horno 41 Base del Horno 42 Plancha de la Parrilla y Parrilla 42 Bandejas del Hor...

Page 54: ...ta de peligros o prácticas no seguras que podrían ocasionar lesiones físicas o daños a la propiedad ADVERTENCIA PRECAUCIÓN QUÉ HACER SI PERCIBE OLOR A GAS Abra las ventanas NO intente prender ningún electrodoméstico NO toque ningún interruptor eléctrico NO use ningún teléfono en su edificio Llame inmediatamente a su distribuidor de gas desde el teléfono de un vecino Siga las instrucciones proporci...

Page 55: ...oméstico Evite situaciones que generen peligro de incendio o choques eléctricos No use adaptadores extensiones ni elimine la conexión a tierra del cable de alimentación No acatar estas advertencias puede provocar lesiones graves incendios o peligro de muerte Instale la estufa de gas lejos del acceso habitual de niños y de lugares con corrientes de aire para prevenir una circulación de aire deficie...

Page 56: ...e producto químico seco multiuso o de espuma NO use el horno o el horno de calentamiento horno inferior si está disponible como espacio de almacenamiento Deje que las rejillas y otras superficies calientes se enfríen antes de tocarlas NO bloquee nunca los orificios de ventilación aberturas de aire de la estufa de gas Proporcionan la entrada y salida de aire necesaria para que la estufa de gas func...

Page 57: ...ién puede causar que el quemador funcione de manera inadecuada Esto puede causar que el nivel de monóxido de carbono sea superior a los estándar actuales permitidos resultando en un peligro para la salud Los alimentos para freír deben estar tan secos como sea posible La escarcha sobre los alimentos congelados o la humedad sobre los alimentos frescos pueden provocar que la grasa caliente burbujee y...

Page 58: ...nte y capturará el calor debajo de sí mismo Esto va a afectar el comportamiento del cajón y pudiera dañar al acabado interior HORNO DE AUTO LIMPIEZA Asegúrese de limpiar las salpicaduras excesivas antes de iniciar el ciclo de auto limpieza NO use limpiadores para hornos Ningún limpiador comercial para hornos ni ningún revestimiento protectivo de los bordes del horno de cualquier tipo se debería us...

Page 59: ... siga las instrucciones del fabricante Use sólo los utensilios de cristal recomendados para su uso en hornos de gas Retire siempre la parrilla de la estufa tan pronto como termine de usarla La grasa acumulada en la parrilla puede comenzar a arder si se usa el horno sin eliminar la grasa de la misma Al usar la parrilla si la carne está demasiado cerca de la llama la grasa podría comenzar a arder El...

Page 60: ...horno Rejillas Quemador pequeño Quemador extragrande Interruptor de luz automática del horno Seguro de autolimpieza Rejilla resistente Rejilla de asados Rejilla resistente Rejilla de asados sólo para LRG3097S Rejilla dividida sólo para LRG3097S Rejillas estándar 2 unidades sólo para LRG3095S Parrilla Rejilla del cajón calentador sólo para LRG3097S Rejilla resistente 2 unidades sólo para LRG3097S B...

Page 61: ...ecial atención al prender los quemadores de esta forma Al producirse una falla eléctrica los quemadores que están siendo usados continuarán funcionando con normalidad QUEMADORES DE GAS SELLADOS Su estufa dispone de cinco quemadores de gas sellados Ofrecen la comodidad posibilidades de limpieza y flexibilidad para usarlos en una amplia gama de aplicaciones de estufa Los quemadores más pequeños está...

Page 62: ...lgunos utensilios pudiera derretirse bajo ciertas condiciones Siga las recomendaciones del fabricante de estos utensilios en cuanto a los métodos de cocción Vidrio Hay dos tipos de utensilios de cocción de vidrio aquéllos que se usan solamente en el horno y aquéllos para cocinar sobre la superficie de cocción cazuelas cafeteras y teteras Los conductores de vidrio se calientan con mucha lentitud Ce...

Page 63: ...contenido en grasas podrían producirse derrames de grasa La parrilla puede calentarse al usar los quemadores aledaños NO caliente la parrilla en exceso Hacerlo puede dañar el recubrimiento antideslizante NO use utensilios metálicos que podrían dañar la superficie de la parrilla No use la plancha como tabla de cortar NO coloque ni almacene objetos sobre la parrilla PRECAUCIÓN NO retire la plancha d...

Page 64: ...star la hora BOTÓN DE TIEMPO DE COCCIÓN Pulse este botón y use los botones numéricos para ajustar la cantidad de tiempo que desee emplear en la cocción de sus alimentos El horno se apagará una vez transcurrido el tiempo de cocción BOTÓN DE TIEMPO DE INICIO Pulse este botón y después los botones numéricos para ajustar el tiempo de retardo para el inicio El horno se pondrá en funcionamiento en el mo...

Page 65: ... este botón y use los botones numéricos para ajustar la cantidad de tiempo que desee emplear en la cocción de sus alimentos El horno se apagará una vez transcurrido el tiempo de cocción BOTÓN DE TIEMPO DE INICIO Pulse este botón y después los botones numéricos para ajustar el tiempo de retardo para el inicio El horno se pondrá en funcionamiento en el momento que establezca BOTÓN DE ACT DESAC DEL T...

Page 66: ... nuevo en marcha la función del horno o el asador LUZ DEL HORNO La luz del horno se prende automáticamente al abrir la puerta La luz del horno también puede PRENDERSE o APAGARSE manualmente pulsando el botón OVEN LIGHT NOTA La luz del horno no se puede encender durante el ciclo de autolimpieza Después de completar el ciclo de autolimpieza la luz del horno no se podrá encender hasta que el horno se...

Page 67: ...as en grasa por otro lado contienen menos grasa y más agua El contenido con altos niveles de humedad de estas margarinas y mantequillas afecta a la textura y al sabor de los productos horneados Para obtener los mejores resultados usando sus antiguas recetas favoritas use margarina o mantequilla que contenga al menos un 70 de aceite vegetal CÓMO AJUSTAR EL HORNO PARA HORNEAR O ASAR Su horno no está...

Page 68: ...de la bandeja de asado Cumpla con las posiciones recomendadas para las bandejas que se indican en la guía de asado a la parrilla La puerta del horno debe permanecer cerrada para comenzar a asar La puerta del horno debe permanecer cerrada durante el proceso de asado Toque el mando BROIL una vez para ajustar la posición Hi Alta y dos veces para la posición Lo Pulse el botón START Una vez finalizado ...

Page 69: ...la cáscara Abrir extendida Unte con mantequilla derretida antes de dorar y a la mitad del tiempo de asado a la parrilla Manipule y voltee con mucho cuidado Unte con mantequilla de limón antes y durante la cocción si lo desea Precaliente la parrilla para dorar más los alimentos Aumente el tiempo entre 5 y 10 por cada cara para grosores de 11 2 o para jamón curado 1 libra 4 porciones de 1 2 a 3 4 de...

Page 70: ...rante 3 segundos Pulse el botón numérico 1 para establecer el formato horario de 12 horas y 2 para el de 24 horas Pulse el botón START para confirmar los cambios CÓMO AJUSTAR EL TEMPORIZADOR El temporizador no controla las funciones del horno El ajuste máximo para el temporizador es de 11 horas y 59 minutos Toque el mando TIMER ON OFF una vez para ajustar los minutos y los segundos toque el mando ...

Page 71: ...erde que aunque el horno se apague automáticamente los alimentos que permanezcan en el horno continuarán cocinándose USO DEL RELOJ Y EL TEMPORIZADOR continuación CÓMO AJUSTAR UN INICIO INMEDIATO Y UNA PARADA AUTOMÁTICA El horno se prenderá inmediatamente y cocinará durante el período de tiempo escogido El final del período de cocción el horno se apagará automáticamente Pulse el botón BAKE Pulse lo...

Page 72: ...o Pulse el botón CLEAR OFF para borrar la pantalla Saque la comida del horno Recuerde que aunque el horno se apague automáticamente los alimentos que permanezcan en el horno continuarán cocinándose CÓMO AJUSTAR UN INICIO RETARDADO Y UNA PARADA AUTOMÁTICA El horno se prenderá a la hora establecida cocinará durante un período de tiempo específico y a continuación se apagará automáticamente Asegúrese...

Page 73: ... vuelva a prenderse Esto se considera NORMAL A B C D E F G Los asados o las aves deben cocinarse con la bandeja en la posición A En un horno de convección un ventilador hace circular el aire caliente sobre bajo y alrededor de los alimentos Este aire caliente de circulación se distribuye uniformemente por la cavidad del horno Como resultado los alimentos se cocinan y doran de forma uniforme a menud...

Page 74: ...roporciona instrucciones específicas para horneado por convección en el envase programe la temperatura de ADAPTACIÓN AUTOMÁTICA de forma que la lectura de temperatura del horno precalentado sea la misma que la que aparece en las instrucciones del envase UTENSILIOS DE ESTUFA PARA LA COCCIÓN POR CONVECCIÓN Antes de usar su horno por convección cheque si sus utensilios de estufa permiten la circulaci...

Page 75: ...sición F A B C D E F G Al hornear por convección sólo con 1 bandeja siga las recomendaciones en cuanto a las posiciones de la bandeja que se indican en la sección Uso del horno HORNEADO DE VARIAS BANDEJAS CÓMO AJUSTAR EL HORNO PARA HORNEAR O ASAR POR CONVECCIÓN Pulse el botón CONV BAKE o CONV ROAST Pulse los botones numéricos para ajustar el horno a la temperatura que desee Pulse el botón START Pa...

Page 76: ...1 8 a 2 3 kg Pavo entero Sin relleno 10 a 16 lbs 4 5 a 7 3 kg Sin relleno 18 a 24 lbs 8 2 a 10 9 kg Pechuga de pavo 4 to 6 lbs 1 8 a 2 7 kg 20 24 24 28 28 32 20 24 24 28 28 32 10 14 14 18 35 45 23 27 23 27 30 35 total 35 40 total 40 45 total 14 18 14 18 14 18 17 20 20 24 17 20 20 24 30 40 total 20 25 total 24 26 50 55 total 55 60 total 24 26 8 11 7 10 16 19 325 F 165 C 325 F 165 C 325 F 165 C 325 ...

Page 77: ...erta pero no el calor El ventilador no comenzará a funcionar hasta que se alcance la temperatura de precalentamiento Es posible que los alimentos perecederos como la leche huevos pescado rellenos aves y cerdo no puedan permanecer sin refrigerar más de 1 hora antes o después de la cocción La temperatura ambiente propicia la aparición de bacterias dañinas Asegúrese de que la luz del horno esté apaga...

Page 78: ...ue aunque el horno se apague automáticamente los alimentos que permanezcan en el horno continuarán cocinándose USO DE LAS FUNCIONES DE HORNEADO Y ASADO POR CONVECCIÓN CON TEMPORIZADOR continuación COMO AJUSTAR UN INICIO RETARDADO Y UNA PARADA AUTOMATICA El horno se prenderá a la hora establecida cocinará durante un período de tiempo específico y a continuación se apagará automáticamente Asegúrese ...

Page 79: ... una temperatura de 170 F 77 C Esta función no es adecuada para recalentar alimentos fríos La función de calentamiento mantendrá los alimentos cocinados calientes para servirlos hasta 3 horas después de haber finalizado la cocción Pasadas 3 horas la función de CALENTAMIENTO apagará el horno automáticamente La función de calentamiento podría usarse sin ninguna otra función de cocción o una vez fina...

Page 80: ...TAMIENTO para mantener la comida caliente La función para subir masas no funciona cuando la temperatura del horno es superior a 125 F 52 C Cuando el horno esté caliente se mostrará HOT en pantalla La función para subir masas de mantiene un ambiente caliente para levantar productos de levadura de trigo fermentada antes del horneado Introduzca la masa cubierta en un plato dentro del horno en la band...

Page 81: ...lse el botón START para confirmar los cambios FUNCIONES ESPECIALES DE CONTROL DE SU HORNO Su nuevo control táctil dispone de funciones adicionales que podrá usar si lo desea Las siguientes páginas describen estas funciones y cómo activarlas Los modos de funciones especiales sólo pueden activarse mientras la pantalla muestra la hora Permanecen en la memoria de control hasta que se repitan los pasos...

Page 82: ...os A continuación pulse una vez el botón WARM y se mostrará el indicador Adj Usando los botones numéricos introduzca la cifra de temperatura que desea aumentar Por ejemplo para aumentar la temperatura del horno 15 pulse 1 y 5 Pulse el botón START para ajustar el aumento de temperatura Para reducir el ajuste de temperatura Mantenga pulsado el botón WARM durante 3 segundos A continuación pulse una v...

Page 83: ...e 3 veces el botón WARM y se mostrará el indicador PrE Pulse el botón número 1 para ACTIVAR ó 2 para DESACTIVAR Pulse el botón START para confirmar los cambios CÓMO AJUSTAR EL VOLUMEN DE LOS AVISOS La función de volumen de los avisos le permitirá ajustar los avisos a un volumen más aceptable Existen cuatro niveles posibles para el volumen fuerte normal bajo y silenciado Pulse el botón WARM durante...

Page 84: ...do interior Permita que la gaveta de calentamiento se precaliente durante un período de 25 minutos aproximadamente NO introduzca líquidos o agua en la gaveta de calentamiento Cubra los alimentos húmedos con una tapa o papel de aluminio Deje sin cubrir los alimentos crujientes Los alimentos deben mantenerse en su recipiente de cocción o transferirse a un plato para servir que sea resistente al calo...

Page 85: ...nados NO use envases de plástico o la película plástica VOLVER A HACER CRUJIENTES ALIMENTOS YA BLANDOS Introduzca los alimentos en platos o recipientes de pared baja Precaliente usando el ajuste 1 Verifique si están ya crujientes tras 45 minutos Añada tiempo si fuese necesario PARA CALENTAR CUENCOS Y PLATOS PARA SERVIR Para calentar ollas y platos para servir ajuste el control en el 1 Use sólo pla...

Page 86: ...L HORNO ANTES DE REALIZAR UN CICLO DE LIMPIEZA Cuando realice un ciclo de autolimpieza se recomienda abrir la ventana de la cocina o bien usar un ventilador o la campana extractora Extraiga del horno las rejillas plancha de la parrilla la parrilla todos los utensilios de estufa termómetros y papel de aluminio no podrán resistir las elevadas temperaturas del ciclo de limpieza IMPORTANTE La salud de...

Page 87: ...a de agua y vinagre Estos depósitos son habitualmente residuos de sal que no pueden eliminarse mediante el ciclo de limpieza Si el horno no está limpio tras un ciclo de limpieza repítalo No podrá cocinar con el horno hasta que se haya enfriado lo suficiente como para que la puerta se desbloquee Durante el ciclo de autolimpieza del horno podrá pulsar el botón CLOCK para examinar la hora Para volver...

Page 88: ...ontrol antes de desmontar las piezas del quemador Las rejillas tapas y las cabezas del quemador pueden desmontarse haciendo más fácil su limpieza Los electrodos no son desmontables Rejilla Tapa del quemador Electrodo Estufa Cabeza del quemador MONTAJE DE LOS QUEMADORES SELLADOS El conjunto de la tapa y de la tapa interior del quemador oval pueden desmontarse haciendo más fácil su limpieza El elect...

Page 89: ...los extrayéndolos de la estufa de gas para proceder a su limpieza Los orificios situados en las cabezas de los quemadores deben mantenerse limpios en todo momento para obtener una llama uniforme y libre de obstáculos Unas tomas o electrodos obstruidos o sucios no permitirán que los quemadores funcionen correctamente Cualquier derrame sobre o alrededor de un electrodo debe limpiarse cuidadosamente ...

Page 90: ...azúcar pueden producir pérdidas de brillo puntuales si no se eliminan los residuos Cuando la superficie se haya enfriado lávela y enjuáguela Para eliminar otro tipo de derrames como salpicaduras de aceite etc lave la superficie con agua y jabón cuando se haya enfriado Enjuague a continuación y sáquele brillo con un paño seco NOTA NO levante la placa de la estufa Levantar la placa de la estufa pued...

Page 91: ...de calentamiento PANEL DE CONTROL Limpie las salpicaduras con un paño húmedo También puede usar un limpiacristales Elimine la suciedad incrustada con agua caliente jabonosa No use abrasivos de ningún tipo NOTA Para evitar activar el panel de control durante las labores de limpieza desenchufe la estufa de gas PANEL FRONTAL Y MANDOS MÚLTIPLES Se recomienda limpiar el panel de control cada vez que us...

Page 92: ...a del horno La puerta del horno es desmontable pero pesada Podría necesitar ayuda para desmontar y montar la puerta PARA LIMPIAR EL INTERIOR DE LA PUERTA NO permita que se introduzca una cantidad excesiva de agua dentro de los orificios y las ranuras de la puerta Como la zona interior de la junta frontal de la cavidad se limpia durante el ciclo de autolimpieza no es necesario limpiarla a mano La z...

Page 93: ... LA PARRILLA Y PARRILLA BASE DEL HORNO La base del horno tiene un acabado de esmalte de porcelana Para facilitar la limpieza proteja la base del horno de derrames excesivos colocando una bandeja para hornear galletas en la bandeja situada debajo de la que se está utilizando para cocinar Esto es particularmente importante al hornear tortas de fruta u otros alimentos con altos contenidos de acidez L...

Page 94: ...LA LUZ DEL HORNO ADVERTENCIA antes de reemplazar el foco de luz de su horno DESCONECTE el suministro eléctrico del mismo en el panel del fusible principal o del disyuntor No hacerlo puede provocar lesiones físicas graves choque eléctricos o incluso la muerte Asegúrese de que el horno y el foco estén completamente fríos PARA REEMPLAZAR Asegúrese de que el horno y el foco estén fríos Desenchufe el h...

Page 95: ...a presione la palanca de deslizamiento izquierda y tire de la derecha Tire de la gaveta de calentamiento para extraerla de la estufa PARA MONTAR LA GAVETA Extraiga las piezas de deslizamiento de soporte hasta el frente de la pieza de deslizamiento del chasis Alinee la pieza de deslizamiento de cada lado de la gaveta con las ranuras correspondientes en la estufa de gas Empuje la gaveta dentro de la...

Page 96: ...berse movido accidentalmente durante las labores de limpieza o desplazamiento Los controles del horno están ajustados incorrectamente La bandeja está en posición incorrecta Está usando utensilios de estufa inadecuados o de un tamaño incorrecto El termostato del horno precisa ajuste El reloj no está en hora Papel de aluminio usado incorrectamente en el horno Asegúrese de que el tomacorriente está c...

Page 97: ...tado completemente en una toma de corriente El interruptor automático del circuito de su casa está trabado o se fundió un fusible Los controles del horno no están programados de manera correcta La bombilla puede estar floja o fundida completemente en una toma de corriente La temperatura del horno está muy alta para programar la función de auto limpieza Los controles del horno no se fijaron adecuad...

Page 98: ...nteriordelhornose consideranormaldurantelosprimerosusos Elventiladordeconvecciónpuedeprenderseo apagarseautomáticamente Permitaqueelhornoseenfríepordebajodelatemperaturade bloqueo Puedetardarhastaunahoradespuésdequetermineelciclo ExaminelasecciónUsodelaautolimpiezadelhorno Elimineelexcesodederramesantesdeiniciarelciclode limpieza Enloshornossuciosenexcesopodríasernecesario volverarealizarelproceso...

Page 99: ...uncionamiento automáticamente al alcanzar la temperatura de precalentamiento Esto se considera normal Saque la gaveta por completo y empújela de la misma forma Examine la sección Cuidado y limpieza de la estufa de gas Reduzca el peso Redistribuya el contenido de la gaveta Reemplace el fusible o restaure el interruptor a su posición original se enfríe Examine la sección Uso de la gaveta de calentam...

Page 100: ...io inundación instalación inadecuada casos fortuitos o uso de productos no aprobados por la Corporación LG 5 Reparación de piezas o sistemas provocados por modificaciones no autorizadas hechas al artefacto 6 Costos de reemplazo de piezas o de mano de obra en reparaciones para unidades operadas fuera de los EE UU 7 Cualquier costo de mano de obra durante el período de garantía limitada Esta garantí...

Page 101: ...Printed in Mexico www lg com Register your product Online LG Customer Information Center 1 800 243 0000 1 888 865 30 26 1 888 542 2 623 USA Consumer User USA Commercial User CANADA ...

Reviews: