background image

- 40 -

English

Français

TROUBLESHOOTING

Possible cause / Solution

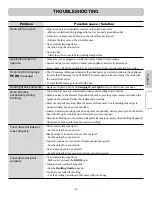
• Poor installation. Place oven rack in center of oven. Place a level on the oven rack.

Adjust leveling legs at base of range until the oven rack is level.

• Be sure floor is level and is strong and stable enough to adequately support range.

• If floor is sagging or sloping, contact a carpenter to correct the situation.

• Kitchen cabinet alignment may make range appear unlevel. Be sure cabinets are square

and have sufficient room for range clearance.

• Cabinets not square or are built in too tightly. Contact builder or installer to make appliance

accessible.

• Carpet interferes with range. Provide sufficient space so range can be lifted over carpet.

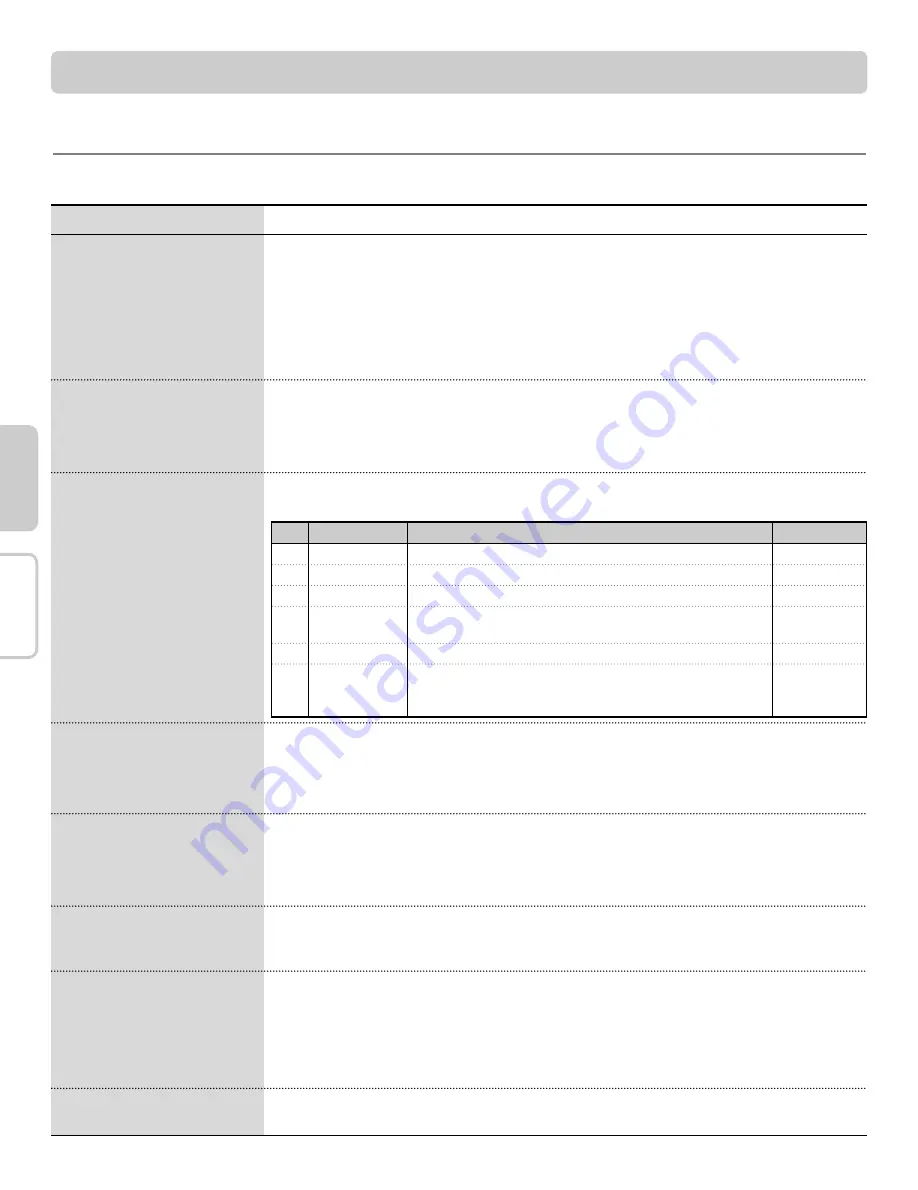
• Electronic control has detected the fault condition. Touch 

CLEAR/OFF

to clear the display and stop beeping.

Reprogram oven. If fault recurs, record fault number. Touch

CLEAR/OFF

and contact a Service agent.

• Improper cookware being used.

- Use pans which are flat and match the diameter of the surface unit selected.

• In some areas, the power (voltage) may be low.

- Cover pan with a lid until desired heat is obtained.

• A fuse in your home may be blown or the circuit breaker tripped.

- Replace the fuse or reset the circuit breaker.

• Cooktop controls improperly set. 

- Check to see the correct control is set for the surface unit you are using.

• This is normal. The unit is still on and hot.

• Food spillovers not cleaned before next use.

- See 

Cleaning the glass cooktop 

section.

• Hot surface on a model with a light-colored cooktop.

- This is normal. The surface may appear discolored when it is hot. This is temporary and 

will disappear as the glass cools.

• This is normal. 

- The element will cycle on and off to maintain the heat setting.

BEFORE CALLING FOR SERVICE

Before you call for service, review this list. It may save you time and expense. The list includes common occurrences that are not
the result of defective workmanship or materials in this appliance.

CODE

F-1

F-2

F-3

F-6

F-10

F-11

Operation

Oven Thermistor remains open for over 1 min, after cook starts

Oven Thermistor is short for over 1 min after cook starts

When touch sensor key has some error for >= 60 seconds.

Oven temperature is over 650°F continuously during 2 minutes
on cooking. 

In case of Door Lock Failure

If current oven temperature does not exceed 150°F and less
equal than start temperature over 5 minutes on preheating,
where door is closed.

Problem

Range is not level.

Cannot move appliance
easily.

Appliance must be
accessible for service.

Oven control beeps and
displays any F code error.

Surface units will not
maintain a rolling boil or
cooking is not fast
enough

Surface units do not work
properly

Surface unit stops
glowing when changed
to a lower setting

Areas of discoloration on
the cooktop

Frequent cycling on and
off of surface units

Description

Opened Sensor

Shorted Sensor

T/S Key Error

Oven hot

Door Lock Fail

No heating

Times/sampling

During cook

During cook

During cook

Motor Operation

During cook

Summary of Contents for LSC5633WS

Page 1: ...ELECTRIC RANGE OWNER S MANUAL COOKING GUIDE PLEASE READ THIS OWNER S MANUAL THOROUGHLY BEFORE OPERATING Printed in Korea P NO MFL38379606 Website http ca lge com LSC5633WS ...

Page 2: ...t for future reference We also suggest that you record the details of any contact with LG LG Electronics Canada Inc concerning this unit Staple your receipt here to verify your retail purchase Model No Serial No Dealer Dealer Phone No Thank you for purchasing an LG electric oven Setting timed bake 24 Setting delayed timed bake 25 Setting broil 25 Recommended broiling guide 26 Setting dual convecti...

Page 3: ... forward Verify that the anti tip devices are engaged Warming drawer or Storage drawer Remove drawer and visually inspect that the rear leveling leg is fully inserted into the anti tip bracket Refer to the installation manual for proper anti tip bracket installation SURFACE COOKING UNITS Use Proper Pan Sizes This appliance is equipped with one or more surface units of different size Select utensil...

Page 4: ...good seal Care should be taken not to rub damage or move the gasket Do Not Use Oven Cleaners No commercial oven cleaner or oven liner protective coating of any kind should be used in or around any part of the oven Clean in the self clean cycle only parts listed in this manual Before self clean the oven remove the broiler pan and any utensils of foods from the oven Before Self Cleaning the Oven Rem...

Page 5: ... on the range to reach items could be seriously injured DO NOT use the glass cooktop surface as a cutting board DO NOT place or store items that can melt or catch fire on the glass cooktop even when it is not being used Always turn the surface units on after placing cookware DO NOT store heavy items above the cooktop surface that could fall and damage it DO NOT place aluminum foil or plastic items...

Page 6: ...tly above cooking surface limit it to items that are infrequently used and can be safely stored in an area subjected to heat Temperatures may be unsafe for items such as volatile liquids cleaners or aerosol sprays DO NOT touch surface elements until it has cooled down sufficiently The surface elements may still be hot and burns may occur NEVER leave food unattended at high or medium high setting B...

Page 7: ...g so will destroy heat distribution produce poor baking results and cause permanent damage to the oven interior aluminum foil will melt to the interior surface of the oven DO NOT force the door open This can damage the automatic door locking system Use care when opening the oven door after the Self Cleaning cycle Stand to the side of the oven when opening the door to allow hot air or steam to esca...

Page 8: ...s for the appliance outlets on your range are located on top of the control console They are rated for 15 amps that may trip if the appliance plugged into it exceeds 15 amps To reset the circuit breaker press the switch of located on the control console Do not place portable appliances on the cooktop Damage to the portable appliance could result if the cooktop is hot Note Appliance Outlet Circuit ...

Page 9: ...e clock with the correct time of day see page 18 HS Hot Surface MESSAGE The HS message will appear in the display once the burner has been turned off and the cooktop is hot to the touch approximately 150 deg F HS will appear during the Self Clean Cycle Bridge Left Rear Element Bridge Left Front Element Triple Right Front Triple Element Warming Zone Single Right Rear Element The temperature setting...

Page 10: ...evel desired is reached Note 3 Touch once to turn on the power level Hi or once for Lo 4 Use the to choose the desired power setting is continuously accessible Adjustable at any time while the element is ON 5 To turn off the element after cooking touch ON OFF once 1 Touch ON OFF The display will flash The display will disappear if not used after 10 seconds 2 Touch SELECT for desired element size T...

Page 11: ...indicates the selected elements 3 Touch once to turn on the power level Hi or once for Lo 4 Use the to choose the desired power setting is continuously accessible Adjustable at any time while the element is ON 5 To turn off the element after cooking touch ON OFF once To turn on a bridge surface element Left Front Bridge Left Rear If LEFT FRONT BRIDGE LEFT REAR all elements is operating Left Front ...

Page 12: ...ERATING THE WARMING ZONE 1 Touch ON OFF at the warming zone control position The warming zone indicator light will flash The display will disappear if not used after 10 seconds 2 Touch once to turn on the power level Hi or to turn on for Lo 3 Use the to choose the desired power setting Adjustable at any time while the element is ON 4 To turn off the element when the food is ready to serve touch ON...

Page 13: ...pillover occurs while cooking immediately clean the spill from the cooking area while it is hot to prevent a tough cleaning chore later Using extreme care remove spill with a proper metal scraper Do not allow spills to remain on the cooking area or the cooktop trim for a long period of time Do not use abrasive cleansing powders or scouring pads which will scratch the cooktop Do not use chlorine bl...

Page 14: ...or ruler 1 Place a ruler across the bottom of the pan 2 Hold it up to the light 3 No light should be visible under the ruler Do not use a small pan on a large element Not only does this waste energy but it can also result in spillovers burning onto the cooking area which requires extra cleaning Do not use non flat specialty items that are oversized or uneven such as round bottom woks rippled botto...

Page 15: ...ts do not hold foods longer than 1 hour For smaller quantities or heat sensitive foods such as eggs do not hold longer than 30 minutes The maximum operating time is 3 hours 1 Touch ON OFF at the WARMING DRAWER position The indicator light will flash If no further pads are touched within 25 seconds the display will clear 2 Touch once to turn on the power level for High 5 level or for Low 1 level 3 ...

Page 16: ... Grid Broiler pan Split rack Heavy duty racks 2 ea Warming drawer rack Dual Purpose Warming drawer Oven door Gasket Split rack Heavy duty racks 2 ea Self clean latch Automatic oven light switch Triple element Single element Warming zone element Appliance outlet circuit breaker Appliance outlet Template Cleaner Cleaning pad Screws 6 ea Anchors 6 ea Anti tip bracket ...

Page 17: ...ff Keys LF Size LF Bridge LR Control RF Size Triple elements Control SELECT Use to control LF Element SELECT Use to control RF Element CLOCK Use to set the time of day COOK TIME Use to enter the cook time bake conv START TIME Use to set delayed time bake conv clean TIMER ON OFF Use to set or cancel the timer CONV BAKE Use to select the Convection Bake CONV ROAST Use to select the Convection Roast ...

Page 18: ...and maximum time or temperature settings that may be entered into the control An entry acceptance beep will sound each time a control pad is touched An entry error tone 2 short melody will sound if the entry of the temperature or time is below the minimum or above the maximum settings for the feature FEATURE MIN TEMP MAX TEMP Default TIME TIME CLOCKTIME KITCHEN TIMER COOKING TIME CONVECTION BAKE C...

Page 19: ...Touch TIMER ON OFF once The display will return to the time of day To set the Timer example for 5 minutes To cancel the Timer before the set time has run out SETTING THE TIMER The TIMER serves as an extra timer in the kitchen that will beep when the set time has run out It does not start or stop cooking The TIMER feature can be used during any of the other oven control functions Setting Limit 11 H...

Page 20: ...20 F 2 and 0 20 F will be displayed 3 Touch START to accept the temperature change and the display will return to the time of day Touch CLEAR OFF to reject the change if necessary To increase the oven temperature 1 Touch SETTING twice 2 To decrease the temperature use the number pads to enter the desired change Example 20 F 2 and 0 and then touch SETTING once 20 F will be displayed 3 Touch START t...

Page 21: ...ven lamp until door is opened You can activate or deactivate smart oven light feature Default Setting is on 1 Touch the SETTING 3 times 2 Touch 1 for ENGLISH or 2 for FRENCH 3 Touch START to accept the change To set language option SETTING LANGUAGE SELECTION English or French The scroll display can be shown either ENGLISH or FRENCH 1 Touch SETTING 6 times 2 Touch 1 number pad for Fahrenheit F or 2...

Page 22: ...acks in positions B and D for 2 racks Place in positions B D and F for 3 racks Place the cookware as shown in Fig 1 2 1 Touch BAKE 350 F will appear in the display 2 Touch 3 7 and 5 BAKE will flash 3 Touch START The display will show BAKE and the changing temperature starting at 100 F Current oven temperature is displayed On preheating increased by 5 F step more than 100 F Fig 1 Fig 2 Type of Food...

Page 23: ...lit Rack can be used as a roasting rack in the broiling pan Be careful when removing cooked food from the split rack to avoid burns To remove racks 1 Pull the rack straight out until it stops 2 Lift up the front of the rack and pull it out To replace racks 1 Place the end of the rack on the support 2 Tilt the front end up and push the rack in CAUTION DO NOT cover a rack with aluminum foil or any o...

Page 24: ...will turn off automatically 1 END OF CYCLE and the time of day will show in the display The oven will shut off automatically 2 The control will beep Cook End Melody The first cook remind beep will sound after 60 seconds of Cook End and thereafter there will be Cook End Melody every 60 seconds until CLEAR OFF is touched Place food in the oven after preheating if the recipe calls for it Preheating i...

Page 25: ... will sound The oven will begin to Bake After the oven has reached the desired temperature the control will sound Preheat Alarm melody and the oven light will flash in preheat alarm light The oven temperature will turn off and setting temperature will be displayed The display will show 300 F and BAKE To program the oven for a Delay Start and to shut off automatically example for baking at 300 F fo...

Page 26: ...before browning Pan frying is recommended Slash fat Broil skin side down first Cut through back of shell Spread open Brush with melted butter before broiling and after half of broiling time Handle and turn very carefully Brush with lemon butter before and during cooking if desired Increase time 5 to 10 minutes per side for 11 2 thick or home cured ham Slash fat Slash fat Grease pan Brush steaks wi...

Page 27: ... cooked Cookies and biscuits should be baked on pans with no sides or very low sides to allow heated air to circulate around the food Food baked on pans with a dark finish will cook faster When using Convection Bake with a single rack place oven rack in position D If cooking on multiple racks place the oven racks in positions B and D for 2 racks Place in positions B D and F for 3 racks Cakes have ...

Page 28: ... around the meat 1 Arrange interior oven racks and place food in oven 2 Touch CONV ROAST CONV ROAST will flash and 350 F will be displayed 3 Touch 3 7 and 5 4 Touch START The display will show CONV ROAST and the changing temperature starting at 100 F Preheat Alarm melody will sound when the adjusted oven temperature for this example it is 350 F is reached and the display will show auto converted o...

Page 29: ...ll show the TIMED CONV BAKE To set the Timed Convection Bake or Roast feature example for baking to cook at 300 F for 30 minutes SETTING TIMED CONVECTION BAKE OR ROAST The CONV BAKE and COOK TIME pads control the Timed CONV BAKE feature The Timed CONV feature will automatically turn off the oven as soon as the bake time has elapsed Baking Roasting time can be set for any amount of time between 1 m...

Page 30: ...in preheat alarm light The oven temperature will turn off and setting temperature will be displayed The display will show 300 F and CONV BAKE or CONV ROAST To set the Delayed Timed Convection Bake or Convection Roast feature example for baking to cook at 300 F for 30 minutes and starting at 4 30 SETTING DELAYED TIMED CONVECTION BAKE OR ROAST The CONV BAKE COOK TIME and START TIME pads control the ...

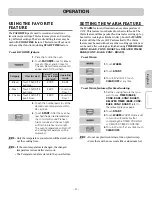
Page 31: ...Chicken Default temperature will appear and COOK will flash 3 Touch the number pads to set the desired oven temperature within 25 seconds 4 Touch START After the oven has reached the desired temperature the control will sound Preheat Alarm melody and the oven light will flash in preheat alarm light The oven temperature will turn off and setting temperature will be displayed To set FAVORITE feature...

Page 32: ...N or OFF by touching the OVEN LIGHT pad 1 Touch and hold START for 3 seconds 2 Lock melody will sound LOCKING will appear DOOR LOCKED will flash in the display Once the oven door is locked the DOOR LOCKED indicator will stop flashing and remain on along with the lock icon light To activate the Oven Lockout feature 1 Touch and hold START for 3 seconds Unlock melody will sound The DOOR LOCKED will c...

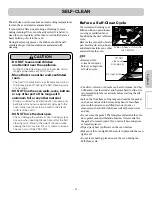
Page 33: ... the kitchen should be well ventilated to get rid of normal odors associated with cleaning Before a Self Clean Cycle We recommend venting your kitchen with an open window or using a ventilation fan or hood during the first self clean cycle Remove the oven racks broiler pan broiler grid all cookware and aluminum foil or any other material from the oven Wipe up heavy soil on the oven bottom Do clean...

Page 34: ...damage the oven Do not force the oven door open when LOCK is displayed The oven door will remain locked until the oven temperature has cooled forcing the door open will damage the door After the Self Clean cycle You may notice some white ash in the oven Wipe it off with a damp cloth or a soapfilled steel wool pad after the oven cools These deposits are usually a salt residue that cannot be removed...

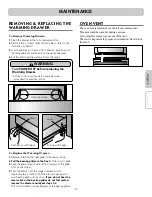
Page 35: ...slots on the range 4 Push the drawer into the range until levers click approximately 2 inches Pull the drawer open again to seat bearing glides into position If you do not hear the levers click or the bearing glides do not feel seated remove the drawer and repeat steps 2 4 This will minimize possible damage to the bearing glides OVEN VENT The oven vent is located above the left rear surface unit T...

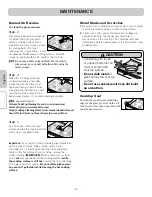
Page 36: ...er with wet paper towels or a dishcloth Soaking the pan will remove burned on foods Both the broiler pan and grid may be cleaned with a commercial oven cleaner Both the broiler pan and grid can also be cleaned in a dishwasher Stainless Steel Surfaces on some models Do not use a steel wool pad it will scratch the surface 1 Shake bottle well 2 Place a small amount of Stainless Steel Appliance Cleane...

Page 37: ...k tracks CLEANING THE GLASS COOKTOP Normal Daily Use Cleaning Use ONLY the Ceramic Cooktop Cleaner or cooktop cleaner included with your range on the glass cooktop Other creams may not be as effective or they might damage the surface with scratches or permanent staining To maintain and protect the surface of your glass cooktop follow these steps 1 Before using the cooktop for the first time clean ...

Page 38: ...king surface while the cooking surface is still hot to avoid the risk of damage to the glass ceramic surface For your safety please wear an oven mitt potholder while cleaning the hot cooking surface Metal Marks and Scratches 1 Be careful not to slide pots and pans across your cooktop It will leave metal markings on the cooktop surface 2 If pots with a thin overlay of aluminum or copper are allowed...

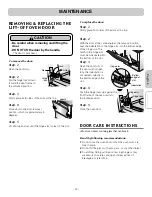
Page 39: ...ated into the bottom of the slot Step 3 Open the door fully If the door will not open fully the indentation is not seated correctly in the bottom edge of the slot Step 4 Push the hinge locks up against the front frame of the oven cavity to the locked position Step 5 Close the oven door DOOR CARE INSTRUCTIONS Most oven doors contain glass that can break Read the following recommendations 1 Do not c...

Page 40: ...ot cleaned before next use See Cleaning the glass cooktop section Hot surface on a model with a light colored cooktop This is normal The surface may appear discolored when it is hot This is temporary and will disappear as the glass cools This is normal The element will cycle on and off to maintain the heat setting BEFORE CALLING FOR SERVICE Before you call for service review this list It may save ...

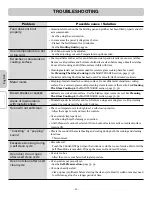
Page 41: ...position the rack to provide proper clearance between the meat and the element Preheat broil element for searing Meat not properly prepared Remove excess fat from meat Cut remaining fatty edges to prevent curling but do not cut into lean Insert on broiler pan wrong side up and grease not draining Always place grid on the broiler pan with ribs up and slots down to allow grease to drip into pan Grea...

Page 42: ...INTENANCE section page 37 38 Mineral deposits from water and food Remove using a ceramic glass cooktop cleaning cream Use cookware with clean dry bottoms The oven temperature is too high to set a self clean operation Allow the range to cool and reset the controls Oven controls improperly set See the using the self cleaning oven section A Self Clean cycle cannot be started if Oven Lockout feature i...

Page 43: ...speed the process set a self clean cycle for a minimum of 3 hours See the Self Clean section page 33 34 A convection fan may automatically turn on and off This is normal The shiny silver colored racks were cleaned in a self clean cycle Apply a small amount of vegetable oil to a paper towel and wipe the edges of the oven racks with the paper towel Convection fan stops during a convection bake cycle...

Page 44: ...modifications made to the appliance 7 Replacement parts or repair labor costs for units operated outside Canada 8 Any labor costs during the limited warranty period This warranty is extended to the original purchaser and any succeeding owner for products purchased for home use within Canada Some provinces do not allow the exclusion or limitation of incidental or consequential damages so this exclu...

Page 45: ... 45 English Français MEMO ...

Page 46: ... 46 English Français MEMO ...

Reviews: