background image

29

OPERATION

ENGLISH

Tips for Broiling
Beef


Steaks and chops should always be allowed to rest 

for five minutes before being cut into and eaten. 

This allows the heat to distribute evenly through the 

food and creates a more tender and juicy result.


Pieces of meat that are thicker than two inches 

should be removed from the refrigerator 30 minutes 

prior to cooking. This will help them cook more 

quickly and evenly, and will produce less smoke 

when broiling. Cooking times will likely be shorter 

than the times indicated in the Broiling Chart.


For bone-in steaks or chops that have been 

frenched

 (all meat removed from around the bone), 

wrap the exposed sections of bone in foil to reduce 

burning.

Seafood


When broiling skin-on fish, always use the Lo broil 

setting and always broil the skin side last.


Seafood is best consumed immediately after 

cooking. Allowing seafood to rest after cooking can 

cause the food to dry out.


It is a good idea to rub a thin coating of oil on the 

surface of the broiling pan before cooking to reduce 

sticking, especially with fish and seafood. You can 

also use a light coating of non-stick pan spray.

Vegetables


Toss your vegetables lightly in oil before cooking to 

improve browning.

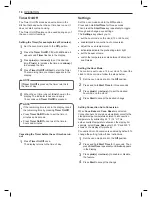
Warm

This function will maintain an oven temperature of 

170 °F. The Warm function will keep cooked food 

warm for serving up to three hours after cooking has 

finished. The Warm function may be used without any 

other cooking operations.

Setting the Warm Function

1

Turn the oven mode knob to select 

Warm

.

2

Press 

Start

.

3

Turn the oven mode knob to the 

Off

 position 

when warming is finished.

NOTE


The Warm function is intended to keep food 

warm. Do not use it to cool food down.


It is normal for the fan to operate during the 

Warm function.

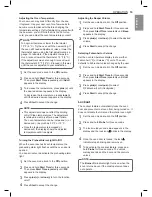
Proof

This feature maintains a warm oven for rising yeast 

leavened products before baking.

Setting the Proof Function

1

Use rack position 2 or 3 for proofing.

2

Turn the oven mode knob to select 

Proof

.

3

Press 

Start

.

4

Turn the oven mode knob to the 

Off

 position 

when proofing is finished.

NOTE


To avoid lowering the oven temperature and 

lengthening proofing time, do not open the oven 

door unnecessarily. Check bread products early 

to avoid over proofing.


Do not use the proofing mode for warming 

food or keeping food hot. The proofing oven 

temperature is not hot enough to keep foods 

at safe temperatures. Use the Warm feature 

to keep food warm. Proofing does not operate 

when the oven is above 125 °F. 

Hot

 shows in 

the display.


It is normal for the fan to operate during the 

Proof function.

Summary of Contents for LSE4617 Series

Page 1: ...2015 08 18 FS1787US English French MFL69300802 108 ...

Page 2: ...ENGLISH FRANÇAIS OWNER S MANUAL ELECTRIC RANGE Read this owner s manual thoroughly before operating the appliance and keep it handy for reference at all times www lg com MFL69300802_01 LSSE3026ST ...

Page 3: ... Cook Time Timed Cook 21 Using the Cooktop 21 Cooking Areas 21 Hot Surface Indicator 21 Using the Cooktop Elements 22 The Recommended Surface Cooking Setting 23 Using the Proper Cookware 23 Choosing Cookware 23 Home Canning Tips 24 Using the Oven 24 Before Using the Oven 24 Oven Vent 24 Using Oven Racks 24 Bake 25 Convection Mode 26 Recommended Baking and Roasting Guide 27 Broil 28 Recommended Bro...

Page 4: ...OPERLY INSTALLED ANTI TIP DEVICE TO CHECK IF THE DEVICE IS INSTALLED PROPERLY REMOVE THE DRAWER BODY AND VERIFY THAT THE ANTI TIP DEVICE IS ENGAGED OR GRASP THE TOP REAR EDGE OF THE RANGE BACK GUARD AND CAREFULLY ATTEMPT TO TILT IT FORWARD Refer to the installation section for instructions It is possible for a child or adult to tip the range and be killed Verify that the anti tip device has been p...

Page 5: ... glass since they can scratch the surface Scratches may cause the glass to shatter WARNING If the door glass cooktop glass surface or oven heating unit of the range are damaged discontinue use of the range and call for service Do not operate the oven without the charcoal heater mesh Do not use plastic to cover food Use foil or oven safe lids only Do not allow anyone to climb stand or hang on the d...

Page 6: ...lammable liquids cleaners or aerosol sprays ELECTRICAL SAFETY CAUTION Be certain that all packing materials are removed from the appliance before operating Keep plastic clothes paper and other flammable materials away from parts of the appliance that may become hot Always disconnect power from the appliance before servicing Do not use aluminum foil or any other material to line the oven bottom Imp...

Page 7: ...hey have had sufficient time to cool This includes the cooktop and the area above the oven door Do not cook on a broken cooktop If the cooktop is broken cleaning solutions and spillovers may penetrate the broken cooktop and create a risk of electric shock Contact a qualified technician immediately Do not use the glass cooktop surface as a cutting board Do not place or store items that can melt or ...

Page 8: ... with the cooktop surface when cooking on the glass ceramic cooktop Match the size of the cooktop burner or element to the size of the cookware in use Using a large element for a small pan wastes heating energy and the exposed surface of the element is a burn or fire hazard Reduce energy use by cleaning light oven soils with the EasyClean feature instead of self clean Avoid opening the oven door m...

Page 9: ... in the self clean cycle only parts listed in this manual Before self cleaning the oven remove the broiler pan all oven racks the meat probe and any utensils or food from the oven Important Instruction The oven displays an F error code and sounds three long beeps during the self cleaning process if it malfunctions in the self clean mode Switch off the electrical power to the main fuse or breaker a...

Page 10: ...roiler pan NOTE Contact LG Customer Service at 1 800 243 0000 1 888 542 2623 in Canada if any accessories are missing For your safety and for extended product life only use authorized components The manufacturer is not responsible for product malfunction or accidents caused by the use of separately purchased unauthorized components or parts The images in this guide may be different from the actual...

Page 11: ...tip device Level the range 240 V Product Specifications The appearance and specifications listed in this manual may vary due to constant product improvements Oven Range Models LSSE3026 Description Electric Slide In Oven Range Electrical requirements 13 5 kW 120 240 VAC Exterior Dimensions 29 7 8 W x 37 7 8 H x 26 1 2 D D with door closed 75 7 cm W x 96 cm H x 67 3 cm D D with door closed Height to...

Page 12: ...CANADA to receive one at no cost WARNING The information in this manual should be followed exactly Failure to do so may result in fire electrical shock property damage personal injury or death Wear gloves during the installation procedure Failure to do so can result in bodily injury Tools Needed Parts Provided Phillips screwdriver Level Template 1 Anti tip bracket kit 1 Anchor sleeves 6 Lag bolts ...

Page 13: ...en flames of operating burners install a ventilation hood over the range that projects forward at least five inches beyond the front of the cabinets Make sure wall covering countertop and cabinets around the range can withstand the heat up to 194 F generated by the range Discoloration delamination or melting may occur This range has been designed to comply with the maximum allowable wood cabinet t...

Page 14: ...hen bottom of wood or metal cabinet is protected by not less than 1 4 6 4 cm flame retardant millboard covered with not less than no 28 MSG sheet steel 0 015 0 381 mm stainless steel 0 024 0 610 mm aluminum or 0 020 0 508 mm copper 15 38 1 cm minimum between countertop and adjacent cabinet bottom 30 76 2 cm 30 76 2 cm Minimum 15 38 1 cm 36 91 4 cm 36 91 4 cm 29 8 75 7 cm 24 60 9 cm Cabinet Cabinet...

Page 15: ...nstallation Read and follow the range installation instruction sheet template Leveling the Range Level the range by adjusting the leveling legs with a wrench Extending the legs slightly may also make it easier to insert the rear leg into the anti tip bracket Use a level to check your adjustments Place the level diagonally on the oven rack and check each direction for level First check direction Th...

Page 16: ...n the rear bracket Insert one of the screws removed in step 1 in the slot at each end of the rear filler 4 Store the remaining two screws with these instructions for future use Test Run Check if the range is properly installed and run a test cycle 1 Turn the oven mode knob to the Off position to start test 2 Turn each knob to the Hi position to check that the surface heating elements are working p...

Page 17: ...ng time runs out Press and hold button for three seconds to set the time of day 4 Start Time Setting Press the button to set the delayed timed cook The oven starts at the set time Press and hold button for three seconds to select and adjust oven settings 5 Probe Lockout Press the button to select Probe function Press and hold button for three seconds to lock the door and control panel 6 Timer On O...

Page 18: ...n NOTE The oven light cannot be turned on if the Self Clean function is active Minimum Maximum Default Settings All of the features listed have a minimum and a maximum time or temperature setting that may be entered into the control An entry acceptance beep sounds each time a control key is pressed An entry error tone two short tones sounds if the entry of the temperature or time is below the mini...

Page 19: ...and hold Start Time for three seconds Then press the Start Time key repeatedly to toggle through and change oven settings The Settings key allows you to set the hour mode on the clock 12 or 24 hours enable disable convection auto conversion adjust the oven temperature activate deactivate the preheating alarm light set the beeper volume switch the temperature scale between Fahrenheit and Celsius Se...

Page 20: ... temperature the preheating alarm light flashes until the oven door is opened You can activate or deactivate the preheating alarm light 1 Set the oven mode knob to the Off position 2 Press and hold Start Time for three seconds Then press Start Time repeatedly until PrE appears in the display 3 Press plus or minus to turn the function on off 4 Press Start to accept the change Adjusting the Beeper V...

Page 21: ...ts and most fruits and vegetables Foods that can easily spoil such as milk eggs fish meat or poultry should be chilled in the refrigerator Even when chilled they should not stand in the oven for more than 1 hour before cooking begins and should be removed promptly when cooking is completed Eating spoiled food can result in sickness from food poisoning Cook Time Timed Cook Set the oven to cook for ...

Page 22: ...urned off and until the surface has cooled to approximately 150 F CAUTION It is normal for the surface elements to cycle on and off during cooking even on higher settings This will happen more frequently if cooking on a lower temperature setting Using the Cooktop Elements CAUTION Only use cookware and dishes that are safe for oven and cooktop use Always use oven mitts when removing food from the c...

Page 23: ... Warming Zone to keep food warm after it has already been cooked Attempting to cook uncooked or cold food on the Warming Zone could result in a food borne illness CAUTION FOOD POISON HAZARD Bacteria may grow in food at temperatures below 140 F Always start with hot food Do not use the warm setting to heat cold food Do not use the warm setting for more than 2 hours Turning on a Warming Zone element...

Page 24: ...able are Aluminum Excellent heat conductor Some types of food will cause it to darken anodized aluminum cookware resists staining and pitting If aluminum pans slide across the ceramic cooktop they may leave metal marks which will resemble scratches Remove these marks immediately Copper Excellent heat conductor but discolors easily May leave metal marks on glass ceramic see Aluminum above Stainless...

Page 25: ... Racks 1 Pull the rack straight out until it stops 2 Lift up the front of the rack and pull it out Replacing Racks 1 Place the end of the rack on the support 2 Tilt the front end up and push the rack in CAUTION Replace oven racks before turning the oven on to prevent burns Do not cover the racks with aluminum foil or any other material or place anything on the bottom of the oven Doing so will resu...

Page 26: ...ws the auto converted oven temperature 350 F and the fan icon 4 When cooking has finished or to cancel turn the oven mode knob to the Off position NOTE The oven fan runs while convection baking The fan stops when the door is open In some cases the fan may shut off during a convection bake cycle Tips for Convection Baking Use Convection Bake for faster and more even multiple rack cooking of pastrie...

Page 27: ...3 Cookies Sugar cookies Chocolate chips Brownies 4 4 4 Pizza Fresh Frozen 5 5 Pastry Crust From scratch Refrigerator 4 4 Breads Biscuit canned Biscuit from scratch Muffins 5 5 5 Desserts Fruit crisps and cobblers from scratch Pies from scratch 2 crust fruit 4 4 Custards Cheesecake crème brulée 2 Soufflés Sweet or savory 2 Casserole Frozen lasagna 5 Roasting rack guide Food Rack position Beef Rib R...

Page 28: ...l Press plus or minus to select Hi or Lo 2 Press Start The oven begins to heat 3 Let the oven preheat for approximately five minutes before cooking the food if using broil 4 Turn the oven mode knob to the Off position to cancel at any time or when cooking is complete Smoking Due to the intense heat associated with broiling it is normal to experience smoke during the cooking process This smoke is a...

Page 29: ...7 0 5 1 0 5 Chicken 1 whole cut up 2 to 21 2 lbs split lengthwise 2 Breasts 5 5 8 10 8 10 4 6 5 7 Broil skin side down first Lobster Tails 2 4 10 to 12 oz each 5 9 12 Do not turn over Cut through back of shell Spread open Brush with melted butter before broiling and after half of broiling time Fish Fillets 1 4 to 1 2 thick 6 2 4 2 4 Handle and turn very carefully Brush with lemon butter before and...

Page 30: ...ly in oil before cooking to improve browning Warm This function will maintain an oven temperature of 170 F The Warm function will keep cooked food warm for serving up to three hours after cooking has finished The Warm function may be used without any other cooking operations Setting the Warm Function 1 Turn the oven mode knob to select Warm 2 Press Start 3 Turn the oven mode knob to the Off positi...

Page 31: ...g self clean warming or proofing Always unplug and remove the meat probe from the oven when removing food Before using insert the probe into the center of the thickest part of the meat or into the inner thigh or breast of poultry away from fat or bones Place food in the oven and connect the meat probe to the jack Keep the probe as far away from heat sources as possible Setting the Meat Probe Funct...

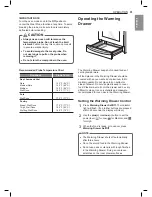
Page 32: ...e Warming Drawer The Warming Drawer keeps hot cooked foods at serving temperature All food placed in the Warming Drawer should be covered with an oven safe lid or aluminum foil to maintain quality Do not place foil on bottom or sides of drawer Do not use plastic wrap to cover food Plastic may melt onto the drawer and be very difficult to clean Use only utensils and cookware recommended for oven us...

Page 33: ... food being heated in the warming drawer Plastic may melt onto the drawer or surrounding areas and is very difficult to remove Use only aluminum foil or cookware that is capable of withstanding baking temperature to heat or cover your food Do not use the warming drawer to heat water or any other liquids Spilled liquids may cause an electrical short or result in severe personal injury electric shoc...

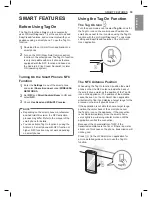
Page 34: ... not work depending on smart phones Using the Tag On Function The Tag On Icon Turn the oven mode knob to select Tag On Look for the Tag On icon on the control panel Position the smart phone next to the icon when using the Tag On function with the LG Smart Diagnosis cook mode setting and EasyClean features of the LG Smart Oven application The NFC Antenna Position When using the Tag On function posi...

Page 35: ...Clean alerts read the instruction guide and simulate and compare energy consumption when using EasyClean versus self clean cycles Oven Settings Allows the user to change oven settings including the hour mode preheat alarm light beeper volume temperature units convection auto conversion and thermostat adjustment IMPORTANT Features could be added or deleted when the LG Smart Oven application is upda...

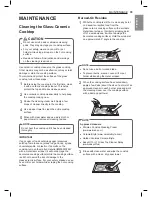
Page 36: ...hup tomato sauce jellies fudge candy syrups chocolate spills or plastic or foil melts on the cooktop remove the molten material IMMEDIATELY with a metal razor scraper it will not damage the decorated cooking surface while the cooking surface is still hot to avoid the risk of damage to the glass ceramic surface For your safety please use an oven mitt or pot holder while scraping the hot cooking sur...

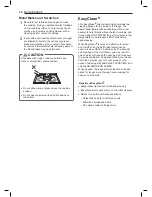
Page 37: ...ture takes advantage of LG s new enamel to help lift soils without harsh chemicals and it runs using ONLY WATER for just 10 minutes in low temperatures to help loosen LIGHT soils before hand cleaning While EasyClean is quick and effective for small and LIGHT soils the Self Clean feature can be used to remove HEAVY built up soils The intensity and high heat of the Self Clean cycle may result in smo...

Page 38: ...Certain non scratch scrubbing sponges such as those made of melamine foam available at your local stores can also help improve cleaning The range should be level to ensure that the bottom surface of the oven cavity is entirely covered by water at the beginning of the EasyClean cycle For best results use distilled or filtered water Tap water may leave mineral deposits on the oven bottom Soil baked ...

Page 39: ...Clean the oven cavity immediately after the EasyClean cycle by scrubbing with a wet non scratch scouring sponge or pad The scouring side will not scratch the finish Some water may spill into the bottom vents while cleaning but it will be captured in a pan under the oven cavity and will not hurt the burner NOTE Do not use any steel scouring pads abrasive pads or cleaners as these materials can perm...

Page 40: ...opening the oven door after the Self Clean cycle Stand to the side of the oven when opening the door to allow hot air or steam to escape The oven may still be VERY HOT During the Self Clean cycle the cooktop elements and warming drawer cannot be used NOTE Remove oven racks and accessories before starting the Self Clean cycle If oven racks are left in the oven cavity during the Self Clean cycle the...

Page 41: ...nd will not damage the oven Do not force the oven door open when the lock is displayed The oven door remains locked until the oven temperature has cooled Forcing the door open will damage the door After the Self Clean Cycle The oven door remains locked until the oven temperature has cooled You may notice some white ash in the oven Wipe it off with a damp cloth or a soap filled steel wool pad after...

Page 42: ...e soil Leave it on for 30 to 60 minutes Rinse with a damp cloth and dry Do not use abrasive cleaners Stainless Steel Surfaces To avoid scratches do not use steel wool pads 1 Place a small amount of stainless steel appliance cleaner or polish on a damp cloth or paper towel 2 Clean a small area rubbing with the grain of the stainless steel if applicable 3 Dry and buff with a clean dry paper towel or...

Page 43: ... pan and grid may be cleaned with a commercial oven cleaner or in the dishwasher Removing and Replacing the Lift Off Oven Doors and Drawer CAUTION Be careful when removing and lifting the door Do not lift the door by the handle The door is very heavy Removing the Door 1 Fully open the door 2 Unlock the hinge locks rotating them as far toward the open door frame as they will go Slot Lock Unlock Hin...

Page 44: ... cleaning can be done with the drawer in place however the drawer may be removed if further cleaning is needed Use warm water to thoroughly clean 1 Fully open the drawer 2 Locate the glide lever on each side of the drawer Push down on the left glide lever and pull up on the right glide lever 3 Pull the drawer away from the range Replacing the Drawer 1 Pull the bearing glides to the front of the ch...

Page 45: ...e convection fan will stop until the door is closed Can I use aluminum foil to catch drippings in my oven cavity Never use aluminum foil to line the bottom or sides of the oven or the warming drawer The foil will melt and stick to the bottom surface of the oven and will not be removable Use a sheet pan placed on a lower oven rack to catch drippings instead If foil has already melted onto the botto...

Page 46: ...n section of your owner s manual Are there any tricks to getting some of the stubborn soils out Scraping the soils with a plastic scraper before and during hand cleaning is recommended Fully saturating soils with water is also recommended However certain types of soils are harder to clean than others For these stubborn soils the Self Clean cycle is recommended Consult the Self Clean section of you...

Page 47: ...ion Turn the Oven mode knob to the Off position to clear the display and stop beeping Reprogram oven If fault recurs record fault number Turn the Oven mode knob to the Off position and contact a Service agent CODE CAUSE F 3 Key short error F 9 Oven not heating Surface units will not maintain a rolling boil or cooking is not fast enough Improper cookware being used Use pans which are flat and match...

Page 48: ... Follow instructions under Setting Oven Controls Meat too close to the element Reposition the rack to provide proper clearance between the meat and the element Preheat broil element for searing Meat not properly prepared Remove excess fat from meat Cut remaining fatty edges to prevent curling Insert on broiler pan wrong side up and grease not draining Always place grid on the broiler pan with ribs...

Page 49: ... blade scraper to remove soil See Cleaning the Glass Ceramic Cooktop in the MAINTENANCE section Areas of discoloration on cooktop Mineral deposits from water and food Remove using a glass ceramic cooktop cleaning creme Use cookware with clean dry bottoms Oven will not Self Clean The oven temperature is too high to set a Self Clean operation Allow the range to cool and reset the controls Oven contr...

Page 50: ...an cycle has been selected but the door is not closed Close the oven door LOCKED is on in the display when you want to cook The oven door is locked because the temperature inside the oven has not dropped below the locking temperature Turn the oven mode knob to the Off position Allow the oven to cool Burning or oily odor emitting from the vent This is normal in a new oven and will disappear in time...

Page 51: ... Use the home telephone for better communication performance resulting in better service Bad call quality may result in poor data transmission from your phone to the machine which could cause Smart Diagnosis to malfunction Smart Diagnosis Through the Call Center 1 Call the LG call center at LG U S 1 800 243 0000 LG Canada 1 888 542 2623 2 When instructed to do so by the call center agent hold the ...

Page 52: ...CT DAMAGES LOSS OF GOODWILL LOST PROFITS PUNITIVE OR EXEMPLARY DAMAGES OR ANY OTHER DAMAGE WHETHER ARISING DIRECTLY OR INDIRECTLY FROM ANY CONTRACTUAL BREACH FUNDAMENTAL OR OTHERWISE OR FROM ANY ACTS OR OMISSIONS TORT OR OTHERWISE This warranty gives you specific legal rights You may have other rights which may vary from province to province depending on applicable provincial laws Any term of this...

Page 53: ...led in accordance with published installation instructions including the product owner s and installation manuals Accessories to the product such as door bins drawers handles shelves etc Also excluded are parts besides those that were originally included with the product All costs associated with the above excluded circumstances shall be borne by the consumer For complete warranty details and cust...

Page 54: ...AIRE CUISINIÈRE ÉLECTRIQUE Veuillez lire attentivement le présent manuel d utilisation avant de faire fonctionner l appareil et conservez le à portée de la main pour le consulter en tout temps www lg com MFL69300802_01 LSSE3026ST ...

Page 55: ...n Cuisson minutée 23 Utilisation de la surface de cuisson 23 Zones de cuisson 23 Indicateur de surface chaude 23 Utilisation des éléments de la surface de cuisson 24 Réglage recommandé pour la surface de cuisson 25 Utilisation des bons ustensiles 25 Choix des ustensiles 25 Conseils pour la mise en conserve à domicile 26 Utilisation du four 26 Avant d utiliser le four 26 Évent du four 26 Utilisatio...

Page 56: ...ÉMENT À LA PROCÉDURE POUR VÉRIFIER SI LE DISPOSITIF EST BIEN INSTALLÉ ENLEVER LE TIROIR ET S ASSURER QUE LE DISPOSITIF ANTIBASCULEMENT EST ENCLENCHÉ OU BIEN TENIR LE BORD SUPÉRIEUR ARRIÈRE DU DOSSERET DE LA CUISINIÈRE ET TENTER PRUDEMMENT DE LA FAIRE BASCULER VERS L AVANT Consulter la section sur l installation pour connaître les consignes Il est possible pour un enfant ou un adulte de faire bascu...

Page 57: ...surface Les égratignures pourraient faire éclater la vitre AVERTISSEMENT Si la vitre de la porte la vitrocéramique la surface ou l unité de chauffage du four de l appareil sont endommagées cessez d utiliser l appareil et appelez le service d entretien Ne faites pas fonctionner la cuisinière sans la grille du poêle à charbon N utilisez pas du plastique pour couvrir la nourriture Utiliser uniquement...

Page 58: ...CTRIQUE MISE EN GARDE S assurer d avoir retiré tout le matériel d emballage avant d utiliser l appareil Gardez les plastiques les vêtements le papier et autres matériaux inflammables loin des parties de l appareil qui peuvent devenir brûlantes Débranchez toujours l alimentation électrique de l appareil avant tout travail de réparation Ne pas utiliser de papier d aluminium ou tout autre matériau po...

Page 59: ... qu ils n aient eu le temps de refroidir Ceci inclut la surface de cuisson et la zone au dessus de la porte du four Ne pas cuisiner sur une surface de cuisson brisée Si la surface de cuisson est brisée les solutions de nettoyage et les liquides renversés peuvent y pénétrer et causer une décharge électrique Communiquez avec un technicien qualifié immédiatement Ne pas utiliser la surface de cuisson ...

Page 60: ... page 28 pour savoir comment disposer la grille et les casseroles adéquatement Utilisez l ustensile de la taille correspondant au plat à cuisiner pour économiser de l énergie pendant la cuisson Chauffer une demi pinte d eau env 473 ml dans un chaudron de trois pintes exige plus d énergie que dans un chaudron d une pinte Pour un meilleur contact avec la table de cuisson en vitrocéramique utilisez d...

Page 61: ...ts pour le four N utiliser aucun produit nettoyant pour fours commerciaux ni aucun revêtement de protection des parois de la cavité dans le four ou près de toute partie du four Ne gardez jamais les oiseaux dans la cuisine Les oiseaux sont extrêmement sensibles aux émanations dégagées par le cycle d autonettoyage Les fumées peuvent être nocives ou même mortelles pour les oiseaux Déplacer les oiseau...

Page 62: ...aladies d origine alimentaire bien cuire la viande et la volaille Le département de l Agriculture a indiqué l utilisation des températures internes minimales sécuritaires suivantes pour la consommation Bœuf veau porc ou agneau haché 160 F Volaille 165 F Bœuf veau porc ou agneau 145 F Poisson fruits de mer 145 F ...

Page 63: ...que des accessoires Pour votre sécurité et pour assurer la longévité du produit utilisez exclusivement les composants autorisés Le fabricant décline toute responsabilité en cas de dysfonctionnement du produit ou d accidents consécutifs à l utilisation de pièces non autorisées et achetées de façon isolée Les illustrations fournies dans ce manuel peuvent être différentes des composants et des access...

Page 64: ...ettre la cuisinière à niveau 240 V Caractéristiques du produit L aspect et les caractéristiques décrits dans le présent manuel peuvent varier en raison des constantes améliorations apportées au produit Modèles de cuisinère LSSE3026 Description Glissière électrique dans la cuisinière Conditions de l alimentation 13 5 kW 120 240 VCA Dimensions extérieures 29 7 8 po L x 37 7 8 po H x 26 1 2 po P P av...

Page 65: ...0 1 888 542 2623 au CANADA pour en recevoir un sans frais supplémentaires AVERTISSEMENT Les consignes présentées dans ce manuel doivent être suivies à la lettre Le non respect de ces consignes peut causer un incendie une décharge électrique des dommages matériels des blessures ou la mort Porter des lors de l installation Le non respect de cette consigne peut causer des blessures Outils nécessaires...

Page 66: ...manutentions au dessus de flammes nues provenant des éléments de cuisson en marche installer une hotte d aspiration au dessus de la cuisinière qui dépasse d au moins cinq pouces le devant des armoires S assurer que le revêtement mural le dessus du comptoir et les armoires entourant la cuisinière peuvent résister à la chaleur de la cuisinière jusqu à 194 F Les matériaux qui les composent peuvent se...

Page 67: ... 78 7 cm au CANADA Au Canada on ne doit pas installer une cuisinière amovible à moins de 15 32 po 12 mm d une surface adjacente 30 po 76 2 cm 30 po 76 2 cm minimum 15 po 38 1 cm 36 po 91 4 cm Dimensions minimales Prévoir un espace minimum de 30 po 76 2 cm entre le dessus de la surface de cuisson et le bas d une armoire de bois ou de métal non protégée ou bien un espace minimal de 24 po 60 9 cm qua...

Page 68: ...uctions contiennent les renseignements nécessaires pour effectuer l installation Lire le feuillet d instructions d installation de la cuisinière et en suivre les étapes gabarit Mise au niveau de la cuisinière Mettez la cuisinière au niveau en réglant les pieds de nivellement au moyen d une clé Le fait de dévisser un peu les pieds de nivellement arrière pourrait faciliter leur insertion dans le sup...

Page 69: ...e la cuisinière Élément de remplissage arrière optionnel Si le comptoir ne remplit pas l ouverture du mur arrière l élément de remplissage arrière fourni avec la cuisinière encastrable sera nécessaire REMARQUE Si la profondeur du comptoir est supérieure à 25 po il y aura un espace entre la trousse de remplissage et le mur arrière Si la profondeur du comptoir est inférieure à 24 po le panneau de co...

Page 70: ...n appuyez sur Probe pendant trois secondes pour vérifier le système de verrouillage La porte du four doit se verrouiller et la surface de cuisson ne doit pas fonctionner quand la fonction de verrouillage est activée Appuyez sur Probe pendant trois secondes pour désactiver le système de verrouillage 4 Vérifiez maintenant le fonctionnement du four Tourner le bouton de mode four pour sélectionner l o...

Page 71: ...e du jour 4 Start Time Heure de mise en marche Setting Réglage Appuyez sur le bouton pour régler la cuisson minutée différée Le four commencera la cuisson à l heure définie Maintenir le bouton enfoncé pendant trois secondes pour sélectionner et ajuster les réglages du four 5 Probe Sonde Verrouillage Appuyez sur le bouton pour sélectionner la fonction de sonde Maintenir le bouton enfoncé pendant tr...

Page 72: ...Autonettoyage est activée Réglages minimum et maximum par défaut Toutes les fonctionnalités citées disposent d un réglage d heure ou de température minimum et maximum qui peut être saisi dans la commande Un bip d acceptation de la saisie retentit chaque fois que l on appuie sur une touche de commande Une tonalité d erreur d entrée 2 sons brefs se fait entendre si la température ou la durée que l o...

Page 73: ... le bouton Start Time enfoncé pendant trois secondes Appuyez ensuite plusieurs fois sur la touche Start Time pour faire défiler les réglages du four et en choisir un La touche Settings vous permet ceci régler le mode d affichage de l horloge 12 ou 24 heures activer ou désactiver la convection à conversion automatique régler la température du four activer ou désactiver le voyant de préchauffage rég...

Page 74: ...iver ou désactiver le voyant d alarme de préchauffage 1 Réglez le bouton de mode four à la position Off 2 Maintenez le bouton Start Time enfoncé pendant trois secondes Appuyez ensuite sur Start Time plusieurs fois jusqu à ce que PrE s affiche 3 Appuyez sur plus ou moins pour activer ou désactiver la fonction 4 Appuyez sur Start pour accepter cette modification Réglage du volume de l avertisseur 1 ...

Page 75: ... faites cuire des viandes fumées ou congelées et la plupart des fruits et légumes Les aliments qui peuvent se détériorer facilement tels que le lait les œufs le poisson la viande ou la volaille doivent tout d abord être placés dans le réfrigérateur Même lorsqu ils sont réfrigérés ils ne doivent pas rester dans le four plus d une heure avant le début de la cuisson et doivent être retirés immédiatem...

Page 76: ...que les éléments de surface s allument et s éteignent durant la cuisson même à des réglages de haute intensité Ceci se produira plus fréquemment si vous cuisinez à une température de plus faible intensité Utilisation des éléments de la surface de cuisson MISE EN GARDE Utilisez seulement une batterie de cuisine et une vaisselle qui vont au four et qui sont adaptées à la surface de cuisson Utilisez ...

Page 77: ...QUE D EMPOISONNEMENT ALIMENTAIRE La formation de bactéries est possible dans les aliments à des températures inférieures à 140 F Toujours commencer avec les aliments chauds Ne pas utiliser la fonction de réchaud pour réchauffer des aliments froids Ne pas utiliser la fonction de réchaud pendant plus de deux heures Pour allumer un élément de la zone réchaud 1 Enfoncer le bouton d élément zone réchau...

Page 78: ...eur de la chaleur Certains types d aliments les noirciront les ustensiles d aluminium anodisé résistent aux taches et à la corrosion Si des poêles d aluminium sont glissées sur la surface de cuisson en céramique elles peuvent laisser des marques de métal qui ressemblent à des égratignures Éliminer ces marques immédiatement Cuivre Excellent conducteur de la chaleur mais se décolore facilement Peut ...

Page 79: ...four Retrait des grilles 1 Tirer la grille jusqu à ce qu elle se bloque 2 Soulever l avant de la grille et tirer pour la sortir complètement Remise en place des grilles du four 1 Placer l extrémité de la grille sur les supports 2 Soulever l avant de la grille et la pousser dans le four MISE EN GARDE Replacez les grilles du four avant d allumer le four pour prévenir les brûlures Ne couvrez pas les ...

Page 80: ...rsion automatique soit 350 F et l icône de ventilateur 4 Une fois la cuisson terminée ou pour annuler réglez le bouton de mode four à la position Off REMARQUE Le ventilateur du four fonctionne pendant la cuisson par convection Le ventilateur s arrête lorsque la porte est ouverte Dans certains cas le ventilateur pourrait s arrêter durant un cycle de cuisson par convection Conseils relatifs à la cui...

Page 81: ... anges 4 3 3 Biscuits Au sucre Aux pépites de chocolat Brownie Carrés au chocolat 4 4 4 Pizza Fraîche Congelée 5 5 Croûte à tarte Maison Réfrigérateur 4 4 Pain Pâte à biscuit en boîte Pâte à biscuit maison Muffins 5 5 5 Desserts Croustades ou pavés aux fruits maison Tartes aux fruits maison à deux croûtes 4 4 Crèmes anglaises Gâteau au fromage Crème brûlée 2 Soufflés Sucré ou salé 2 Casserole Lasa...

Page 82: ...ionner l option Broil ou Speed Broil Appuyez sur plus ou sur moins pour sélectionner Hi ou Lo 2 Appuyez sur Start Le chauffage du four commence 3 Laissez préchauffer le four pendant environ cinq minutes avant d y placer les aliments à cuire 4 Tourner le bouton de mode four à la position Off pour annuler à tout moment ou lorsque la cuisson est terminée Fumée En raison de la chaleur intense associée...

Page 83: ...2 à 2 1 2 lb fendu dans le sens de la longueur Deux poitrines 5 5 8 à 10 8 à 10 4 à 6 5 à 7 Faites d abord griller le côté avec la peau en dessous Queues de homard De 2 à 4 De 10 à 12 oz chacune 5 9 à 12 Ne pas tourner Couper le dos de la carapace Écarter Badigeonner de beurre fondu avant le grillage et à la mi temps de grillage Filets de poisson 1 4 à 1 2 po d épaisseur 6 2 à 4 2 à 4 Manipulez et...

Page 84: ...leur brunissement Warm Réchaud Cette fonction maintiendra la température du four à 170 F La fonction Réchaud gardera le plat cuisiné chaud pour le servir jusqu à trois heures après sa cuisson La fonction Réchaud peut être utilisée sans autres opérations de cuisson Réglage de la fonction Réchaud 1 Tourner le bouton de mode four pour sélectionner Warm 2 Appuyez sur Start 3 Tourner le bouton de mode ...

Page 85: ...illage l autonettoyage le réchaud ou le levage du pain Toujours débrancher et retirer la sonde thermique du four lors du retrait des aliments Avant d utiliser la sonde thermique l insérer dans le centre de la partie la plus épaisse de la viande ou à l intérieur de la cuisse ou de la poitrine de la volaille sans toucher le gras ou les os Placer les aliments dans le four et brancher la sonde thermiq...

Page 86: ...permettant de les consommer Tous les aliments placés dans le tiroir réchaud doivent être recouverts d un couvercle allant au four ou de papier d aluminium pour maintenir leur qualité Ne placez pas de papier d aluminium dans le fond ou sur les côtés du tiroir N utilisez pas de pellicule de plastique pour couvrir la nourriture La pellicule de plastique peut fondre dans le tiroir et il sera très diff...

Page 87: ...ure en cours de réchauffement dans le tiroir réchaud Le plastique peut fondre dans le tiroir ou autour et il sera très difficile de le retirer Utilisez seulement du papier d aluminium ou des ustensiles de cuisine qui sont capables de résister à la chaleur pour réchauffer ou couvrir les aliments N utilisez pas le tiroir réchaud pour faire bouillir de l eau ou tout autre liquide Les éclaboussures de...

Page 88: ...oit pas offerte sur certains téléphones intelligents Utilisation de la fonction Tag On L icône Tag On Tourner le bouton de mode four pour sélectionner Tag On Rechercher l icône Tag On sur le panneau de commande Placez le téléphone intelligent près de l icône lorsque vous utilisez la fonction Tag On avec les fonctions LG Smart DiagnosisMC de réglages du mode de cuisson et EasyClean de l application...

Page 89: ...ons et de simuler la consommation d énergie aux fins de comparaison entre EasyClean et le cycle d autonettoyage Réglages du four Permet à l utilisateur de modifier les réglages du four y compris le mode horaire le voyant d alarme de préchauffage le volume de l avertisseur les unités de température la convection à conversion automatique et le thermostat IMPORTANT Des caractéristiques peuvent être a...

Page 90: ... fruits ketchup sauce tomate gelées fudge bonbons sirops chocolat etc se déversent sur la surface de cuisson ou si du plastique ou du papier d aluminium s y collent et fondent enlevez la matière fondue IMMÉDIATEMENT avec un grattoir à lame de rasoir inoffensive pour les motifs décoratifs pendant que la surface de cuisson est encore chaude afin d éviter d endommager la surface en vitrocéramique Pou...

Page 91: ...yage pour l intérieur de la cuisinière La fonction EasyClean tire profit du nouvel émail de LG pour déloger les saletés sans produits chimiques agressifs en seulement 10 minutes à l aide d EAU UNIQUEMENT et à basse température elle aide à déloger les saletés LÉGÈRES avant le nettoyage à la main La fonction EasyClean est rapide et efficace pour les saletés petites et LÉGÈRES tandis que la fonction ...

Page 92: ...e Certaines éponges à récurer qui ne provoquent pas de rayures comme celles fabriquées en mousse de mélamine en vente à votre supermarché local peuvent également améliorer le nettoyage La cuisinière doit être au niveau pour assurer que le fond du four est entièrement recouvert d eau au début du cycle EasyClean Pour de meilleurs résultats utilisez de l eau distillée ou filtrée L eau du robinet pour...

Page 93: ...nt après le cycle EasyClean nettoyez la cavité du four avec une éponge ou un tampon à récurer antiégratignure mouillé Le côté récurant ne causera pas de rayures sur le fini De l eau peut s écouler dans les évents inférieurs pendant le nettoyage mais sera recueillie dans un bac sous la cavité du four et n endommagera pas l élément de cuisson REMARQUE N utilisez pas de tampons à récurer en métal de ...

Page 94: ... sur le côté du four lorsque vous ouvrez la porte pour laisser l air chaud ou la vapeur s échapper Le four pourrait être encore TRÈS CHAUD Durant le cycle Autonettoyage les éléments de la table de cuisson et le tiroir réchaud ne peuvent pas être utilisés REMARQUE Enlevez les grilles et les accessoires avant de démarrer le cycle Autonettoyage Si les grilles sont laissées dans la cavité du four dura...

Page 95: ...mal et n endommagera pas votre four Ne forcez pas la porte du four à rester ouverte lorsque l icône de cadenas est affichée La porte du four restera verrouillée jusqu à ce que la température ait diminué Forcer la porte à rester ouverte endommagera la porte Après le cycle Autonettoyage La porte du four restera verrouillée jusqu à ce que la température ait diminué Vous pourriez voir des cendres de c...

Page 96: ...z avec un chiffon humide et séchez N utilisez pas des produits à nettoyer abrasifs Surfaces en acier inoxydable Pour éviter les égratignures n utilisez pas de tampons en laine d acier 1 Placez une petite quantité de détergent ou de produit à polir pour les appareils en acier inoxydable sur un chiffon humide ou un papier essuie tout 2 Nettoyez une petite surface en frottant dans le sens des fibres ...

Page 97: ...uvent tous deux être nettoyés avec un produit de nettoyage pour four commercial ou au lave vaisselle Retrait et remise en place de la porte du four et du tiroir amovibles MISE EN GARDE Faites attention lorsque vous enlever et soulever la porte Ne soulevez pas la porte par la poignée La porte est très lourde Retrait de la porte 1 Ouvrez complètement la porte 2 Dégagez les verrous de charnière en le...

Page 98: ...oir est en place toutefois le tiroir peut être retiré si un nettoyage plus en profondeur est nécessaire Servez vous d eau chaude pour nettoyer à fond 1 Ouvrez complètement le tiroir 2 Repérez les leviers de glissement de chaque côté du tiroir Poussez vers le bas le levier de glissement de gauche et tirez vers le haut le levier de glissement de droite Levier Poussez vers le bas avec un doigt Tirez ...

Page 99: ...égouttements dans la cavité de mon four N utilisez jamais de papier d aluminium pour protéger le fond ou les côtés du four ou du tiroir réchaud L aluminium va fondre et coller à la surface inférieure du four et il ne sera plus possible de l enlever Placez plutôt une plaque à pâtisserie sur une grille inférieure du four pour recueillir les égouttements Si l aluminium a déjà fondu dans le fond du fo...

Page 100: ...ge de ce manuel Y a t il des trucs pour faire disparaître les saletés tenaces Il est conseillé de gratter les saletés avec un grattoir de plastique avant et pendant le nettoyage à la main Saturer entièrement la saleté avec de l eau est également recommandé Par contre certains types de saletés sont plus difficiles à nettoyer que d autres Pour ces saletés tenaces la fonction Autonettoyage est recomm...

Page 101: ...mode four à la position Off pour effacer l écran et arrêter la tonalité Reprogrammer le four Si le problème revient enregistrer le numéro Tourner le bouton de mode four à la position Off et communiquer avec un agent de service CODE CAUSE F 3 Erreur de court circuit de la touche F 9 Le four ne chauffe pas Les éléments de surface ne maintiennent pas l ébullition ou ne cuisent pas assez rapidement Ut...

Page 102: ...gagement approprié entre la viande et l élément Préchauffer l élément de grillage pour le grillage La viande n est pas bien préparée Enlever le gras excédentaire Découper les bords gras pour empêcher la viande de retrousser pendant la cuisson La grille de la lèchefrite est placée du mauvais côté et la graisse ne s écoule pas Toujours placer la grille de la lèchefrite avec les nervures vers le haut...

Page 103: ...Nettoyage de la surface de cuisson en vitrocéramique dans la section ENTRETIEN Marques ou points bruns Les liquides qui débordent cuisent sur la surface Utilisez un grattoir à lame de rasoir pour enlever la saleté Consultez la rubrique Nettoyage de la surface de cuisson en vitrocéramique dans la section ENTRETIEN Zones décolorées sur la surface de cuisson Dépôts minéraux provenant de l eau et des ...

Page 104: ...cessaire d exécuter un autre cycle d autonettoyage ou d augmenter la durée du cycle d autonettoyage Les messages CLEAN et DOOR s affichent Le cycle d autonettoyage a été sélectionné mais la porte n est pas fermée Fermez la porte du four Le message LOCKED s affiche lorsque l on veut utiliser la cuisinière La porte du four est verrouillée parce que la température à l intérieur du four n a pas baissé...

Page 105: ...ous obtiendrez une meilleure qualité de communication et un meilleur service si vous utilisez votre téléphone fixe Une mauvaise qualité d appel peut causer une mauvaise transmission des données entre votre téléphone et la cuisinière et donc un mauvais fonctionnement de la fonction Smart DiagnosisMC Smart DiagnosisMC Diagnostic par le centre de service 1 Appelez le centre de service LG au Canada 1 ...

Page 106: ...DOMMAGE ACCESSOIRE CONSÉCUTIF SPÉCIAL DIRECT OU INDIRECT D AUCUNE PERTE D ACHALANDAGE OU DE PROFITS D AUCUN DOMMAGE PUNITIF EXEMPLAIRE OU AUTRE DIRECTEMENT OU INDIRECTEMENT ATTRIBUABLE À TOUTE VIOLATION CONTRACTUELLE FONDAMENTALE OU AUTRE OU À UNE ACTION UNE OMISSION UN DÉLIT OU TOUTE AUTRE CHOSE La présente garantie vous confère des droits légaux spécifiques Vous pourriez disposer d autres droits...

Page 107: ...r une utilisation commerciale dans un bureau ou un centre récréatif ou est utilisé contrairement aux instructions spécifiées dans le manuel d utilisation du produit Les coûts associés au retrait du produit de votre résidence aux fins de réparation Le retrait et la réinstallation du produit s il est installé à un endroit inaccessible ou contrairement aux instructions d installation publiées y compr...

Page 108: ...55 AIDE MÉMOIRE FRANÇAIS AIDE MÉMOIRE ...

Page 109: ...LG Customer Information Center Register your product Online www lg com 1 800 243 0000 USA 1 888 542 2623 CANADA Printed in Korea ...

Reviews: