background image

7-22

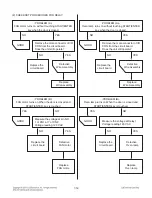
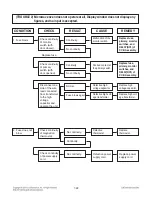
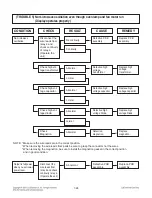
(TROUBLE 2)   Microwave oven does not operate at all, Display window does not display any 

figures, and no input is accepted.

CONDITION

CHECK

RESULT

CAUSE

REMEDY

2. Fuse does not 

blow.

No continuity.

Continuity.

Check continuity 

of power supply 

cord.

Defective power 

supply cord.

Replace power 

supply cord.

Defective

thermostat.

Replace

thermostat.

Check continuity 

of magnetron 

thermostat.

No continuity.

1. Fuse blows.

Continuity.

Malfunction of the 

monitor switch.

Replace fuse,

primary, monitor

switches, and

RELAY(RY4) of

P.C.B Assembly.

Check continuity 

of monitor 

switch (with 

door closed).

Check continuity 

of primary 

switch (with 

door opened).

No continuity.

Disconnect one 

side of the wire 

lead connected 

from transformer 

to the high 

voltage 

capacitor and 

operate the unit.

No continuity.

Continuity.

Shorted contact at 

the primary switch.

Replace fuse,

primary, monitor

switches, and

RELAY(RY4) of

P.C.B Assembly.

Fuse blows again

Normal.

Defective high 

voltage capacitor.

Replace high 

voltage capacitor.

Defective high volt-

age transformer.

Replace high volt- 

age transformer.

Replace fuse

Summary of Contents for LSMC3086ST

Page 1: ...ERVICE MANUAL MODEL LSMC3086ST LSMC3089BD CAUTION BEFORE SERVICING THE UNIT READ THE SAFETY PRECAUTIONS IN THIS MANUAL Website http biz lgservice com P NO MFL06272539 May 2015 Printed in Korea 삼 흥 정 판 Internal Use Only ...

Page 2: ...roper alignment integrity and connections d Any defective or misadjusted components in the interlock monitor door seal and microwave generation and transmission systems shall be repaired replaced or adjusted by procedures described in this manual before the oven is released to the owner e A Microwave leakage check to verify compliance with the Federal performance standard should be performed on ea...

Page 3: ...ONTROL PANEL INSTRUCTIONS 4 2 OVERALL CIRCUIT DIAGRAM 5 1 SCHEMATIC DIAGRAM 5 1 GENERAL INFORMATION FOR SERVICE 6 1 GENERAL PRECAUTIONS IN USE 6 1 TRIAL OPERATION 6 1 FEATURES AND SPECIFICATIONS FEATURES 6 1 SERVICE INFORMATION 7 1 PRECAUTIONS AND REPAIR SERVICE TIPS 7 1 MICROWAVE LEAKAGE TEST 7 2 POWER OUTPUT MEASUREMENT 7 3 DISASSEMBLY INSTRUCTIONS 7 4 INTERLOCK SYSTEM 7 11 INTERLOCK CONTINUITY ...

Page 4: ...ry Interlock Switch Interlock Monitor Switch Magnetron 2M246 Cook top Lamp 130 V 50 W Cavity Lamp 130 V 50 W Timer Digital up to 99 min 99 sec in each cooking stage Tray Tempered Safety Glass Overall Dimensions 2915 16 W x167 16 H x153 8 D Oven Cavity Size 211 4 W x97 16 H x143 16 D Effective Capacity of Oven Cavity 1 7 Cu ft Accessories Use Care Guide Cooking Guide Installation Manual Exhaust Ada...

Page 5: ...ng operation BEFORE TOUCHING any parts of the oven always remove the power plug from the outlet Remove your watches whenever working close to or replacing the Magnetron DO NOT touch any parts of the control panel circuit A resulting static electric discharge may damage this P C B NEVER operate the oven with no load NEVER injure the door seal and front plate of the oven cavity NEVER put iron tools ...

Page 6: ...GROUNDING INSTRUCTIONS For personal safety this appliance must be fully grounded at all times In the event of an electrical short circuit grounding reduces the risk of electrical shock The plug must be plugged into an outlet that is properly installed and grounded CAUTION This unit is equipped with a 3 prong plug for your safety If the wall outlet is a grounded 3 hole type the unit will be grounde...

Page 7: ...4 1 OPERATING INSTRUCTIONS CONTROL PANEL 1 2 4 6 3 9 12 14 15 18 21 7 10 13 16 19 17 20 11 8 5 ...

Page 8: ...N COMBI 9 CUSTOM SET Touch this key to change the oven s default settings for sound clock display speed and defrost weight 10 AUTO COOK Touch this key to cook bacon fresh rolls and muffins frozen rolls and muffins beverages chicken pieces and hot cereal SOFTEN butter ice cream cream cheese or frozen juice MELT butter chocolate cheese or marshmallows 11 SPEED AUTO COMBI Touch this pad when setting ...

Page 9: ... 1 OVERALL CIRCUIT DIAGRAM SCHEMATIC DIAGRAM CAUTIONS Disconnect from electrical supply before servicing unit Sharp edges Wear gloves when replacing main fuse or servicing the product to prevent injuries ...

Page 10: ...ll show the time counting down by seconds D After about 5 minutes make sure the primary interlock switch the secondary interlock switch and the interlock monitor switch operate properly by opening and closing the door several times Touch the START ENTER key each time the door is closed E Continue operating the unit Two short and a long beep sound signal is heard when the time is up The unit will s...

Page 11: ...w the limit of 5 mW cm2 All service adjustments should be made for minimum microwave energy leakage readings 3 Do not operate the unit until it is completely repaired if any of the following conditions exist The unit must not be operated a The door does not close firmly b The hinge is broken c The door seal is damaged d The door is bent or warped or there is any other visible damage on the unit th...

Page 12: ...ave radiation leakage emitted by the microwave oven should not exceed 1mW cm sq And always start measuring of an unknown field to assure safety for operating personnel from radiation leakage NOTE The standard is 5mW cm sq while in the customerʼs home 1mW cm sq stated here is manufacturerʼs own voluntary standard for units in customer ʼs home Move probe along shaded area Probe scanning speed Less t...

Page 13: ...used 3 At least once a year have the electromagnetic energy leakage monitor checked for calibration by its manufacturer POWER OUTPUT MEASUREMENT 1 Microwave power output measurement is made with the microwave oven supplied at its rated voltage and operated at its maximum microwave power setting with a load of 1000 5 g of potable water 2 The water is contained in a cylindrical borosilicate glass ve...

Page 14: ...RDING TO THE OVERALL CIR CUIT DIAGRAM ESPECIALLY SWITCHES AND HIGH VOLTAGE CIRCUIT A REMOVING POWER AND CONTROL CIRCUIT BOARD Figures 1 2 and 3 1 Remove a screw securing the control panel assembly to the oven cavity 2 Remove the control panel with pushing it upward 3 Remove the five connectors CN1 CN2 CN3 CN5 CN6 CN8 CN10 CN11 and wire leads Relay1 Relay2 Relay4 from the circuit board Control Pane...

Page 15: ...r duct 3 Remove the mounting plate by turning the screws 1 or 2 screws securing it to the out case 4 Remove two screws on the left central edge and one screw on the right central edge of Base plate Remove the Mount All from the out case by removing one screw securing it to the out case 5 Remove six screws of the rear cavity 6 Remove the outcase Figure 4 ...

Page 16: ... according to ADJUSTMENT PROCEDURES on page 7 11 Latch Board Primary Interlock Switch Monitor Interlock Switch Secondary Interlock Switch Latch Board Primary Interlock Switch Monitor Interlock Switch Secondary Interlock Switch Latch Board Primary Interlock Switch Monitor Interlock Switch Secondary Interlock Switch Latch Board Primary Interlock Switch Monitor Interlock Switch Secondary Interlock Sw...

Page 17: ...magnetron VERY CAREFULLY NOTES When removing the magnetron make sure that its dome does not hit any adjacent parts or it may be damaged When replacing the magnetron be sure to install the magnetron gasket in the correct position and be sure that the gasket is in good condition After replacing the magnetron check for microwave energy leakage with a survey meter Check microwave energy leakage must b...

Page 18: ...ng the door be sure to check that the primary interlock switch the secondary interlock switch and the interlock monitor switch is in good operating normally After replacing the door check for microwave energy leakage with a survey meter Microwave energy leakage must be below the limit of 5mW cm2 With a 275 ml water load Figure 12 G DISASSEMBLING DOOR Figure 13 1 Remove the dielectric choke by usin...

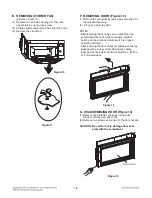
Page 19: ...Remove the mounting plate by loosening mounting plate screws 1 or 2 screws securing it to the back plate See Figure 14 2 Remove MOUNT ALL loosening one screw loosening one screw securing the ventilation Motor and back plate See Figure 15 a 3 Carefully pull the ventilation motor ASS Y out of the microwave oven See Figure 15 b J REPLACING THE HUMIDITY SENSOR For sensor model only 1 Remove the sensor...

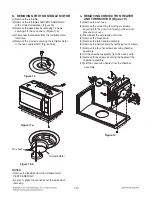
Page 20: ...nnector not the wires when removing L REMOVING CONVECTION HEATER AND THERMISTOR Figure 19 1 Remove the out case 2 Remove the air duct by removing six screws securing it to the oven front plate guide air and glasswool L cover 3 Disconnect the wire leads of air duct 4 Remove the magnetron 5 Remove the latch board assembly 6 Remove the bottom plate by removing four screws 7 Remove the four net screws...

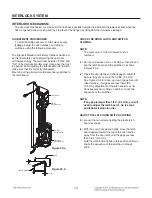
Page 21: ...Interlock Switch Figure 20 a Figure 20 b CHECK THE DOOR LATCH AND SWITCH CLOSING NOTE The outer cover of the microwave oven is removed 1 Set the microwave oven on its side so that you can see the latch board and the switches as shown inFigure 20 a 2 Close the door tightly and check gaps A and B to be sure they are no more than 1 64 0 5 mm See Figure 20 b for close up view of gaps A and B door latc...

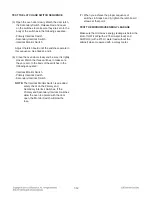
Page 22: ...ro to the body of the switches in the following sequence Interlock Monitor Switch Primary Interlock Switch Secondary Interlock Switch NOTE The Interlock Monitor Switch is an added safety check on the Primary and Secondary Interlock Switches If the Primary and Secondary Interlock Switches allow the oven to operate with the door open the Monitor Switch will blow the fuse 7 When you achieve the prope...

Page 23: ...When the secondary switch operation is abnormal make the necessary adjustment or replace the switch only with the same type of switch C MONITOR SWITCH TEST Disconnect the wire lead from the monitor switch Connect the ohmmeter leads to the common COM and normally closed NC terminals of the switch The meter should indicate closed circuit in the door open condition When the door is closed meter shoul...

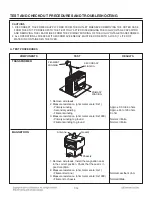
Page 24: ...TRON 1 Remove wire leads 2 Measure resistance ohm meter scale Rx1 Primary winding Secondary winding Filament winding 3 Measure resistance ohm meter scale Rx1000 Primary winding to ground Filament winding to ground 1 Remove wire leads Install the magnetron seal in the correct position Check that the seal is in good condition 2 Measure resistance ohm meter scale Rx1 Filament terminal 3 Measure resis...

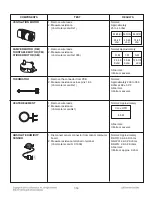
Page 25: ...resistance in both directions 1 Measure continuity ohm meter scale Rx1 2 Remove the lead wires and operate oven at power level 1 through power level 10 1 Measure continuity ohm meter scale Rx1 2 Remove the lead wires and operate oven at Convection Cooking 1 Remove wire leads 2 Measure resistance ohm meter scale Rx1 Relay 4 Power Level 00 10 20 30 40 50 60 70 80 90 100 0 Sec 4 Sec 6 Sec 8 Sec 10 Se...

Page 26: ...le Motor T m Stirrer Motor s m Thermistor Heater element Absolute Humidity Sensor 1 Remove wire leads 2 Measure resistance ohm meter scale Rx1 1 Remove wire leads 2 Measure resistance ohm meter scale Rx1000 1 Remove the connector from PCB 2 Measure resistance across pins 1 3 ohm meter scale Rx1 1 Remove wire leads 2 Measure resistance ohm meter scale Rx1 1 Disconnect sensor connector from micom co...

Page 27: ...NTER key is touched Malfunction of the high voltage transformer the high voltage capacitor including the diode the magnetron the blower motor or the circuit board NOTES If the fuse is blown by an improper switch operation replace all switches and the fuse at the same time After replacing the defective switches with new ones make sure that they are correctly connected Check for microwave energy lea...

Page 28: ...without touching START ENTER key when the door is closed GOOD Remove the mate connector of I O CON from the circuit board Does the unit still operate Defective Wire Assembly Replace the circuit board Replace Wire Assembly NO NO YES YES GOOD Measure the voltage at pin NO 1 of CN1 at 7 of CN2 Voltage reading 120 V AC Replace the circuit board Defective FAN motor YES NO NO YES Replace FAN motor PROBL...

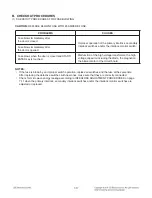
Page 29: ...usly operates 3 Proper temperature measurement is not obtained 4 The buzzer does not sound or continues to sound 5 Some segments of one or more digits do not light up or they continue to light up or segments light when they should not 6 Wrong figures appear 7 The figures of all digits 8 Some of the indicators do no flicker light up 9 The clock does not keep time properly NOTE A MICROWAVE ENERGY LE...

Page 30: ...while working on this panel to discharge any static charge built up in your body Micom model only CONDITION Microwave oven does not work Inserting many plugs into one outlet and using them at the same time blown fuse or breaker Plug is not inserted tightly Output power is too low Low AC input voltage Food temperature is too low Using metallic ware and allowing it to touch the oven wall Sparks occu...

Page 31: ...ly TROUBLE 1 The following visual conditions indicate a probable defective control circuit 1 Incomplete segments Segment missing Partial segment missing Digit flickering NOTE Slight flickering is normal 2 Colon does not turn on or blink 3 A distinct change in the brightness of one or more numbers in display 4 One or more digits in the display are not lighting 5 Display indicates a number different...

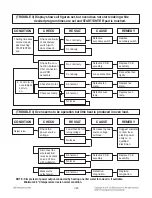
Page 32: ... of the monitor switch Replace fuse primary monitor switches and RELAY RY4 of P C B Assembly Check continuity of monitor switch with door closed Check continuity of primary switch with door opened No continuity Disconnect one side of the wire lead connected from transformer to the high voltage capacitor and operate the unit No continuity Continuity Shorted contact at the primary switch Replace fus...

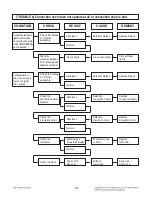
Page 33: ...ion then tightly Output is low Lower than 90 of rating voltage Normal Decrease in power source voltage with load Suggest customer contact local electric power utility co or qualified electrician Check the power source voltage Disconnect the wire leads from relay 4 and check on and off time with multitester Abnormal Normal Abnormal Defective magnetron Replace magnetron Defective P C B assembly Repl...

Page 34: ...capacitor Replace high voltage capacitor Check high vol tage capacitor Abnormal Defective magnetron Replace magnetron Check Magnetron TROUBLE 5 No microwave oscillation even though oven lamp and fan motor run Display operates properly Output is full power when you set lower power level Abnormal Defective PCB assembly Replace PCB assembly Disconnect the wire leads from relay 4 and check continuity ...

Page 35: ...htly Check the Relay 2 of P C B assembly Temperature in the oven cavity is lower or higher than preset Abnormal Normal Abnormal Check the convection heater element Defective Relay 2 Replace Relay 2 Defective convection heater Replace convection heater Check the Relay 2 of P C B assembly Abnormal Check the circulation motor Defective circulation motor Replace circulation motor Cook on the glass tra...

Page 36: ...EXPLODED VIEW DOOR PARTS 1005 1381 1000 1004 1007 1006 W244 1009 EV MODEL Customer Model Product Code SVC Model ...

Page 37: ...2004 2381 2028 2011 2008 260M 2030 2006 2400 2041 2043 2042 EV CONTROLLER PARTS ...

Page 38: ...OVEN CAVITY PARTS 3103 3031 3001 3029 3024 3010 6001 3005 W178 W202 3026 3011 3025 3032 3009 3045 3037 6000 EV ...

Page 39: ...LATCH BOARD PARTS 4001 4000 4002 W102 4003 4002 4004 EV ...

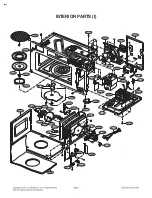
Page 40: ...00 5018 5009 3006 5002 5003 W101 5012 5052 5007 W101 5035 W101 5404 4003 5705 5019 W177 5409 3008 5024 5062 5407 W125 W124 W124 W141 W141 5403 3206 3207 5021 5029 5049 5008 5116 5028 5402 5411 5039 3044 3208 5401 5452 5068 5116 5116 EV ...

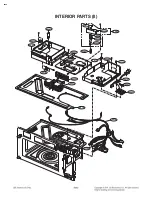
Page 41: ...INTERIOR PARTS II 5382 5412 5045 3005 3021 5011 5037 3027 5410 5016 3051 5006 5010 5001 5041 5014 W140 W140 W300 5385 W178 5800 5067 3006 EV ...

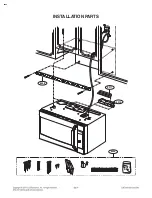
Page 42: ...INSTALLATION PARTS VINYL BAG 6009 6008 6011 6010 EV ...

Page 43: ......

Reviews: