background image

17

INSTALLATION

ENGLISH


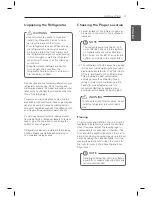
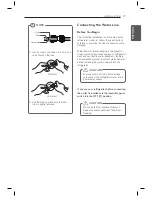
NOTE

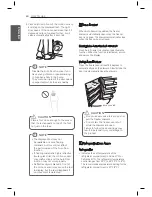
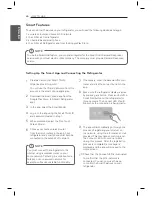
1)  Gently  insert  the  tube  until  only  one 

line shows on the tube. 


(Correct)


(Incorrect)

2)  Pull the tube to make sure that the 

tube is tightly fastened. 

Collet

Tube


Insert Line

Connecting the Water Line

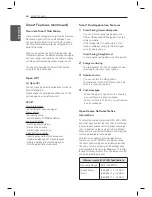
Before You Begin

This water line installation is not covered by the 
refrigerator warranty. Follow these instructions 
carefully to minimize the risk of expensive water 
damage.

Water hammer (water banging in the pipes) in 
house plumbing can cause damage to refrigerator 
parts and can lead to water leakage or flooding. 
Call a qualified plumber to correct water hammer 
before installing the water supply line to the 
refrigerator.

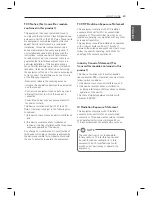
If you use your refrigerator before connecting 
the water line, make sure the icemaker power 
switch is in the OFF (O) position.


CAUTION

Do not install the icemaker tubing in 
areas where temperatures fall below 
freezing.


CAUTION

To prevent burns and product damage, 
only connect the refrigerator water line to 
a cold water supply.

Summary of Contents for LUPXS3186N

Page 1: ...Order Number GETEC C1 16 277 FCC Part 18 Test Report Number GETEC E3 16 032 Page 1 1 EUT Type Refrigerator FCC ID BEJF31GDA APPENDIX H USER S MANUAL ...

Page 2: ...OWNER S MANUAL FRENCH DOOR REFRIGERATOR Please read this owner s manual thoroughly before operating and keep it handy for reference at all times LUPXS3186N www lg com ENGLISH FRANÇAIS ESPAÑOL ...

Page 3: ...taching the In Door Ice Bin 30 Assembling the In Door Ice Bin 31 Automatic Icemaker 33 Ice and Water Dispenser 34 Storing Food 34 Food Preservation Location 35 Food Storage Tips 35 Storing Frozen Food 36 Adjusting the Refrigerator Shelves 36 Detaching the Shelf 36 Assembling the Shelf 37 When Closing the Door 37 CustomChill Pantry 37 Setting the CustomChill Pantry 38 Crisper Drawers 38 Removing th...

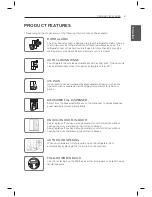
Page 4: ...he refrigerator doors close automatically with a slight push The door only closes automatically when it is open at an angle less than 30 MEASURED FILL DISPENSER Select from the Measured Fill menu on the dispenser to quickly dispense pre measured amounts automatically KNOCK ON DOOR IN DOOR See at a glance if you have enough mustard or cold soft drinks without opening the door and allowing the cold ...

Page 5: ...with this product 115V 60Hz AC only It is the user s responsibility to replace a standard 2 prong wall outlet with a standard 3 prong wall outlet Do not install the refrigerator where there may be a danger of the unit falling y y Use DO NOT allow children to climb stand or hang on the refrigerator doors or on the shelves in the y y refrigerator They could damage the refrigerator and seriously inju...

Page 6: ... y y In refrigerators with automatic icemakers avoid contact with the moving parts of the ejector y y mechanism or with the heating element that releases the cubes Do not place fingers or hands on the automatic ice making mechanism while the refrigerator is plugged in When dispensing ice from the dispenser do not use crystal ceramics y y Do not touch the cold surfaces in the freezer compartment wi...

Page 7: ... not store articles on the top of the appliance y y Maintenance Do not use strong detergents like wax or thinners for cleaning Clean with a soft cloth y y Wipe foreign objects such as dust and water off the prongs of the power plug and contact y y areas regularly Do not store disassemble or repair the refrigerator by yourself y y Remove any dust or foreign matter from the power plug pins y y Do no...

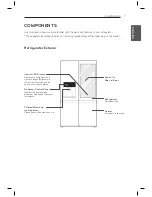
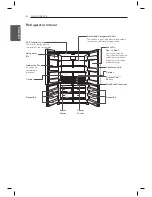
Page 8: ...odel Refrigerator Exterior Interior LED Display Displays the refrigerator and freezer s target temperature the air filter condition and the network connection status Refrigerator Preserves food Freezer Preserves frozen food Dispenser Control Panel Displays the icemaker and dispenser modes and the water filter status Filtered Water and Ice Dispenser Dispenses purified water and ice Knock On Door in...

Page 9: ... are adjustable to meet your individual storage needs Refrigerator Bin Crisper Freezer Bin FreshSteel Container CustomChill Pantry Freezer Drawer Freezer Drawer Indoor Ice Bin Ice cubes are automatically produced Knock On Door in Door See what s inside the Door in Door compartment without opening the door Keeps the cold air inside and saves energy Condiment Bin Crisper Freezer Bin ...

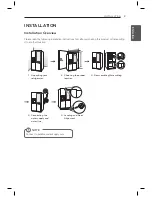
Page 10: ...on instructions first after purchasing this product or transporting it to another location Note Connect to potable water supply only 1 Unpacking your refrigerator 4 Connecting the water supply and water line 2 Choosing the proper location 5 Leveling and Door Alignment 3 Disassembling Assembling ...

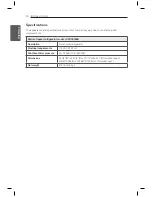
Page 11: ...product improvements Bottom freezer refrigerator model LUPXS3186N Description French door refrigerator Electrical requirements 115 VAC 60 Hz Min Max Water pressure 20 120psi 138 827kPa Dimensions 35 7 8 W x 36 1 2 D x 70 1 4 H x 51 1 8 D w door open 912 W X 929 D X 1784 H X 1298 mm D w door open Net weight 473 lb 215 kg ...

Page 12: ...move tape or glue These products can damage the surface of your refrigerator Refrigerator shelves are installed in the shipping position Please reinstall shelves according to your individual storage needs The refrigerator should always be plugged y y into its own individual properly grounded electrical outlet rated for 115 Volts 60 Hz AC only and fused at 15 or 20 amperes This provides the best pe...

Page 13: ... least 2 inches 5 08 cm between the back of the refrigerator and the wall Removing Assembling the Doors 2 5 08 cm 24 61 cm Removing the Left Refrigerator Door 1 The water supply is connected to the upper right part of the rear surface of the refrigerator Remove the ring in the joint area Hold the water supply connection and gently push the collet to detach the water supply line as shown in Note De...

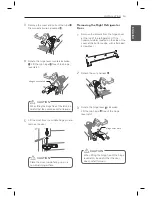
Page 14: ...n and remove the door Caution Place the door inside facing up on a non scratching surface Removing the Right Refrigerator Door 1 Remove the screws from the hinge cover at the top of the refrigerator Lift the hook not visible located on the side of the cover at the bottom edge with a flat head screwdriver 2 Detach the wire harness 1 1 Caution When lifting the hinge free of the hinge lever latch be ...

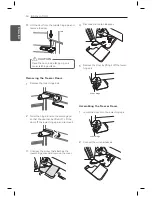
Page 15: ...move the cover Removing the Freezer Doors 1 Remove the inner hinge bolt 2 Twist the hinge to raise the pivoting end so that the door can be lifted off Lift the door off the lower hinge pin and remove it 4 Disconnect all wire harnesses 5 Remove the door by lifting it off the lower hinge pin Assembling the Freezer Doors 1 Lower the door onto the lower hinge pin 2 Connect the wire harnesses 1 2 Lower...

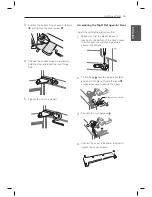
Page 16: ...atch and slot it into place Rotate the lever counterclockwise to secure the hinge 3 Connect the wire harness 4 Position the cover in its place Insert and tighten the cover screws 3 Position the bottom hinge cover in its place and tighten the cover screw 4 Position the middle hinge pin in place to hold the door and insert the inner hinge bolt 5 Tighten the inner hinge bolt Assembling the Right Refr...

Page 17: ...place Rotate the lever clockwise and fasten the hinge Assembling the Left Refrigerator Door 3 Connect all the wire harnesses 2 1 Hinge Lever Latch 4 Push the water supply tube into the hole on the top case and pull it through the backplate 5 Hold the water supply connection and gently push in the collet to connect the water supply line as shown in Insert the tube at least 5 8 inch 15 mm into the c...

Page 18: ... water damage Water hammer water banging in the pipes in house plumbing can cause damage to refrigerator parts and can lead to water leakage or flooding Call a qualified plumber to correct water hammer before installing the water supply line to the refrigerator If you use your refrigerator before connecting the water line make sure the icemaker power switch is in the OFF O position Caution Do not ...

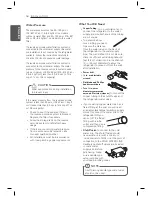
Page 19: ... must be in accordance y y with local plumbing code requirements What You Will Need Copper Tubing y y in outer diameter to connect the refrigerator to the water supply Be sure both ends of the tubing are cut square To determine how y y much tubing you need measure the distance from the water valve on the back of the refrigerator to the water supply pipe Then add 8 feet 2 4 m Be sure there is suffi...

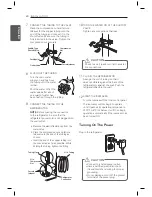
Page 20: ... production or smaller cubes WARNING When using any electrical device such as a power drill during installation be sure the device is battery powered double insulated or grounded in a manner that will prevent the hazard of electric shock 4 FASTEN THE SHUTOFF VALVE Fasten the shutoff valve to the cold water pipe with the pipe clamp Pipe Clamp Saddle Type Shutoff Valve Vertical Cold Water Pipe Note ...

Page 21: ...onnection as far as possible While holding the tubing tighten the fitting Tubing Clamp in Tubing in Compression Nut Refrigerator Connection Ferrule sleeve Saddle Type Shutoff Valve Packing Nut Outlet Valve Compression Nut Ferrule sleeve 10 TURN THE WATER ON AT THE SHUTOFF VALVE Tighten any connections that leak 11 PLUG IN THE REFRIGERATOR Arrange the coil of tubing so that it does not vibrate agai...

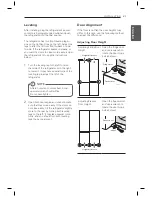
Page 22: ...s two front leveling legs one on the right and one on the left Adjust the legs to alter the tilt from front to back or side to side If the refrigerator seems unsteady or you want the doors to close more easily adjust the refrigerator s tilt using the instructions below 1 Turn the leveling leg to the left to raise that side of the refrigerator or to the right to lower it It may take several turns o...

Page 23: ...or to malfunction Turn off the icemaker if the refrigerator is not yet connected to the water supply Turn off the automatic icemaker and then plug the power plug of the refrigerator into the grounded electrical outlet This is applicable only to certain models Caution Putting food in the refrigerator before it has cooled could cause the food to spoil or a bad odor could linger inside the refrigerat...

Page 24: ...he Auto Door function is enabled 111 text is displayed on the floor near the motion sensor 1 Smart Grid Connect Smart Grid Press the Smart Grid button to turn the Smart Grid function On Off When the function is on the icon illuminates The Smart Grid function automatically turns on when the refrigerator is connected to the Wi Fi network When the refrigerator is responding to a Demand Response DR me...

Page 25: ...opens If the door opens less than 20 degrees and is not opened further it will close automatically after 3 seconds Caution Do not use excessive force to push or y y pull the freezer drawers Do not slam the freezer door shut y y while the drawers are open Failure to follow these warnings may result in personal injury or damage to the product Note The displayed text may not y y be readable on some f...

Page 26: ...r button once for y y Power PWR mode Press the Fresh Air Filter button again to y y switch back to Auto mode 8 Ice Plus This function increases both ice making and freezing capabilities Press Ice Plus to illuminate the icon in the y y display and activate the function for 24 hours After 24 hours the icon and the function automatically turn off To deactivate the function manually press Ice y y Plus...

Page 27: ... and click the connect button in the app 8 Make sure the refrigerator display is active by pressing any button Press and hold the Smart Grid button on the refrigerator for three seconds The Connect LED should blink while the connection is being made 9 The app will automatically go through the process of registering your product on the network using the information you ve provided This may take som...

Page 28: ...nd Response signals If the refrigerator receives a Demand Response signal from the utility company the refrigerator will turn on the Grid LED on the refrigerator display and control its power consumption according to the signal The refrigerator will respond to the signals received from the utility company as long as product performance is maintained If the refrigerator receives a Demand Response s...

Page 29: ...rgy usage based on Demand Response DR signals from the utility company If the refrigerator is operating in Smart Saving mode according to the DR signal you can see a pop up Smart Saving_Delay Defrost Lower energy usage based on time period 2 Energy monitoring The refrigerator can check number of door openings and power consumption 3 Remote Control You can control the Refrigerator Temperature Fresh...

Page 30: ... that may cause undesired operation of the device Any changes or modifications in construction of this device which are not expressly approved by the party responsible for compliance could void the user s authority to operate the equipment FCC RF Radiation Exposure Statement This equipment complies with FCC radiation exposure limits set forth for an uncontrolled environment This transmitter must n...

Reviews: