background image

5

ENGLISH

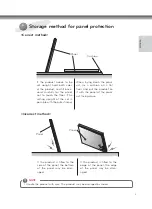
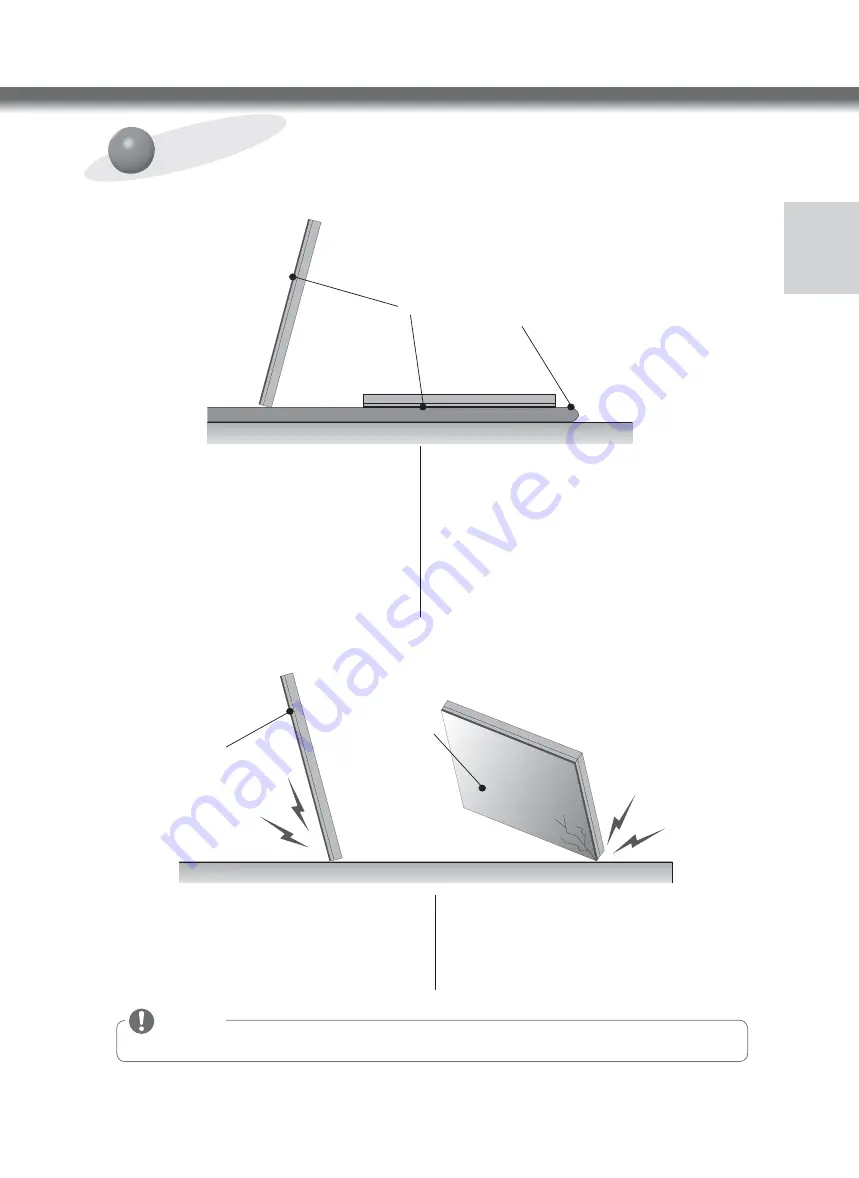
<Correct method>

Panel

Cushion

If the product needs to be 
set upright, hold both sides 
of the product, and tilt back-
ward carefully for the panel 
not to touch the floor. (The 
setting upright of the set is 
possible with the outer frame)

When laying down the prod-
uct, lay a cushion on a flat 
floor, and put the product on 
it with the panel of the prod-
uct facing down.

<Incorrect method>

Panel

Panel

If the product is tilted to the 
side of the panel, the bottom 
of the panel may be dam-
aged.

If the product is tilted to the 
edge of the panel, the edge 
of the panel may be dam-
aged. 


Handle the product with care. The product may be damaged by shocks.

NOTE

Storage method for panel protection

Summary of Contents for MultiVision SPM42C4-WL

Page 1: ...Owner s Manual MultiVision Mounting Bracket Please read the safety information carefully before using the product SPM42C4 WL SPM42C4 WP P NO MFL63640518 1207 REV00 ...

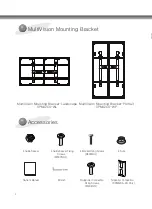
Page 2: ...tiVision Mounting Bracket Portrait SPM42C4 WP MultiVision Mounting Bracket 4 Guide Spacer 4 Guide Spacer Fixing Screws M6X35mm 4 Bracket Fixing Screws M6X80mm 4 Nuts Owner s Manual Wrench 4 Supporter Connection Fixing Screws M4X8mm Supporter Connection SPM42C4 WL Only ...

Page 3: ...re that the power cord is removed from the outlet before installing the product Otherwise it may cause an electric shock or a fire Keep the product away from sprinklers sprinkler sensors high tension wires and power sources Do not install the product in a locationwhere vibrations or shock impacts are likely to occur Wearworking gloveswhen installing the product Do not use bare hands Otherwise it m...

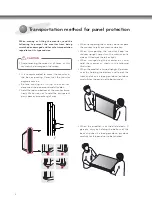
Page 4: ...sult in damage on the screen CAUTION When transporting the monitor do not expose the monitor to jolts or excessive vibration When transporting the monitor keep the monitor upright never turn the monitor on its side or tilt towards the left or right When transporting the monitor by hand hold the monitor as shown in the following illustration When the product is carried upright 2 persons carry by ho...

Page 5: ...hen laying down the prod uct lay a cushion on a flat floor and put the product on it with the panel of the prod uct facing down Incorrect method Panel Panel If the product is tilted to the side of the panel the bottom of the panel may be dam aged If the product is tilted to the edge of the panel the edge of the panel may be dam aged Handle the product with care The product may be damaged by shocks...

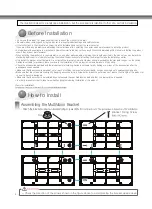
Page 6: ...e bracket on vertical walls Do not install the bracket on a wall inclined at an angle exceeding the standard range or on the ceiling Salitek is not liable for problems that occur due to the installation of the product on a slanted wall or on the ceiling Check the accessories provided with the product before installing Salitek is not liable for any damage to or loss of the accessories after the pac...

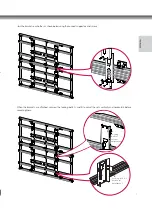
Page 7: ...ow using the connect supporters and screws When the brackets are attached unscrew the locking bolts A and B to adjust the sets vertically and horizontally before mounting them A Locking bolt for vertical adjustment Locking bolt for horizontal adjustment B ...

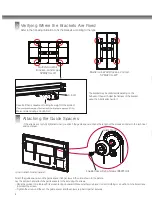
Page 8: ... the Guide Spacers If the screws are not fully tightened when you attach the guide spacers check the length of the screws and refer to the technical service manual How to attach Guide Spacers Attach the guide spacers and the guide spacer fixing screws in the order shown in the picture Lay the set down and attach the guide spacers to the set using the screws Place the product on a table with its sc...

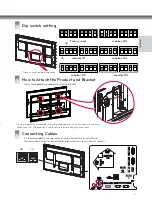
Page 9: ...fer to the set s owner s manual Place the product assembled with the guide spacers as illustrated with the arrow Make sure that the product is fixed securely by checking attachement 4 Dip switch setting OFF ON 1 2 3 4 1 2 3 4 1 2 3 4 1 2 3 4 1 2 3 4 1 2 3 4 monitor 3 1 2 3 4 1 2 3 4 monitor 4 1 2 3 4 1 2 3 4 monitor 5 1 2 3 4 1 2 3 4 monitor 1 monitor 2 Factory reset RX TX There is a switch on the...

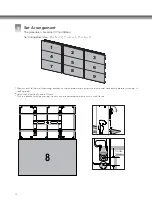
Page 10: ... 9 6 3 1 Mount set 8 to the wall mounting bracket as shown below and adjust it vertically and horizontally before fastening A locking bolts Adjust set 8 vertically within 10 mm This is a bracket with gas spring so sets can be adjusted vertically with a small force 8 1 4 7 2 5 8 3 6 9 A Under 10mm ...

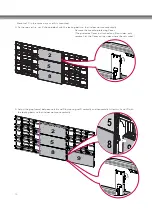
Page 11: ...force Remove the module protecting Cover The protective Cover is attached on all four sides only re move first the Cover on the sides where the sets meet CAUTION when set 5 is mounted the sets may collide and cause damage Avoid severe impact to the set when adjusting the gap seam Otherwise this can cause damage to the module glass 5 8 5 8 Fine tuning the gap between the sets Rotate the guide pins t...

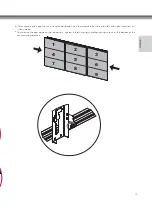
Page 12: ...tically Remove the module protecting Cover The protective Cover is attached on all four sides only remove first the Cover on the sides where the sets meet 2 5 8 9 2 5 8 5 Adjust the gap seam between sets 8 and 9 by moving set 9 vertically and horizontally After this fix set 9 with the locking bolts so that it does not move vertically 5 8 9 A A ...

Page 13: ...explained above finish the assembly by sliding the left and right three sets as shown below To minimize the gap between the joined sets tighten the left and right sliding locking screws at the bottom of the wall mounting brackets 1 4 7 2 5 8 3 6 9 ...

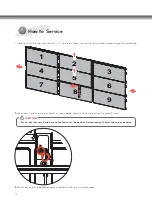
Page 14: ...ht sliding fixing locks are released 2 Move sets 2 and 5 to the position B as shown below Move set 8 to the position A and pull it out CAUTION Make sure that sets 2 and 5 are not pulled out at the position A when moving them to the service position 3 Mount back set 8 replaced for service and adjust the sets in reverse order A B ...

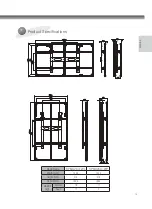
Page 15: ...uct Specifications Model Name SPM42C4 WP Width mm 1426 1426 Height mm 210 210 Depth mm 1006 1006 Weight kg Gross 18 17 Net 1 1 1 1 106 185 79 100 1325 5 749 650 600 400 185 79 100 106 1325 5 749 400 600 650 SPM42C4 WL ...

Page 16: ...The model name and serial number are located on the back and side of the product Please make a note of these below Model Name Serial Number ...

Reviews: