50
PRDCAM
AHU Communication Kit Installation Manual
Due to our policy of continuous product innovation, some specifications may change without notification.
©LG Electronics U.S.A., Inc., Englewood Cliffs, NJ. All rights reserved. “LG” is a registered trademark of LG Corp.
EEV KIT INSTALLATION
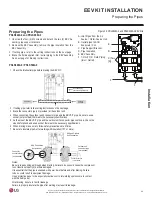
Liner
Fold
A
B
C
D
f
Brazing
E
F
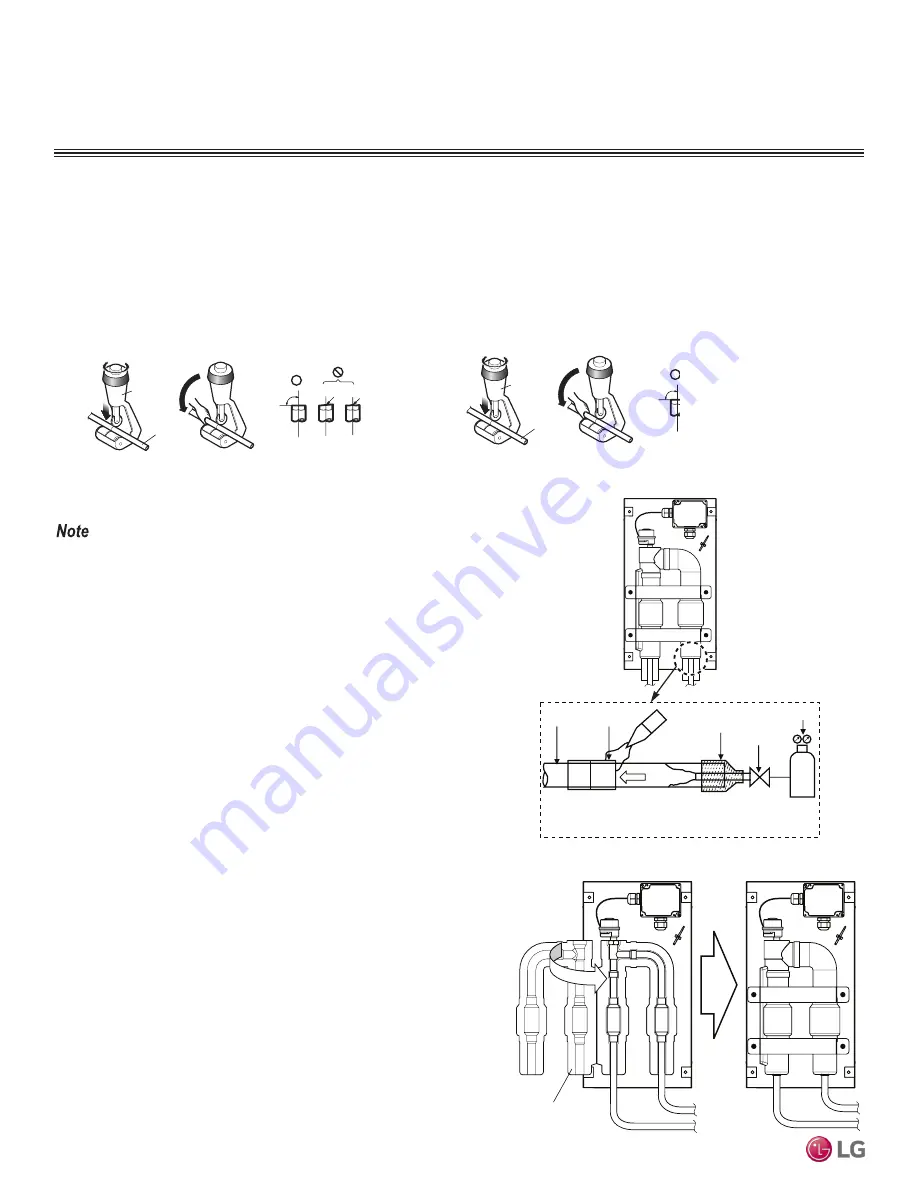
A Refrigerant Piping
B Area to be Brazed
C Tape
D Hands-On Valve
E Pressure-Reducing Valve
F Nitrogen
Insulating the Piping
1. After brazing is complete, place the Pipe Insulation back on the
EEV Assembly. Peel off the liner, fold the insulation as shown in
the figure at right, and press down to seal.
2. Fully insulate the field piping up to the EEV Assembly. To avoid
condensation, make sure there are no gaps between the field
piping insulation and the EEV Assembly insulation. Finish the
connection with tape.
3. To secure the EEV Assembly, re-install the two (2) pipe support
brackets using the four (4) M4 screws.
Brazing
• Use a nitrogen purge set to 0.02 MPa while brazing.
Brazing without a nitrogen purge will create a large amount of
oxidization on the inside of the pipes, adversely affecting valves and
compressors in the refrigerating system and preventing normal system
operation�
• When brazing the field piping to the EEV Kit Assembly, use a wet cloth to pro-
tect and ensure that the main EEV body temperature does not exceed 248°F.
• Make sure that the other parts such as electrical box, support ties, and wiring
are also protected from direct flames during brazing.
• After brazing is complete, use medical grade dry nitrogen and pressure
test the refrigerant piping system to a minimum of 550 psi for a period of 24
hours. Pressurize the liquid, low pressure vapor, and high pressure vapor
pipes (heat recovery systems only) of the air-source / water-source units
concurrently. The test must be done with the air-source / water-source unit
service valves closed. (For more details, refer to the manual of the respective
air-source / water-source installation manuals.)
Figure 23: Brazing Field Piping to EEV Assembly.
Brazing and Insulating the Piping
Figure 24: Installing the Insulation.
Cutting Pipe
1 Use a copper pipe cutter to cut the pipe in a straight line.
2 When cutting, tilt the pipe end downward to prevent
burrs from getting inside the pipe. After cutting, use
a reamer to remove any burrs from inside the pipe.
Copper
pipe cutter
90°
Incline Roughness
Pipe
Copper
pipe cutter
90°
Incline Roughness
Pipe
Notes:
The presence of burrs can result in refrigerant leakage.
Remove any burrs with a reamer.
Cutting dust could lead to malfunctioning if it gets
inside the pipe.

