background image

P A G E   1 6

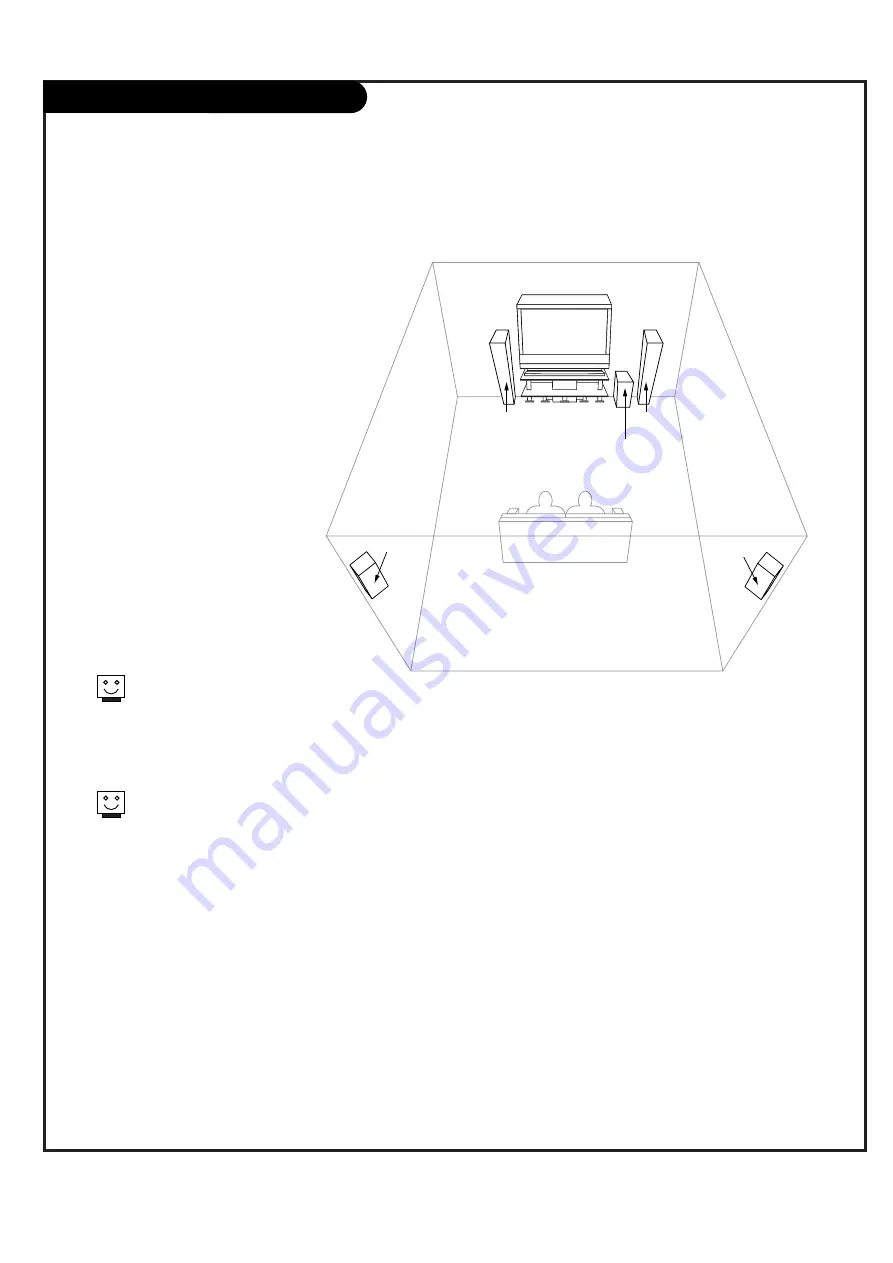
Home Theater: Speaker Layout

sub-woofer

right
speaker

left

speaker

surround

sound 

speaker

surround
sound 
speaker

This is a typical speaker layout. 
Any number of other speaker setups
are possible, and some changes may
be needed to maximize your sound.
However, a Dolby Digital Receiver is
required to hear 5.1 channel audio.

Left and right speakers on each 
side of the TV enhance separation.
The TV's sound optional hookup
“center mode in,” makes the dialog
sound as though it’s coming directly
from the TV. The rear surround
sound speakers provide 
the majority of other sounds, like
those from special effects in movies.
Your sub-woofer generates ultra-low 
frequency sound, for rumbling 
low-end audio.

Sound is affected by 
speaker placement, so 
make sure nothing is in
front of the speakers, and
that they are aimed in
appropriate directions.

You have the option of 
turning the TV speakers on
or off.

Summary of Contents for RU-44SZ83D

Page 1: ...efully before operating your set Retain it for future reference Record model number and serial number of the set See the label attached on the back cover and quote this information to your dealer when you require service MODEL RU 44SZ83D LG Electronics U S A Inc ...

Page 2: ... to comply with the limits for a Class B digital device pursuant to Part 15 of the FCC Rules These limits are designed to provide reasonable protection against harmful interference when the equip ment is operated in a residential installation This equipment generates uses and can radiate radio frequency energy and if not installed and used in accordance with the instruction manual may cause harmfu...

Page 3: ... the manufac turer s instructions and should use a mounting accessory recommended by the manufacturer 8 Transporting Product A product and cart combination should be moved with care Quick stops excessive force and uneven surfaces may cause the product and cart combination to overturn 9 Attachments Do not use attachments not recommended by the product manufacturer as they may cause hazards 10 Venti...

Page 4: ...alified service personnel 20 Damage Requiring Service Unplug this product from the wall outlet and refer servic ing to qualified service personnel under the following con ditions a If the power supply cord or plug is damaged b If liquid has been spilled or objects have fallen into the product c If the product has been exposed to rain or water d If the product does not operate normally by following...

Page 5: ...ure outside Picture 27 Booster 28 VIDEO Menu Options 29 30 AUDIO Menu Options 31 32 TIME Menu Options Auto Clock Setup 33 Manual Clock Setup 34 TV Turn Off Time Setup 35 TV Turn On Time Setup 36 Sleep Timer Setup 37 Auto Off 38 SPECIAL Menu Options Aspect Ratio 39 On Screen Menu Languages 40 Captions Setup 41 Caption Text Mode Selection 42 Key Lock 43 Cinema Mode Setup 44 Demo Menu Review 45 LOCK ...

Page 6: ...mode Orange Projection lamp is reaching the end of its life and needs to be replaced with a new lamp Contact your service center Red flashing There is a problem with the lamp or around it Contact an authorized service center Green flashing The lamp cover is not closed Orange The projection TV is overheating Check the blocked vents of the projection TV and the accumulated dust in the dust filter Re...

Page 7: ... a sub woofer to your surround sound system RF Connector Antenna Used to connect analog cable or antenna signals to the television either directly or through your cable box Video 1 or 2 Connects the video sig nals from various types of equipment Component Input 1 2 Connect a component video audio device to these jacks Refer to your DVD manual for further information Connecting cables and external ...

Page 8: ...t menu Left Right Audio Used for stereo sound from various types of equipment Video Connects the video signals from any piece of equipment S Video A connection available on some very high end equipment that provides better picture quality than video input If you input both Side Video and S Video only the S Video will work If you re connecting a video game device make sure to change the picture set...

Page 9: ...u receive your RF signal through an antenna that is several years old and connects with two small prongs you will need to pur chase a 300 to 75 ohm adapter It should be available from your local electronics dealer We recommend using a 75 ohm cable for your antenna connections in order to prevent interference MONITOR OUT VIDEO INPUT 2 VIDEO INPUT 1 S VIDEO R L AUDIO VIDEO MONO 75 Ω ANT IN Antenna C...

Page 10: ...nect them following the instructions provided with your equipment This can be combined with any other equipment you may want to hook up 1 In Output Switch Out 3 4 Audio TV VCR L R Video MONITOR OUT VIDEO INPUT 2 VIDEO INPUT 1 S VIDEO R L AUDIO VIDEO MONO 75 Ω ANT IN Cable TV Wall Jack Panel RF Coaxial Wire 75 ohm Cable Box If you re using a cable box leave the TV on channel 3 or 4 and use your cab...

Page 11: ... hear stereo sound from cable or your VCR you will need to connect A V cables as well as the wire that runs from the VCR to your TV If you want to receive your signals on Channel 3 or 4 locate the Out to TV jack on your VCR Connect a cable from the Out to TV jack to the Antenna In jack on the back of your TV After connecting external equipment to the TV don t display a still picture for a long tim...

Page 12: ...C DTV XGA 480p 720p 1080i PC DTV XGA 480p 720p 1080i RGB INPUT UPGRADE PORT RGB DVI INPUT R L AUDIO R L AUDIO VARIABLE AUDIO OUT MONITOR OUT VIDEO INPUT 2 VIDEO INPUT 1 S VIDEO R L AUDIO VIDEO MONO 75 Ω ANT IN COMPONENT INPUT2 INPUT1 PR PB Y R L AUDIO DVI DVD 480i 480p 720p 1080i 480i 480p 720p 1080i Component Video S Video Component input jacks on the Monitor Y PB PR Video output jacks on DVD pla...

Page 13: ...80i 480p 720p 1080i 480i 480p 720p 1080i Audio L R Dolby Digital Out AUDIO CENTER MODE IN DVI INPUT PC DTV XGA 480p 720p 1080i PC DTV XGA 480p 720p 1080i RGB INPUT UPGRADE PORT RGB DVI INPUT R L AUDIO R L AUDIO VARIABLE AUDIO OUT COMPONENT INPUT2 INPUT1 PR PB Y R L AUDIO DVI DVD 480i 480p 720p 1080i 480i 480p 720p 1080i HD SET TOP 1920x1080i 1280x720P 720x480P RGB DTV DVI DTV Input Signal 480i 480...

Page 14: ...40x350 31 5KHz 70Hz 640x480 31 5KHz 60Hz 640x480 37 9KHz 72Hz 640x480 37 5KHz 75Hz 800x600 35 2KHz 56Hz 800x600 37 9KHz 60Hz 800x600 48 1KHz 72Hz 800x600 46 9KHz 75Hz 1024x768 48 4KHz 60Hz 1024x768 56 5KHz 70Hz 1024x768 60 0KHz 75Hz SVGA VGA Text XGA RGB PC DVI PC Input Select RGB PC Source and press ENTER Use UP DOWN arrows to select the desired options H Position V Position H Size V Size Phase a...

Page 15: ...o directions provided with the amplifier 3 Connect Left Right Variable Audio Output to an external Audio Amplifier System AUDIO CENTER MODE IN DVI INPUT PC DTV XGA 480p 720p 1080i PC DTV XGA 480p 720p 1080i RGB INPUT UPGRADE PORT RGB DVI INPUT R L AUDIO R L AUDIO VARIABLE AUDIO OUT MONITOR OUT VIDEO INPUT 2 VIDEO INPUT 1 S VIDEO R L AUDIO VIDEO MONO 75 Ω ANT IN COMPONENT INPUT2 INPUT1 PR PB Y R L ...

Page 16: ...peakers on each side of the TV enhance separation The TV s sound optional hookup center mode in makes the dialog sound as though it s coming directly from the TV The rear surround sound speakers provide the majority of other sounds like those from special effects in movies Your sub woofer generates ultra low frequency sound for rumbling low end audio Sound is affected by speaker placement so make ...

Page 17: ...t device s input settings 1 2 Audio S Video AUDIO CENTER MODE IN DVI INPUT PC DTV XGA 480p 720p 1080i PC DTV XGA 480p 720p 1080i RGB INPUT UPGRADE PORT RGB DVI INPUT R L AUDIO R L AUDIO VARIABLE AUDIO OUT MONITOR OUT VIDEO INPUT 2 VIDEO INPUT 1 S VIDEO R L AUDIO VIDEO MONO 75 Ω ANT IN COMPONENT INPUT2 INPUT1 PR PB Y R L AUDIO DVI DVD 480i 480p 720p 1080i 480i 480p 720p 1080i PB Component 1 2 RGB D...

Page 18: ...E Switches the sound on or off THUMBSTICK Allows you to navigate the on screen menus and to adjust the system set tings and preferences by moving to an option withF G and selecting the highlighted option with TV VIDEO Selects Analog Video1 Video2 Side video Component1 2 RGB and DVI input sources MODE Selects the remote operating mode TV VCR Cable DVD and Satellite Select other operating modes for ...

Page 19: ... in the menu system and other on screen displays selects highlighted options RECORD PAUSE REW FFWD PLAY STOP Control the functions on your VCR VOLUME UP DOWN Increases decreases the sound level RATIO Changes the screen format or aspect ratio SKIP Playing CDs Selects songs Playing DVDs Selects movie chapters COMPONENT 1 2 Selects component signal sources such as DVD or HD receiver ENTER When in the...

Page 20: ...ONO TV 6 Main Channel Display Displays current channel number Channel Label If a channel label has been set then it will appear here PIP Display This display appears when PIP is active Volume Volume level is displayed while adjusting the sound Mute Appears when sound is muted Time Appears when pressing the enter button ABC ...

Page 21: ...page 6 Lamp indicator See page 6 Temperature indicator See page 6 1 2 3 4 5 6 7 8 See menu pages for instructions on using the on screen menus The POWER MENU ENTER VOLUME and CHANNEL buttons work just as they do on your remote control If TV is moved from cold to normal room tempera ture condensation may form inside TV wait 3 hours the TV to adjust to room temperature before turning it on ...

Page 22: ...HT arrow button to access the Setup menu Use the UP DOWN arrow to select EZ Scan Press ENTER or the Right arrow button to start the EZ Scan channel search 1 2 3 4 5 Automatically finds analog channels available through ANT IN input and stores all active over the air and cable channels in memory on the channel list back of remote 6 7 EZ Scan G Ch Edit Ch Label Main Input Sub Input Booster Processin...

Page 23: ...now see a screen filled with channel numbers and a preview picture Use the UP DOWN and LEFT RIGHT arrow to select a channel then use ENTER to Delete remove the channel from the channel scan or Add include the chan nel in the channel scan Press SURF to add the channel to the Surf List Press EXIT to save and return to TV view ing or press MENU to save and return to the previous menu 3 4 5 2 1 EZ Sca...

Page 24: ... change the letter Press SURF to save Repeat 5 and 6 steps until all channels are Labeled Press EXIT to save and return to TV view ing 1 2 3 4 5 6 7 8 Choose preset labels for your channels Use Channel on your remote control in the Ch Label menu to select a channel for labeling then choose a suitable label for the channel by pressing to attach the label to the selected channel EZ Scan Ch Edit Ch L...

Page 25: ...EXIT to save and return to TV view ing or press the LEFT arrow to save and return to the previous Menu 3 4 5 Changes the picture source for the main screen so you can watch your TV cable TV VCR DVD or any other devices that are connected to your TV EZ Scan Ch Edit Ch Label Main Input G Sub Input Booster Prev Ant Cable Video1 Video2 Side Video Component 1 Component 2 RGB DTV G DVI DTV G SETUP SETUP...

Page 26: ...ub Picture image so you can watch your TV cable TV VCR or any other devices that are connected to your TV Press the PIP button to show the sub picture Each press of PIP changes the PIP options as shown below PIP lets you view 2 different inputs sources on your monitor screen at the same time One source will be large and the other source PIP will show a smaller inset image Twin Picture splits the s...

Page 27: ...y one on the 3 POP screen display while the main screen remains the current channel Press the SWAP button Each time you press the SWAP button you switch the Main and Sub pictures It s available to SWAP the Main and Sub picture in Ant Cable video 1 2 and side video input sources for Main picture In the PIP mode each press of the UP DOWN LEFT RIGHT arrow buttons will move the sub picture to a differ...

Page 28: ...ow button to select On or Off Press EXIT to save and return to TV view ing or press the ENTER arrow to save and return to the previous Menu 3 4 5 If TV signal reception is poor because you are in a fringe area set Booster to On If the picture condition is good set Booster to Off Adjustments for one channel don t affect the adjustment for other channels Set booster to on or off for each channel sep...

Page 29: ...s EXIT to save and return to TV viewing or press the ENTER button to save and return to the previous menu 1 2 3 You can manually adjust the levels for the picture quality settings such as Contrast Brightness Color etc Adjust the picture appearance to suit your preference and viewing situations You can also select a preset value from the EZ Picture menu based on the category of the program 4 5 Prev...

Page 30: ... settings to the levels that are more suitable to view sporting events Contrast and Color levels are raised so that an action scene appears clear and brilliant Contrast Adjusts the difference between the light and dark levels of the picture Press the right arrow button to activate adjusting Brightness Adjusts the white or light level of the overall picture Color Adjusts the intensity of all colors...

Page 31: ...OWN arrows to select the option EZ SoundRite EZ Sound Front Surround or TV Speaker Press EXIT to save and return to TV viewing or press the ENTER button to save and return to the previous menu 1 2 3 Adjust the sound to suit your taste and room situations 4 5 EZ SoundRite G EZ Sound Balance Treble Bass Front Surround TV Speaker Prev SETUP SETUP VIDEO VIDEO AUDIO AUDIO TIME TIME LOCK LOCK SPECIAL SP...

Page 32: ...es both high and low frequency sounds in addition to the front surround sound to create the sensation you would experience in a theater Balance Adjusts the left to right balance of the TV speakers Treble Increases or decreases the higher frequency sounds from the TV speakers Increases in treble for example make voice or string sounds stand out Bass Increases or decreases the lower frequency sounds...

Page 33: ...observes Daylight Savings Auto Clock If you select Auto Clock use the UP DOWN arrow button to choose On or Off Press EXIT to save and return to TV viewing or press the ENTER button to save and return to the previous menu 1 2 3 4 Sets the time automatically from the PBS broadcast sig nal The PBS channel signal includes information for the cor rect time Auto Clock G Manual Clock Off Timer On Timer S...

Page 34: ...e Use the UP DOWN arrow to set the Year Date and Time Press EXIT to save and return to TV viewing or press the ENTER button to save and return to the previous menu 1 2 3 4 5 6 Auto Clock Manual Clock G Off Timer On Timer Sleep Timer Auto Off Prev SETUP SETUP VIDEO VIDEO AUDIO AUDIO TIME TIME LOCK LOCK SPECIAL SPECIAL Year 2 0 0 4 Date 01 10 Time AM 10 44 1 2 3 4 5 6 7 8 9 0 TV MODE LIGHT POWER TV ...

Page 35: ... Off Timer option Use the UP DOWN arrow to set the hours and then set the minutes Press EXIT to save and return to TV view ing or press the ENTER button to save and return to the previous menu 1 2 3 4 5 6 7 Auto Clock Manual Clock Off Timer On Timer Sleep Timer Auto Off Prev SETUP SETUP VIDEO VIDEO AUDIO AUDIO TIME TIME LOCK LOCK SPECIAL SPECIAL AM 12 00 Off On 1 2 3 4 5 6 7 8 9 0 TV MODE LIGHT PO...

Page 36: ... and return to the previous menu 1 2 3 4 5 Time function operates only if current time is set Unless a button is pressed within two hours after the TV is turned on by the On timer function the TV will auto matically turn itself off 6 7 Auto Clock Manual Clock Off Timer On Timer G Sleep Timer Auto Off Prev SETUP SETUP VIDEO VIDEO AUDIO AUDIO TIME TIME LOCK LOCK SPECIAL SPECIAL Tim AM 04 00 Ch TV 1 ...

Page 37: ...o the previous menu 1 2 3 4 5 Select a preset time to turn your TV off automatically Auto Clock Manual Clock Off Timer On Timer Sleep Timer G Auto Off Prev Off 10 min 20 min 30 min 60 min 90 min 120 min 180 min 240 min SETUP SETUP VIDEO VIDEO AUDIO AUDIO TIME TIME LOCK LOCK SPECIAL SPECIAL If you turn the TV off after setting sleep timer the setting will be erased Set it again if necessary 1 2 3 4...

Page 38: ...r press the MENU button to save and return to the previous menu 1 2 3 4 5 If there is no input signal the TV can be set up to switch to standby mode automatically after 10 minutes Auto Clock Manual Clock Off Timer On Timer Sleep Timer Auto Off G Prev Off On SETUP SETUP VIDEO VIDEO AUDIO AUDIO TIME TIME LOCK LOCK SPECIAL SPECIAL 1 2 3 4 5 6 7 8 9 0 TV MODE LIGHT POWER TV VIDEO DVI RGB VCR CABLE DVD...

Page 39: ...The picture taking a halfway trade off between alteration and screen coverage Press EXIT to save and return to TV viewing or press the ENTER button to save and return to the previous menu 1 2 3 4 5 Lets you choose the way that an analog picture with a 4 3 aspect ratio is displayed on your TV 16 9 aspect ratio TV screen When you receive an analog picture with a 4 3 aspect ratio on your 16 9 TV you ...

Page 40: ... return to TV viewing or press the ENTER button to save and return to the previous menu 1 2 3 4 5 Select your preferred language for the menus English Spanish or French On Screen Menu Languages Aspect Ratio Language G G Captions Caption Text Key Lock Cinema Demo Prev English Español Français SETUP SETUP VIDEO VIDEO AUDIO AUDIO TIME TIME LOCK LOCK SPECIAL SPECIAL 1 2 3 4 5 6 7 8 9 0 TV MODE LIGHT P...

Page 41: ...tions G Caption Text Key Lock Cinema Demo Prev Off EZ Mute On SETUP SETUP VIDEO VIDEO AUDIO AUDIO TIME TIME LOCK LOCK SPECIAL SPECIAL 1 1 2 3 4 5 6 7 8 9 0 TV MODE LIGHT POWER TV VIDEO DVI RGB VCR CABLE DVD SAT MUTE SWAP PIPCH PIPCH PIP RATIO RECORD STOP PAUSE REW PLAY FF MENU EXIT CC FREEZE PIP INPUT VOL CH SURF SAP VIDEO COMP2 COMP1 SIDE SKIP ENTER FLASHBK 2 3 5 1 3 4 2 3 5 1 3 4 Using the CC bu...

Page 42: ...ct a closed caption mode for displaying captioning information when provided on the program Captions displays information at any position on the screen usually the program s dialog Text displays information usually at the bottom position and is used for a data service generally not program related Aspect Ratio Language Captions Caption Text G G Key Lock Cinema Demo Prev CC 1 CC 2 CC 3 CC 4 Text 1 ...

Page 43: ...e set up so that it can only be used with the remote control The feature can be used to prevent unauthorized viewing by disabling the front panel controls The TV is programmed to remember which option it was last set to even if you turn the TV off Aspect Ratio Language Captions Caption Text Key Lock G Cinema Demo Prev Off On SETUP SETUP VIDEO VIDEO AUDIO AUDIO TIME TIME LOCK LOCK SPECIAL SPECIAL 1...

Page 44: ... TV viewing or press the ENTER button to save and return to the previous menu 1 2 3 Set up the TV for the best picture appearance for viewing movies SETUP SETUP VIDEO VIDEO AUDIO AUDIO TIME TIME LOCK LOCK G 1 2 3 4 5 6 7 8 9 0 TV MODE LIGHT POWER TV VIDEO DVI RGB VCR CABLE DVD SAT MUTE SWAP PIPCH PIPCH PIP RATIO RECORD STOP PAUSE REW PLAY FF MENU EXIT CC FREEZE PIP INPUT VOL CH SURF SAP VIDEO COMP...

Page 45: ... Demo Press EXIT button to return to TV view ing 1 2 3 4 5 EZ Demo Use to scan the features and menu options available on your TV XD Demo Use to see the difference between XD Demo On and XD Demo Off Aspect Ratio Language Captions Caption Text Key Lock Cinema Demo G Prev SETUP SETUP VIDEO VIDEO AUDIO AUDIO TIME TIME LOCK LOCK SPECIAL SPECIAL 1 2 3 4 5 6 7 8 9 0 TV MODE LIGHT POWER TV VIDEO DVI RGB ...

Page 46: ...ot apply to other TV programs Unless you block cer tain TV programs intended for mature audi ences in the TV Rating General menu your children may view those programs TV Rating General Blocks certain TV pro grams that you and your family do not want to watch based on the ratings Block Ch Blocks any channels that you do not want to watch or that you do not want your children to watch Aux Block Enab...

Page 47: ...ore may be unsuitable for children under 17 G General Audiences All ages can view PG Parental Guidance Suggested Some program content may not be suitable for children PG 13 Parents strongly cautioned Some program content may not be appropriate for children under 13 R Restricted Children under 17 requires parent or adult guardian be present NC 17 No one 17 or younger should view TV Y All Children P...

Page 48: ...e one at a time Press the POWER button after each code change If the right code is found the device will turn off B Enter a code number using the number buttons on the remote The right code num bers for the corresponding component can be found on the following pages Again if the code is correct the device will turn off Press the EXIT button to store the program Test the remote control functions to...

Page 49: ...116 MINERVA 088 MITSUBISHI 004 006 024 028 040 042 109 116 124 146 MTC 004 006 062 101 NAD 015 025 NEC 006 007 016 Brand Codes 019 024 040 056 130 132 134 NIKEI 043 ONKING 043 ONWA 043 OPTONICA 019 081 PANASONIC 034 056 080 092 164 PHILCO 003 004 006 024 043 056 059 060 063 064 127 143 164 PHILIPS 003 004 005 006 038 059 070 093 143 160 164 PIONEER 006 018 023 025 027 116 135 176 PORTLAND 004 143 ...

Page 50: ...A 013 020 MITSUBISHI 013 020 045 046 049 051 059 061 151 MTC 034 040 MULTITECH 024 034 NEC 012 023 039 043 048 NORDMENDE 043 OPTONICA 053 054 PANASONIC 066 070 074 083 133 140 145 PENTAX 013 020 031 033 063 PHILCO 031 034 067 PHILIPS 031 033 034 054 067 071 101 PILOT 101 PIONEER 013 021 048 PORTLAND 108 PULSAR 072 QUARTZ 011 014 QUASAR 033 066 075 145 RCA 013 020 033 Brand Codes 034 040 041 062 06...

Page 51: ...070 PACE SKY SATELLITE 143 PANASONIC 060 142 PANSAT 121 Brand Codes PERSONAL CABLE 117 PHILIPS 071 PICO 105 PRESIDENT 019 102 PRIMESTAR 030 110 111 PROSAT 072 RCA 066 106 REALISTIC 043 074 SAMSUNG 123 SATELLITE SERVICE CO 028 035 047 057 085 SCIENTIFIC ATLANTA 032 138 SONY 103 STARCAST 041 SUPER GUIDE 020 124 125 TEECOM 023 026 075 087 088 090 107 130 137 TOSHIBA 002 127 UNIDEN 016 025 042 043 044...

Page 52: ...12 064 079 MEMOREX 001 MOVIE TIME 028 032 NSC 015 028 038 071 073 OAK 016 031 037 053 PANASONIC 044 047 PARAGON 001 PHILIPS 006 012 013 020 065 085 090 PIONEER 034 051 052 063 076 POST NEWS WEEK 016 PRUCER 059 PTS 011 048 071 072 073 074 PULSAR 001 RCA 047 Brand Codes REGAL 049 050 REGENCY 057 REMBRANT 025 RK 091 SAMSUNG 030 068 SCIENTIFIC ATLANTA 003 011 041 042 043 045 046 SHERITECH 022 SIGNAL 0...

Page 53: ...to other factors If there are problems with the image on your TV consult the Troubleshooting guide on the following pages You may also want to contact your cable service provider to deter mine if the problem is from the cable service If you use your TV to play video games or for other uses that have single fixed images such as a photo CD player you should avoid setting the Brightness level too hig...

Page 54: ... Audio cables properly installed Are the wires for external speakers if you have external speakers properly installed Make sure your speakers are turned on in the Audio menu If your audio mode is set to SAP that channel may not have an SAP program Are you in TV or cable tuning mode and should be in the other Make sure output channels on all A V equipment are on the same channel 3 or 4 Check that a...

Page 55: ...ment has been turned on Make sure that the connections are secure on the back of your TV and on the source equipment Check to see if all the connections are secure Look in the Audio mode menu to see if all the settings are correct You are using channel 3 or 4 to view your VCR No stereo sound is present under that decision Check to be sure that the PIP source is turned on You might want to adjust t...

Page 56: ...3 aspect ratio High Definition television will normally be formatted in the wider 16 9 aspect ratio AUDIO CENTER MODE IN Input jack provided for connecting external Dolby digital preamplifier output to the TV to use as the center speaker channel and enhance your home theater setup CAPTIONS A form of subtitling that writes out the dialog of a program on the screen COMPONENT INPUT YPbPr Series of in...

Page 57: ...viewing feature RGB INPUT Red green blue 15 pin input provided for computers or set top boxes SECOND AUDIO Second Audio Programming SAP is another separate audio channel available with some program ming Choosing SAP often refers to listening to audio in another language such as Spanish or French SIGNAL Picture and sound traveling through cable or on the air to your television screen SOURCE The ter...

Page 58: ... CATV 1 125 Power Consumption W 220W Antenna 75 ohm External Terminal for VHF UHF Audio Output W 12W x 2 Supplied Accessories Remote control 2 size AA batteries 2 filters External Input Output Ports A V input 3 set A V output 1 set S Video input 2 Component input 2 set RGB input 1 DVI input 1 RGB DVI audio input 1 set Variable audio output 1 set Audio center mode input 1 Calibration port 1 Design ...

Reviews: