8
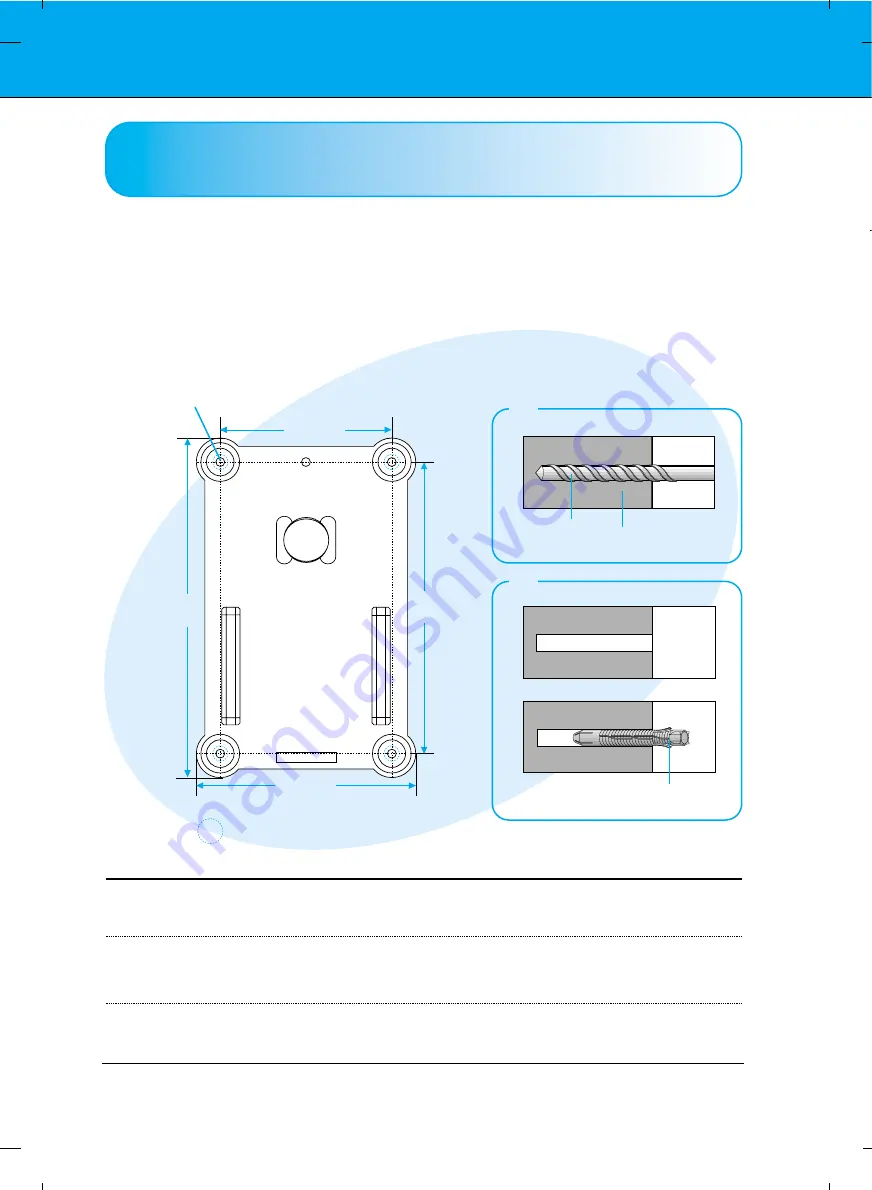
3. 제품이 결합될 벽면에 위치를 표시한 뒤 앵커를 삽입하세요.
그림과 같이 도면에 나타나 있는 앵커의 위치를 벽면에 표시하세요.
벽면에 표시된 앵커 위치에 드릴 비트 직경 8mm를 사용해 깊이 80mm~100mm 이내로 구멍을 뚫으세요.
2
뚫은 구멍을 청소한 뒤 구멍에 동봉된 앵커를 삽입하세요.
3
� 벽체의 재질 및 마감재의 두께를 확인하세요.
� 벽체의 재질이 금가지 않는 콘크리트벽, 경량 콘크리트, 강한 자연석, 연한 자연석, 조적 벽돌, 중공 블록일 때에는
동봉된 앵커 및 볼트를 사용할 수 있습니다.
� 마감재의 두께가 20mm 이하일 경우에만 동봉된 앵커와 볼트의 사용이 가능합니다.
� 석고보드로만 만들어진 벽체에는 절대로 설치하지 마세요.
드릴 /
Drill
벽면 /
Wall
앵커 /
Anchor
벽면용 브라켓
1
11
10
0m
mm
m
1
14
40
0m
mm
m
:: 앵
앵커
커 삽
삽입
입 위
위치
치
�
2
21
16
6..5
5
m
mm
m
1
18
86
6
m
mm
m
2
3
1
1
Fix anchors after marking the positions where units are
mounted on the wall
Mark the positions of the anchor holes in the wall as above Fig.
Drill the hole positions as above Fig. Using an 8mm drill appropriate for the material on the wall,
drill each hole to a depth of 80mm – 100mm.
Clean each drilled hole and Insert an anchor supplied into each hole.
�
The surface that the wall mounting bracket is to be mounted on should be of sufficient strength to
support the weight of the product and speakers typically; concrete, strong/weak natural rock, brick and
hollow block.
�
Plasterboard is not a sufficiently strong enough material; unless the bolts are anchored into standard
construction type studs capable of supporting the weight of the monitor and speakers.
Wall mounting braket
::
anchors insertion position
Summary of Contents for RW240
Page 13: ...RW240 RW240 壁掛支架 安裝及設定指南 P NO 3828TUL255H 1101 REV01 Printed in Korea ...
Page 14: ...2 壁掛支架 配件 4 個襯圈 墊圈 4 個牆面固定螺栓套筒 固定螺絲 4 個 M4x25 4 個壁掛專用墊圈連結螺栓 LGTV 安裝及設定指南 壁掛支架 ...
Page 18: ...6 分離配件 安裝壁掛支架 從壁掛支架卸下螺栓 從壁掛支架卸下產品專用固定支架 壁掛支架 支架固定螺絲 產品專用固定支架 ...
Page 21: ...9 1 2 1 2 安裝壁掛支架 將壁掛支架安裝到牆上 使用隨附的 4 個墊圈和螺栓 將壁掛支架放到牆上 將墊圈連結螺栓拴進每個螺絲孔 壁掛專用墊圈連結螺栓 第一步 安 裝 其 他 ...


