background image

25

Wa
rr

an

ty

W

F

arranty

What is not covered.

Service trips to your home to instruct you on the product.
If the product is connected to any voltage other than that shown on the
rating plate.
If the fault is caused by accidents, neglects, misuses of Acts of God.
If the fault is caused by reasons except for normal domestic use or use in
accordance with the owner's manual.
If the fault is caused by pests, for example, rats or cockroaches etc..
Noise or vibration that is considered normal,for example, water drain sound,
spin sound or warning beeps.
Correcting the installation for example, leveling the product, adjustment of
drain.
Normal maintenance recommended by the owner's manual.
Removal of foreign objects/substances from the machine including the pump
and inlet hose filter, for example, grit,nails, bra wires and buttons etc..
Replace fuses in or correct wiring or correct house plumbing.
Correction of unauthorized repairs.
Incidental or consequential damage to personal property caused by possible
defects with this appliance.
If this product is used for commercial purposes, it is not warranted.
(Example:Public places such as public bathroom, lodging house, training
center, dormitory)

If the product is installed outside the normal service area, any cost of
transporatation involved in the repair of the products, or the replacement of
a defective part, shall be borne by the owner.

Disposal of your old appliance

1. When this crossed-out wheeled bin symbol is attached to a product it

means the product is covered by the European Directive
2002/96/EC.

2. All electrical and electronic products should be disposed of

separately from the municipal waste stream via designated collection
facilities appointed by the government or the local authorities.

3. The correct disposal of your old appliance will help prevent potential

negative consequences for the environment and human health.   

4. For more detailed information about disposal of your old appliance,

please contact your city office, waste disposal service or the shop
where you purchased the product.  

Summary of Contents for TD-C70040E

Page 1: ...f your product Have all these details ready when you call for service Condensing Dryer 2P 25P Manualed usoemanutenzione Prima dell uso leggere attentamente questo manuale e conservarlo per consultazione futura Annotare il nome del modello e il numero di serie del prodotto Si consiglia di tenere questi dati a portata di mano nel caso occorra contattare l assistenza Asciugabiancheria condensante 26P...

Page 2: ...sm and optimized heater Innovative noise performance Noise gets reduced by Noise absorption screening technology Easy of Use Wide LED display using electric control F F eatures C F ontents Safety Instructions 3 Installation Instructions 6 Appearance design 9 Operating your dryer 10 Additional Functions 14 Caring for your dryer 15 Additional Tips for smart use 20 Troubleshooting 22 Technical Data 2...

Page 3: ...yer away from electric stove candle and any inflammable Objects It may cause melting of some parts or an fire Do not damage power cord itself or place heavy objects on the cord Cord damage may cause a fire and an electric shock Do not grasp power cord or switch with wet hands It may cause an electric shock Disconnect the power cord by grasping the plug not the cord It may cause cutting off wires s...

Page 4: ...may fall off Pets or children may be wounded by rotating parts or suffocated inside drum Be sure that pets eat off the dryer Pets may die from an electric shock and appearance may be damaged Do not press the button with sharp edged devices like a screwdriver or a pin It may cause an electric shock Do not use dry cleaning detergents for the dryer or place the laundry with cleaning detergents It may...

Page 5: ...cooking oil constitute a fire hazard and should not be placed in a tumble dryer It may cause an explosion and a fire Items that have been previously cleaned in washed in soaked in or spotted with petral gasoline dry cleaning solvents or other flammable or explosive substances should not be placed in a tumble dryer It may cause an explosion and a fire Items containing foam rubber also known as late...

Page 6: ...d not be located near gas hob cooker heater or eye level grill as flames from the burners could cause damage to your dryer When the dryer is fitted under a work surface allow 15 mm space from each side of the dryer for air to exit the rear grille This airflow is critical to condense the water during drying If you use this dryer near or stacked on top of washing machine seperate main plugs and sock...

Page 7: ...nances Additional Grounding Procedure Some local codes may require a separate ground In such cases the required accessory ground wire clamp and screw must be purchased separately Condensate Drain The dryer can drain water without delivering to water container Water is directly pumped out of the dryer Stacking Kit In order to stack this dryer on a LG washing machine LG stacking kit is needed Built ...

Page 8: ...properly level adjust the front levelling legs up and down as necessary Turn them clockwise to raise and counterclockwise to lower until the dryer is not wobbling both front to back and side to side Diagonal Check When pushing down the edges of the washing machine the machine should not move up and down at all Please check both of two directions If machine rocks when pushing the machine top plate ...

Page 9: ...ourite Time Delay LED Display Time Display Indicator lamps Control panel Start Pause Program selector TD C70042E 43E 46E 47E Additional function buttons High Temp Low Temp Buzzer Off Anti Crease Favourite Time Delay LED Display Time Display Indicator lamps Start Pause Program selector Water container Door Condenser Cover Air ventilation grill ...

Page 10: ... lightly not completely light Dry work clothes Bed linen table linen towels T shirts For fabrics which do need to be ironed Iron Dry Polo shirts and work clothes Bed linen table linen towels For fabrics which do need to be pressed Machine Iron Time Cycles for selected length of time Bath towels bath robes dishclothes Small clothes pre dried laundry Normal Warm 20min Quilted fabrics made of acrylic...

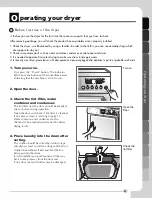
Page 11: ...de 1 Turn power on First press the Power button The indicator light above the button will become illuminated indicating that the machine is all set to run 2 Open the door 3 Check the lint filter water container and condenser The lint filter near the door should be emptied after or before drying operation Open the door and check if lint filter is cleaned If not please clean it referring to page 15 ...

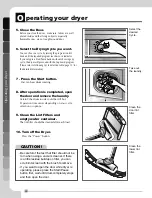
Page 12: ...an hear drum rotating 8 After operation is completed open the door and remove the laundry Careful the drum inside could be still hot Operation time varies depending on your cycle selection or options 9 Clean the Lint Filters and empty water container The lint filter should be cleaned after each load 10 Turn off the Dryer Press the Power button Select the desired Cycle Take out the laundry Clean th...

Page 13: ... Open the door 2 Do not remove the lint screen 3 Place dryer Rack over the bottom of the dryer door opening Reset the Rack on the dryer back lodge Push down on the frame front to secure over lint screen 4 Place wet items on top of the Rack Allow space around items for air to circulate The Rack does not move but the drum will rotate 5 Close the door 6 Select Rack Dry NOTE Check the lint filter and ...

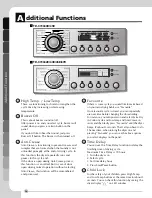
Page 14: ...thout selecting Anti Crease this function will be remembered and processed Favourite If there is some cycle you would like to make based on your own drying habit use Favourite Once favourite cycle is stored you can repeatedly use next time before changing the stored setting For instance you turn power on and select Extra Dry in Cotton Cycle and Low temp and Anti Crease in series and then lastly pr...

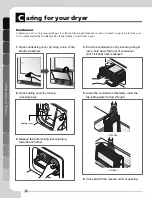
Page 15: ...ptly 1 Cool the dryer down and follow the mentioned steps 2 Press the Start Pause button Empty Water container Condensed water is collected to water container You should empty the water container after every use Not doing this may result in improper drying performance If water container is full Empty Water Lamp glows and a buzzer sounds while the dryer is operating In this case water container mus...

Page 16: ...ar 1 Open condensing cover by using a coin or flat blade screwdriver 2 Open sealing cover by turning a locking lever 3 Release the both locking levers turning towards each other 4 Draw the condenser out by inserting a finger into a hole down the front of condenser Don t forcefully treat condenser 5 Clean the condenser completely under the tap letting water to flow through 6 Close all with the reve...

Page 17: ... the build up of lime scale on the surface of sensor Wipe the sensors inside drum Shown in the picture 1 Unscrew cover 2 Take connecting kit out 3 Separate water container hose from the kit 4 Connect drain hose to the kit Condensed water Drain out Normally condensed water is pumped up to water container where water is collected until emptied Not only using water container but water can be drained ...

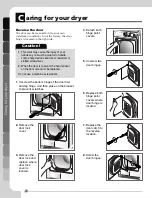
Page 18: ...lotted screwdriver 2 When the door is revered the hand sticker on the door also must be replaced Do not use a machine screwdriver 4 Detach both hinge point covers 5 Unscrew two door hinges 6 Replace both hinge point covers where door hinge is located 1 Unscrew the bottom hinge of the door first and top hinge And then place on the blanket to prevent scratches 2 Remove the door lock cover 3 Remove t...

Page 19: ...avoid danger of electric shock 1 Open the door put a hand into the drum and grasp a bulb cover 2 With bulb held by a hand turn the bulb to the clockwise direction with a certain amount of force 4 Remove the current bulb turning it to Counter clockwise direction Be careful that it does not fall off 5 Screw in the new bulb in the reverse unscrewing direction 3 Seperate bulb cover from the socket hou...

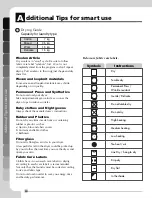
Page 20: ...plastics such as a Aprons bibs and chair covers b Curtains and table clothes c Bathmats Fiber glass Do not dry fiberglass articles in your dryer Glass particles left in the dryer could be picked up by your clothes the next time you use the dryer and irriate your skin Fabric Care Labels Clothes have its own wash care labels so drying according to wash care labels is recommended Not only that the la...

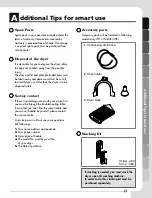
Page 21: ...ed safely Service contact If there is something wrong with your dryer first you must be through the troubleshooting table In case that you can t find the same trouble and you can not handle by yourself please contact the service centre A service person will ask you some questions like followings 1 Your name address and postcode 2 Your phone number 3 Description of trouble 4 The model No and the se...

Page 22: ...is overloaded 1 Check filter is cleaned 2 Check condenser unit is clogged Check the bulb filament is cut off 1 Check lint filter is empty 2 Check dryer has only clean items 3 Check laundry is properly sorted in the drum 4 Check laundry is overloaded 5 Check there is any paper tissue or similar item in the pockets of laundry The drying time for a load will vary depending on the heat setting the siz...

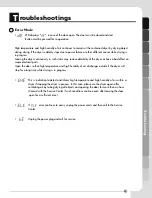
Page 23: ... on major electrical parts Open the door so that high temperature and high humidity of air discharges outside if the dryer will stop for a long time while drying is in progress This is indication to detect and inform high temperature and high humidity of air within a dryer if stopping the dryer in process In this case please use the dryer again after ventilating air by taking drying all objects an...

Page 24: ...t Counter Sides 0 mm 0 mm Top 0 mm 250 mm Rear 25 mm 125 mm Ventilation Requirement Alcove or under counter Closet Closet door must have 2 louvered openings each having a minimum area of 60 sq inches 387 sq cm located 3 inches 8 cm from bottom and top of door Ensure air flow of 112 cu ft min through dryer 850 mm 600 mm Weight 50 kg 595 mm Volts 230 V Hertz 50 Hz Watts 2250 ...

Page 25: ...ncidental or consequential damage to personal property caused by possible defects with this appliance If this product is used for commercial purposes it is not warranted Example Public places such as public bathroom lodging house training center dormitory If the product is installed outside the normal service area any cost of transporatation involved in the repair of the products or the replacemen...

Page 26: ...riduzione della rumorosità La tecnologia di assorbimento e filtrazione dei suoni riduce notevolmente la rumorosità dell apparecchio Facile da usare Ampio display LED con controllo elettronico C F aratteristiche S F ommario Istruzioni di sicurezza 27 Istruzioni per l installazione 30 Spiegazione dei comandi sul pannello 33 Come utilizzare l asciugabiancheria 34 Funzionalità aggiuntive 38 Manutenzio...

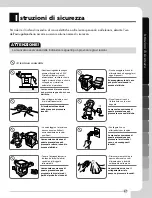
Page 27: ...a fornelli elettrici candele e altri oggetti infiammabili La mancata osservanza di questa precauzione può provocare la bruciatura di parti del prodotto o incendi Non danneggiare il cavo di alimentazione né appoggiarvi oggetti pesanti Il danneggiamento del cavo può provocare incendi o scosse elettriche Non afferrare il cavo o l interruttore con le mani bagnate La mancata osservanza di questa precau...

Page 28: ...ere I bambini o gli animali potrebbero ferirsi con le parti rotanti o soffocare all interno del cestello Tenere gli animali lontano dall asciugabiancheria Gli animali possono morire a causa di scosse elettriche e possono anche danneggiare l aspetto del prodotto Non premere i tasti con oggetti appuntiti come cacciaviti o perni La mancata osservanza di questa precauzione può provocare scosse elettri...

Page 29: ... centrifuga La mancata osservanza di questa precauzione può provocare incendi o esplosioni Articoli lavati macchiati o bagnati con petrolio benzina solventi detergenti o altre sostanze infiammabili o esplosive non dovrebbero essere introdotti in un asciugabiancheria a centrifuga La mancata osservanza di questa precauzione può provocare incendi o esplosioni Articoli contenenti gomma espansa nota an...

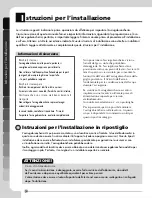
Page 30: ...gabiancheria viene posizionata sotto a un piano di lavoro lasciare 15 mm di spazio su ciascun lato per consentire la fuoriuscita dell aria dell asciugabiancheria dalla griglia posteriore Il ricircolo dell aria è fondamentale per la condensazione dell acqua durante l asciugatura Se si utilizza l asciugabiancheria accanto o impilata su una lavatrice utilizzare prese di alimentazione separate per cia...

Page 31: ...prevedono una messa a terra separata In questo caso occorre acquistare separatamente il filo di messa a terra il morsetto e la vite opzionali Scarico della condensa L asciugabiancheria è in grado di scaricare l acqua senza passare per la vaschetta dell acqua l acqua viene pompata direttamente all esterno dell apparecchio Kit per il montaggio in pila Per montare questa asciugabiancheria su una lava...

Page 32: ...ttamente in piano regolare i piedini frontali alzandoli o abbassandoli secondo necessità Ruotarli in senso orario per alzare o in senso antiorario per abbassare l elettrodomestico fino a quando l asciugatrice sia perfettamente stabile Controllo in diagonale Spingendo i bordi dell asciugabiancheria la macchina non dovrebbe muoversi eseguire il controllo in entrambe le direzioni Se la macchina dondo...

Page 33: ...isplay a LED Visualizzazione orario Spie di indicazione Pannello di controllo Avvio Pausa Selettore di programma TD C70042E 43E 46E 47E Tasti per funzionalità aggiuntive Alta temp bassa temp Disattivazione cicalino Anti sgualcitura Preferito Avvio programmato Display a LED Visualizzazione orario Spie di indicazione Avvio Pausa Selettore di programma Vaschetta dell acqua Sportello Coperchio del con...

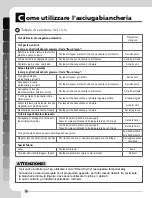
Page 34: ...parziale Asciugatura leggera abiti da lavoro Lenzuola biancheria da tavola tovaglie Per tessuti che necessitano di stiratura Asciutto stiro magliette polo e abiti da lavoro Biancheria da tavola lenzuola tovaglie Per tessuti che necessitano di stiratura Asciutto pressa Cicli a tempo di durata selezionata Asciugamani accappatoi strofinacci Piccoli indumenti e bucato pre asciugato Caldo 20min tessuti...

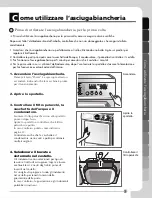
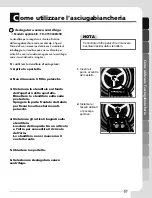
Page 35: ...iuscire eventuali odori dall interno 1 Accendere l asciugabiancheria Premere il tasto Power La spia sopra al tasto si accenderà indicando che la macchina è pronta per il funzionamento 2 Aprire lo sportello 3 Controllare il filtro pelucchi la vaschetta dell acqua e il condensatore Svuotare il filtro pelucchi vicino allo sportello prima o dopo l uso Aprire lo sportello e controllare che il filtro pe...

Page 36: ...tello comincerà a girare 8 Al termine del ciclo aprire lo sportello e rimuovere il bucato Attenzione Il cestello potrebbe essere ancora caldo La durata del ciclo varia a seconda del programma impostato 9 Pulire il filtro pelucchi e svuotare la vaschetta dell acqua Il filtro pelucchi deve essere pulito dopo ogni ciclo 10 Spegnere l asciugabiancheria Premere il tasto Power Selezionare il ciclo desid...

Page 37: ...gatura 1 Aprire lo sportello 2 Non rimuovere il filtro pelucchi 3 Sistemare lo stenditoio sul fondo dell apertura dello sportello Rimettere lo stenditoio sulla sede posteriore Spingere la parte frontale del telaio per fissarlo sullo schermo anti pelucchi 4 Sistemare gli articoli bagnati sullo stenditoio Lasciare dello spazio tra un articolo e l altro per consentire il ricircolo dell aria Lo stendi...

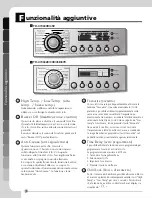
Page 38: ...avourite preferito In caso di ciclo usato più frequentemente utilizzare la funzione Favourite Una volta memorizzato il ciclo preferito è possibile utilizzarlo ripetutamente le volte successive senza dover modificare l impostazione memorizzata Ad esempio accendere l elettrodomestico e selezionare Extra Dry nel ciclo Cotone seguito da Low temp e Anti Crease infine premere il tasto Favourite fino a u...

Page 39: ...raffreddare l asciugabiancheria e procedere come indicato 2 Premere il tasto Start Pausa Svuotare la vaschetta dell acqua Nella vaschetta dell acqua si accumula l acqua condensata Per questo motivo la vaschetta deve essere svuotata dopo ogni ciclo In caso contrario l efficienza dell asciugabiancheria potrebbe diminuire Se la vaschetta dell acqua è piena la spia Empty Water lampeggia e suona un cic...

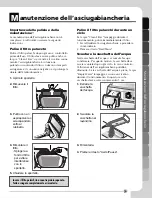
Page 40: ... il condensatore utilizzando una moneta o un cacciavite a punta piatta 2 Aprire il coperchio ruotando la levetta di bloccaggio 3 Girare entrambe le levette una verso l altra per rilasciare il coperchio 4 Estrarre il condensatore inserendo un dito nel foro nella parte frontale del condensatore non tirare con forza 5 Pulire il condensatore sciacquandolo sotto al rubinetto facendovi scorrere acqua al...

Page 41: ...questo componente è la rimozione degli accumuli di calcare sulla superficie del sensore Pulire i sensori all interno del cestello mostrati in figura 1 Svitare il coperchio 2 Rimuovere gli attacchi 3 Staccare il tubo della vaschetta dell acqua dagli attacchi 4 Collegare il tubo di scarico agli attacchi Scarico dell acqua condensata Normalmente l acqua condensata viene pompata fino alla vaschetta do...

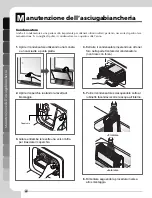
Page 42: ...tello occorre sostituire anche l adesivo sullo sportello Non utilizzare cacciaviti elettrici 4 Staccare entrambi i coperchi della cerniera 5 Svitare le due cerniere dello sportello 6 Dopo aver posizionato lo sportello rimontare entrambi i coperchi della cerniera 1 Svitare prima la cerniera inferiore quindi quella superiore Sistemare lo sportello su un panno per evitare che si graffi 2 Rimuovere il...

Page 43: ...uare questo intervento onde evitare il rischio di scosse elettriche 1 Aprire lo sportello introdurre la mano nel cestello e afferrare il coperchio della lampadina 2 Ruotarla in senso orario esercitando una certa forza 4 Rimuovere la lampadina ruotandola in senso antiorario Fare attenzione a non farla cadere 5 Avvitare la nuova lampadina nel senso inverso 3 Staccare il coperchio della lampadina dal...

Page 44: ...li cuscini per sedie b Tende e tovaglie di plastica c Tappetini per il bagno Fibra di vetro Non asciugare articoli in fibra di vetro nell asciugabiancheria Negli usi successivi le particelle di vetro residue nell elettrodomestico potrebbero introdursi negli indumenti e irritare la pelle Etichette per la cura dei tessuti Si consiglia di seguire le indicazioni riportate sulle etichette per la cura d...

Page 45: ...ugabiancheria può essere smaltita Per contattare l assistenza In caso di guasto dell asciugabiancheria consultare la tabella per la risoluzione dei problemi Se non si riesce a risolvere il guasto contattare il centro di assistenza Vi verranno chieste informazioni come 1 Nome indirizzo e codice di avviamento postale 2 Numero di telefono 3 Descrizione del guasto 4 Numero di modello e numero di serie...

Page 46: ...elezionato il programma corretto 8 Verificare che l asciugabiancheria non sia sovraccarica 1 Verificare che il filtro sia pulito 2 Verificare che il condensatore non sia ostruito Verificare che il filo della lampadina non sia spezzato 1 Verificare che il filtro pelucchi sia vuoto 2 Verificare che nell asciugabiancheria vi siano solo indumenti puliti 3 Verificare di aver selezionato correttamente i...

Page 47: ...ttriche Se l asciugabiancheria si ferma a lungo durante il funzionamento aprire lo sportello per far fuoriuscire l umidità e far raffreddare il cestello Questo messaggio di errore indica che all interno del cestello vi è molta umidità e la temperatura è elevata In questo caso prima di riutilizzare l elettrodomestico rimuovere tutti gli articoli e far circolare aria per almeno un ora lasciando lo s...

Page 48: ...e porte del ripostiglio devono avere due aperture ciascuna con un area minima di 387 cm2 60 quadrati situate a 8 cm 3 dalla parte superiore e inferiore della porta Assicurare un ricircolo dell aria di 3 metri cubi al minuto attorno all elettrodomestico 850 mm 600 mm Peso 50 kg 595 mm A incasso o nel vano di una credenza Ripostiglio Lati 0 mm 0 mm Parte superiore 0 mm 250 mm Parte posteriore 25 mm ...

Page 49: ... proprietà personali causate da possibili difetti dell elettrodomestico Se il prodotto è utilizzato a scopi commerciali non è coperto da garanzia ad esempio in luoghi pubblici come bagni pubblici case di accoglienza scuole dormitori Se il prodotto è installato al di fuori di un area coperta dall assistenza eventuali costi di trasporto necessari per la riparazione del prodotto o la sostituzione di ...

Page 50: ...P No 3828EL4002P ...
Reviews: