
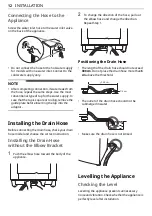
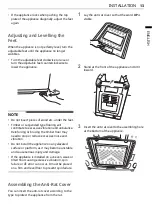
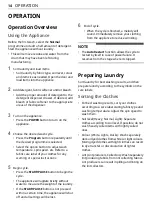
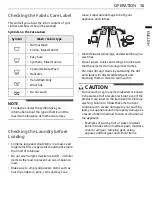


25
OPERATION
ENGLISH
NOTE
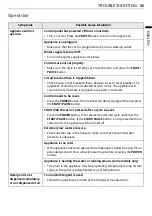
• This function is the time to the end of the
programme, not the start. The actual running
time may vary due to water temperature, wash
laundry and other factors.
• Reservation can be made up to 18 hours;
- 1 hour interval up to 3 - 12 hours
- 2 hours interval up to 12 - 18 hours
• This function cannot be set for less than 3 hours.
• To cancel this function, press
Time Delay
button
repeatedly until the reservation is cancelled or
press the
POWER
button to turn off and on
power.
Soak
This option can be selected to wash heavily soiled
clothes by soaking them in water for some time to
loosen dirt and grime.
• When this option is activated, the
u
icon is lit.
• To activate this option, press and hold the
Turbo
Wash
button for 3 seconds.
• To change the soak time on the display or
deactivate this option, press the
Turbo Wash
while this option is activated.
NOTE
• While
Turbo Wash
is activated, this option
cannot be set even if the
Turbo Wash
button is
pressed for 3 seconds.
Tub Dry
Use this option when you want to dry the empty
tub after a wash.
• Press the
Tub Dry
button to dry the empty tub
after a wash.
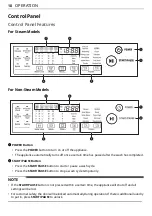
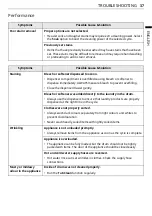
Setting
Child Lock
Use
Child Lock
function to disable the controls.
This function can prevent children from changing
programmes or operating this appliance.
NOTE
• Once this function is set, all buttons are locked
except the
POWER
button.
• When the controls are locked,
CL
and the
remaining time are alternatively shown on the
display during the wash while the child lock is
engaged.
• Turning off the power will not reset this function.
You must deactivate this function before you can
access any other options and functions.
Locking the Control Panel
1
Turn on the power.
2
Press and hold the
Water Level
and
Spin
buttons simultaneously for 3 seconds to
activate this function.
Unlocking the Control Panel
1
Turn on the power.
2
Press and hold the
Water Level
and
Spin
buttons simultaneously for 3 seconds to
deactivate this function.
• When this function is deactivated, a beeper
will sound and the remaining time for the
current cycle will reappear on the display.
Buzzer
This appliance plays a melody when it starts and
stops.
• Press the
Buzzer
button to deactivate/activate
this function.
Summary of Contents for TH2112DSAV
Page 9: ...9 INSTALLATION ENGLISH Dimension mm W 540 D 540 H 945 D 560 H 1250 H H D D W ...
Page 39: ...Memo ...
Page 40: ......


