background image

3

ENG

ENGLISH

3

EXTERNAL CONTROL DEVICE SETUP

EXTERNAL CONTROL DEVICE SETUP

• 

Image shown may differ from your TV.

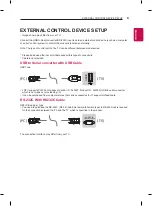
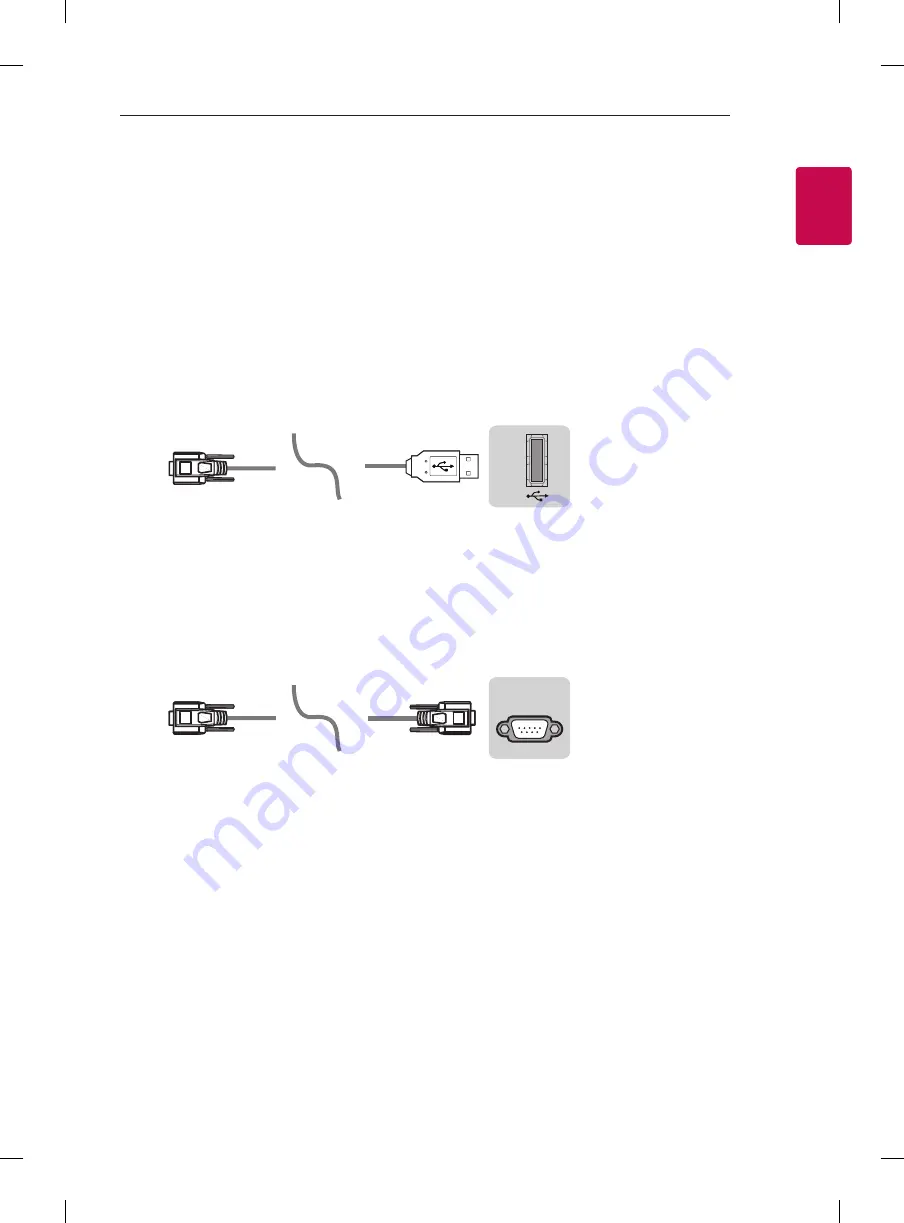
Connect the USB to Serial converter/RS-232C input jack to an external control device (such as a computer 

or an A/V control system) to control the product’s functions externally.

Note: The type of control port on the TV can be different between model series.

*  Please be advised that not all models support this type of connectivity.
*  Cable is not provided.

USB to Serial converter with USB Cable

USB Type

USB IN

(TV)

(PC)

(PC)

RS-232C IN

(CONTROL & SERVICE)

(TV)

(TV)

(PC)

(TV)

(PC)

SERVICE ONLY

RS-232C IN

(CONTROL & SERVICE)

RS-232C IN

(CONTROL & SERVICE)

1

3

2

1

3

2

• 

LGTV supports PL2303 chip-based (Vendor ID : 0x0557, Product ID : 0x2008) USB to serial converter 

which is not made nor provided by LG.

• 

It can be purchased from computer stores that carry accessories for IT support professionals.

RS-232C With RS232C Cable

DE9 (D-Sub 9pin) Type

• 

You need to purchase the RS-232C (DE9, D-Sub 9pin female-to-female type) to RS-232C cable required 

for the connection between the PC and the TV, which is specified in the manual.

USB IN

(TV)

(PC)

(PC)

RS-232C IN

(CONTROL & SERVICE)

(TV)

(TV)

(PC)

(TV)

(PC)

SERVICE ONLY

RS-232C IN

(CONTROL & SERVICE)

RS-232C IN

(CONTROL & SERVICE)

1

3

2

1

3

2

The connection interface may differ from your TV.

Summary of Contents for UM71 Series

Page 1: ... energijos sąnaudas rasite etiketėje ant gaminio Srpski Izlasiet sadaļu Drošība un normatīvi Informāciju par elektroenerģijas padevi un patēriņu skatiet izstrādājumam pievienotajā etiķetē Pročitajte odeljak Bezbednost i regulatorna pitanja Da biste saznali informacije u vezi sa napajanjem i potrošnjom energije pogledajte oznaku na proizvodu Hrvatski Shqip Македонски Pročitajte Sigurnost i usklađen...

Page 2: ...71007LB 1368 862 269 796 89 1 19 8 19 4 70UM7100PLA 1578 984 299 913 91 1 31 4 30 7 75UM7110PLB 1693 1048 345 978 88 8 35 4 34 6 Power requirement AC 100 240 V 50 60 Hz R R VIDEO Y P B P R L MONO AUDIO VIDEO Y P B P R L MONO AUDIO VIDEO AUDIO VIDEO L MONO AUDIO R R R VIDEO Y P B P R L MONO AUDIO VIDEO Y P B P R L MONO AUDIO VIDEO AUDIO VIDEO L MONO AUDIO R A Kg E ...

Page 3: ...nics Inc All Rights Reserved LED TV OWNER S MANUAL LG LED TV applies LCD screen with LED backlights Safety and Reference Please read this manual carefully before operating your set and retain it for future reference MFL71100103 1903 REV00 ...

Page 4: ...ion Do not block or cover the product with cloth or other materials while unit is plugged in Take care not to touch the ventilation openings When watching theTV for a long period the ventilation openings may become hot Protect the power cord from physical or mechanical abuse such as being twisted kinked pinched closed in a door or walked upon Pay particular attention to plugs wall outlets and the ...

Page 5: ... only an authorized attachments accessories approved by LG Electronics Otherwise this may result in fire electric shock malfunction or product damage Never disassemble the AC adapter or power cord This may result in fire or electric shock Handle the adapter carefully to avoid dropping or striking it An impact could damage the adapter To reduce the risk of fire or electrical shock do not touch theT...

Page 6: ... an optimal connection HDMI cables and USB devices should have bezels less than 10 mm thick and 18 mm width Use an extension cable that supports USB 2 0 if the USB cable or USB memory stick does not fit into yourTV s USB port A B A B A 10 mm B 18 mm Use a certified cable with the HDMI logo attached If you do not use a certified HDMI cable the screen may not display or a connection error may occur ...

Page 7: ...r damaged and for safe transportation regardless of its type and size It is recommended to move theTV in the box or packing material that theTV originally came in Before moving or lifting theTV disconnect the power cord and all cables When holding theTV the screen should face away from you to avoid damage Hold the top and bottom of theTV frame firmly Make sure not to hold the transparent part spea...

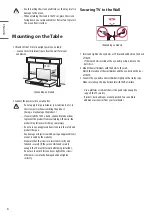
Page 8: ...duct life span Any damage or injuries caused by using unapproved items are not covered by the warranty Make sure that the screws are inserted correctly and fastened securely If they are not fastened securely enough theTV may tilt forward after being installed Do not use too much force and over tighten the screws otherwise screw may be damaged and not tighten correctly Securing TV to the Wall Depen...

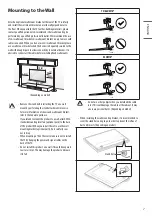
Page 9: ...installing theTV on a wall mount by performing the stand attachment in reverse For more information of screws and wall mount bracket refer to the Separate purchase If you intend to mount the product to a wall attachVESA standard mounting interface optional parts to the back of the product When you install the set to use the wall mounting bracket optional parts fix it carefully so as not to drop Wh...

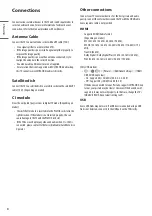
Page 10: ...he module is not inserted properly this can cause damage to theTV and the PCMCIA card slot If theTV does not display any video and audio when CI CAM is connected please contact to theTerrestrial Cable Satellite Service Operator Other connections Connect yourTV to external devices For the best picture and audio quality connect the external device and theTV with the HDMI cable Some separate cable is...

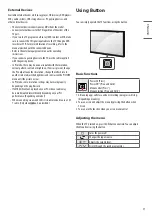
Page 11: ...e refresh rate to another rate or adjust the brightness and contrast on the PICTURE menu until the picture is clear In PC mode some resolution settings may not work properly depending on the graphics card If ULTRA HD content is played on your PC video or audio may become disrupted intermittently depending on your PC s performance Depending on model When connecting via a wired LAN it is recommended...

Page 12: ...ber buttons Enters numbers Accesses the QUICK HELP Accesses the saved programmes list MORE ACTIONS Displays more remote control functions Edits QUICK ACCESS QUICK ACCESS is a feature that allows you to enter a specified app or LiveTV directly by pressing and holding the number buttons Adjusts the volume level Audio descriptions function will be enabled Accesses your favorite channel list Shows pro...

Page 13: ... functions Edits QUICK ACCESS QUICK ACCESS is a feature that allows you to enter a specified app or LiveTV directly by pressing and holding the number buttons Audio descriptions function will be enabled Adjusts the volume level MUTE Mutes all sounds MUTE Accesses the Accessibility menu Scrolls through the saved programmes Voice recognition Network connection is required to use the voice recognitio...

Page 14: ...es In your community there might be regulations that require you to dispose of these batteries properly due to environmental considerations Please contact your local authorities for disposal or recycling information Batteries inside or inside the product shall not be exposed to excessive heat such as sunshine fire or the like User Guide For more information about thisTV read the USER GUIDE embedde...

Page 15: ...iod of time may cause image sticking Avoid displaying a fixed image on theTV screen for a long period of time Generated Sound Cracking noise A cracking noise that occurs when watching or turning off theTV is generated by plastic thermal contraction due to temperature and humidity This noise is common for products where thermal deformation is required Electrical circuit humming panel buzzing A low ...

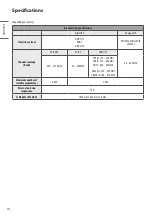
Page 16: ...PAL SECAM B G I D K SECAM L Channel coverage Band DVB S S2 DVB C DVB T T2 46 862 MHz 950 2 150 MHz 46 890 MHz VHF III 174 230 MHz UHF IV 470 606 MHz UHFV 606 862 MHz S Band II 230 300 MHz S Band III 300 470 MHz Maximum number of storable programmes 6 000 3 000 External antenna impedance 75 Ω CI Module W x H x D 100 0 mm x 55 0 mm x 5 0 mm ...

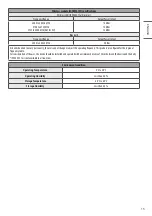
Page 17: ...channels can vary per country the user cannot change or adjust the operating frequency This product is configured for the regional frequency table For consideration of the user this device should be installed and operated with a minimum distance of 20 cm between the device and the body IEEE 802 11ac is not available in all countries Environment condition OperatingTemperature 0 C to 40 C Operating ...

Page 18: ...claimers and copyright notices are available for download LG Electronics will also provide open source code to you on CD ROM for a charge covering the cost of performing such distribution such as the cost of media shipping and handling upon email request to opensource lge com This offer is valid for a period of three years after our last shipment of this product This offer is valid to anyone in re...

Page 19: ...The model and serial number of the product are located on the back and on one side of the product Record them below in case you ever need service Model Serial No ...

Page 20: ...OWNER S MANUAL EXTERNAL CONTROL DEVICE SETUP www lg com Please read this manual carefully before operating the set and retain it for future reference ...

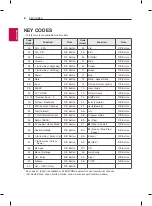
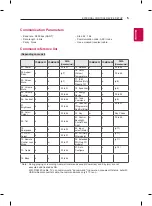
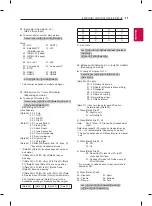
Page 21: ...R C Button 1A Q View Flashback R C Button 8E Forward R C Button 1E FAV Favorite Channel R C Button 8F Rewind R C Button 20 Text Teletext R C Button AA Info R C Button 21 T Opt Teletext Option R C Button AB Program Guide R C Button 28 Return BACK R C Button B0 Play R C Button 30 AV Audio Video Mode R C Button B1 ꕗ Stop File List R C Button 39 Caption Subtitle R C Button BA ꕘ Freeze Slow Play Pause ...

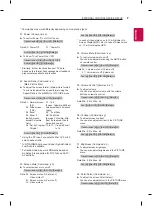
Page 22: ...CONTROL SERVICE TV TV PC TV PC SERVICE ONLY RS 232C IN CONTROL SERVICE RS 232C IN CONTROL SERVICE 1 3 2 1 3 2 LGTV supports PL2303 chip based Vendor ID 0x0557 Product ID 0x2008 USB to serial converter which is not made nor provided by LG It can be purchased from computer stores that carry accessories for IT support professionals RS 232C With RS232C Cable DE9 D Sub 9pin Type You need to purchase th...

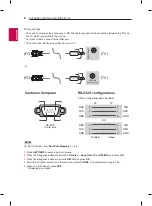
Page 23: ...C TV PC SERVICE ONLY RS 232C IN CONTROL SERVICE RS 232C IN CONTROL SERVICE 1 3 2 1 3 2 Customer Computer RS 232C configurations 3 Wire Configurations Not standard 1 6 5 9 PC TV RXD 2 2 TXD TXD 3 1 RXD GND 5 3 GND OR RXD 3 2 TXD TXD 2 1 RXD GND 5 3 GND D Sub 9 Phone RS 232C Serial port Set ID For Set ID number see Real Data Mapping on p 6 1 Press SETTINGS to access the main menus 2 Press the Naviga...

Page 24: ... to 05 06 Contrast k g 00 to 64 20 Tune Command m a p 9 07 Brightness k h 00 to 64 21 Channel Programme Add Del Skip m b 00 to 01 08 Color Colour k i 00 to 64 22 Key m c Key Codes 09 Tint k j 00 to 64 23 Control Backlight Control Panel Light m g 00 to 64 10 Sharpness k k 00 to 32 24 Input select Main x b p 11 11 OSD Select k l 00 to 01 25 3D Only 3D models x t p 11 12 Remote Control Lock Mode k m ...

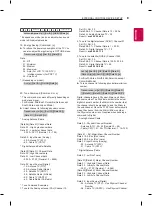
Page 25: ... OK Data x The set transmits ACK acknowledgement based on this format when receiving normal data At this time if the data is data read mode it indicates present status data If the data is data write mode it returns the data of the PC computer Error Acknowledgement Command2 Set ID NG Data x The set transmits ACK acknowledgement based on this format when receiving abnormal data from non viable funct...

Page 26: ... may work differently based on model and is supported for DTV fully and ATV AV partially 03 Screen Mute Command k d To select screen mute on off Transmission k d Set ID Data Cr Data 00 Screen mute off Picture on Video mute off 01 Screen mute on Picture off 10 Video mute on Ack d Set ID OK NG Data x In case of video mute on only TV will display On Screen Display OSD But in case of Screen mute on TV...

Page 27: ... not turn on by power on key of IR Local Key 13 Treble Command k r To adjust treble You can also adjust in the AUDIO menu Transmission k r Set ID Data Cr Data Min 00 to Max 64 Ack r Set ID OK NG Data x Depending on model 14 Bass Command k s To adjust Bass You can also adjust in the AUDIO menu Transmission k s Set ID Data Cr Data Min 00 to Max 64 Ack s Set ID OK NG Data x Depending on model 15 Bala...

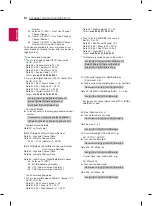
Page 28: ...Antenna TV 00 Result ma 00 00 0a 00 2 Tune to the digital antenna DVB T Channel 01 Set ID All 00 Data 00 01 Channel Data is 1 00 01 Data 02 Digital Antenna TV 10 Result ma 00 00 01 10 3 Tune to the satellite DVB S Channel 1000 Set ID All 00 Data 00 01 Channel Data is 1000 03 E8 Data 02 Digital Satellite TV 40 Result ma 00 03 E8 40 Ack a Set ID OK Data 00 Data 01 Data 02 x a Set ID NG Data 00 x For...

Page 29: ... Channel Data Data 04 Low byte Channel Data Data 05 Input Source Digital Satellite for Japan 02 Antenna TV DTV 07 BS Broadcasting Satellite 08 CS1 Communication Satellite 1 09 CS2 Communication Satellite 2 Tune Command Examples 1 Tune to the digital antenna ISDB T channel 17 1 Set ID All 00 Data 00 Don t know Physical 00 Data 01 02 Major is 17 00 11 Data 03 04 Minor Branch is 1 00 01 Data 05 Digit...

Page 30: ...ng If Data 00 is 00 3D On or 03 2D to 3D Data 03 works when 3D Mode Genre is manual only All 3D pattern options Data 01 may not be available according to broadcasting video signal Data 00 Data 01 Data 02 Data 03 00 O O O 01 X X X 02 X X X 03 X O O X don t care Ack t Set ID OK Data00 Data01 Data02 Data03 x t Set ID NG Data00 x 26 Extended 3D Command x v only 3D models Depending on model To change 3...

Page 31: ...ICE SETUP 27 Auto Configure Command j u Depending on model To adjust picture position and minimize image shaking automatically It works only in RGB PC mode Transmission j u Set ID Data Cr Data 01 Run Auto Configure Ack u Set ID OK NG Data x ...

Reviews: