background image

P/NO : MMBB0071304

ISSUE 2.0

PRINTED IN KOREA

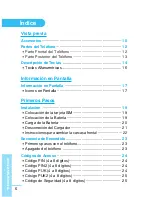
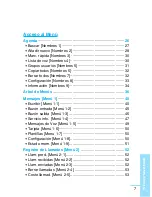
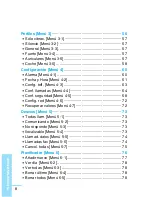
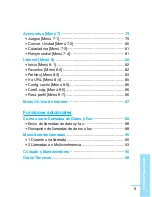
Summary of Contents for W3000

Page 1: ...P NO MMBB0071304 ISSUE 2 0 PRINTED IN KOREA ...

Page 2: ...fono WAP MANUAL DE USUARIO MODELO W3000 T E L É F O N O W A P T E L É F O N O W A P Por favor lea este manual cuidadosamente antes de utilizar su teléfono Consérvelo para su futura consulta ESPAÑOL ENGLISH ...

Page 3: ...Teléfono WAP MANUAL DE USUARIO MODELO W3000 Por favor lea este manual cuidadosamente antes de utilizar su teléfono Consérvelo para su futura consulta ESPAÑOL ...

Page 4: ......

Page 5: ...ESPAÑOL 3 W3000 Teléfono El W3000 presenta un magnífico acabado que proporciona a su usuario un agradable tacto y gran practicidad ...

Page 6: ...nas donde esté expresamente prohibido su uso Por ejemplo no está permitida la utilización de teléfonos móviles en hospitales por el riesgo de que se vean afectados dispositivos como audífonos y marcapasos Pequeñas interferencias pueden afectar a receptores de televisión radios ordenadores etc No sostenga el teléfono con sus manos cuando conduzca No desmonte el teléfono ni la batería del mismo Mant...

Page 7: ...cia pueden no estar disponibles en todas las redes celulares Por lo tanto usted no debe depender exclusivamente del teléfono en caso de comunicaciones esenciales como emergencias médicas Información importante Este manual de usuario contiene información importante sobre la utilización y manejo de este teléfono Por favor lea cuidadosamente toda esta información para poder obtener las mejores presta...

Page 8: ...meros Pasos Instalación 19 Colocación de la tarjeta SIM 19 Colocación de la Batería 19 Carga de la Batería 20 Desconexión del Cargador 21 Instrucciones para cambiar la carcasa frontal 22 Secuencia de Encendido 23 Primeros pasos con el teléfono 23 Apagado del teléfono 23 Códigos de Acesso 24 Código PIN 4 a 8 dígitos 24 Código PIN2 4 a 8 dígitos 24 Código PUK 4 a 8 dígitos 24 Cósigo PUK2 4 a 8 dígit...

Page 9: ...3 Información Nombres 9 34 Árbol de Menús 36 Mensajes Menú 1 40 Escribir Menú 1 1 40 Buzón entrada Menú 1 2 45 Buzón salida Menú 1 3 46 Servicio info Menú 1 4 47 Mensajes de Voz Menú 1 5 49 Tarjeta Menú 1 6 50 Plantillas Menu 1 7 50 Configuración Menú 1 8 50 Estado mem Menú 1 9 51 Registro de Llamadas Menú 2 52 Llam perd Menú 2 1 52 Llam recibidas Menú 2 2 52 Llam enviadas Menú 2 3 52 Borrar llama...

Page 10: ... 3 63 Conf llamadas Menú 4 4 64 Conf seguridad Menú 4 5 68 Config red Menú 4 6 72 Recuperar valores Menú 4 7 72 Desvíos Menú 5 73 Todas llam Menú 5 1 73 Comunicando Menú 5 2 73 No responde Menú 5 3 73 Ilocalizable Menú 5 4 73 Llamad datos Menú 5 5 74 Llamadas fax Menú 5 6 74 Cancel todas Menú 5 7 75 Planificador Menú 6 76 Añadir nuevo Menú 6 1 77 Ver día Menú 6 2 78 Ver todas Menú 6 3 78 Borrar úl...

Page 11: ...enú 8 3 83 Ir a URL Menú 8 4 85 Confg caché Menú 8 5 86 Certif seg Menú 8 6 86 Rest perfil Menú 8 7 86 Menú On line de Internet 87 Funciones adicionales Como usar la llamadas de Datos y Fax 88 Envío de llamadas de datos y fax 88 Recepción de llamadas de datos o fax 88 Menú durante llamadas 90 1 Durante una llamada 90 2 Llamadas en Multiconferencia 93 Cuidado y Mantenimiento 96 Datos Técnicos 98 ...

Page 12: ...s Vista previa ESPAÑOL 10 Por favor compruebe que tiene todos los componentes mostrados Teléfono Cargador de Viaje Tarjeta s de Garantía Manual de Usuario Batería Estándar BSL 15GA Carcasa Frontal Intercambiable ...

Page 13: ...Vista previa Accesorios opcionales ESPAÑOL 11 Kit de Datos CD Carcasa Frontal Intercambiable Manos Libres Portátil Cargador de Mechero Kit Manos Libres ...

Page 14: ...Altavoz 2 Pantalla 3 Tecla Multifuncional Izquierda 4 Teclas de Navegación 5 Tecla de Envío 6 Tecla Asterisco 7 Tecla Multifuncional Derecha 8 Teclas de Encendido Apagado 9 Teclas Numéricas 10 Tecla Almohadilla 11 Micrófono 12 Conector de Auricular 2 5 4 3 7 8 10 11 6 9 12 1 ...

Page 15: ...ÑOL 13 1 Batería 2 Conector de Cable Conector de Carga Conector Manos Libres de Coche 3 Terminales de Batería 4 Alojamiento para Tarjeta SIM 5 Alojamiento Correa de Transporte 6 Anclaje de Batería 7 Conector para Manos Libres Portátil 5 7 6 4 3 2 1 ...

Page 16: ... para realizar una conexión directa a WAP También se usa para borrar caracteres Teclas de Navegación Se usan para desplazarse entre nombres números de teléfono menús u opciones de configuración Se usa para entrar en el menú Mensajes directamente Se usa para desplazarse entre nombres o números de teléfono Tecla de Envío Puede marcar un número o responder una llamada Si presiona esta tecla sin haber...

Page 17: ...as internacionales 0 Marcación rápida desde 2 hasta 9 Se usa para cambiar al modo de vibración cuando se mantiene presionada durante un cierto tiempo Se usa para llamar mediante la voz cuando se mantiene presionada durante un cierto tiempo Esta tecla se utiliza también como tecla de conexión cuando se conecta el auricular Tecla de Encendido Apagado Se usa para finalizar o rechazar llamadas Esta te...

Page 18: ... continuación en la siguiente tabla Tecla Descripción 1 A B C 2 Ä À Á Â Ã Æ Ç a b c ä à á â ã ç D E F 3 È É Ë Ê d e f è é ë ê G H I 4 Î Ï Ì Í g h i î ï ì í J K L 5 j k l M N O 6 Ö Ô Ò Ó Ø Ñ m n o ö ô ò ó ø ñ P Q R S 7 p q r s T U V 8 Ü Ù Û Ú t u v ü ù û ú W X Y Z 9 w x y z 0 espacio Vista previa Descripción de Teclas ...

Page 19: ...tá subscrito al Servicio de Dos Líneas La alarma ha sido ajustada y está activa Indica el estado de carga de la batería Ha recibido un mensaje de texto Ha recibido un mensaje de voz depende de la subscripción Ha recibido un correo electrónico Puede ver su calendario Todas las señales de audio han sido desconectadas Perfil General activado Perfil Alto activado Perfil Silencio activado Información e...

Page 20: ...das Perfiles Configuración Desvíos Planificador Accesorios Internet Servicios SIM Iconos del Menú Principal Icon Indicador Descripción Perfil Auricular activado Perfil Coche activado Puede desviar una llamada Información en Pantalla Información en Pantalla ...

Page 21: ...soportes plateados con los conectores dorados hacia abajo y la esquina recortada hacia la derecha Colocación de la Batería Nota Antes de la colocación inicial compruebe que el teléfono esté apagado y la batería desconectada Los contactos metálicos de la tarjeta SIM peden ser fácilmente dañados por los arañazos Ponga por tanto especial atención en su manejo e instalación Siga las instrucciones sumi...

Page 22: ...s del cargador de viaje en la parte inferior del teléfono 2 Conecte el otro extremo del cargador de viaje a una toma de corriente Utilice solo el cargador incluido en el embalaje del teléfono Atención No fuerce el conector pues se podrían dañar el teléfono o el propio cargador 2 Presionela hasta que oiga un clic Instalación Primeros Pasos ...

Page 23: ...do El mensaje Batería cargando se mostrará en la pantalla durante la carga Cuando la batería esté totalmente descargada se encenderá la luz de fondo sin mostrar mensaje alguno La barras en movimiento que aparecen en pantalla durante la carga se pararán cuando la batería esté totalmente cargada Desconexión del Cargador Desconecte el cargador de viaje del teléfono presionando los botones laterales ...

Page 24: ...quier otro dispositivo Instalación Primeros Pasos 1 Para sacar la carcasa presione la presilla de la misma con una moneda por ejemplo Comience a retirar la carcasa desde la parte posterior 2 Para cambiar la carcasa primero coloque la parte inferior de la misma sobre el teléfono en su correspon diente alojamiento y después presiónela contra aquel ...

Page 25: ...e escuche un tono 2 Dependiendo de la configuración del código PIN Menú 4 5 1 tendra que introducir el código PIN o no 3 Si su teléfono se conecta a una red el nombre de esta será mostrado en pantalla en breves instantes Apagado del teléfono En el modo de espera mantenga presionada la tecla E key hasta que escuche un tono ...

Page 26: ...el código PIN está Deshabilitado su teléfono se conecta directamente a la red si ésta está presente sin pedir el código PIN Código PIN2 4 a 8 dígitos El código PIN2 suministrado con algunas tarjetas SIM es requerido para acceder a determinadas funciones como el Coste de Llamadas o los Números de Marcación Fija Estas funciones estarán disponibles solo si la tarjeta SIM las soporta Código PUK 4 a 8 ...

Page 27: ... servicio para pedirlo Código de Seguridad 4 a 8 dígitos El código de seguridad protege su teléfono contra el uso no autorizado del mismo Normalmente se suministra con el teléfono Este código es requerido para borrar todas las entradas del teléfono y para activar el menú Restablecer Valores de Fábrica El Número de Seguridad por defecto es 0000 Puede cambiarlo en el menú Seguridad Primeros Pasos ...

Page 28: ...el 2 al 9 4 Lista de voz Permite ver una lista de los números de teléfono que tienen una etiqueta de voz asociada 5 Grupos usuarios Permite ver una lista de grupos 6 Copiar todos Permite copiar entradas de la agenda desde la memoria del teléfono a la tarjeta SIM y viceversa 7 Borrar todos Permite borrar todos los datos de la agenda tanto de la memoria del teléfono como de la tarjeta SIM 8 Configur...

Page 29: ...editar borrar o copiar una entrada o añadir otra o asignar una etiqueta de voz a una mediante la selección de Opcs El siguiente menú será mostrado Editar Permite editar el nombre el número el correo electrónico y el fax presionando Aceptar Borrar Permite borrar una entrada Copiar Permite copiar una entrada de la SIM al teléfono y viceversa Llamar Puede llamar a la entrada seleccionada Voz Puede as...

Page 30: ...guardar una serie de caracteres pero el número de estos dependerá de las características de la tarjeta 1 Abra la agenda mediante la pulsación de la tecla Nombr en el modo de espera 2 Desplácese hasta Añadir nuevo y presione Selec para acceder 3 Selecione en qué memoria desea guardar la entrada nueva SIM o Teléfono SIM Puede añadir un nombre y un número para la entrada a Escriba el nombre deseado b...

Page 31: ...a asegurar la precisión del reconocimiento de voz Después de que el reconocimiento de voz haya concluido la voz será asignada automáticamente Nota La voz solo puede ser asignada al teléfono principal que haya definido Por ejemplo si cambia el número principal la etiqueta de voz será automáticamente asignada al número cambiado Puede añadir una etiqueta de voz a un número en la SIM La etiqueta puede...

Page 32: ...ecciona un número asignado a marcación rápida podrá ver los siguientes submenús Cambiar Puede cambiar la asignación del número de marcación rápida Des marc ráp Puede borrar el número de marcación rápida asignado Lista de voz Nombres 4 Puede ver los números de teléfono que tienen una etiqueta de voz asignada Puede también llamar directamente mediante S Enviar Tras seleccionar un número de teléfono ...

Page 33: ...milia Amigos Compañeros VIP etc 4 Seleccione el nombre del Grupo que desea gestionar mediante Selec 5 Los siguientes submenús serán mostrados Añadir miemb Puede añadir un número en Grupos Ver miembros Puede ver la lista de números en Grupos Puede seleccionar el miembro deseado mediante Opcs y entonces habilitar los submenús como Editar Borrar Timbre grupo Puede asignar una melodía de timbre a un g...

Page 34: ... del teléfono Teléf a SIM Puede copiar la entrada de la memoria del teléfono a la tarjeta SIM Borrar todos Nombres 7 Puede borrar todas las entradas de la SIM o del Teléfono y las Voces Esta función requiere el código de seguridad 1 Pulse Nombr para acceder a la agenda desde en modo de espera 2 Desplácese hasta Borrar todos y pulse Selec 3 Seleccione la memoria que desee borrar SIM teléfono o Voz ...

Page 35: ...ón y pulse Selec 3 Aparecerán los siguientes submenús Config memoria 1 Resalte la opción Config memoria y pulse Selec 2 Los siguientes submenús serán mostrados Variable Si selecciona Variable el teléfono le preguntará dónde almacenar las entradas que añada en la Agenda SIM Si selecciona SIM el teléfono guardará las entradas directamente en la SIM sin hacer ninguna pregunta Teléfono Si selecciona T...

Page 36: ...iona Número el teléfono busca las entradas por número Información Nombres 9 SDN Número de Llamada de Servicio Utilice esta función para acceder a una lista de servicios ofrecidos por su operador de red si lo soporta la tarjeta SIM 1 Abra la agenda primero mediante la pulsación de Nombr en el modo de espera 2 Desplácese hasta SDN y pulse Selec para acceder 3 Se mostrarán los nombres de los servicio...

Page 37: ...as hay en el teléfono 1 Abra la agenda primero mediante la pulsación de Nombr en el modo de espera Seleccione Información pulsando Selec 2 Desplácese hasta Estado mem y entonces pulse Selec para accede a este menú Número propio dependiente de la SIM Puede comprobar su propio número en la tarjeta SIM ...

Page 38: ... Servicio info 1 Leer 2 Recepción CB 3 Alerta 4 Idioma 5 Asunto 5 Mensajes de Voz 1 Llam Buzón voz 2 Num Buzón voz 6 Tarjeta 7 Plantillas 8 Configuración 1 Tipo mensaje 2 Per validez 3 Informe de estado 4 Pago por resp 5 Centro SMS 9 Estado mem 2 Registro de Llamadas 1 Llam perd 2 Llam recibidas 3 Llam enviadas 4 Borrar llamadas 5 Coste llamad 1 Duración llam 2 Coste llamadas 3 Config coste Árbol ...

Page 39: ... Hora 1 Fecha 2 Hora 3 Confg telf 1 Pantalla 2 Idioma 4 Conf llamadas 1 Aviso minut 2 Cualq tecla 3 Enviar número 4 Llam espera 5 Rellam auto 6 Selección de línea 7 Próx entr 5 Conf seguridad 1 Código PIN 2 Bloq teléf 3 Bloq auto 4 Restr llam 5 Números de marcación rápida 6 Camb código 6 Config red 1 Automático 2 Manual 3 Preferidas 4 Def usuar 7 Recuperar valores ...

Page 40: ...de 4 Ilocalizable 5 Llamad datos 6 Llamadas fax 7 Cancel todas 6 Planificador 1 Añadir nuevo 1 Plan 2 Memoria 2 Ver día 3 Ver todas 4 Borrar último 5 Borrar todos 7 Accesorios 1 Juegos 2 Conver Unidad 3 Calculadora 4 Reloj mundial Acceso al Menú Árbol de Menús ...

Page 41: ...ú ESPAÑOL 39 8 Internet 1 Inicio 2 Favoritos 3 Perfiles 4 Ir a URL 5 Confg caché 1 Borrar caché 2 Compr caché 6 Certif seg 7 Rest perfil 9 Servicios SIM Este menú depende de la tarjeta SIM y de los servicios de red ...

Page 42: ... caracteres Además puede comprobar el número de caracteres 1 Entre en el menú Mensajes pulsando Selec 2 Si desea escribir un mensaje nuevo seleccione Escribir en el menú 3 Introduzca el mensaje mediante el texto eZi Para ampliar detalles consulte texto eZi Página 43 4 Cuando termine de escribir el mensaje pulse Opcs Aparecerá el siguiente menú de opciones Mensajes Menú 1 Acceso al Menú Mensajes ...

Page 43: ...4 Pulse si desea guardarlo en la Bandeja de salida o si no es así Guardar Almacena el mensaje en la Bandeja de salida 1 El teléfono preguntará si desea almacenar el mensaje 2 Pulse si desea guardarlo en la Bandeja de salida o si no es así Usar plant Una plantilla es un mensaje predefinido Puede añadir una plantilla de la lista al mensaje que desea editar Usa tarjeta Los elementos de la tarjeta de ...

Page 44: ...uzca una palabra y pulse Añadir Listar dicc Puede ver la lista de palabras que ya ha añadido al diccionario 1 Acceda al menú 2 Desplácese hasta Listar dicc y pulse Selec 3 Puese comprobar la lista de palabras 4 Si desea borrar una palabra pulse Borrar 5 Si desea borrar todas las palabra de la lista seleccione Borrar todos al final de la lista mediante la pulsación de Selec Acceso al Menú Mensajes ...

Page 45: ...abras y frases Si pulsa la tecla durante unos segundos puede cambiar el idioma El teléfono soporta cuatro modos de entrada de caracteres Modo eZi Modo numérico Modo mayúsculas y Modo minúsculas Si desea cambiar el modo pulse la tecla Como usar el modo eZi Para introducir un carácter en modo texto eZi pulse cada tecla una sola vez para el carácter que desee Por ejemplo para escribir Campos en modo ...

Page 46: ...eclado Como usar el modo mayúsculas Para introducir un letra mayúscula presione la tecla del carácter que aparece en el teclado Como usar el modo minúsculas Para introducir un letra minúscula presione la tecla del carácter que aparece en el teclado 1024 1 1024 1 abc Nota Si desea introducir un símbolo pulse la tecla en cada modo Mensajes Menú 1 ...

Page 47: ...ras lee el mensaje puede pulsar Opcs para acceder a las opciones disponibles Borrar El mensaje seleccionado es borrado Editar Puede editar un mensaje recibido y enviarlo o guardarlo Reenviar Puede enviar el mensaje seleccionado a otra persona Usar número Si el mensaje seleccionado contiene un número de teléfono puede extraerlo y guardarlo en la agenda También puede llamar a ese número Responder Pu...

Page 48: ...s para borrar todos los mensajes contenidos en este menú Después de leer el mensaje pulse Opcs para acceder a los siguientes submenús Borrar El mensaje seleccionado es borrado Editar Puede editar un mensaje y enviarlo o guardarlo Reenviar Puede enviar el mensaje seleccionado a otra persona Usar número Si el mensaje seleccionado contiene un número de teléfono puede extraerlo y guardarlo en la agend...

Page 49: ...nformación tiene un número por lo que puede llamar a su proveedor de servicio Cuando recibe un mensaje CB puede leerlo de la siguiente manera Leer Menú 1 4 1 1 Cuando recibe un mensaje CB será mostrado en pantalla Puede leer el mensaje desplazándose por él mediante U o D 2 Después de leer el mensaje pulse E para volver al modo de espera Además puede guardarlo hasta que llegué otro mensaje Recepció...

Page 50: ...nar el idioma de los mensajes CB pulsando Selec El idioma seleccionado será mostrado con una indicación Asunto Dependiente de la red y la subscripción Menú 1 4 5 Añadir Menú 1 4 5 1 Si selecciona este menú añadirá una categoría de mensajes CB en la memoria del teléfono Ver lista Menú 1 4 5 2 Si selecciona este menú puede ver la categoría de los mensajes CB Si pulsa Opcs podrá editarla y borrarla L...

Page 51: ...r el proveedor de servicios de red Cuando llega un mensaje de voz el símbolo correspondiente sera mostrado en pantalla Por favor compruebe con su proveedor de servicios de red los detalles del servicio para poder configurar el teléfono de acuerdo con estos 1 Pulse la tecla 1 durante varios segundos en el modo de espera 2 Puede comprobar los siguientes submenús Inicio Menú 1 5 2 1 Número marcado en...

Page 52: ...uardar 6 plantillas antes de editar Pero puede cambiarlas Las demás están Vacías Editar Permite editar una plantilla Borrar Permite borrar una plantilla Configuración Menú 1 8 Tipo mensaje Menú 1 8 1 Texto Voz Fax Búsq nac X 400 E mail ERMES Normalmente el tipo de mensaje está por defecto en modo Texto Puede convertir ese texto en formatos alternativos que sean compatibles con el dispositivo que r...

Page 53: ...ectamente o no Pago resp Menú 1 8 4 Cuando haya enviado un mensaje permite a la persona a la que envió el mensaje responder al mismo pero siéndole el coste de éste facturado a usted Centro SMS Menú 1 8 5 Si desea enviar el mensaje de texto puede acceder a la dirección del centro de mensajes SMS a través de este menú Estado mem Menú 1 9 Si selecciona este menú el teléfono mostrará la memoria usada ...

Page 54: ...as Menú 2 2 Puede comprobar las llamadas recibidas recientes En este menú puede guardar estos números llamar a ellos o ver la fecha y hora de las llamadas Llam enviadas Menú 2 3 Puede comprobar las llamadas realizadas recientes En este menú puede guardar estos números llamar a ellos o ver la fecha y hora de las llamadas Registro de Llamadas Menú 2 Acceso al Menú Pulse una vez Registro de ...

Page 55: ...lse Si Coste llamad Menú 2 5 Dentro de estos submenús podrá ver la duración y el coste de las llamadas Duración llam Menú 2 5 1 Esta función permite ver la duración de la Última Llamada de Todas las Llamadas de las Llamadas Recibidas y de las Llamadas Realizadas en horas minutos y segundos También puede reinicializar todos los contadores 1 Pulse Menú en el modo de espera 2 Pulse 2 para acceder dir...

Page 56: ... todas Config coste Menú 2 5 3 Dependiente de la SIM Establ Tarifa Menú 2 5 3 1 Puede determinar el tipo de moneda y el precio unitario Contacte con sus proveedores de servicio para obtener los precios unitarios de facturación Para seleccionar la moneda o la unidad necesita el código PIN2 1 Pulse Menú en el modo de espera 2 Pulse 2 para acceder directamente o use U y D para entrar en el Registro d...

Page 57: ...cceder 4 Seleccione Def crédito Mostr auto Menú 2 5 3 3 Este servicio de red permite ver automáticamente el coste de la última llamada Si selecciona Si en el menú Mostr auto podrá ver el ultimo coste cuando finalice la llamada 1 Pulse Menú en el modo de espera 2 Pulse 2 para acceder directamente o use U y D para entrar en el Registro de Llamadas 3 Desplácese hasta Config coste y pulse Selec para a...

Page 58: ... el perfil Auricular 1 Pulse Menú en modo de espera 2 Pulse 3 para acceder directamente o use U y D para entrar en el menú Perfiles Perfiles Menú 3 Acceso al Menú Nota En caso que el teléfono esté conectado a un accesorio como un manos libres portátil o un kit manos libres de coche no podrá cambiar manualmente a otros perfiles El menú perfiles dispone de un submenú Habilitar excepto para Coche y A...

Page 59: ...ores de este perfil General Menú 3 3 Habilitar Puede activar el perfil General para un uso habitual del teléfono Cambiar Puede cambiar los valores de este perfil Fuerte Menú 3 4 Habilitar Puede activar el perfil Alto si está en un lugar ruidoso Cambiar Puede cambiar los valores de este perfil Auriculares Menú 3 5 Habilitar Puede activar el perfil Auricular cuando conecte un manos libres portátil C...

Page 60: ...tes submenús Avis entrada Menú 3 x 1 Permite determinar el tipo de alerta para las llamadas entrantes Timbre llam Menú 3 x 2 Permite definir el tipo de melodía de timbre o tono para las llamadas entrantes Vol timbre Menú 3 x 3 Permite definir el volumen del timbre para las llamadas entrantes Alerta mens Menú 3 x 4 Permite activar uno de los siguientes tipos de aviso cuando se recibe un mensaje Avi...

Page 61: ...as entrantes Tras 5 seg Después de 5 segundos el teléfono responderá automáticamente Tras 10 seg Después de 10 segundos el teléfono responderá automáticamente Acceso al Menú Nota Si conecta el kit manos libres al teléfono puede activar la vibración contemplada en los menús Alerta de entrada y Alerta de mensajes Por lo tanto en el menu Coche podrá ver los siguientes submenús Avis entrada Timbre Sil...

Page 62: ...e avise cuando lo necesite Habilitar Menú 4 1 1 Puede ajustar la hora a la que la alarma debe sonar 1 Entre en el menú 2 Seleccione Habilitar pulsando Selec y después defina la hora a la que desee que la alarma le avise 3 Pulse Aceptar 4 Seleccione el periodo de repetición Una vez Diaria Semanal o Mensual 5 Si selecciona Alarma con teléfono apagado la alarma sonará a la hora seleccionada incluso a...

Page 63: ...je Cancelar alarma si está había sido activada previamente 4 Si desea cancelarla pulse Si Si no pulse No Fecha y Hora Menú 4 2 Fecha Menú 4 2 1 Fecha En este menú puede ajustar la fecha del teléfono 1 Acceda al menú 2 Seleccione Fecha pulsando Selec 3 Introduzca el valor que desee para la fecha 4 Pulse Aceptar Formato fecha Puede determinar el Formato fecha en este menú Acceso al Menú ...

Page 64: ...Hora En este menú puede ajustar la hora 1 Seleccione Hora pulsando Selec 2 Introduzca el valor que desee para la hora 3 Seleccione el formato de hora am pm que desse mediante la pulsación larga de las teclas U o D 4 Pulse Aceptar Formato hora Puede definir el formato de hora entre 12 ó 24 horas 1 Desplácese hasta Formato hora pulsando Selec 2 Seleccione 12 ó 24 horas pulsando Selec Configuración M...

Page 65: ... será presentado durante unos instantes en pantalla cuando se enciende el teléfono 1 Seleccione Configuración Confg telf Pantalla Saludo 2 El texto que usted defina se mostrará en pantalla Si selecciona este elemtno su teléfono le pedirá que edite el mensaje Luz fondo Menú 4 3 1 3 Puede determinar la duración de la luz de fondo que aparece cada vez que pulsa una tecla Deshabilitar 5 segundos o 10 ...

Page 66: ...i selecciona esta opción podrá contestar a una llamada entrante pulsando cualquier tecla excepto y E No Menu 4 4 2 2 Si selecciona esta opción podrá contestar a una llamada entrante pulsando Responder o S Nota Como usar un Manos libres portátil Cuando esté usando un manos libres portátil auricular para responder una llamada mediante el botón de respuesta del mismo deberá mantener éste pulsado dura...

Page 67: ...nú 4 4 3 2 Si selecciona esta opción no podrá enviar su número de teléfono Por defecto Menú 4 4 3 3 Si selecciona esta opción el teléfono se ajustará al valor por defecto Llam espera Menú 4 4 4 dependiente de la red Si este servicio está disponible podrá responder a una llamada entrante en espera Habilitar Menú 4 4 4 1 Permite activar el servicio correspondiente Deshabilitar Menú 4 4 4 2 Permite d...

Page 68: ...solo será útil si el Servicio de Línea Alternativa está disponible Entonces estarán registrados dos números de teléfono independientes para el teléfono Esta función le proporciona la posibilidad de seleccionar el número de teléfono activo en cada momento Si esta función está disponible por su proveedor de red el siguiente menú estará disponible 1 Línea 1 Define la Línea 1 como número de teléfono a...

Page 69: ...oz Si selecciona el modo podrá recibir datos faxes o voz en cada caso Una vez que acceda a esté menú se mostrarán las siguientes opciones Voz Puede recibir la llamada de voz Datos Puede recibir la llamada de datos Fax Puede recibir la llamada de fax Nota El Servicio de Número Único implica que el número de fax o datos es el mismo que el de voz Estos modos dependen de las características de red ...

Page 70: ...go PIN mediante las pulsación de Selec 5 Podrá ver los siguientes submenús Habilitar Habilita la petición del código PIN Deshabilitar Deshabilita la petición del código PIN Bloq teléf Menú 4 5 2 Puede utilizar el bloqueo de teléfono para impedir el uso no autorizado de su teléfono Cuando encienda su teléfono éste le pedirá que introduzca el código de seguridad siempre si está habilitado Si define ...

Page 71: ... ninguna acción en 25 segundos Habilitar Deshabilitar Nota Si desea bloquear el teclado manualmente acceda al menú Principal y pulse Si desea desbloquear el teclado pulse la tecla desbloquear y a continuación presione Pero si había activado el Bloqueo automático del teclado anteriormente el teclado se bloqueará automáticamente después de 25 segundos ...

Page 72: ...las llamadas salientes Sal intern Restringe todas las llamadas salientes internacionales Sal int itin Restringe todas las llamadas salientes internacionales excepto a la red propia Todas entran Restringe todas las llamadas entrantes Entr en itin Restringe todas las llamadas entrantes cuando se está en itinerancia roaming Cancel todas Cancela todas las restricciones Camb contr Puede cambiar la clav...

Page 73: ...uede restringir las llamadas salientes a determinados números de teléfono Off Puede llamar sin ningún tipo de restricción Lista de Puede ver la lista de números guardada como números Número de marcación fija Camb código Menú 4 5 6 Puede cambiar los códigos de acceso Código PIN Código PIN2 y Código segur 1 Pulse Menú en el modo de espera 2 Pulse 4 para acceder directamente o use U y D para acceder ...

Page 74: ...redes preferidas en las que el teléfono debe intentar registrarse en primer lugar antes de intentarlo en otras Esta lista es creada a partir de la lista de redes conocidas predefinidas en el teléfono Def usuar Menú 4 6 4 Puede añadir o eliminar redes de la lista predefinida Ésta puede incluso contemplar nuevas redes cuyos códigos no sean conocidos por el teléfono Para hacer esto seleccione y despu...

Page 75: ...de servicio 1 Pulse Menú en el modo de espera 2 Pulse 5 para acceder directamente o U y D para entrar en Desvíos Todas llam Menú 5 1 Desviar todas las llamadas de voz incondicionalmente Comunicando Menú 5 2 Desvía las llamadas cuando hay una en curso No responde Menú 5 3 Desvía las llamadas cuando no responde Ilocalizable Menú 5 4 Desvía las llamadas cuando el teléfono está apagado o sin cobertura...

Page 76: ...ilitar Menú 5 x 1 Activa el correspondiente servicio Buzón de voz Menú 5 x x 1 Reenvía al centro de mensajes Esta función no está disponible en los menús Todas las llamadas de datos y Todas las llamadas de fax Otro número Menú 5 x x 2 Define el número al que desviar Favorito Menú 5 x x 3 Muestra una lista con 5 números de desvío ESPAÑOL 74 Nota Puede elegir el número deseado en el menú Favoritos D...

Page 77: ...L 75 Acceso al Menú Deshabilitar Menú 5 x 2 Desactiva el servicio correspondiente Estado Menú 5 x 3 Comprueba el estado del servicio correspondiente Cancel todas Menú 5 7 Cancela todos los servicios de desvío ...

Page 78: ...sta un evento dentro de un día este aparecerá marcado con un símbolo de subrayado Esta función sirve para recordarle sus eventos y citas El teléfono hará sonar un tono de alarma para cada evento si usted así lo desea Para cambiar el día el mes y el año Anual Mensual Si pulsa estas teclas brevemente podrá ajustar la alarma diaria Si las pulsa por un periodo largo podrá hacerlo semanalmente Tecla De...

Page 79: ...o habrá repetición Diaria repetición diaria durante 5 días Semanal repetición semanal durante 5 semanas Mensual repetición mensual durante 5 meses Anual repetición anual durante 5 años Hora alarma Menú 6 1 1 1 1 Hora precisa alarma en el momento preciso del evento 10 min antes alarma 10 minutos antes del momento preciso del evento 30 min antes alarma 30 minutos antes del momento preciso del evento...

Page 80: ... Si asoció una alarma a la nota un reloj de alarma será mostrado Pulse Opcs para borrar o editar la nota seleccionada Ver todas Menú 6 3 Muestra las notas presentes de todos los días Use U y D para desplazarse entre la lista de notas Pulsando Opcs podrá acceder al mismo menú que en Ver día Borrar último Menú 6 4 Puede borrar el ultimo evento que se le haya notificado Borrar todos Menú 6 5 Puede bo...

Page 81: ... uno dispone de pantallas de ayuda en la tecla de control principal Otras teclas de control comunes son mostradas a continuación Teclas de Función Comunes Tecla multifunción 1 Empezar Juego CLR Pausa Tecla multifunción 2 Atrás E Fin Salir Tecla Asterisco Luz de fondo Tecla multifunción 1 Guardar tanteador U D 0 9 Control de Nivel Arriba Abajo teclas numéricas Pulse seis veces Accesorios ...

Page 82: ...ea Peso y Volumen 1 Puede seleccionar una de las cuatro pulsando Selec 2 Seleccione la unidad que desea convertir mediante U y D 3 Puede cambiar la unidad pulsando Camb 4 Puede introducir el primer número pulsando 5 Puede borrar el primer número pulsando 6 Pulse E o Volver si desea finalizar el proceso de conversión de valor 0 00 cm 0 000 cm Camb Volver Accesorios Menú 7 Acceso al Menú ...

Page 83: ...lsando Opcs y seleccionando Égaler 4 Si desea continuar los cálculos repita el proceso 5 Puede borrar un signo o número mediante 6 Pulse E si desea finalizar el proceso de cálculo Reloj mundial Menú 7 4 Puede ver la hora de varias ciudades del mundo Cuando pulse U o D brevemente podrá ver ciudades pertenecientes a diferentes husos horarios y cuando pulse durante cierto tiempo U o D podrá ver todas...

Page 84: ... página principal que esté configurada en el perfil activo Favoritos Menú 8 2 Cuando acceda a este menú podrá ver sus Favoritos Entonces pulse para acceder a las opciones disponibles o para salir Conectar Conectar con el Favorito seleccionado Añadir nuevo Permite añadir un Favorito nuevo manualmente Editar Permite editar el nombre y la dirección del Favorito seleccionado Borrar Borra el Favorito s...

Page 85: ... introducir la dirección URL de la página que desea usar como principal No necesita escribir http delante de cada URL dado que el navegador WAP lo añadirá automáticamente Mostrar imág Menú 8 3 1 2 2 Puede seleccionar si las imagines contenidas en cada página WAP son mostradas en pantalla o no Tipo conexión Menú 8 3 1 2 3 Las opciones disponibles son Continua o Temporal y dependen de la pasarela de...

Page 86: ...or un sitio WAP Config datos Menú 8 3 1 2 6 Estos valores de configuración deben ser suministrados por su operador de red Dirección IP Introduzca la dirección IP de la pasarela WAP que utilice para el acceso Marcar núm Introduzca el número de teléfono al que hay que llamar para acceder a su pasarela WAP Tipo llamada Selecciona el tipo de llamada de datos Analógica o Digital RDSI Vel llamada Veloci...

Page 87: ... 8 3 1 3 Edite el nombre del perfil Serv e mail Menú 8 3 1 4 Guarde la dirección URL del servidor de correo electrónico e mail que utilice con mayor frecuencia Conectar Menú 8 3 1 4 1 Conecta con el servidor de correo electrónico que haya configurado Editar dirección Menú 8 3 1 4 2 Edite la URL del servidor de correo electrónico Ir a URL Menú 8 4 Puede conectar directamente con el sitio que desee ...

Page 88: ...la memoria caché Siempre Menú 8 5 2 1 La caché siempre será comprobada cuando una URL sea cargada o se navegue por ella Sólo inicio Menú 8 5 2 2 La caché sólo sera comprobada al abrir el navegador WAP Desact Menú 8 5 2 3 La caché nunca será comprobada Certif seg Menú 8 6 Muestra una lista de los certificados disponibles Rest perfil Menú 8 7 Puede reiniciar la configuración de los perfiles actuales...

Page 89: ...nú 8 2 Guardar como Favoritos Guarda la URL actual como un Favorito También puede editar el nombre del Favorito Ir a URL Igual que Menú 8 4 Ir a servidor e mail Conecta con el servidor de correo electrónico que haya configurado Determinar como servidor e mail Guarda la URL actual como servidor de correo electrónico Menú On line de Internet Acceso al Menú ...

Page 90: ...o E Fin o cerrando la carpeta Recepción de llamadas de datos o fax Si dispone de números diferentes para las llamadas de voz datos y fax su teléfono reconocerá el tipo de llamada Recepción de llamadas de datos o fax Números separados Multi numbers Al usar el servicio de datos o fax la pantalla muestra el tipo de llamada que se está recibiendo Para recibir una llamada de datos o fax 1 Conecte su or...

Page 91: ...seada Voz Datos o Fax y pulse Selec 4 Conecte su ordenador al teléfono 5 Después de abrir el programa de comunicaciones acepte una llamada y reciba los datos o el fax si la llamada no ha sido respondida automáticamente 6 Tras la recepción puede finalizar la llamada simplemente cerrando su aplicación de comunicaciones pulsando E Fin o cerrando la carpeta Una vez que haya configurado el teléfono par...

Page 92: ... hacerla activa 1 2 Haciendo una segunda llamada Puede recuperar un número de la agenda para realizar una segunda llamada Pulse Nombr y seleccione Buscar Para guardar el número marcado en la agenda durante la llamada pulse Nombr y seleccione Añadir neuva 1 3 Alternando entre dos llamadas Para cambiar de una llamada a otra seleccione Opcs y luego seleccione Alternar o pulse la tecla S Enviar Puede ...

Page 93: ...a la segunda mediante S Enviar o seleccionando la tecla Respoder y luego Retener y Responder Puede finalizar la actual y responder a la llamada en espera mediante la tecla Menú y luego Finalizar y Responder 1 5 Rechazando un llamada entrante Puede rechazar un llamada entrante sin necesidad de aceptarla simplemente pulsando la tecla E Fin Cuando haya una llamada activa puede rechazar una segunda ll...

Page 94: ...os DTMF durante una llamada Para activar los tonos DTMF durante una llamada por ejemplo para permitir que su teléfono haga uso de una centralita automática seleccione Opcs y luego DTMF On Los tonos DTMF se pueden desactivar de la misma manera 1 9 Accediendo al Menú Principal Las opciones principales de Mensajes y Servicios SIM pueden ser utilizadas desde el menu Durante una llamada mediante la tec...

Page 95: ...pciones están disponibles desde el menú Durante una llamada y aparecen en Sección El número máximo de personas que pueden estar conectadas en una llamada de multiconferencia es cinco Una vez iniciada por usted esa llamada usted llevará el control de la misma y será el único que podrá añadir llamadas a la misma 2 1 Haciendo una segunda llamada Puede realizar una segunda llamada cuando tenga una act...

Page 96: ... activa a la llamada de multiconferencia retenida seleccione Opcs y luego Multiconferencia Unir todas 2 6 Mostrar las personas conectadas en una Llamada en Multiconferencia Para desplazarse en la pantalla del teléfono por los números de las llamadas conectadas pulse las teclas U y D 2 7 Reteniendo a un miembro de una Llamada en Multiconferencia Para retener a una determinada persona de las que est...

Page 97: ... presentado en pantalla de una llamada en multiconferencia puede ser desconectado mediante la tecla E Fin Para finalizar una llamada en multiconferencia pulse Opcs y luego Multiconferencia Fin Sleccionando la tecla Opcs y luego Multiconferencia Finalizar todas desconectará todas las llamadas activas y retenidas 2 10 Transferencia de Llamadas Explícita ECT Si tiene una llamada retenida y a otra act...

Page 98: ... se caiga No someta la unidad a golpes o vibraciones La superficie del teléfono puede ser dañada si se cubre con fundas de vinilo o material sintético Use un trapo suave y seco para limpiar el exterior del teléfono no utilice disolventes como benceno o alcohol No someta el teléfono a ambientes con exceso de humo o polvo No mantenga el teléfono cerca de tarjetas de crédito o cupones de viaje la inf...

Page 99: ... desmonte ni cortocircuite la batería Mantenga limpios los contactos metálicos de la batería Sustituya la batería cuando esta no proporcione unas prestaciones aceptables La batería puede ser recargada cientos de veces hasta que necesite ser cambiada Recargue la batería si no ha sido usada durante largo tiempo para tratar de asegurar su correcto estado No exponga el cargador de batería a la luz dir...

Page 100: ...ral Nombre del Producto W3000 Sistema GSM 900 DCS 1800 Tarjeta SIM Tarjeta pequeña sólo 3V Dimensiones Tamaño 102 X 45 X 20 mm Peso con Batería Estándar 80g Temperaturas Ambiente Máxima 55 C Mínima 10 C Datos Técnicos ...

Page 101: ...MEMO ESPAÑOL 99 ...

Page 102: ...ESPAÑOL 100 MEMO ...

Page 103: ...WAP Phone USER S MANUAL MODEL W3000 Please read this manual carefully before operating your set Retain it for future reference ENGLISH ...

Page 104: ......

Page 105: ...ENGLISH 3 W3000 Phone W3000 has a polished style which provides users a better feel and convenience ...

Page 106: ...erations Switch off the phone in any area where are forced by special regulations For example the phone does not allow to be used in hospital because pacemakers and hearing aids can be affected Minor interference may affect TVs radios PCs etc Do not hold the phone in your hand while driving Do not dismantle phone or battery Keep the phone in a safe place out of children s reach since it contains t...

Page 107: ...t be available under all cellular networks Therefore you should never depend solely on the phone for essential communications such as medical emergencies Important Information This user s guide contains important information on the use and operation of this phone Please read all the information carefully for optimal performance and to prevent any damage to or misuse of the phone Any changes or mod...

Page 108: ... Installation 19 Inserting the SIM Card 19 Installing the Battery 19 Charging the Battery 20 Disconnecting the charger 21 Instructions for changing the front colour cover 22 Powering On Sequence 23 To get started with the phone 23 To turn off the phone 23 Access Codes 24 PIN code 4 to 8 digits 24 PIN2 code 4 to 8 digits 24 PUK code 4 to 8 digits 24 PUK2 code 4 to 8 digits 25 Security code 4 to 8 d...

Page 109: ...formation Names 9 34 Menu Tree 36 Messages Menu 1 40 Write message Menu 1 1 40 Inbox Menu 1 2 45 Outbox Menu 1 3 46 Info Service Menu 1 4 47 Voice messages Menu 1 5 49 Namecard Menu 1 6 50 Templates Menu 1 7 50 Settings Menu 1 8 50 Check memory Menu 1 9 51 Call Register Menu 2 52 Missed calls Menu 2 1 52 Received calls Menu 2 2 52 Dialled calls Menu 2 3 52 Clear recent calls Menu 2 4 53 Call charg...

Page 110: ...settings Menu 4 4 64 Security settings Menu 4 5 68 Network settings Menu 4 6 72 Restore factory settings Menu 4 7 72 Call Divert Menu 5 73 All voice calls Menu 5 1 73 If busy Menu 5 2 73 If no reply Menu 5 3 73 If unreachable Menu 5 4 73 All data calls Menu 5 5 74 All fax calls Menu 5 6 74 Cancel all Menu 5 7 75 Scheduler Menu 6 76 Add new Menu 6 1 77 View day Menu 6 2 78 View all Menu 6 3 78 Dele...

Page 111: ...files Menu 8 3 83 Go to URL Menu 8 4 85 Cache settings Menu 8 5 86 Security certifications Menu 8 6 86 Reset profiles Menu 8 7 86 Internet On line menu 87 Additional Functions How to Use Data and Fax call 88 Sending Data or Fax Calls 88 Receiving Data or Fax Calls 88 In call Menu 90 1 During a call 90 2 Multiparty or Conference Calls 93 Care and Maintenance 96 Technical Data 98 ...

Page 112: ...Accessories Overview ENGLISH 10 Check to make sure that you have all the parts shown below Handset Travel Adapter Warranty Card s User s manual Standard Battery Changeable front cover ...

Page 113: ...Overview Optional Accessories ENGLISH 11 Data Kit CD Changeable front cover Portable Handsfree Cigar Lighter Adapter Handsfree Kit ...

Page 114: ...view Front of the Phone 1 Earpiece 2 Display Screen 3 Soft Left Key 4 Navigation Keys 5 Send Key 6 Star Key 7 Soft Right Key 8 END PWR keys 9 Numeric Keys 10 Hash Key 11 Microphone 12 Ear Microphone Connector 2 5 4 3 7 8 10 11 6 9 12 1 ...

Page 115: ...ne Overview ENGLISH 13 1 Battery 2 Cable Connector Battery Charging Connector Hands Free Car kit Connector 3 Battery Terminals 4 SIM Card Socket 5 Handstrap Hole 6 Battery Lock 7 Ear Microphone Connector 5 7 6 4 3 2 1 ...

Page 116: ...phone numbers menus or setting options Used to enter Message menu directly Used to scroll through names phone numbers Send Key You can dial a phone number and answer a call If you press this key without entering a number your phone shows the most recently dialed number Numeric Keys These keys are used mainly to dial in standby mode and enter numbers or characters in editing mode When you press the...

Page 117: ...essing this key for a long time Used to call by voice dial with long pressing this key This key is also used as Ear mic hook key when connecting Ear mic END PWR Key Used to end or reject a call This key is also used as Power Key Pressing and holding this key for a few seconds ...

Page 118: ...s the following table Key Description 1 A B C 2 Ä À Á Â Ã Æ Ç a b c ä à á â ã ç D E F 3 È É Ë Ê d e f è é ë ê G H I 4 Î Ï Ì Í g h i î ï ì í J K L 5 j k l M N O 6 Ö Ô Ò Ó Ø Ñ m n o ö ô ò ó ø ñ P Q R S 7 p q r s T U V 8 Ü Ù Û Ú t u v ü ù û ú W X Y Z 9 w x y z 0 Space Key Key Description Overview ...

Page 119: ...oing calls If you subscribe to the Two Line Service The alarm has been set and is on Tells you the status of the battery You have received a text message You have received a voice message depending on your subscription You have received an E mail You can view your schedule All audible signals are turned off General menu in profiles Loud menu in profiles Quiet menu in profiles Display Information D...

Page 120: ...all register Profiles Settings Call divert Scheduler Fun Tools Internet Sim service Top Menu Icons Icon Indicator Description Headset menu in profiles Handsfree menu in profiles You can divert a call Display Information Display Information ...

Page 121: ...he silvery holders with the golden connectors facing down and the cut corner to the right Installing the Battery Notice Before installing always make sure that the phone is switched off and remove the battery The metal contact of the SIM card can be easily damaged by scratches Pay special attention to the SIM card when you handle and install Follow the instructions supplied with the SIM card 1 Pla...

Page 122: ...rt one end of the travel adapter into the bottom of the phone 2 Connect the other end of the travel adapter to an AC wall outlet Use only the included packing charger Warning Do not force the connector as this may damage the phone and or the travel adapter 2 Push it until you hear a click Installation Getting Started ...

Page 123: ...d while charging Battery Charging is displayed on the screen after connecting the travel adapter Only if the battery is totally empty Back light is on without displaying Battery Charging The moving bars of battery icon will stop after charging completely Disconnecting the charger Disconnect the travel adapter from the phone by pressing its side buttons ...

Page 124: ... charger or any other device Installation Getting Started 1 To remove the cover press the locking catch of the cover for example with a coin Start to open the cover from its upper part 2 To replace the cover first place and close the catch in the lower part of the cover into the corresponding hole in the phone and then gently close the whole cover ...

Page 125: ...e 1 Press and hold key until you hear a tone 2 Depending on setting PIN Code Menu 4 5 1 you can enter PIN code or not 3 If your phone connects to a network the network name will be displayed shortly To turn off the phone In stand by mode press and hold key until you hear a tone ...

Page 126: ...On the contrary when PIN code is set Disable your phone connects to the network directly without the request PIN code PIN2 code 4 to 8 digits The PIN2 code supplied with some SIM cards is required to access some functions such as Advice of call charge Fixed Dial number These functions are only available if supported by your SIM card PUK code 4 to 8 digits The PUK Personal Unblocking Key code is re...

Page 127: ...so contact your service provider Security code 4 to 8 digits The security code protests the unauthorized use of your phone It is usually supplied with the phone This code is required to delete all phone entries and to activate Factory reset menu The default number of Security code is 0000 You can also change it in Security menu Getting Started ...

Page 128: ...s 4 Voice list Allows you to list phone numbers which is attatched voice 5 Caller groups Allows you to show group list 6 Copy all Allows you to copy entries from your Phone memory to SIM card or from SIM card to Phone memory 7 Delete all Allows you to erase all the data in either your phonebook or the SIM card to the phone memory 8 Settings Allows you to set the memory and to search item by Variab...

Page 129: ...rs by pressing List 7 If you want to edit delete copy an entry or to add the voice to one select Options The below menu will be displayed Edit You can edit the name number E mail and fax by pressing OK Delete You can delete an entry Copy You can copy a entry from SIM to phone or from phone to SIM Call You can call thru the chosen entry Voice You can add the voice to the entry or change the voice t...

Page 130: ...g Names in standby mode 2 Scroll to highlight Add new and press Select to enter 3 Select the memory you want to save SIM or Phone SIM You can add name and number for entry a Write a name to add b Press OK then you can input a number c Press OK d If you want to add the voice press Yes Phone You can add name mobile home office fax no and E mail address a Write a name to add b Press OK c Enter the nu...

Page 131: ... can only be attached to main number which you set For example If you change main number voice will be automatically attached changed number You can add voice tag to phone number in SIM card The voice tag can be erased removing or changing SIM card And voice tag attached to phone number in SIM card may be attached to another phone number when you changed SIM card Why The answer is that SIM card do...

Page 132: ...me by speed dial you can view following the submenus Change You can change the allocation of speed dial number Undo You can delete the allocated speed dial number speed dial Voice list Names 4 You can see all phone numbers which contain voice You can also call directly by pressing Send After selecting phone number by using and and press Options you can see following the submenus Play You can play ...

Page 133: ... Friend Colleague VIP etc 4 Select Group name that you want to manage by pressing Select 5 Then submenus below will be displayed Add member You can add the number in Caller groups View member You can view the number list in Caller groups You can select the member you want by pressing Options then you can enable the submenu such as Edit Delete Group ring tone You can set the ring tone depending on ...

Page 134: ...IM Card to Phone memory Phone to SIM You can copy the entry from Phone memory to SIM Card Delete all Names 7 You can delete all entries in SIM Phone and Voice This function requires security code 1 Press Names to enter into the phonebook in standby mode 2 Scroll to Delete all then press Select 3 Then select a memory to erase SIM Phone Voice 4 And then you will be requested to enter Security code 5...

Page 135: ...ss Select to enter 3 Then submenus below will be displayed Set memory 1 Scroll to highlight Set memory then press Select to enter 2 The three submenus are displayed Variable If you select Variable the phone asks you where to store whenever you add entries in Phonebook SIM If you select SIM the phone stores entries to SIM directly without asking you where to store Phone If you select Phone the phon...

Page 136: ...ber If you select Number the phone searches entries by number Information Names 9 SDN Service Dial Number Use this function to access a particular list of services provided by your network operator if supported by the SIM card 1 Open the phonebook first by pressing Names in a standby mode 2 Scroll to SDN then Press select to enter 3 The names of the available services will be shown 4 Use and to se...

Page 137: ...d in use are in your phonebook 1 Open the phonebook first by pressing Names in standby mode Select Information by pressing Select 2 Scroll to Check memory then press select to enter this menu Own number SIM dependent You can check your own number in SIM card Back Handset 0 200 SIM Card 0 250 ...

Page 138: ...1 Read 2 Receive CB 3 Alert 4 Language 5 Topics 5 Voice messages 1 Listen to voice message 2 Voice mailbox number 6 Namecard 7 Templates 8 Settings 1 Message type 2 Validity period 3 Status report 4 Pay for reply 5 SMS centre 9 Check memory 2 Call Register 1 Missed calls 2 Received calls 3 Dialled calls 4 Clear recent calls 5 Call charge 1 Call duration 2 Show call costs 3 Cost settings Menu Tree ...

Page 139: ...me 3 Phone settings 1 Display 2 Language 4 Call settings 1 Minute minder 2 Any key answer 3 Send number 4 Call waiting 5 Auto redial 6 Select line 7 Next incoming 5 Security settings 1 PIN code 2 Phone lock 3 Automatic key lock 4 Call barring 5 Fixed dial num 6 Change code 6 Network settings 1 Automatic 2 Manual 3 Preferred 4 User define 7 Restore factory settings ...

Page 140: ... If no reply 4 If unreachable 5 All data calls 6 All fax calls 7 Cancel all 6 Scheduler 1 Add new 1 Schedule 2 Memo 2 View day 3 View all 4 Delete passed 5 Delete all 7 Fun Tools 1 Game 2 Unit convert 3 Calculator 4 World time Menu Tree Accessing the Menu ...

Page 141: ...nu ENGLISH 39 8 Internet 1 Home 2 Bookmarks 3 Profiles 4 Go to URL 5 Cache settings 1 Clear cache 2 Cache check 6 Security certifications 7 Reset profiles 9 Sim Service This menu depends on SIM and the network services ...

Page 142: ...024 characters Also you can check the number of characters 1 Enter the Message menu by pressing Select 2 If you want to write a new message select Write message in the menu 3 Input the message by using eZi text For details see eZi text Page 43 4 When you finish writing your message press Options Then following option menu will be displayed Messages Menu 1 Accessing the Menu Select Back Messages ...

Page 143: ...e 4 Press if you want to store it in Outbox and press if you don t want to Save Stores the message in Outbox 1 Your phone asks whether you will save the edited message 2 Press if you want to save it in Outbox and press if you don t want to Use template The template is pre defined message You can add the template of the list to the message when you edit it Use namecard The items of the name card ar...

Page 144: ...ut a word and then press Add List dictionary You can view the list you already saved words in a dictionary 1 Enter the menu 2 Scroll to highlight List dictionary and then press Select 3 You can check the word list 4 If you want to delete a word press Delete 5 If you want to delete all words in a list select Delete all at the bottom of the list by pressing Select Messages Menu 1 Accessing the Menu ...

Page 145: ...ng time you can change the type of language Also the phone supports four modes eZi Mode Numeric mode Capital mode and Small mode If you want to change mode press key How to Use in eZi mode To input a character in eZi text mode you just press each key once for a character you want For example to write Girl in eZi mode eZi Text For g For i 1024 1 ENG Ezi 1023 1 ENG Ezi H 1022 1 ENG Ezi Hi For r For ...

Page 146: ...he keypad How to use in Capital mode To input Capital letter you press a character key displayed on the keypad How to use in Small mode To input Small letter you press a character key displayed on the keypad 1024 1 123 Back Options 1024 1 Back Options 1024 1 abc Back Options Note If you want to input a symbolic character press key in each mode ...

Page 147: ...ding the message press Options to access the available options Delete The selected message is deleted Edit You can edit an incoming message and send or save the edited message Forward You can forward the selected message to the other party Get number If the selected message has the phone number you can extract and save it in a phonebook Also you can call by this number Reply You can reply to the s...

Page 148: ... all for deleting all outgoing messages at the bottom of the list After reading message press Options to access the following submenus Delete The selected message is deleted Edit You can edit an outgoing message and send or save it Forward You can forward the selected message to the other party Get number If the selected message has the phone number you can extract and save it in a phonebook Also ...

Page 149: ... you can contact service provider When you receive CB message you can read it following sequence Read Menu 1 4 1 1 When you receive CB message it will be displayed on the screen You can read the message by scrolling 2 After reading the message press to return to the standby mode In addition you can save it until another message is reached Receive CB Menu 1 4 2 Yes If you select this menu your phon...

Page 150: ... by you You can select Cell broadcast language pressing Select The language list which you selected already will be displayed with check box Topics Dependent to network and subscription Menu 1 4 5 Add Menu 1 4 5 1 If you select this menu you will add the CB message category in Phone memory View list Menu 1 4 5 2 If you select this menu you can see CB message category If you press Options you can e...

Page 151: ... this feature is supported by the network service provider When new voicemail is arrived the symbol will be displayed on the screen Please check with your network service provider for details of their service in order to configure the handset accordingly 1 Press key for a long time in standby mode 2 You can check the following submenus Home Menu 1 5 2 1 The number dialed on the home network to lis...

Page 152: ... save 6 templates before you edit But you can change them The others are Empty Edit You can edit a template Delete You can delete the template Settings Menu 1 8 Message type Menu 1 8 1 Text Voice Fax Natl paging X 400 E mail ERMES Usually the type of message is set to Text You can convert your text into alternative formats which are suitable for the device that will be received the message Contact...

Page 153: ...is sent successfully or not Pay for reply Menu 1 8 4 When a message is sent it allows the person to whom you sent the message to reply and charges the cost of the reply to your telephone bill SMS centre Menu 1 8 5 If you want to send the text message you can get the address of SMS center thru this menu Check memory Menu 1 9 If you select this menu the phone shows an used memory and total amount of...

Page 154: ... Received calls Menu 2 2 You can check the recent received numbers You can call by this number save it or view date and time in this menu Dialled calls Menu 2 3 You can check the recent dialled numbers You can call by this number save it or view date and time in this menu Call Register Menu 2 Accessing the Menu Select Back Press once Call Register ...

Page 155: ... then press Select then press one more time Yes to confirm Call charge Menu 2 5 Within these submenus you can view the duration and the call cost Call duration Menu 2 5 1 This function allows you to view the duration of your Last Call All Calls Incoming Calls and Outgoing Calls in hours minutes and seconds You can also reset the call timers 1 Press Menu in standby mode 2 Press for direct access or...

Page 156: ... calls Remaining and Reset all Cost settings Menu 2 5 3 SIM Dependent Set tariff Menu 2 5 3 1 You can set the currency type and the unit price Contact your services providers to obtain charging unit prices To select the currency or unit in this menu you need the PIN2 code 1 Press Menu in standby mode 2 Press for direct access or Use and to enter Call register 3 Scroll to highlight Cost settings an...

Page 157: ...ess Select to enter 4 Select Set credit Auto display Menu 2 5 3 3 This network service allows you to see automatically cost of your last call If you select Yes in Auto display menu you can see the last cost when the call is released 1 Press Menu in standby mode 2 Press for direct access or use and to enter Call register 3 Scroll to highlight Cost settings and press Select to enter 4 Select Auto di...

Page 158: ...o the Earmic it ll be automatically set to Headset profiles menu 1 Press Menu in standby mode 2 Press for direct access or use and to enter Profiles Profiles Menu 3 Accessing the Menu Note In case that your phone is connected to Accessories such as Earmic and Handsfree you cannot enable Profiles menu manually Profiles menu has Enable submenu except Headset and Car so that you can set Profiles menu...

Page 159: ...the values of Profiles submenus General Menu 3 3 Enable You can adjust the Profiles as General Change You can change the values of Profiles submenus Loud Menu 3 4 Enable You can adjust the Profiles as Loud if you are in a noisy environment Change You can change the values of Profiles submenus Headset Menu 3 5 Enable You can adjust the Profiles as Headset when you put on a headset Change You can ch...

Page 160: ...menus as shown below Incoming alert type Menu 3 x 1 Allows to set alert type for the incoming call for adjusting environment Ringing tone Menu 3 x 2 Allows to set the ringing tone for adjusting environment Ringing volume Menu 3 x 3 Allows to set the ringing volume for adjusting environment Message alert Menu 3 x 4 Allows to alert when receiving a message for adjusting environment Beep Vibrator and...

Page 161: ... your phone will not answer automatically After 5 sec After 5 seconds your phone will answer automatically After 10 sec After 10 seconds your phone will answer automatically Accessing the Menu Note If you set the Handsfree kit to the phone you can t activate the vibration related with Incoming alert type or Message alert menu Therefore in Car menu you can view the following submenus Incoming alert...

Page 162: ...this menu Enable Menu 4 1 1 You can set the time Hour and Minute for raising the alarm 1 Enter the menu 2 Select Enable by pressing Select and then enter the alarm time you want 3 Press OK 4 Select the repeat period Once Daily Weekly and Monthly 5 If you set in Power off alarm the alarm signal sounds at the time you set even if the phone is turned off Settings Menu 4 Accessing the Menu Select Back...

Page 163: ... when the phone is set to alarm before 4 If you want to cancel press Yes If not press No Date Time Menu 4 2 Date Menu 4 2 1 Set date In this menu you can set the date of your phone 1 Enter the menu 2 Select Set date by pressing Select 3 Enter the number you want to set the date 4 Press OK Date format You can set the Date format in this menu Accessing the Menu ...

Page 164: ...You can set time of your phone in this menu 1 Select Set time by pressing Select 2 Enter the number you want to set the time 3 Select the am pm you want to set the time format by long pressing key 4 Press OK Time format Your can select time format between 12 hour or 24 hour 1 Scroll to highlight Time format by pressing Select 2 Select 12 hour or 24 hour you want by pressing Select Settings Menu 4 ...

Page 165: ...Menu 4 3 1 2 This menu allows you to set the message which is shown briefly when the phone is switched on 1 Select Settings Phone settings Display Welcome note 2 Your own text can be displayed If you select this item your phone asks you to edit the message Backlight Menu 4 3 1 3 You can set the light up duration you want whenever you press a key LCD contrast Menu 4 3 1 4 You can set the brightness...

Page 166: ...answer Menu 4 4 2 Yes Menu 4 4 2 1 If you select this menu you can receive an incoming call by pressing any key except key and key No Menu 4 4 2 2 If you select this menu you can receive an incoming call by Answer or Settings Menu 4 Accessing the Menu Note How to use Handsfree portable If you want to use the handsfree portable earphone Please press the button for a long time after inserting it to ...

Page 167: ... Menu 4 4 3 2 If you select this you can t send your phone number Default Menu 4 4 3 3 If you select this menu this phone will be set to the default value Call waiting Menu 4 4 4 network dependent If this service is available you can accept a waiting incoming call Enable Menu 4 4 4 1 Activating the corresponding service Disable Menu 4 4 4 2 Deactivating the corresponding service Check status Menu ...

Page 168: ...network dependent This function is only used if Alternate line service supported by the Service Provider Two independent phone numbers are registered for the phone This function provides you with the selection the currently used phone number If this function is supported by your service provider the following menu will be displayed 1 Line 1 Select Line 1 as the current phone number 2 Line 2 Select...

Page 169: ... you select the mode you can receive data fax or voice each mode Once you enter this menu you following options are displayed Voice You can receive the voice call Data You can receive the data call Fax You can receive the fax call Note Single numbering service means that the number of fax or data service is identical with the number of voice service And these modes depend on network feature ...

Page 170: ... highlight Security settings menu 4 Select PIN code by pressing Select 5 You can view the following submenus Enable Enable PIN code request Disable Disable PIN code request Phone lock Menu 4 5 2 You can use security code to avoid unauthorized use of your phone When you switch on your phone Your phone will request security code always if you set phone lock to Enable if you set phone lock to Automat...

Page 171: ...seconds without any key requesting Enable Disable Note If you want to lock your phone keypad manually enter Top menu and press key If you want to unlock your phone keypad press unlock key and then press key But if you enabled Automatic key lock before your phone keypad will be unlock and then after 25 seconds the keypad will be lock up again automatically ...

Page 172: ... all outgoing calls Outgoing Intl The barring service of all outgoing international calls Outg intl roam The barring service of all international outgoing calls except home network All incoming The barring service of all incoming calls Inc when roam The barring service of all incoming calls when roaming Cancel all You can cancel all barring service Change passwd You can change the password for Cal...

Page 173: ...wing submenus On You can restrict your outgoing calls to selected phone number Off you can call without restricting phone number Number list You can view the number list saved as Fixed dial number Change code Menu 4 5 6 You can change the access codes PIN PIN2 and Security code 1 Press Menu in standby mode 2 Press key for direct access or use and to enter Settings 3 Scroll to highlight Security se...

Page 174: ...eement with your home network operator Preferred Menu 4 6 3 You can set a list of preferred networks the handset should attempt to register with first before attempting to register to any other networks This list is created from the handset s predefined list of known networks User define Menu 4 6 4 You can add entries or delete new ones from the network list This can even include new networks whos...

Page 175: ...e provider 1 Press Menu in standby mode 2 Press for direct access or use and to enter Call Divert All voice calls Menu 5 1 Diverts voice calls unconditionally If busy Menu 5 2 Diverts voice calls when the phone is in progress If no reply Menu 5 3 Diverts voice calls which you do not answer If unreachable Menu 5 4 Diverts voice calls when the phone is switched off or out of range Select Back Press ...

Page 176: ...Enable Menu 5 x 1 Activating the corresponding service Voicemail box Memu 5 x x 1 Forwards to message center This function is not included in All data calls and All fax calls menus Other number Memu 5 x x 2 Inputs the number for diverting Favorite Memu 5 x x 3 Shows the list of 5 diverting numbers ENGLISH 74 Call Divert Menu 5 Accessing the Menu network and subscription dependent Note You can sele...

Page 177: ...SH 75 Accessing the Menu Disable Menu 5 x 2 Deactivating the corresponding service Check status Menu 5 x 3 Checking the Status of the corresponding service Cancel all Menu 5 7 Cancels all call divert service ...

Page 178: ...you see under bar on the calendar it means that there is a schedule that day This function helps to remind you of your schedule and memo The phone will sound an alarm tone if you set alarm for the note For changing the day month and year Yearly Monthly If you press these keys shortly you can set the alarm daily In case of pressing for a long time you can set it weekly Key Description Select Back P...

Page 179: ...peat Daily repeat schedule daily for 5 days Weekly repeat schedule weekly for 5 weeks Monthly repeat schedule monthly for 5 months Yearly repeat schedule yearly for 5 years Alarm time Menu 6 1 1 1 1 On time alarm on time you set already 10 min before alarm before 10 minutes from the schedule you set already 30 min before alarm before 30 minutes from the schedule you set already 1 hour before alarm...

Page 180: ... to browse through the note lists If you set alarm for the note Alarm watch is displayed Press Options to delete edit the note you selected View all Menu 6 3 Shows the notes that are set for all days Use to browse through the note lists Pressing Options allows access to the same menu as in View day Delete passed Menu 6 4 You can delete for the last schedule already is notified you Delete all Menu ...

Page 181: ...ontrol keys are different for each game But each game has screens to explain the main control key Other common control keys are below Common Key Function Soft 1 Key Start Game CLR Pause Soft 2 Key Back END Exit Star Key Backlight Soft 1 Key Save score Level control Up Down numeric key Select Back Press six times Fun Tools ...

Page 182: ...lume 1 You can select one of four unit types by pressing Select key 2 Select the unit you want to convert by pressing and 3 You can change unit by pressing Change key 4 You can input the prime number after the decimal place by pressing key 5 You can delete the number you want by pressing 6 Press key or Back key if you want to end the process for converting the value 0 00 cm 0 000 cm Options Back ...

Page 183: ...select equals 4 If you want to continue the calculation repeat the process 5 You can delete the number or sign you want by pressing 6 Press key if you want to end the calculation process World time Menu 7 4 You can view the time for each city around the world when you press shortly you can view the city belonged to the different time zone and when you press long you can view the all of city on the...

Page 184: ...on such as news weather reports and flight times Home Menu 8 1 You can connect to the configured homepage of the activated profile Bookmarks Menu 8 2 When you enter this menu you can see the bookmarks Then press button to access available option or press to exit it Connect Connect to selected bookmark Add new Add a new bookmark manually Edit Edit the title and the address of the selected bookmark ...

Page 185: ...his setting allows you to enter the address URL of the site you want to use as homepage You do not need to type http in front of each URL as the WAP Browser will automatically add it Display image Menu 8 3 1 2 2 You can select whether images on WAP cards are displayed or not Conn type Menu 8 3 1 2 3 The options for connection type are Continuous or Temporary and depend on the gateway Continuous Me...

Page 186: ...ng are provided by your network IP address Enter the IP address of the WAP gateway you are uisng to access Dial number Enter the telephone number to dial to access your WAP gateway Call type Select the type of data call Analogue or ISDN Digital Call speed The speed of your data connection User ID The user identity for your dial up server and NOT the WAP gateway Password The password required by yo...

Page 187: ... the E mail server that you frequently use Connect Menu 8 3 1 4 1 Connect to the E mail server that you configured Edit address Menu 8 3 1 4 2 Edit the URL of the E mail server Go to URL Menu 8 4 You can directly connect to the site that you want You need to enter the specific URL that you want to directly connect ...

Page 188: ...king the Cache memory Always Menu 8 5 2 1 The cache is always checked whenever URL is loaded or navigated Start only Menu 8 5 2 2 The cache is only checked when the WAP is started Off Menu 8 5 2 3 The cache is never checked Security certifications Menu 8 6 A list of the available certificates is shown Reset profiles Menu 8 7 You can reset all the current settings of profiles to the factory default...

Page 189: ...age Bookmarks This is the same as Menu 8 2 Save as bookmarks Save the current URL as a bookmark You can also edit the bookmark title Go to URL Same as Menu 8 4 Go to e mail server Connect to the E mail server that you configured Set as e mail server Save the current URL as an E mail server Internet On line menu Accessing the Menu ...

Page 190: ...te software pressing End or by closing the folder Receiving Data or Fax Calls If you have separate numbers for voice data and fax calls your phone recognizes the type of call Receiving Data or Fax Calls Separate numbers Multi numbers To use a data or a fax service the display shows which type of call you are receiving To receive a data or fax call 1 Connect your computer to the phone 2 After start...

Page 191: ...oming 3 Select the call type you want Voice Data or Fax and press Select 4 Connect your computer to the phone 5 After starting the communicate software accept a call and receive a data or fax if it is not answered automatically 6 After the data or fax reception you can end the call by just ending of the communicate software pressing End or by closing the folder Once you have set your phone for a s...

Page 192: ... Call You can get a dial number from phonebook to make a second call Press Names key then select Search To save the dial number into phonebook during call press Names key then select Add new 1 3 Swapping Between Two Calls To switch between two calls select the Options key then select Swap or just press Send key You can make one of two calls focused by pressing up down arrow key If you want to end ...

Page 193: ...nd answer the second by pressing Send or by selecting the Answer key then Hold Answer You can end the current call and answer the waiting call by selecting the Menu key then End Answer 1 5 Rejecting an Incoming Call You can reject an incoming call without answering by simply pressing the End key When in a call you can reject an incoming call by pressing the Menu key and selecting Multiparty Reject...

Page 194: ...hear them 1 8 Switching DTMF Tones on During a Call To turn DTMF tones on during a call for example to allow your handset to make use of an automated switchboard select the Options key then DTMF On DTMF tones can be turned off the same way 1 9 Calling up the Main Menu The Messages and SIM Tool kit main menu options can be reached from the in call menu by selecting the Options key then Main Menu SI...

Page 195: ... the person who set up the multiparty call These options are all available from the in call menu and are listed in Section The maximum callers in a multiparty call is five Once started you are in control of the multiparty call and only you can add calls to the multiparty call 2 1 Making a Second Call You can make a second call while you are already in a call To do this enter the second number and ...

Page 196: ...s in a Multiparty Call To scroll through the numbers of the callers who make up a multiparty call on the handset screen press and keys 2 7 Putting a Member of a Multiparty Call on Hold To place one selected caller whose number is currently displayed on screen of a multiparty call on hold select the Options key then Multiparty Exclude 2 8 A Private Call in a Multiparty Call To have a private call w...

Page 197: ...n select Multiparty End multiparty Selecting the Options key then Multiparty End all will end all the active and held calls 2 10 Explicit Call Transfer ECT If you have one caller on hold and another active call you may connect one call party to another call party and then leave the call This is done by selecting the Multiparty Transfer option from the in call menu Additional Functions ...

Page 198: ... to mechanical vibration or shock The coating of the phone may be damaged if covered with wrap or vinyl wrapper Use dry cloth to clean the exterior of the unit Do not use solvent such as benzene thinner or alcohol Do not subject this unit to excessive smoke or dust Do not keep the phone next to credit cards or transport tickets it can be affect the information on the magnetic strips Do not tap the...

Page 199: ...mble or short circuit the battery pack Keep the metal contacts of the battery pack clean Replace the battery when it no longer provides acceptable performance The battery pack may be recharged hundreds of times until it needs replacing Recharge the battery if it has not been used for a long time to maximize usability Do not expose the battery charger to direct sunlight or use it in high humidity s...

Page 200: ...98 General Product Name W3000 System GSM 900 DCS 1800 SIM Card Small plug in card only 3V Dimensions Size 102 X 45 X 20 mm Weight with Standard battery 80g Ambient Temperatures Max 55 C Min 10 C Technical Data ...

Page 201: ...MEMO ENGLISH 99 ...

Page 202: ...ENGLISH 100 MEMO ...

Reviews: