background image

2

DISASSEMBLY INSTRUCTIONS

-

4

-

1

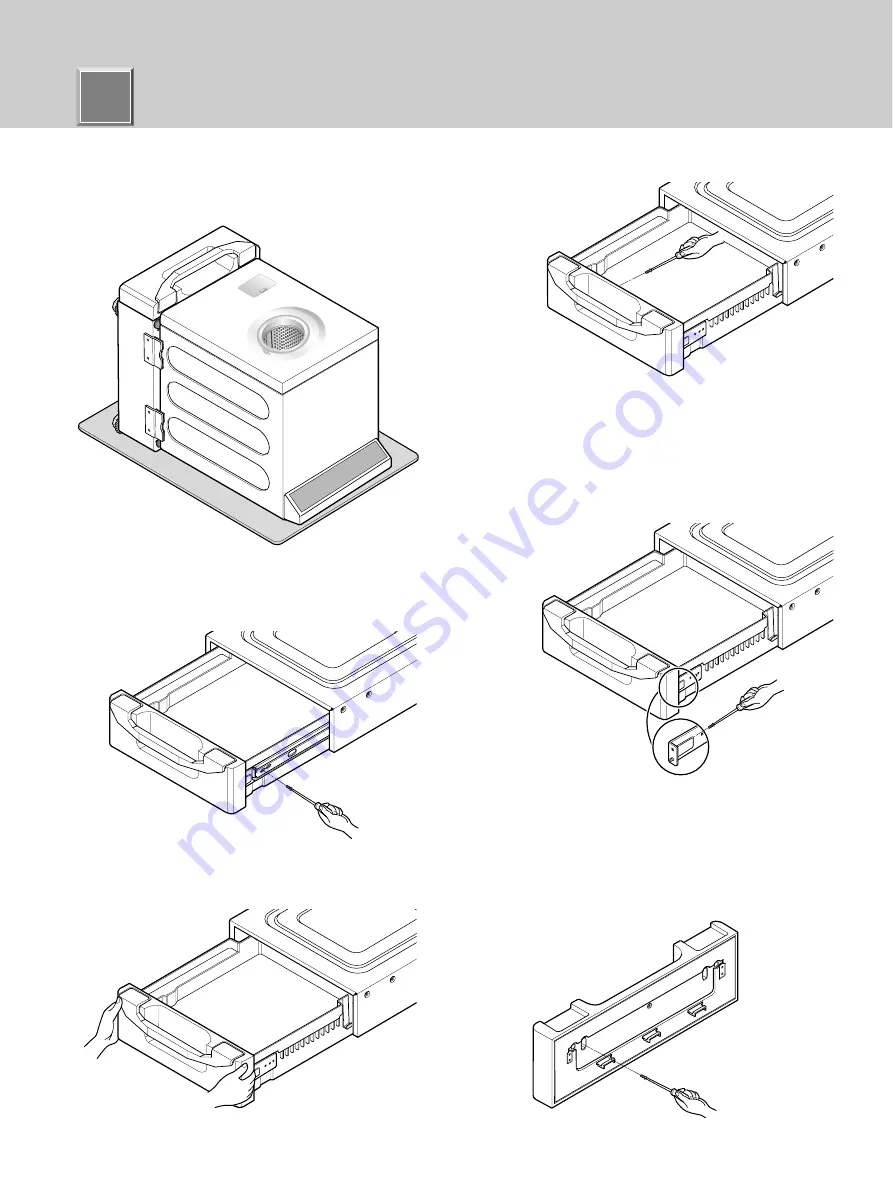
Protect the floor with a large piece of cardboard.
Lay the appliance on the cardboard.
Be sure the cardboard is under the entire lower
back of the appliance.

2

Open the drawer, and then remove the four (4)
screws (two on each side) on both side of drawer.

3

Pull up the drawer to disassemble.

4

Remove three (3) screws on the drawer.

5

Remove two (2) screws on the either side of the
drawer.

6

Remove six (6) screws on the front cover
assembly.

Summary of Contents for WDP1 Series

Page 1: ...SERVICE MANUAL PEDESTAL For washer dryer and combo LG 27 CAUTION READ THIS MANUAL CAREFULLY TO DIAGNOSE CORRECTLY BEFORE SERVICING THE UNIT MODEL WDP1 WDP2 WDP3 ...

Page 2: ...ach the lower side first 5 Be sure to press the adhesive parts of the brackets firmly to the appliance 6 Install the eight 8 screws supplied to attach the brackets to the pedestal 7 Move the washer combo to the desired place NOTE The appliance and pedestal assembly must be placed on a solid and level floor for proper operation Adjust the legs of the appliance and pedestal by turning with a wrench ...

Page 3: ... the installation or service Make sure that all feet are stable and resting on the floor pedestal When pushing down the edges of the appliance top plate diagonally it should not move at all Check all directions After installation servicing operate the appliance to ensure it functions correctly WARNING 1 Remove pedestal installation hardware and instructions from the shipping carton 2 Position drye...

Page 4: ... cardboard is under the entire lower back of the appliance 2 Open the drawer and then remove the four 4 screws two on each side on both side of drawer 3 Pull up the drawer to disassemble 4 Remove three 3 screws on the drawer 5 Remove two 2 screws on the either side of the drawer 6 Remove six 6 screws on the front cover assembly ...

Page 5: ...2 5 DISASSEMBLY INSTRUCTIONS 7 Loosen the leg using the wrench supplied 8 Remove twelve 12 screws on the bottom of the pedestal 9 Remove four 4 screws two on each side on both side of slide ...

Page 6: ...3 6 EXPLODED VIEW A150 A140 A170 A170 A160 A100 A120 A110 A130 A102 A103 A190 A101 A210 ...

Page 7: ...P NO 3828ER3018F APR 2003 PRINTED IN KOREA ...

Reviews: