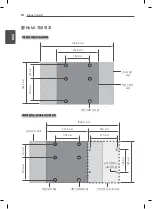
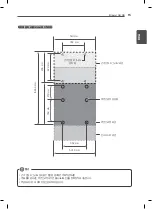
background image

www.lg.com

사용 설명서

벽걸이 지지대 

WM-B840H

사용전에 안전을 위한 주의사항을 반드시 읽고 정확하게 사용하세요.

벽걸이 지지대 모델 목록

KO
R

한국어

P/NO : MFL67405301 (1110-REV00)
Printed in Korea

Summary of Contents for WM-B840H

Page 1: ...www lg com 사용 설명서 벽걸이 지지대 WM B840H 사용전에 안전을 위한 주의사항을 반드시 읽고 정확하게 사용하세요 벽걸이 지지대 모델 목록 KOR 한국어 P NO MFL67405301 1110 REV00 Printed in Korea ...

Page 2: ... KOR 한국어 목차 목차 3 안전을 위한 주의 사항 4 제품 구성 5 설치 방법 5 체결 홀 준비 및 고정 작업 8 체결 시 상하 확인 및 고정 홀 위치 9 간격 조절용 지그 JIG 장착 10 VESA 브라켓에 모니터 설치 11 모니터를 벽면 브라켓에 설치 가로 11 모니터를 벽면 브라켓에 설치 세로 12 제품 조작 14 홀 Hole 가공 위치 16 제품 규격 ...

Page 3: ... 제품을 설치하세요 사용설명서의 지시를 따르지 않을 경우 잘못된 설치로 인해 심 한 부상 및 제품 피해의 원인이 될 수 있습니다 설치 시에는 반드시 먼저 벽체 종류를 확인하고 조건이 맞다 면 동봉한 앵커와 나사를 사용하세요 지정되지 않은 앵커와 나사를 사용할 경우 제품의 무게를 지탱 하지 못해 안전상의 문제가 발생할 수도 있습니다 제품을 물에 젖은 수건으로 닦지 마시고 제품이 설치된 장소 아래에서 열기구 및 가습기 등을 사용하지 마세요 물기가 제품 안으로 들어 가거나 수증기 및 열기로 인해 화재 감전 고장의 원이이 될 수 있습니다 제품을 설치 하기전 콘센트에서 전원 코드를 분리하세요 전원코드가 꽂힌 상태에서 제품을 설치할 경우 감전 화재의 원인이 될 수 있습니다 제품을 설치할 때 또는 제품 설치 후 높이 조...

Page 4: ...랍니다 부속품은 실물과 다르게 보일 수 있습니다 벽면 브라켓 SET 고정용 나사 M6 4개 벽걸이 고정 앵커 6개 VESA 브라켓 케이블 홀더 벽걸이 고정 나사 M5 x 65L 6개 간격 조정 지그 JIG 사용 설명서 안전 및 제품 수명을 위해 불법 복제품은 사용하지 마십시오 불법 복제품 사용으로 인한 모든 파손이나 부상에는 품질 보증이 적용되지 않습니다 제품의 부속품은 모델에 따라 다르게 제공될 수 있습니다 이 사용 설명서의 제품 사양이나 내용은 제품의 품질 향상을 위해 예고 없이 변경될 수 있습니다 주의 참고 ...

Page 5: ...니터를 가로로 설치 시 모니터를 세로로 설치 시 설치 방법 체결 홀 준비 및 고정 작업 각 홀 hole 은 M6 이하 크기의 나사 체결이 가능합니다 체결용 홀 Hole 을 설치 전 벽에 만들어야 하며 14 페 이지의 홀 Hole 간 치수 도면 참조 바랍니다 참고 드릴 벽면 벽걸이 고정 나사 벽걸이 고정용 앵커 벽면 브라켓 벽걸이 1대 설치 1 벽면에 브라켓 설치용 홀 hole 을 뚫으세요 2 벽걸이 고정용 앵커 Anchor 를 삽입하세요 3 벽걸이 고정용 나사로 벽면 브라켓을 고정하세요 ...

Page 6: ...6 KOR 한국어 설치 방법 간격 조정 지그 JIG 를 사용하여 벽에 설치하세요 여러대의 벽걸이 설치 가로 설치 VESA 벽걸이를 가로로 설치하여 모니터를 가로로 걸 수 있도록 하세요 ...

Page 7: ...7 KOR 한국어 설치 방법 간격 조정 지그 JIG 를 사용하여 벽에 설치하세요 VESA 벽걸이를 세로로 설치하여 모니터를 세로로 걸 수 있도 록 하세요 여러대의 벽걸이 설치 세로 설치 ...

Page 8: ...8 KOR 한국어 설치 방법 체결 시 상하 확인 및 고정 홀 위치 1 벽면 브라켓 설치 시 그림과 같이 상하 조정 Screw 부 가 아래에 위치하도록 설치 하세요 2 브라켓 고정시 VESA 브라켓 걸이 부분을 움직여 그림 과 같이 홀 Hole 이 보이도록 한 후에 나사로 벽에 고정 하세요 벽걸이 고정 나사 ...

Page 9: ...법 간격 조정 지그 JIG 장착 1 멀티 장착시 거리 조절용 브라켓 설치용 홀 Hole 에 나사를 이용하여 고정하세요 나사는 동 제품에 동봉 안 됨 단 필요 시에만 나사로 고정을 하고 불필요시 홈에 끼워 사용하세요 가로 설치시 그림과 같이 간격 조정 지그 JIG 의 돌기를 홈에 끼워 위치를 맞추세요 세로 설치시 그림과 같이 간격 조정 지그 JIG 의 돌기를 홈에 끼워 위치를 맞추세요 ...

Page 10: ...10 KOR 한국어 설치 방법 표시부가 제품 상단을 향하도록 장착합니다 가로 설치 시 세로 설치 시 제품 고정부 제품 고정부 제품 고정부 제품 고정부 VESA 브라켓에 모니터 설치 제품 후면에 동봉된 M6 나사를 이용하여 VESA 브라켓을 장착하세요 ...

Page 11: ...11 KOR 한국어 설치 방법 모니터를 벽면 브라켓에 설치 가로 모니터를 벽면 브라켓에 설치 세로 설치된 벽면용 브라켓의 GUIDE SPACER에 모니터와 VESA 브라켓 조립체를 걸어서 설치합니다 설치된 벽면용 브라켓의 GUIDE SPACER에 모니터와 VESA 브라켓 조립체를 걸어서 설치합니다 GUIDE SPACER 걸이부 GUIDE SPACER 걸이부 ...

Page 12: ...12 KOR 한국어 제품 조작 제품 조작 전후 조절 TILT 좌 120 mm 우 120 mm 상 5 mm 하 5 mm 최대 90 mm 이상 돌출이 가능합니다 아래로 TILT가 가능합니다 전방 90 mm 이상 돌출 가능 162 mm 252 mm 좌우 슬라이딩 상하 조절 ...

Page 13: ...13 KOR 한국어 제품 조작 고정 바 Bar 전후 조절 시 전방 최대 돌출 상태 고정을 위하여 고정 바 bar 를 장착해주세요 약 87 mm 돌출 량 유지할 수 있습니다 ...

Page 14: ...ole 의 위치 여러대 설치 시 홀 Hole 의 수평 위치 352 mm 352 mm 420 mm 210 mm 210 mm 591 6 mm 350 mm 350 mm 332 mm 591 mm 591 6 mm 591 6 mm 455 mm 1046 6 mm 1046 6 mm 모니터 SET 외관 모니터 SET 외관 벽면 브라켓 외관 벽면 브라켓 설치 홀 벽면 브라켓 설치 홀 벽면 브라켓 외관 간격 조정 지그 JIG 외관 간격 조정 지그 JIG 설치 홀 ...

Page 15: ...350 mm 210 mm 420 mm 352 mm 591 6 mm 332 mm 591 mm 455 mm 1046 6 mm 모니터 SET 외관 벽면 브라켓 설치 홀 벽면 브라켓 외관 간격 조정 지그 JIG 외관 간격 조정 지그 JIG 설치 홀 간격 조정 지그 JIG 설치 홀은 필요할 경우에만 벽에 작업하세요 벽에 홀이 없더라도 벽면 브라켓의 측면 홀 Hole 에 조립을 통해 장착이 가능합니다 벽걸이와 SET 의 상하 중심은 일치하지 않습니다 참고 ...

Page 16: ...x높이x깊이 mm 880 x 592 x 162 BOX 크기 WxDxH mm 974 x 674 x 252 무게 kg 15 Kg 벽걸이 Vesa 규격 800 400 최대 인장 하중 kg f 100 kgf 위치 조정 상하 합계 약 10 mm 좌우 합계 약 240 mm 전방 돌출 최소 90 mm SET와 벽간 최소 이격 거리 약 160 mm Special feature 전하방 Tilt 기능 880 mm 592 mm 162 mm 592 mm ...

Page 17: ......

Page 18: ...받으실 수 있습니다 전화 연결 시 ARS 안내에 따라 제품을 정확하게 선택하 시면 해당 제품의 전문 상담원에게 최고의 서비스를 받으실 수 있습니다 고객 상담실 제안 및 불만사항 080 023 7777 인터넷 서비스를 이용하시면 원하시는 날짜와 시간에 서비스 신청 실시간 PC 원격 상담이 가능하여 보다 편리하게 이용하실 수 있습니다 인터넷으로 출장 서비스를 신청하시면 수리비 할인 혜택을 드립니다 단 당사의 사정에 의해 변경될 수 있습니다 불편사항에 대한 자가진단 방법을확인하실 수 있습니다 모델 별 증상에 대한 상세한 조치 방법을 확인하실 수 있습니다 서비스품질 SQ 인증마크란 서비스품질이 우수한 기업에 대한 품질을 국가 기관인 지식경제부 기술표준원이 보증하는 인증 마크입니다 ...

Page 19: ...www lg com Owner s manual WALL MOUNTING BRACKET WM B840H Please read the safety information carefully before using the product List of Wall Mounting Bracket Model ENG ENGLISH ...

Page 20: ...and fixings 8 Check the position of the bracket and bracket holes 9 Attach spacing Jig 10 Mount the monitor into the VESA bracket 11 Mount the monitor onto the wall mounting bracket landscape 11 Mount the monitor onto the wall mounting bracket portrait 12 Product Operation 14 Location of the holes 16 PRODUCT SPECIFICATIONS ...

Page 21: ...o the product During installation check whether the wall is strong enough to hold the product and use the anchors and screws provided If you use anchors and screws that are not specified by the manufacturer they may not hold the weight of the product causing safety issues Do not clean the product with wet towels and do not use a heater or a humidifier underneath the product Moisture permeating int...

Page 22: ...ensure safety and product life The product warranty will not cover damage or injury caused by the use of counterfeit components The accessories supplied with your product may vary depending on the model Without prior notice all information and specifications in this manual are subject to change to improve the performance of the product CAUTION NOTE Wall mounting bracket Four set fixing screws M6 S...

Page 23: ...ets and fixings M6 screws or smaller can be used in each hole The bracket holes must be drilled before the bracket is mounted See the diagram in the 14 page for the location and distance between holes Wall mounting fixing screws Wall mounting fixing Anchor Wall mounting bracket For single installation 1 Drill the necessary holes in the wall for the wall mounting bracket 2 Insert anchors into the b...

Page 24: ...TO INSTALL Use the attach spacing jig to install the wall mounting bracket on the wall as shown in the diagram For multi installation Landscape Mount the VESA bracket horizontally to install the monitor in landscape mode ...

Page 25: ...W TO INSTALL Use the attach spacing jig to install the wall mounting bracket on the wall as shown in the diagram Mount the VESA bracket vertically to install the monitor in portrait mode For multi installation Portrait ...

Page 26: ...les 1 When installing the wall mounting bracket make sure that the up down adjustment screws are located at the bottom of the bracket as shown in the diagram 2 To mount the bracket move the VESA bracket so that the holes appear as shown in the diagram wall mounting fixing screws ...

Page 27: ...ix the product if necessary otherwise hang the attach spacing jig by inserting it into the holes For landscape installation place the attach spacing jig in the correct place by inserting the projections into the holes as shown in the diagram For portrait installation place the attach spacing jig in the correct place by inserting the projections into the holes as shown in the diagram ...

Page 28: ...the red circle is placed at the top For landscape installation For portrait installation Fixing unit Fixing unit Fixing unit Fixing unit Mount the monitor into the VESA bracket Mount the VESA bracket by attaching the enclosed M6 screws on the back of the product ...

Page 29: ...unt the monitor onto the wall mounting bracket portrait Mount the monitor with the VESA bracket attached onto the guide spacer of the wall mounting bracket Mount the monitor with the VESA bracket attached onto the guide spacer of the wall mounting bracket GUIDE SPACER Holes GUIDE SPACER Holes ...

Page 30: ...tion Forward backward adjustment TILT Right 120 mm Left 120 mm Up 5 mm Down 5 mm It can stretch out up to 90 mm forward The monitor can be tilted downward It can stretch out up to 90 mm forward 162 mm 252 mm Left right sliding Up down adjustment ...

Page 31: ... ENGLISH HOW TO INSTALL Fixing bar When adjusting it forward or backward mount the fixing bar to maintain the maximum stretched position The monitor can be moved forward by approximately 87 mm and maintained ...

Page 32: ...n landscape 352 mm 352 mm 420 mm 210 mm 210 mm 591 6 mm 350 mm 350 mm 332 mm 591 mm 591 6 mm 591 6 mm 455 mm 1046 6 mm 1046 6 mm Exterior of monitor set Exterior of monitor set Exterior of wall mounting bracket Wall mounting bracket holes Wall mounting bracket holes Exterior of wall mounting bracket Exterior of attach spacing jig Exterior of jig holes ...

Page 33: ...r of monitor set Wall mounting bracket holes Exterior of wall mounting bracket Exterior of attach spacing jig Exterior of Jig holes Only drill the holes into the wall for the attach spacing jig if necessary It can be mounted by using the side holes of the wall mounting bracket no drilling is necessary The center of the wall mounting bracket and the set is not met NOTE ...

Page 34: ... D x H mm 974 x 674 x 252 Weight kg 15 Kg VESA Standard 800 x 400 Max Tensile Load kg f 100 kgf Position adjustment Vertical adjustment in total approx 10 mm Horizontal adjustment in total approx 240 mm Forward min 90 mm Minimum distance between the set and the wall Approx 160 mm Special feature Forward and downward tilt 880 mm 592 mm 162 mm 592 mm ...

Page 35: ......

Page 36: ......

Reviews: