background image

9

Avvertenze per la sicurezza
AVVERTENZA!

 Per motivi funzionali i bordi e le punte 

sono spigolosi.

Avvertenze generali

•   Le istruzioni di impiego costituiscono parte 

integrante del prodotto e devono pertanto venire 

conservate, nonché consegnate insieme in caso di 

cessione del prodotto ad altri.

•   Smaltimento: www.maerklin.com/en/imprint.html

Azionamento

Sotto la carrozza si trova un commutatore “Acceso/

Spento” per l’illuminazione interna. 

Sostituzione delle lampadine
Illuminazione interna (tutte le carrozze) e fanali di 

coda laterali (carrozza panoramica ”Observation“):

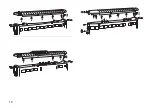
•  Rimuovete le tre o quattro viti sulle pareti di testa 

della carrozza.

•  Rimuovete il tetto dalla carrozza. 
•  Tirate fuori il cavetto della corrente.
•  Sostituite la lampadina.
•  Rimontate di nuovo tale modello. Durante il mon-

taggio premete il tetto fissandolo sul corpo della 

carrozza. 

Fanale di testa e ”Drumhead“ (solo carrozza panora-

mica ”Observation“):

•  Rimuovete l’anello all’esterno sul vetro del fanale. 
•  Sollevate con cautela il vetro dal fanale.
•  Con una pinzetta estraete dallo zoccolo la lampadi-

na innestata. 

•  Innestate una lampadina nuova. 
•  Assemblate nuovamente il modello. 

Summary of Contents for 36574

Page 1: ...y t h i n gy o un e e df o r y o u r h o b b y a t www t r a i n l i c o m 1 7 7 5 3 0 2 8 0 1 1 S a y t h a n ky o ua n dl i k eu s o nF a c e b o o k h t t p s www f a c e b o o k c o m t r a i n l i p a g e C l i c kH e r e ...

Page 2: ...Streamline Personenwagen 36574 ...

Page 3: ...ten Aussichtswagen Observation 4 Stirnlampe und Drumhead nur Aussichtswagen Observation 4 Bilder 10 Ersatzteile 11 Safety Notes 5 General Notes 5 Operation 5 Replacing the light bulbs 5 Interior lights all cars and marker lights Observation Car 5 Rear light and drumhead Observation Car only 5 Figures 10 Spare parts 11 ...

Page 4: ...tuig Observation 7 Frontlamp en Drumhead alleen uitzichtrijtuig Observation 7 Afbeeldingen 10 Onderdelen 11 Aviso de seguridad 8 Informaciones generales 8 Azionamento 8 Sostituzione delle lampadine 8 Illuminazione interna tutte le carrozze e fanali di coda laterali carrozza panoramica Observation 8 Fanale di testa e Drumhead solo carrozza panoramica Observation 8 Figuras 10 Recambios 11 Avvertenze...

Page 5: ...n und seitliche Schlussleuchten Aussichtswagen Observation Entfernen Sie die drei oder vier Schrauben an den Stirnseiten des Wagens Nehmen Sie das Dach vom Wagen ab Ziehen Sie die Stromkabel ab Tauschen Sie die Glühlampe aus Bauen Sie das Modell wieder zusammen Drücken Sie das Dach beim Zusammenbau fest auf den Wagenkörper Stirnlampe und Drumhead nur Aussichtswagen Observation Entfernen Sie den Ri...

Page 6: ...f switch for the interior lights Replacing the light bulbs Interior lights all cars and marker lights Observa tion Car Remove the three or four screws on the ends of the car Pull the roof off the car body Disconnect the wiring cables Remove and replace the light bulb Reassemble When replacing the roof press the roof firmly onto the car body Rear light and drumhead Observation Car only Remove the r...

Page 7: ... lampes à incandescence Eclai rage intérieur toutes les voitures et feux arrières latéraux voiture panoramique observation Retirez les trois ou quatre vis à l avant de la voiture Enlevez le toit de la voiture Débranchez le câble d alimentation Remplacez les ampoules Remontez le modèle Assemblez le toit sur la voiture par une forte pression Lampe frontale arrière et drumhead seulement pour la voitu...

Page 8: ...n de gloeilampen Binnenverlichting alle rijtuigen en sluitlichten Uitzichtrijtuig Observation Verwijder de drie of vier schroeven aan de kop kanten van het rijtuig Neem het dak van het rijtuig Trek de stroomkabel er af Vervang de gloeilampen Zet het model weer in elkaar Druk het dak bij het in elkaar zetten vast op de rijtuigbak Frontlamp en Drumhead alleen uitzichtrijtuig Ob servation Verwijder d...

Page 9: ...luminazione interna tutte le carrozze e fanali di coda laterali carrozza panoramica Observation Rimuovete le tre o quattro viti sulle pareti di testa della carrozza Rimuovete il tetto dalla carrozza Tirate fuori il cavetto della corrente Sostituite la lampadina Rimontate di nuovo tale modello Durante il mon taggio premete il tetto fissandolo sul corpo della carrozza Fanale di testa e Drumhead solo...

Page 10: ...ne Illuminazione interna tutte le carrozze e fanali di coda laterali carrozza panoramica Observation Rimuovete le tre o quattro viti sulle pareti di testa della carrozza Rimuovete il tetto dalla carrozza Tirate fuori il cavetto della corrente Sostituite la lampadina Rimontate di nuovo tale modello Durante il mon taggio premete il tetto fissandolo sul corpo della carrozza Fanale di testa e Drumhead...

Page 11: ...10 3 ...

Page 12: ...x 9 5 E124 206 Schraube 3 0 x 9 5 E124 197 Beilagscheibe 9 mm E124 208 Faltenbalg E125 998 Schraube 2 2 x 4 5 E129 265 Lagerplatten E185 045 Drehgestell ohne Haken E277 746 Drehgestell mit Haken E277 747 Kupplung E171 327 Metall Scheibenradsatz 67 419 Kugellager Radsatz 67 403 Fahrersitz E278 159 ...

Page 13: ...Gebr Märklin Cie GmbH Stuttgarter Straße 55 57 73033 Göppingen Germany www lgb de 277895 0317 Sm1Ef Änderungen vorbehalten Gebr Märklin Cie GmbH www maerklin com en imprint html ...

Reviews: