background image


  Maintenance Manual of Elevating Work Platform


26 


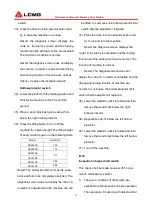
The filter core shall be frequently 

replaced in the poor working 

environment.


!

Warning: scald hazard 

Watch out the hot oil. The exposure to 

the hot oil may cause the severe burn.


!

Notice: the oil return filter of 

hydraulic oil tank is installed at the 

center between the functional valve     

block and the hydraulic power unit.


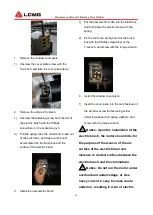
Clean the hydraulic oil overflowed from the 

filter  and  then  remove  the  filter  with  a 

spanner. 


Remove  the  filter  and  replace  a  new  filter 
core. 


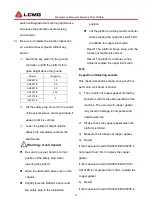
Apply  the  hydraulic  oil  coating  on  the  filter 

seal  ring  and  tighten  the  seal  ring  with 

hands. 


Mark the time and date of replacement with 

a  marking  pen  on  the  filter  core 

replacement table. 


Switch  the  key  switch  to  the  ground 

controller and draw out the red emergency 

stop  buttons  from  the  ground  and  platform 

controller. 


Press and press the lifting function selector 

button. 


Check the filter component for oil leakage. 


Clean the overflowed hydraulic oil. 

1.13 


Steps of checklist E 

E-1 

Test and replacement of hydraulic oil 

This procedure is made once per 200h or per 

year, whichever is shorter. 

1)  The  replacement  or  test  of  hydraulic  oil  is 

essential to the good equipment performance 

and  service  life.  The  polluted  hydraulic  oil 

and  the  filter  can  affect  the  machine 

performance, which can damage the parts, if 

being  used  still.  The  frequent  operation  is 

especially  required  in  the  poor  operation 

situations. 

2)  Check  if  it  is  necessary  to  replace  the 

hydraulic oil with an oil separator in advance. 

3)  It the hydraulic oil has not been replaced for 

two years, check it once per quarter. Replace 

the hydraulic oil, if the inspection fails. 

!


Notice: this operation shall be 

made when the machine is folded.


!


Warning: The operation of live 

circuit may cause the severe injury or 

even the death. Take off rings, watches 

and other jewelry in    the operation 

process. 

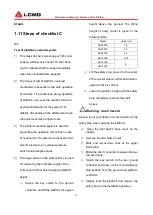
  Open  the  installation  try  of  hydraulic 

power unit. 

  Mark  and  disconnect  the  oil  return  pipe 

Summary of Contents for AS0607E

Page 1: ...Before operation and maintenance the drivers and service personnel shall always read and thoroughly understand all information in this manual Failure to do so may result in fatal accidents or personal...

Page 2: ...inted for the first time in December 2021 LINGONG GROUP JINAN HEAVY MACHINERY CO LTD Add F12 Building 3 LushangGuoao Plaza 9777 Jingshi Road Lixia District Jinan Shandong 250000 China Tel 86 0531 6760...

Page 3: ...Maintenance Manual of Elevating Work Platform I Contents Forewords II Safety precaution III Chapter 1 Maintenance 1 Chapter 2 Appendix 29...

Page 4: ...ing to the interval specified in the maintenance schedule Please keep the manual at the specified location for convenience of reference at any time This manual is one part of this machine When the own...

Page 5: ...or the distributor The operation maintenance prevention measures listed in this manual are only applicable to the specified uses of this machine Our company shall assume no responsibility if this mac...

Page 6: ...Maintenance Manual of Elevating Work Platform 1 Chapter 1 Maintenance...

Page 7: ...Maintenance Manual of Elevating Work Platform 2...

Page 8: ...Electrocution hazard The live operation may cause severe personal injury or death Take off all rings watches and other jewelry in the operation process Personal injury hazard The battery electrolyte...

Page 9: ...pect the fluid level of the hydraulic oil tank Result the hydraulic oil shall be located at the oil tank mark Please add the hydraulic oil based on the demand and do not add excessive hydraulic oil No...

Page 10: ...ter the inspection or keep it as specified by the owner and laws and regulations of the workstation and government Legend description Y Accepted N Rejected R Repaired Check list A Y N R A 1 Inspection...

Page 11: ...the requirements of this manual 1 7 2 Description 1 Please follow the operation manual on the equipment 2 The pre delivery preparation composed of the operation check maintenance item and function te...

Page 12: ...Completion of operation check Project maintenance completion Functional test completion 1 9 Steps of checklist A A 1 Inspection of manual and label The completeness of operation and maintenance manual...

Page 13: ...s essential to the safe operation of machine The function test is aimed to discovering the functional defects of the machine before the operation The defected machine cannot be put into service Once a...

Page 14: ...st the specific liquid gravity of each battery according to the instructions below Increase the specific liquid gravity by 0 004 per 5 if the temperature is higher than 27 Decrease the specific liquid...

Page 15: ...er is running and charging the battery Result The charger alarm rings and the indicator flashes Please check and correct the connection of fuse and charger Guarantee the normal operation of charger an...

Page 16: ...rea 8 Check if there is any burn scratched eroded bent and loosened wire in the areas below Wire of scissor arm ECU to the platform Harness connector connected on the platform 9 Check the free coating...

Page 17: ...the red emergency stop button on the ground controller to the OFF position Result No action is enabled by the machine 5 Press the red emergency stop button on the platform controller to the OFF positi...

Page 18: ...abnormal sound The hydraulic releasing of braking system shall be normal 2 Be sure to complete the braking function inspection on a solid and level ground without any barrier Ensure the machine is fo...

Page 19: ...nt when the reference point passes the starting line Keep driving at the full speed and record the time when the reference point passes the finishing line Refer to the specification B 9 Test of drivin...

Page 20: ...ng line and the finishing line Switch the key switch to the platform controller and draw out the red emergency stop buttons from the ground and platform controller Lower the platform to the folding po...

Page 21: ...irty or blocked exhaust cover may degrade the machine performance The frequent inspection is the must for the poor working environment Remove the exhaust cover from the hydraulic oil tank cover Check...

Page 22: ...ion 10 Release the lever and do the test 11 Open the lower limit switch base cover and unplug the connector of lower limit switch 12 Switch the key switch to the platform controller 13 Slightly raise...

Page 23: ...is vertical 20 Lower the platform height until the safety prop completely contacts the shaft sleeve 21 Warning crush hazard 22 Turn the key switch to the OFF position 23 Remove the platform control li...

Page 24: ...etched The diagnosis screen does not display the code 18 no alarm is outputted and the machine can still be lifted In such case the hollow protector limit switch shall be adjusted or replaced 37 Press...

Page 25: ...the platform and recover the safety prop to the installation position Lift the platform via the ground controller while pressing the upper limit switch arm to initialize the upper limit switch Result...

Page 26: ...isconnect battery Periodic Check Check the motor at least once semiannually in the following method 1 Conduct external check keep the outer surface of the motor clean 2 Open the protective cover and c...

Page 27: ...h box and hold down the electric brush with the spring 2 Fix the tail to the wiring board of the brush box with the Phillips screwdriver or the T wrench and screw with the torque wrench 4 Install the...

Page 28: ...nation angle of the scissor and further determining the platform height Switch the key switch to the ground controller and lift the platform for a given height above the ground The lifting height of e...

Page 29: ...12E 3 73 AS1212E 4 AS1413E 9 Lift the safety prop move it to the center of the scissor sleeve center and rotate it upward until it is vertical 10 Lower the platform height until the safety prop comple...

Page 30: ...ure the distance between the inner connecting rod and the steer plate on the side of the battery box side without turning ends Result a If the measured result of SS0407E AS0607E AS0812E AS1012E AS1212...

Page 31: ...ctor button Check the filter component for oil leakage Clean the overflowed hydraulic oil 1 13 Steps of checklist E E 1 Test and replacement of hydraulic oil This procedure is made once per 200h or pe...

Page 32: ...c oil and correctly use the discharge hydraulic oil Clean the hydraulic oil tank with mild solvent and absolutely dry it with air 1 Install the hydraulic oil tank and screw the hydraulic oil tank fast...

Page 33: ...Maintenance Manual of Elevating Work Platform 28...

Page 34: ...Maintenance Manual of Elevating Work Platform 29 Chapter 2 Appendix...

Page 35: ...Maintenance Manual of Elevating Work Platform 30...

Page 36: ...Maintenance Manual of Elevating Work Platform 31 2 1Battery Maintenance Schedule...

Page 37: ...nce level Routine inspection Level I Level II Level III Level IV Level V Electric system Check the battery capacity Check if all the buttons on the PCU panel function normally Check if the PCU emergen...

Page 38: ...ally Check if the motor motor controller relay and ECU wirings are loose Check if the wiring of every solenoid valve winding of main valve block is normal or loose Check if the charger wiring is loose...

Page 39: ...aks Replace the hydraulic oil tank vent cap Replace the reducer lubricating oil First 50 hours once a year Whole machine Check the fork sliding block for abnormal noise Check and replace the sliding b...

Page 40: ...se temperature Oil type Minimum air temperature 9 L HM 46 antiwear hydraulic oil 33 minimum air temperature 9 L HV 46 low temperature hudraulic oil 39 minimum air temperature 33 L HS 46ultralow temper...

Page 41: ...Maintenance Manual of Elevating Work Platform 36 SS0407E SS0507E HYDRAULIC SCHEMATIC...

Page 42: ...Maintenance Manual of Elevating Work Platform 37 AS0607E HYDRAULIC SCHEMATIC...

Page 43: ...Maintenance Manual of Elevating Work Platform 38 AS0812E HYDRAULIC SCHEMATIC...

Page 44: ...Maintenance Manual of Elevating Work Platform 39 AS1012E AS1212E HYDRAULIC SCHEMATIC...

Page 45: ...Maintenance Manual of Elevating Work Platform 40 AS1413E HYDRAULIC SCHEMATIC...

Page 46: ...Maintenance Manual of Elevating Work Platform 41 SS07E ELECTRIC SCHEMATIC...

Page 47: ...Maintenance Manual of Elevating Work Platform 42 AS07E AS08E AS12E ELECTRIC SCHEMATIC...

Page 48: ...Maintenance Manual of Elevating Work Platform 43 AS1413E ELECTRIC SCHEMATIC...

Reviews: