background image

Pearl® Imager Accessories

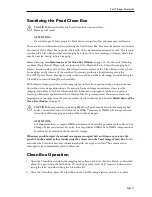
Figure 1-9. Location and function of
front panel indicator lights.

Indicator

Description

(Blue)

ON continuously when the docking station is powered on. OFF when
an error condition exists or the power supply is disconnected.

(Green)

Blinks rapidly when heater plate is not within 1.5 °C of the 38 °C set
point.

ON continuously when heater plate is within 1.5 °C of the 38 °C set
point.

OFF when an imaging bed is not installed on the docking station or
there is an error condition.

(Red)

ON continuously when the heater plate temperature is greater than 5
°C above set point (38 °C). The heater plate is automatically turned
OFF, but the indicator remains on. Disconnect the power supply to
turn off the red warning light and reset the temperature controller.
Connect the power supply again after the heater plate has cooled.

Blinks slowly when the current to the heater plate is not correct. This
may indicate that the heater plate contact pins are dirty, shorted
(bent), or need replacement. See Chapter 5 of the Pearl Imager
Operator's Manual for the contact pin replacement procedure.
Contact LI-COR if the error condition persists after contact pin
replacement.

3) Wait for the heater plate to reach the set point (38 °C). The green “running” icon blinks rapidly

until the set point is reached and then stops blinking and remains on (Figure 1-9).

4) Use the adjustment knob on the rotameter to set the flow rate to 0.5 liters per minute (typical)

and start gas flow from isoflurane vaporizer or equivalent. Allow 1 minute to prime the system
with isoflurane gas. Observe the safety warnings given in Chapter 1 concerning use of isoflurane
gas and oxygen. Follow the instructions from the manufacturer of the anesthesia system to anes-
thetize mice.

CAUTION:

To prevent pressure build up in the external anesthesia system, don’t close the

rotameter on the Pearl Docking Station unless the anesthesia system is properly vented.

AVERTISSEMENT:

Pour empêcher l'accumulation de pression dans le système externe d'anesthésie, ne fermez
pas le rotamètre sur la station d'amarrage de Pearl à moins que le système d'anesthésie soit
correctement aéré.

5) Move the mouse from the induction chamber to the imaging bed, remove the nose cone plug,

and slide the muzzle of the mouse into the nose cone. Complete instructions can be found in
Chapter 4 of the Pearl Imager Operator's Manual. Consult the appropriate chapter in this
manual for any additional instructions for the specific imaging bed you are using.

6) Lift the locking handle on the accessory imaging bed and remove it from the docking station.

Move the imaging bed immediately to the Pearl Imager for imaging.

Important:

The flow of anesthesia gas stops after the imaging bed is unlocked from the docking

station and does not start again until the imaging bed is locked into the Pearl Imager imaging
drawer or returned to the docking station and locked in place.

Page 7

Summary of Contents for 5700-DS

Page 1: ...Pearl Trilogy Accessories Manual...

Page 2: ......

Page 3: ...This product model number 5700 DS is a CE marked product For conformity information contact LI COR Support at http www licor com biotechsupport Outside of the U S contact your local sales office or d...

Page 4: ...nt NOTE Notes contain additional information and useful tips IMPORTANT Information of importance to prevent procedural mistakes in the operation of the equipment or related software Failure to comply...

Page 5: ...d by copyright All rights are reserved No part of this document may be photocopied reproduced or translated to another language without prior written consent of LI COR Inc Printing History Publication...

Page 6: ...Box Description 9 Installation 9 Connecting a HEPA Filter to the Docking Station 9 Connecting a HEPA Filter to the Pearl Imager 10 Nose Cone Installation and Replacement 10 Sanitizing the Pearl Clean...

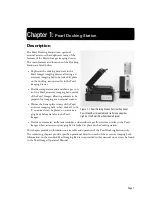
Page 7: ...on trol to a Pearl accessory imaging bed outside of the Pearl Imager allowing animals to be prepared for imaging at an external station l Warms the heater plate in any of the Pearl accessory imaging b...

Page 8: ...instructions dans ce chapitre pour vous assurer que le port d chappement est reli un filtre charbon que le syst me d anesth sie fourni par l utilisateur est correctement reli et que le cone de nez est...

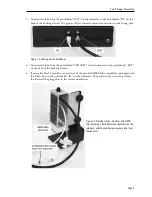
Page 9: ...UST on the rotameter to the port labeled OUT on the back of the docking station 5 If using the Pearl Clean Box connect one of the provided HEPA filter assemblies packaged with the Clean Box to the por...

Page 10: ...rage de Pearl n est compatible qu avec les syst mes d anesth sie qui fournissent le gaz isoflurane Le d bit et la pression dans l instrument ne devraient pas exc der 1 litre par minute et 6 9 kPa resp...

Page 11: ...UST port Recommendations for monitoring and replacement of the charcoal filter are given in Chapter 3 of the Pearl Imager Operator s Manual Figure 1 6 The included charcoal filter or a user supplied c...

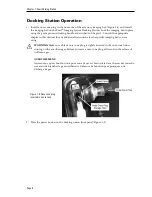
Page 12: ...structions for the specific imaging bed you are using WARNING Make sure a black nose cone plug is tightly inserted in the nose cone before turning on the anesthesia gas Failure to insert a nose cone p...

Page 13: ...the adjustment knob on the rotameter to set the flow rate to 0 5 liters per minute typical and start gas flow from isoflurane vaporizer or equivalent Allow 1 minute to prime the system with isoflurane...

Page 14: ...ire or loose connections Periodically inspect external tubing for cracking or damage that could cause leaks Docking Station Specifications Docking Station Operating Conditions For Indoor use only oper...

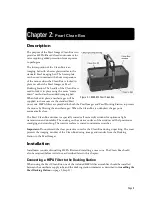
Page 15: ...the anesthesia gas When the Clean Box is undocked the gas ports automatically close The Pearl Clean Box window is a specially coated cell cast acrylic window for optimum light transmission and durabi...

Page 16: ...ion after it is plugged in 3 Connect the opposite end of the HEPA filter assembly to the provided anesthesia supply tube provided with the Pearl Imager Nose Cone Installation and Replacement Nose cone...

Page 17: ...the imaging bed surface with 0 5 chlorine bleach Ethanol or isopropanol can be also used as a cleaning solution for applications where chlorine bleach is not required If necessary clean any fingerprin...

Page 18: ...IMPORTANT Move the Clean Box quickly Anesthesia gas does not flow while the Clean Box is undocked 8 Remove the Clean Box cover to expose the window close the imaging drawer and acquire an image as des...

Page 19: ...rove insufficient use LI COR Optical Tissue and LI COR Optical Cleaner Apply a few drops to an optical tissue and gently clean the window with a circular motion Follow with a second dry tissue to remo...

Page 20: ...iosciences GmbH Siemensstra e 25A 61352 Bad Homburg Germany Phone 49 0 6172 17 17 771 Fax 49 0 6172 17 17 799 bio eu licor com LI COR Biosciences UK Ltd St John s Innovation Centre Cowley Road Cambrid...

Reviews: