Real Time Data
Real Time Graphics
Using the LI-6400
6-11
Changing Variables and Scales
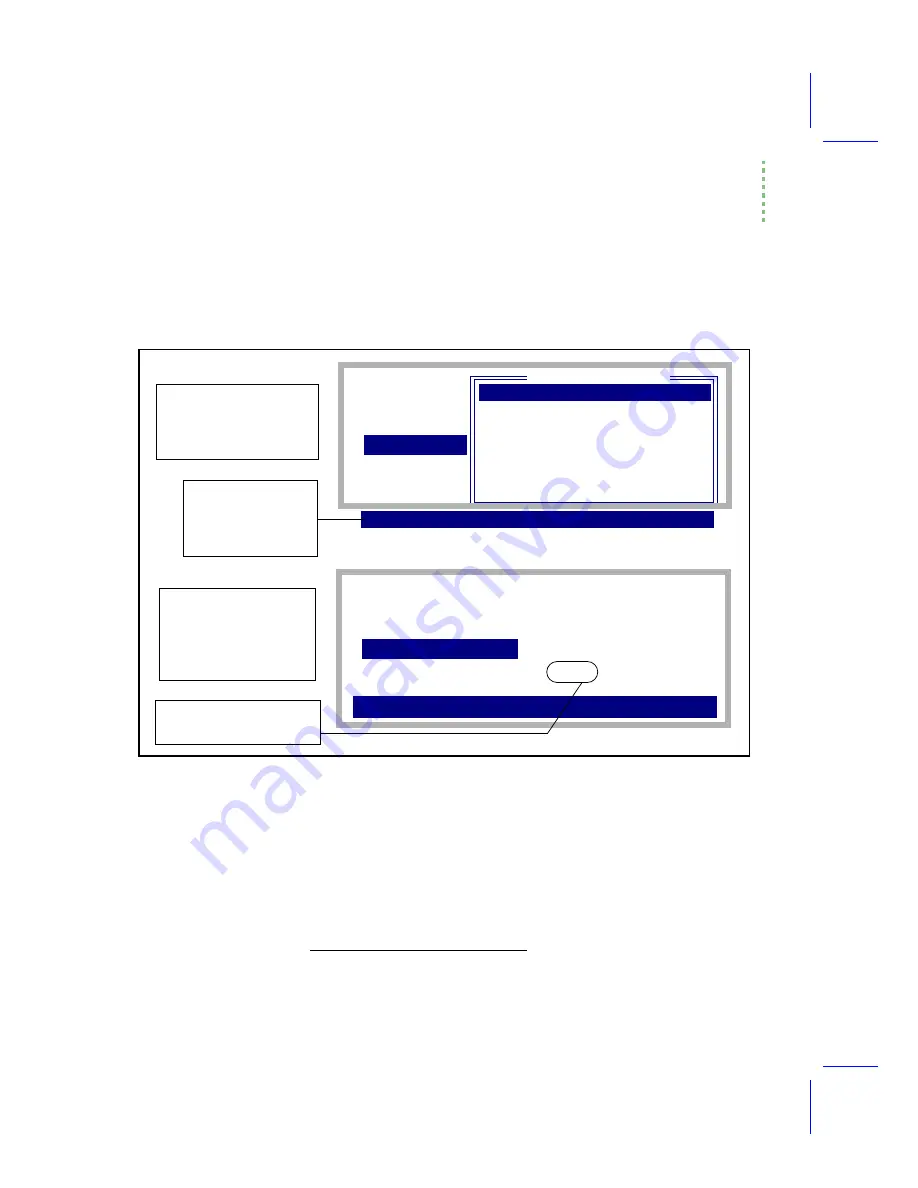
Each plot has two axes definitions, each consisting of a variable name and
scaling information.When edited, the variable is selected from a menu, and
the scaling information is entered from the keyboard (Figure 6-11).
Strip Charts and XY Plots
The variable that is chosen for the X axis determines if the plot will be a strip
chart or an XY plot. Strip charts use the variable
1
labelled
"Strip Chart
Time"
(at the top of the selection menu). Selecting any other variable for the
X axis will make it an XY plot.
Figure 6-11. Editing an axis involves (Step 1) selecting the variable, and (Step 2) entering the scaling. The scaling
entry determines if the axis autoscrolls or not. The time axis on strip charts always scroll, however.
RealTime Graphics
__X_AXIS_________ __Y_AXIS___________
1:PARi:0 to 2000 Photo:0 to 20
2:PARi:0 to 2000 Cond:0 to 1
Æt=120
3:
totalCV%:0 to 5
10:(U/S)
20:Trans
21:Trmmol
23:Cond
30:Photo
35:CndCO2
Pick X Variable
0: Strip Chart Time
RealTime Graphics
__X_AXIS_________ __Y_AXIS___________
1:PARi:0 to 2000 Photo:0 to 20
2:PARi:0 to 2000 Cond:0 to 1
100 400_
3:
totalCV%:0 to 5
Enter Scaling Info for Flow
1 val = Æ or 2 vals = min, max
DelLn
¨
ClrEnd
¨
DelChar
¨
CapLock
¨
AnyChar
Step 1: Pick a variable. If
picking the X axis variable,
the top entry in the list will be
Strip Chart Time. Select this
if you want a strip chart.
Step 2: Enter the scaling.
Enter 1 value (delta) if you
want auto scrolling, or 2 val-
ues (min and max) if you
donÕt. If entering 2 values,
separate them by a space.
¨
Find
¨
Refind
¨
CANCEL
¨
SELECT
Pressing labels brings
up these function keys.
Find
can be useful for
finding a variable in the
long list.
Shows the variable selected
in Step 1. (Flow in this case)
1.
This isnÕt really a system variable; itÕs just an entry in the menu when youÕre
selecting an X axis variable.
Summary of Contents for LI-6400
Page 1: ...Using the LI 6400 Portable Photosynthesis System ...
Page 15: ...Part I The Basics ...
Page 16: ......
Page 174: ...Making Measurements Answers to Questions 4 56 Using the LI 6400 4 ...
Page 175: ...Part II Useful Details ...
Page 176: ......
Page 200: ...Standard Tools Power ON Hooks 5 24 Using the LI 6400 5 ...
Page 214: ...Real Time Data Real Time Graphics 6 14 Using the LI 6400 6 ...
Page 234: ...Environmental Control Light Control 7 20 Using the LI 6400 7 ...
Page 244: ...Light Sensor Considerations Gallium Arsenide Phosphide GaAsP Sensor 8 10 Using the LI 6400 8 ...
Page 288: ...Data Logging Making Your Own AutoPrograms 9 44 Using the LI 6400 9 ...
Page 289: ...Part III Working With Files ...
Page 290: ......
Page 312: ...The LPL File System Troubleshooting 10 22 Using the LI 6400 10 ...
Page 340: ...Downloading Files Using a Data Capture Program 11 28 Using the LI 6400 11 ...
Page 375: ...Part IV Configuration Issues ...
Page 376: ......
Page 420: ...Defining User Variables Old Style vs New Style 15 18 Using the LI 6400 15 ...
Page 454: ...Using an Energy Balance Further Reading 17 12 Using the LI 6400 17 ...
Page 455: ...Part V Maintenance Troubleshooting ...
Page 456: ......
Page 572: ...Troubleshooting Useful Information 20 46 Using the LI 6400 20 ...
Page 593: ...Part VI Programming ...
Page 594: ......
Page 622: ...Programming with LPL Compiler Directives 22 28 Using the LI 6400 22 ...
Page 846: ...Index I 16 Using the LI 6400 ...


