background image

Operating Instructions

18

3.2

Status LED Modes

3.3

Navigating the Menu

To review or change any settings on the UPS, 

use the buttons on the User Interface shown 

at left. Because some menus contain more 

than four rows of information, you may see an 

arrow on the display pointing up or down (as 

shown below)—indicating to scroll using the


or


buttons.

If you are scrolling through any of the Main 

Menus, items will scroll one line at a time 

with the menu heading on the top line:

Pressing


reveals: 

Note the arrows on the screen indicate that 

the user can scroll up or down to reveal more 

information.

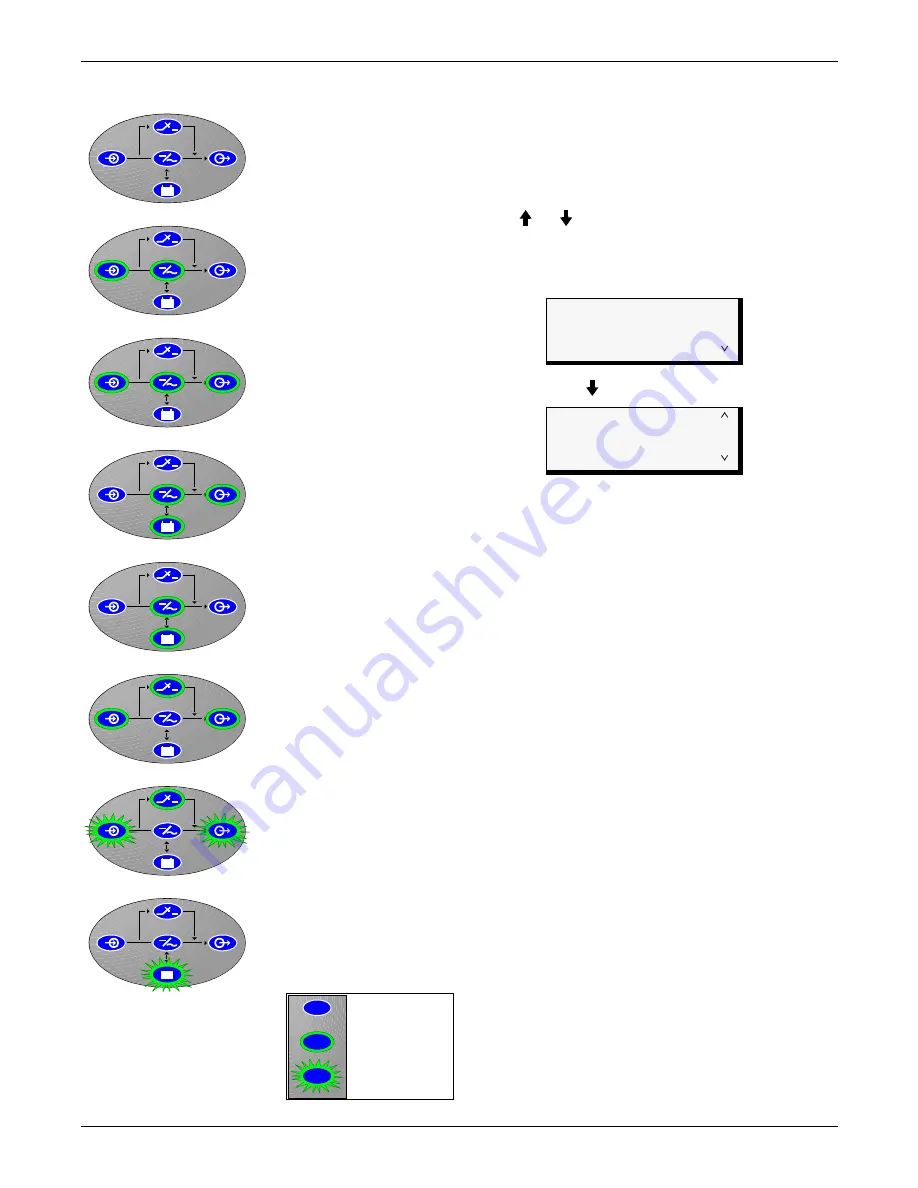
LED Off

UPS is Off or Initializing

UPS is On, Utility is Good 

and Output is On

(Normal Operation)

UPS is On, Utility is Bad 

and Output is On

(On Battery Operation)

UPS is On, Utility is Good 

and Output is Off

UPS is On, Utility is Bad 

and Output is Off

UPS is in Bypass Operation

(Manual or Automatic)

UPS is in Manual Bypass 

Operation with Utility Out of 

Bypass Operation Range

Shutdown Due to 

End of Discharge

LED On

LED Flashing

UPS Status

Present Load

Redundant Status

Battery Status

UPS Status

Redundant Status

Battery Status

Volts/Amps/kVA

Summary of Contents for Nfinity

Page 1: ...POWER AVAILABILITY Nfinity Power System USER MANUAL 105 210V 50 60Hz 4 to 16 kVA ...

Page 2: ......

Page 3: ...2 1 3 Site Preparation 8 2 2 Unloading 9 2 2 1 Unloading the UPS 9 2 2 2 Stationary Mounting 10 2 3 Cable Installation 11 2 3 1 Wiring Preparation 11 2 3 2 Connecting to External Panel Boards 13 Input Cabling and Protection 13 Output Cabling 14 2 3 3 REPO Connection 15 2 4 Communications 16 2 4 1 COM Ports 16 2 4 2 Intellislot Ports 16 3 0 OPERATING INSTRUCTIONS 3 1 Controls and Indicators 17 3 1 ...

Page 4: ...rms 31 4 2 Module LED Indication 33 4 3 Module Replacement 34 4 3 1 Removing Modules 34 4 3 2 Adding or Replacing Modules 35 4 3 3 Replacing the User Interface 35 5 0 MAINTENANCE 5 1 Maintenance 36 5 1 1 Proper Care 36 5 1 2 Scheduled Maintenance 36 5 1 3 Replacing Fan Filters 36 6 0 SPECIFICATIONS 6 1 Product Warranty Registration 37 FIGURES Figure 1 Front and back views 12 bay model shown 4 Figu...

Page 5: ...ct at their own expense Operate the UPS in an indoor environment only in an ambient temperature range of 32 F to 104 F 0 C to 40 C Install it in a clean environment free from conductive contaminates moisture flam mable liquids gases and corrosive substances Turn the UPS off and isolate the UPS before cleaning Use only a soft cloth never liquid or aerosol cleaners Keep the front and rear vents free...

Page 6: ...utput Requests the user to consult the manual Indicates the unit contains a valve regulated lead acid battery Recycle DC voltage Equipment grounding conductor Bonded to ground AC voltage OFF ON Standby No telecommunication connection Locked position Unlocked position Contact closure signals Serial communications i ...

Page 7: ...s brownouts surges or noise interference The Nfinity modular UPS was designed to provide maximum system availability to business critical equipment Nfinity is also an easily adaptable UPS system By simply installing additional Power or Battery Modules you can expand your current system capacity or extend your backup runtime Nfinity has a comprehensive user interface that enables configuration acco...

Page 8: ... 508 x 711 x 1016 12 bay 1176 534 20 x 28 x 53 508 x 711 x 1346 ESC User Interface Control Switch SW2 Power Module Bays Battery Module Bays Manual Bypass Switch SW1 Intake Cooling Fans DB 9 Communication Ports Output Power Terminal Input Power Terminal External Battery Connection REPO Connection Intellislot Communications Ports Input Earth Terminal Input Circuit Breaker CB1 BACK VIEW with access p...

Page 9: ...ing power to connected equipment This feature is enabled at the factory but can be disabled by the user The user can also program two auto restart delay settings 1 Battery capacity level 2 Countdown timer Bypass Mode The bypass provides an alternate path for power to the connected equipment and operates in the fol lowing manner Automatic In the event of an internal fault or should the inverter ove...

Page 10: ... configure the system Review the event log to assist with troubleshooting Enable disable the output power Silence the audible alarm Manually transfer the unit to bypass For a more detailed explanation on how to operate the User Interface Module see 3 1 Controls and Indi cators 1 3 3 System Control Module The System Control Module is the communications backbone of the UPS It gathers input from all ...

Page 11: ...and controls to isolate the Battery Module in the event of a battery failure The modules are paralleled to provide greater capacity backup time and or redundancy Mod ules may be added or replaced on line with no interruption or danger to the connected equipment provided that the UPS is not operating on battery Under normal operation the Green Status LED will blink continuously and the Yellow Fault...

Page 12: ...t of a fully loaded unit Check to make sure that your UPS will be located in a well ventilated area with at least 12 inches 305mm behind it The UPS is air cooled utilizing internal fans Air is drawn into the front of the UPS and is exhausted through ventilation grilles in the back It should also have at least 36 inches 915mm in front in order to change modules when necessary The unit frame is bolt...

Page 13: ...allet back of unit as shown below 1 Use a ratchet or wrench 1 2 13mm to remove the four mounting bolts from the front and rear pallet brackets Remove the mounting brackets from the pallet and UPS Keep the brackets for future transportation of the UPS or for additional stability of the UPS once in place 4 Using two people slowly move the UPS down the ramp until the UPS is on a level surface Pull ra...

Page 14: ...ing the mounting brackets used in shipping to the floor as shown below left For greater stability use a higher grade bolt Refer to the dimensions above right when drilling holes for stationary mounting 1 2 13mm 28 711mm 5 16 7 94mm diameter in six places Optional Stationary Mounting Dimensions Center Line 4 75 120mm 4 75 120mm Shipping Brackets Used for Stationary Mounting ...

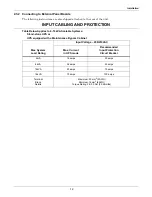
Page 15: ...vice at the AC input supply distribution point To avoid random tripping on start up it is recom mended that the AC input supply be protected with a circuit breaker capable of withstanding this initial inrush This UPS is fitted with EMI suppression filters Earth leakage current is less than 40mA Tran sient and steady state earth leakage currents may occur when starting the equipment This should be ...

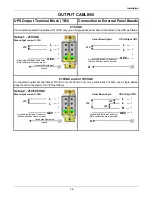
Page 16: ...ngrounded branch circuit supply conductors This cable must be green with or without one or more yellow stripes and is to be installed as part of the branch circuit that supplies the unit or system The grounding conductor is to be grounded to earth at the service equipment or if supplied by a separately derived sys tem at the supply transformer or generator set Output Wiring TB3 Refer to the chart ...

Page 17: ... 16kVA Scalable Systems Stand alone UPS or UPS equipped with a Maintenance Bypass Cabinet Max System Load Rating Input Voltage 200 210VAC Max Current in UPS mode Recommended Input Protection Circuit Breaker 4kVA 18 amps 50 amps 8kVA 36 amps 50 amps 12kVA 53 amps 75 amps 16kVA 70 amps 100 amps Terminal Block Details Maximum 35mm2 2AWG Minimum 16mm2 6AWG Torque Rating 2 5 3 0Nm 22 26in lbs ...

Page 18: ...ected to the UPS as follows 1 2 3 4 Setup 1 210 VAC 210 Grounding Electrode Conductor Field connection must be made L L GEC Max output current 76A Connected Equipment Ground 210 UPS Output TB3 Panel Board Input Grounding Electrode Conductor Field connection must be made 1 2 3 4 L L GEC G 1 2 3 4 Setup 2 210 105 VAC Grounding Electrode Conductor Field connection must be made Max output current 76A ...

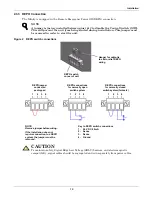
Page 19: ...gnal Edge Low Voltage SELV barriers and electromagnetic compatibility signal cables should be segregated and run separately from power cables NOTE Remove jumper before wiring If the installation does not require connection to a REPO system the jumper must be removed 1 2 3 4 Key to REPO switch connections 1 24 V DC 50mA 2 Sense 3 Sense 4 Ground REPO connections for normally open switch system REPO ...

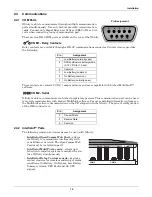
Page 20: ...n please see the MultiLink software documentation on the CD shipped with the Nfinity The pin out configuration of the DB 9 connector is 2 4 2 Intellislot Ports The following communication cards may be used with Nfinity Intellislot OpenComms Web Card allows the Nfinity to communicate intelligently with your Ethernet network The OpenComms Web Card must be installed in port 1 Intellislot MultiPort4 c...

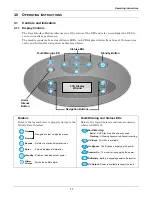
Page 21: ...o the legend below to indicate occurrence when an LED is lit LCD Display Window Standby Button Alarm Silence Button Fault Warning LED Status LEDs Navigation Buttons ESC Navigates cursor on display menus Returns to previous display screen Selects displayed information Enables disables output power Mutes the audible alarm Up Down Escape Enter Standby Alarm Silence ESC On Bypass The Bypass is supplyi...

Page 22: ...op line Pressing reveals Note the arrows on the screen indicate that the user can scroll up or down to reveal more information LED Off UPS is Off or Initializing UPS is On Utility is Good and Output is On Normal Operation UPS is On Utility is Bad and Output is On On Battery Operation UPS is On Utility is Good and Output is Off UPS is On Utility is Bad and Output is Off UPS is in Bypass Operation M...

Page 23: ... the manual bypass switch to the bypass position The manual bypass switch is behind the front bottom bezel To transfer the UPS from bypass to normal mode follow the on screen instructions Once is pressed the bypass alarm will annunciate and cannot be canceled until the manual bypass switch is operated To transfer the UPS from bypass to normal mode simply operate the manual bypass switch back to th...

Page 24: ...ats Active Alarms Active Alarms Message UPS Configuration UPS Configuration Review Settings Change Settings Service Mode Main Menu UPS Status UPS Configuration Display Date Time Event Log Active Alarms Transfer to Bypass Module Replacement Service Tools UPS Status UPS Status Present Load Redundant Status Battery Status Volts Amps kVA UPS Frequency Bypass Information UPS Information Module Informat...

Page 25: ...atus PMs Installed xx PM N 1 redundant non redundant SC Redundant non redundant Battery Status Battery Status Voltage VDC xxx Capacity xxx Status charging BMs Installed xx Ext batt present No Discharge count xxxx Batt Usage Hr xxxx x Module Information Main Control S N xxxxxxxxxxxxxxx FW ver xxxx Redundant Control S N xxxxxxxxxxxxxxx FW ver xxxx User Interface S N xxxxxxxxxxxxxxx FW ver xxxx Power...

Page 26: ...ee Shutdown External Battery External batt config Amp Hr 0000 Charge A 00 0 Bypass Alarm Mode Bypass Alarm Mode Mode Enable Intelli Battery Ca Intelli Batteries 0 Air Filter Reminder Air Filter Reminder Mode 26 weeks Guarantee Shutdown Guarantee Shutdown Mode Enable Disable Voltage Voltage Settings Input 210 Output 210 Frequency Frequency Settings Frequency Hz 50 60 Sync Range Hz 5 0 Slew Range Hz...

Page 27: ...h Once set the password will be required to change the configuration Main Menu UPS Status UPS Configuration Display Date Time Event Log Active Alarms Transfer to Bypass Module Replacement Service Tools UPS Configuration UPS Configuration Review Settings Change Settings Service Mode Change Settings Frequency Frequency Sync Range Frequency Slew Rate Set Password Auto Battery Test Low Battery Warning...

Page 28: ...or select the appropriate lan guage Auto Battery Test Interval Start Day Start Time Interval Batt Test Interval 1 week 2 weeks 3 weeks 4 weeks 6 weeks Disabled Start Day Batt Test Weekday SUN MON TUE WED THU FRI SAT Start Time Battery Test Time 06 00 Low Battery Warning 02 Minutes Auto Restart Mode Auto restart batt Auto restart delay Auto Restart Mode Auto Restart Mode Enable Disable Auto Restart...

Page 29: ...has been shut down External Battery Sets total amp hour for external batteries to provide a more accurate runtime remain ing value on the LCD display and through communi cations When using the Non Modular External Battery Cabinets with Chargers P N PB10SLF105WC120 enter the following Set Time Date DST Mode Set Time Date DST Mode DST Mode Enabled Disabled Set Date Time Date Time MM DD YYYY HH MM SS...

Page 30: ...Allows the user to control the amount of line drop compensation to be applied to the nominal output voltage Line drop compensation is intended to compensate for any IR drop that may occur when the UPS is a significant distance from the protected load Factory Defaults Allows the user to reset all set tings to the values in effect when the UPS was shipped from the factory Bypass Alarm Mode Enable Di...

Page 31: ...splay Date Time This feature shows the current date and time At the Main Menu select UPS Configuration and press Next select Display Date Time and press Main Menu UPS Status UPS Configuration Display Date Time Event Log Active Alarms Transfer to Bypass Module Replacement Service Tools UPS Configuration UPS Configuration Review Settings Change Settings Service Mode Service Mode Service Mode Set Sit...

Page 32: ...ms Alarms affecting the Nfinity can be viewed at the Active Alarms screen To access the screen go to the Main Menu select Active Alarms and press When an alarm sounds the User Interface LCD will display a general explanation as to what the alarm is indicating To view these messages in chronological order press the and buttons The first line of a typical Active Alarms screen will display the reason...

Page 33: ...placement 1 Remove bottom bezel and place UPS in bypass 2 Lift off display panel and place on top of UPS 3 Locate amber LED 4 Open lever 5 Loosen fastener 6 Replace module 7 Tighten fastener 8 Close lever 9 Wait for amber LED to stop flashing 10 Replace display 11 Switch bypass to return to UPS operation 12 Replace bezel Power Module w Redundant Pwr Mod Replacement 1 Remove all front bezels 2 Loca...

Page 34: ...lude manual bypass count bypass overload count and other bypass count Main Menu UPS Status UPS Configuration Display Date Time Event Log Active Alarms Transfer to Bypass Module Replacement Service Tools Service Tools Service Tools UPS Test Clear Failures BM Cell Replacement Reset Battery Stats Reset Bypass Stats Service Tools Service Tools UPS Test Clear Failures BM Cell Replacement Reset Battery ...

Page 35: ...30 seconds and then turn the output on Power Module N 1 Redundancy Alarm Number of power modules is not adequate to provide power redundancy Reduce the UPS s load add power modules to the frame or disable the alarm feature via the User Interface Output Off Output Short Circuit A short circuit was detected on the output Correct short or extreme overload condition and turn on the UPS s output UPS Ou...

Page 36: ...e System Control Module Provide qualified bypass power so that transfer to bypass is possible Add a redundant System Control Module so that the load is not dropped Failure Select Manual Bypass The System Controller detected a failure Select manual bypass so that the unit can be serviced Transfer UPS to manual bypass and contact Liebert Global Services Output Off bypass unavailable This event infor...

Page 37: ...G OFF Normal Operation FLASHING FLASHING Module is in start up qualification mode or module warning FLASHING ON Module failed and is off line OFF FLASHING Abnormal operation re insert module ON OFF ON ON ON FLASHING If this persists for more than 30 seconds check to verify the lever is in the down position otherwise the module is faulty If both green and yellow LEDs are flashing for more than 30 s...

Page 38: ...rt to pull out module shown above right top About 2 3 out it will stop b Slide module away from the center of the UPS shown above right center c Continue to pull until module is removed shown above right bottom 5 Dispose of module in an environmentally responsible way that complies with local codes regulations or return to Liebert for proper disposal CAUTION Battery Modules are heavy 66 lb 30 kg N...

Page 39: ... in bypass manually transfer back to UPS operation 6 Replace bezels 4 3 3 Replacing the User Interface 1 Lift off user interface and set it on top of the UPS frame 2 The attached cable will be connected to an Intellislot card found in a port between the control modules 3 Remove the cable and the attached Intellislot card from the UPS 4 Plug the new Intellislot card into the UPS 5 Plug the new user...

Page 40: ...per airflow It is recommended the following maintenance is performed annually Verify all Power Modules are operating properly Verify all Battery Modules are operating properly Verify redundancy if applicable 5 1 3 Replacing Fan Filters Nfinity s intake fans contain filters that will need to be replaced or cleaned periodically depending on the surrounding environment Check by removing the bottom be...

Page 41: ...non condensing 10 000 3 000 Maximum operating altitude ft m Nominal heat dissipation BTU Hr 1 062 2 124 3 186 4 248 Acoustic noise level dBA 62 1 meter Input Data Units Nominal input voltage VAC 200 or 210 Minimum Voltage Range Typical Operating voltage range is variable based on output loading percentages UPS Load Input Voltage 80 100 170 VAC 60 80 144 VAC 30 60 127 VAC 0 30 110 VAC Power factor ...

Page 42: ...Specifications 38 ...

Page 43: ......

Page 44: ...l liability for damages resulting from use of this information or for any errors or omissions 2003 Liebert Corporation All rights reserved throughout the world Specifications subject to change without notice Liebert and the Liebert logo are registered trademarks of Liebert Corporation All names referred to are trademarks or registered trademarks of their respective owners SLI 23950J 8 03 Rev 0 Tec...

Reviews: