7
Life Fitness Model 4000 Treadmill
How To... ADJUST AND TENSION THE STRIDING BELT
(Continued)
Tools Required:
Hex key wrench set, phillips screwdriver
It is
EXTREMELY
important that the treadmill be correctly leveled prior to any tracking adjustments.
An unstable unit may cause Striding Belt misalignment.
Tracking (Centering) an Existing or New Striding Belt
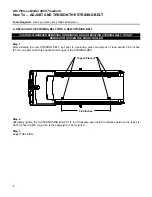
Step 1
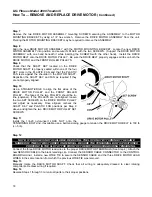
Locate the two belt TENSIONING BOLTS on each side of the REAR ROLLER MOUNTING BRACKETS. The
TENSIONING BOLTS are accessible from the holes provided in the ENDCAPS.
Step 2
Enter the Manual program and set the belt speed to run at 4.0 mph.
CAUTION: DO NOT OVER TIGHTEN THE TENSIONING BOLTS WHILE MAKING BELT ADJUSTMENTS.
OVER TIGHTENING OF BOLTS MAY OVER STRETCH AND DAMAGE THE STRIDING BELT AS WELL AS
PLACE AN UNNECESSARY LOAD ON THE REAR ROLLER BEARINGS.
Continued
Life Fitness Model 4000 Treadmill
CAUTION: DO NOT MOVE OR PLACE YOUR HANDS UNDER THE UNIT WHILE THE MACHINE IS
PLUGGED INTO AN ELECTRICAL OUTLET.
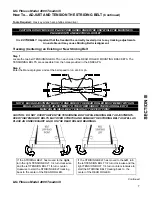
NOTE: EACH ADJUSTMENT MADE TO ONE SIDE OF THE REAR ROLLER MUST BE MET WITH AN
EQUAL AND OPPOSITE ADJUSTMENT TO THE OTHER SIDE OF THE REAR ROLLER TO
MAINTAIN AN IDEAL BELT TENSION AT THE PIVOT POINT.
If the STRIDING BELT
has moved to the
right
,
turn the right
TENSION BOLT
1/4 turn clock-wise
and the left TENSION BOLT
1/4 turn counter-
clockwise to start the STRIDING BELT
tracking
back to the center of the REAR ROLLER.
If the STRIDING BELT
has moved to the
left
, turn
the left TENSION BOLT 1/4 turn clock-wise and the
right TENSION BOLT 1/4 turn counter-clockwise to
start the STRIDING BELT
tracking back to the
center of the REAR ROLLER.

