background image

T

ABLE OF

C

ONTENTS

Section             Description


     1.                  Getting Started . . . . . . . . . . . . . . . . . . . . . . . . . . . . . . . . . . . . . . . . . . . . . . . . . . . . . . . . . . . . . . . . .5

     1.1                Important Safety Instructions  . . . . . . . . . . . . . . . . . . . . . . . . . . . . . . . . . . . . . . . . . . . . . . . . . . . . . .5

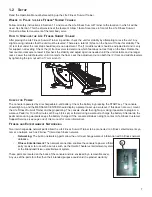
     1.2                Setup  . . . . . . . . . . . . . . . . . . . . . . . . . . . . . . . . . . . . . . . . . . . . . . . . . . . . . . . . . . . . . . . . . . . . . . . .7

     2.                  Console Overlay  . . . . . . . . . . . . . . . . . . . . . . . . . . . . . . . . . . . . . . . . . . . . . . . . . . . . . . . . . . . . . . .8

     2.1                Console Overlay Overview  . . . . . . . . . . . . . . . . . . . . . . . . . . . . . . . . . . . . . . . . . . . . . . . . . . . . . . .8

     2.2                Console Overlay Descriptions  . . . . . . . . . . . . . . . . . . . . . . . . . . . . . . . . . . . . . . . . . . . . . . . . . . . . .9

     2.3                Reading Rack and Bottle Holder  . . . . . . . . . . . . . . . . . . . . . . . . . . . . . . . . . . . . . . . . . . . . . . . . . .12

     3.                  Heart Rate Zone Training

®

 . . . . . . . . . . . . . . . . . . . . . . . . . . . . . . . . . . . . . . . . . . . . . . . . . . . . . . .13

     3.1                Why Heart Rate Zone Training

®

Exercise . . . . . . . . . . . . . . . . . . . . . . . . . . . . . . . . . . . . . . . . . . . .13

     3.2                Heart Rate Monitoring . . . . . . . . . . . . . . . . . . . . . . . . . . . . . . . . . . . . . . . . . . . . . . . . . . . . . . . . . . .14

     4.                  The Workouts  . . . . . . . . . . . . . . . . . . . . . . . . . . . . . . . . . . . . . . . . . . . . . . . . . . . . . . . . . . . . . . . . .16

     4.1                Workout Overviews . . . . . . . . . . . . . . . . . . . . . . . . . . . . . . . . . . . . . . . . . . . . . . . . . . . . . . . . . . . . .16

     4.2                Using the Workouts  . . . . . . . . . . . . . . . . . . . . . . . . . . . . . . . . . . . . . . . . . . . . . . . . . . . . . . . . . . . .18

     4.3                Workout Descriptions  . . . . . . . . . . . . . . . . . . . . . . . . . . . . . . . . . . . . . . . . . . . . . . . . . . . . . . . . . . .22

     4.4                Personal Trainer Workouts  . . . . . . . . . . . . . . . . . . . . . . . . . . . . . . . . . . . . . . . . . . . . . . . . . . . . . . .30

     4.5                Logging On to the Network  . . . . . . . . . . . . . . . . . . . . . . . . . . . . . . . . . . . . . . . . . . . . . . . . . . . . . . .30

     4.6                Using the Life Fitness Summit Trainer  . . . . . . . . . . . . . . . . . . . . . . . . . . . . . . . . . . . . . . . . . . . . . .31

     5.                  System Menu  . . . . . . . . . . . . . . . . . . . . . . . . . . . . . . . . . . . . . . . . . . . . . . . . . . . . . . . . . . . . . . . . .32

     5.1                Entering and Using the System Menu  . . . . . . . . . . . . . . . . . . . . . . . . . . . . . . . . . . . . . . . . . . . . . .32

     5.2                Manager’s Configuration Settings . . . . . . . . . . . . . . . . . . . . . . . . . . . . . . . . . . . . . . . . . . . . . . . . . .33

     6.                  Service and Technical Data  . . . . . . . . . . . . . . . . . . . . . . . . . . . . . . . . . . . . . . . . . . . . . . . . . . . . . .35

     6.1                Preventive Maintenance Tips  . . . . . . . . . . . . . . . . . . . . . . . . . . . . . . . . . . . . . . . . . . . . . . . . . . . . .35

     6.2                Preventive Maintenance Schedule  . . . . . . . . . . . . . . . . . . . . . . . . . . . . . . . . . . . . . . . . . . . . . . . . .36

     6.3                Troubleshooting the Optional Polar

® 

Telemetry Heart Rate Chest Strap  . . . . . . . . . . . . . . . . . . . .37

     6.4                Troubleshooting the iPod

® 

 . . . . . . . . . . . . . . . . . . . . . . . . . . . . . . . . . . . . . . . . . . . . . . . . . . . . . . .39

     6.5                Troubleshooting the Lifepulse™ System Sensors  . . . . . . . . . . . . . . . . . . . . . . . . . . . . . . . . . . . . .41

     6.6                How to Obtain Product Service / Serial Number Location  . . . . . . . . . . . . . . . . . . . . . . . . . . . . . . .41

     7.                  Specifications  . . . . . . . . . . . . . . . . . . . . . . . . . . . . . . . . . . . . . . . . . . . . . . . . . . . . . . . . . . . . . . . . .42

     7.1                CLSL Summit Trainer Specifications  . . . . . . . . . . . . . . . . . . . . . . . . . . . . . . . . . . . . . . . . . . . . . . .42

     7.2                CLSL Summit Trainer Warranty Information  . . . . . . . . . . . . . . . . . . . . . . . . . . . . . . . . . . . . . . . . . .43

© 2010 Life Fitness, a division of Brunswick Corporation. All Rights Reserved

2

Summary of Contents for CLSL

Page 1: ...INTEGRITY SERIES SUMMIT TRAINER CLSL OPERATION MANUAL M051 00K68 A035...

Page 2: ...Operating Hours 9 00h 17 00h MEZ Spain Life Fitness IBERIA C Frederic Mompou 5 1 1 08960 Sant Just Desvern Barcelona SPAIN Telephone 34 93 672 4660 Fax 34 93 672 4670 Service Email info iberia lifefit...

Page 3: ...On to the Network 30 4 6 Using the Life Fitness Summit Trainer 31 5 System Menu 32 5 1 Entering and Using the System Menu 32 5 2 Manager s Configuration Settings 33 6 Service and Technical Data 35 6 1...

Page 4: ...to provide reasonable protection against harmful interference when the equipment is operated in a commercial environment This equipment generates uses and can radiate radio frequency energy and if no...

Page 5: ...r the age of 45 or smokes has high cholesterol is obese or has not exercised regularly in the past year If at any time while exercising the user experiences faintness dizziness pain or shortness of br...

Page 6: ...retrieve it If the item cannot be reached contact Life Fitness Customer Support Services Never place liquids of any type directly on the unit except in the water bottle holder Containers with lids ar...

Page 7: ...de la prise et r cup rez le avec pr caution Si vous ne pouvez pas l atteindre consultez le service apr s vente de Life Fitness Ne placez jamais de liquides d aucune sorte directement sur l appareil s...

Page 8: ...jam nut with a 17 mm wrench CHECK FOR POWER The console is powered by a rechargeable 6 volt battery Check the battery by pressing the START key The console should light up and the MESSAGE CENTER shoul...

Page 9: ...itness improvement from one work out to the next Begin stepping Select workout or Quick Start Quick Start below iPod TV The heart rate displayed may be inaccurate and should be used for reference only...

Page 10: ...ies per Hour display cannot be turned on at the same time C NUMERIC keypad Use these keys to enter values such as length of workout weight age target heart rate and in tensity level While a workout is...

Page 11: ...eps on the ped als and begins pedaling Q ARROW keys A pair of UP and DOWN arrows is located on either side of the TIME LEVEL window When setting up a workout use either set of arrows to change workout...

Page 12: ...key to select TV iPod or optional AUX auxillary audio source Z PLAY PAUSE Use this key to Play or Pause the current track iPod only AA POWER Use this key to turn the power On and Off TV only BB LEFT a...

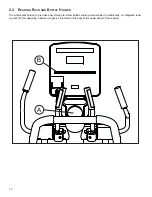
Page 13: ...R The water bottle holder A provides easy storage for water bottles and or personal objects Additionally an integrated read ing rack B for supporting a book or magazine is located at the base of the u...

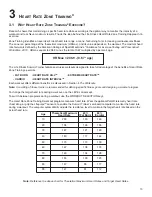
Page 14: ...FAT BURN HEART RATE HILLTM EXTREME HEART RATETM CARDIO HEART RATE INTERVALTM Each workout offers different benefits as discussed in Section 4 The Workouts Note Consulting a fitness trainer is recommen...

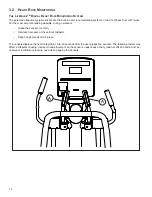
Page 15: ...ible during a workout Grasp the sensors A firmly Hold each sensors at the vertical midpoint Keep hands steady and in place The console displays the heart rate within 10 to 40 seconds after the user gr...

Page 16: ...the heart back to the receiver Moisten the electrodes Then secure the Polar telemetry heart rate chest strap as high under the chest muscles as possible The strap should be snug but comfortable enough...

Page 17: ...ccessed by the FIT TEST key The following workouts are accessed by pressing the HILL PLUS key HILL is an interval training workout Intervals are periods of intense aerobic exercise separated by regula...

Page 18: ...s continuously HEART RATE INTERVALTM alternates between a hill and a valley based on the target heart rate The user wears a Polar telemetry heart rate chest strap or grasps the LifepulseTM sensors con...

Page 19: ...display each of the other options Press ENTER to select the desired workout For CROSS TRAIN AEROBICS and PERSONAL TRAINER WORKOUTS When prompted by the MESSAGE CENTER to select a workout press the PE...

Page 20: ...ensity of the cardiovascular exercise SELECTING A GOAL TYPE Workouts can be programmed to target certain type of goals Calories Distance Time in zone The Calories Goal feature is designed to promote w...

Page 21: ...er Throughout the work out the MESSAGE CENTER displays prompts to vary the workload and emphasize different muscle groups such as upper and lower body This feature can be used with any workout except...

Page 22: ...der Select level Begin workout FAT BURN Press FAT BURN Enter weight Enter time Enter age Accept target heart rate Begin workout CASCADES Press HILL PLUS repeatedly until CASCADES appears press ENTER E...

Page 23: ...gned to maintain a user s heart rate at 65 of the theoretical maximum HRmax for opti mal results Throughout the workout the user wears a Polar telemetry heart rate chest strap or grasps the LifepulseT...

Page 24: ...to the low end of the target zone Check the heart rate at the end of this phase 3 Interval Training is a series of increasingly steeper hills alternating with valleys or stints of recovery The heart r...

Page 25: ...hill continues for one minute When the minute expires the level decreases into a valley Once the user s heart rate falls to 65 of HRmax the valley continues for one minute then the next hill begins wi...

Page 26: ...e level decreases into a valley Once the 65 of HRmax goal is reached the valley continues for three minutes after which the next hill begins The user s fitness level determines the number of hills and...

Page 27: ...ting up the workout the user enters a target heart rate After a standard three minute warm up the intensity in creases until the user reaches the target heart rate goal of 85 of the theoretical maximu...

Page 28: ...levels gradually increase and decrease FOOTHILLS is a rolling hill workout with low intensity levels INTERVAL is a HILL workout in which intensity levels rise and fall The higher levels gradually inc...

Page 29: ...nder SELECT GENDER Using the UP DOWN ARROW KEYS select a gender Press ENTER to accept the gender selection The message center will next prompt for a workout level ENTER LEVEL Consult the following rec...

Page 30: ...ual adjustment of level is not permitted The tables below list Fit Test results Life Fitness developed this rating scale based on VO2 max percentile distributions referenced in American College of Spo...

Page 31: ...o either modify the workout or proceed to another number Pressing the CLEAR key overwrites the previously created workout making it possible to create a new workout for that number Pressing ENTER bypa...

Page 32: ...s This po sition is good for beginners and recovery from advanced positions 2 Upright Total Body With hands on moving arms maintain an upright plumb line position as described above with your ears ove...

Page 33: ...keys can be used to navigate through the list of items that may be displayed Press the CLEAR key once to exit the Information Menu and hence the System Menu DIAGNOSTIC MENU SERVICE MENU The Diagnostic...

Page 34: ...actively engaging the product in exercise This configuration applies to externally powered prod ucts only Upon entry to this utility the current configura tion setting shall be displayed The UP DOWN a...

Page 35: ...rted using the selected language Selecting a language is not necessary to begin a workout Simply press the QUICK START key to start a workout or any of the program keys to begin workout pro gramming u...

Page 36: ...ness Approved Cleaners and a soft cotton cloth Long fingernails may damage or scratch the surface of the console use the pad of the finger to press the selec tion buttons on the console Clean the hous...

Page 37: ...CE SCHEDULE ITEM WEEKLY MONTHLY BI ANNUALLY Console Overlay Clean Inspect Bottle Holder Clean Inspect Console Mounting Bolts Inspect Frame Clean Inspect Plastic Covers Clean Inspect Inspect Lifepulse...

Page 38: ...oltage high current power lines Heart rate readings are abnormally elevated Television sets and or antennas generate electro magnetic interference Move the Summit Trainer a few inches away from the pr...

Page 39: ...the heart rate receiver Make sure the chest strap trans mitter is within 3 feet 1 meter of the heart rate receiver Polar telemetry heart rate chest strap battery is depleted Contact Life Fitness Custo...

Page 40: ...iPod volume using console keypad controls Headphones are plugged into iPod instead of console head phone jack Plug headphones into console headphone jack Volume control on iPod is being used with hea...

Page 41: ...ntrols Audio track containing video begins playing as part of an audio playlist known Apple issue with iPod device firmware Play track as a video selection Cannot navigate iPod menus Use of console ke...

Page 42: ...d its features and workouts 2 Locate and write down the serial number of the unit which is located on the front stabilizer 3 Contact Life Fitness Customer Support Services 6 7 RECYCLING THE BATTERY Wh...

Page 43: ...25 speed independent Pedal speed range 0 5 5 8mph 0 8 9 3kph Drive type Belt alternator Heart rate monitoring systems Patented Lifepulse digital contact heart rate and Polar telemetry compatible heart...

Page 44: ...in 10 days after discovery of the defect if instructed return any defective part for replacement or if necessary the entire Product for repair OPERATION MANUAL It is VERY IMPORTANT THAT YOU READ THE M...

Reviews: