background image

17

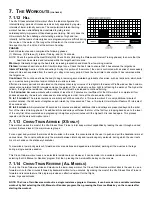
5.2  HEART RATE MONITORING 

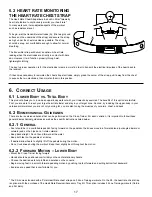
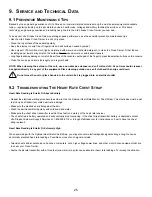
THE HEART RATE CHEST STRAP

The Heart Rate Chest Strap allows the built-in Polar

®

telemetry

heart rate feature to continuously monitor your heart rate.* 
In many workouts, it also adjusts aspects of the workout 
such as resistance level.

To begin, wet the transmitter electrodes (A), (the two grooved
surfaces on the underside of the strap) and secure the strap
as high under the chest muscles as possible. The strap
should be snug, but comfortable enough to allow for normal
breathing.

The transmitter strap will deliver an optimum heart rate
reading when the electrodes are directly in contact with bare
skin. However, it will function properly through wet,
lightweight clothing.

The key to proper operation is for the electrodes to remain moist in order to transmit the electrical impulses of the heart back to
the receiver.

If it becomes necessary to remoisten the chest strap electrodes, simply grasp the center of the strap, pull it away from the chest
to expose the two electrodes, then moisten them in this position.

6.  C

ORRECT

U

SAGE

6.1  L

OWER

B

ODY VS

. T

OTAL

B

ODY

This product allows you to include an upper-body workout with your lower-body exercise. The benefits of this option are twofold.
First, you are able to reach your target heart rate faster and stay in your target zone. Second, by including the upper-body in your
cardiovascular workout you are not only burning fat, you are also toning the muscles of your arms, chest, and back.

6.2  B

IOMECHANICAL

G

UIDELINES

There are four exercise variations that can be performed on the Cross-Trainer. For each variation, it is important to follow these
general biomechanical guidelines as well as the specific instructions listed below.

6.2.1  G

ENERAL

• Feet should be in a comfortable position facing forward on the pedals so the knees move in a forward plane (not angled inward or

outward) and so the hips do not rotate outward.

• Keep back straight. Do not bend forward at the waist.
• Keep both feet on the pedals at all times.
• If desired, allow heels to slightly lift off the pedals during the motion.
• Do not lock knees during the workout. Keep them slightly bent throughout the motion.

6.2.2  F

ORWARD

M

OTION

– L

OWER

B

ODY

• Mount the Cross-Trainer facing forward
• Hands should be positioned comfortably on the center stationary handle
• Choose the desired workout profile and duration on the console
• Begin moving feet in a smooth forward pedaling motion by pushing top foot forward and pulling bottom foot backward
• Exercise at a speed that is comfortable for you

* The X5i comes standard with a Polar Heart Rate chest strap and 5 Zone Training workouts. On the X5, the heart rate chest strap
is optional with the purchase of the Heart Rate Receiver/Accessory Tray Kit. This option includes 2 Zone Training workouts (Cardio
and Fat Burn).

Summary of Contents for Elliptical X5i

Page 1: ...X5 X5i CROSS TRAINER ASSEMBLY OPERATION MANUAL lifefitness com...

Page 2: ...e functions of the Life Fitness X Series X5 X5i Cross Trainers Statement of Purpose This Cross Trainer is a home exercise machine that combines low impact elliptical pedaling with push pull arm motion...

Page 3: ...6 2 2 Forward Motion Lower Body 17 6 2 3 Forward Motion Total Body 18 6 2 4 Reverse Motion Lower Body 18 6 2 5 Reverse Motion Total Body 18 7 THE WORKOUTS 18 24 7 1 Workout Descriptions 18 7 1 1 Manua...

Page 4: ...or disabled persons Do not use this product outdoors near swimming pools or in areas of high humidity Never insert objects into any opening in this product If an object should drop inside turn off th...

Page 5: ...Upright Cap Front Shroud Mounting Fastener Qty 5 6 20 x 1 2 LONG Phillips Pan PLT ST 3226003 4 Upright Mounting Bolt Qty 2 3 8 16 x 5 LONG 3223301 5 Front Clevis Pedal Lever Upright Mounting BoltQty 6...

Page 6: ...bly A 3 Connect the upright tube assembly A to the base frame B using four 5 3 1 4 bolts eight 7 washers 4 on each side and four 6 high profile nylock nuts DO NOT FULLY TIGHTEN AT THIS POINT CAUTION T...

Page 7: ...4 1 Attach front shroud A to base frame B using eight 1 phillips pan head screws 4 on each side Using a phillips screwdriver secure the shrouds to the base frame B Repeat for the opposite side same fo...

Page 8: ...ness J through the slot in the accessory tray bracket K 3 Line up the holes on the accessory tray bracket K with the holes on the console plate H and then secure the accessory tray with the two 0 self...

Page 9: ...e connector snaps into place 3 Plug in flat 6 pin 6P connector for the Activity Zone 4 Push excess cable s into the opening of the upright tube assembly A 1 4 SETUP CONTINUED STEP 8 Attach the display...

Page 10: ...ommended if available 2 Repeat procedure for opposite side 1 4 SETUP CONTINUED STEP 9 Connect the pedal levers to the upper arms 1 Insert pedal lever M into the clevis bracket N of the upper arm O 2 C...

Page 11: ...loor Retighten the JAM NUT NOTE It is extremely important that the stabilizing leg be correctly adjusted for proper operation 1 6 PLUGGING IN THE CROSS TRAINER Your Life Fitness Cross Trainer comes wi...

Page 12: ...HEART RATE CHART Quick reference chart used to identify your target heart rate H CT REVERSE Places the cross trainer in CT Reverse mode I CLEAR PAUSE Pressing the PAUSE CLEAR button switches the monit...

Page 13: ...rogramming Time can be adjusted before or during a workout D WORKOUT PROFILES Choose the Fat Burn Cardio Heart Rate Hill Heart Rate Interval Extreme HR Sport Training Hill Random QuickStart Manual and...

Page 14: ...el the most comfortable and natural to taller individuals Similarly you may prefer a shorter stride setting when performing a slower paced workout while the longer stride setting might feel best when...

Page 15: ...ONTINUED 3 STEP OPERATION 4 3 STRIDE DESCRIPTIONS Position 1 18 46cm Walk Position 1 the shortest stride offering This stride can be used for a variety of workouts You can use this setting as a power...

Page 16: ...85 of the theoretical maximum heart rate Life Fitness offers five exclusive workouts designed to take full advantage of the benefits of Heart Rate Zone Training The effect of the exercise activities...

Page 17: ...get zone Second by including the upper body in your cardiovascular workout you are not only burning fat you are also toning the muscles of your arms chest and back 6 2 BIOMECHANICAL GUIDELINES There a...

Page 18: ...nit responds to the heart rate and adjusts the workout accordingly NOTE For all Heart Rate Control Programs The Cross Trainer varies resistance automatically to keep your HR in the target zone In orde...

Page 19: ...stay in your zone HEART RATE HILL takes you through 3 progressively intense workout levels based on your target heart rate Climbing Hill 1 you are challenged to reach the first heart rate goal of 90...

Page 20: ...workout level you would normally select for the Hill workout 7 1 9 MANUAL MANUAL is a steady pace workout that lets you change the resistance at any time during your workout The resistance levels here...

Page 21: ...ases adequately the workout condenses at various stages in order to meet the chosen workout time 10 to 19 minutes The interval durations are initially set at 30 seconds for a 10 minute workout For eve...

Page 22: ...weight Enter age Enter level Begin workout RANDOM Enter time Enter weight Enter age Enter level Begin workout EZ RESISTANCE Enter time Enter weight Enter age Enter level Begin workout EXTREME HR Ente...

Page 23: ...er that is flashing Pressing a button scrolls forward and pressing a button scrolls backwards through the alphanumeric characters 7 When the user has selected the character to be programmed pressing t...

Page 24: ...lect a workout via the Workout Profile button or will toggle through the workout profiles using the arrow buttons Pressing enter will accept the profile 3 The user will be prompted for data necessary...

Page 25: ...oth and then wipe unit down Do not move the unit or place hands into the unit while it is plugged into an electrical outlet 9 SERVICE AND TECHNICAL DATA Heart Rate Reading Is Erratic Or Absent Entirel...

Page 26: ...ESS AUSTRIA Vertriebs GmbH Hintschiggasse 1 1100 Vienna AUSTRIA Tel 43 1 61 57 198 Fax 43 1 61 57 198 20 LIFE FITNESS BENELUX NV Lambrechtshoekenlaan 309 311 B 2170 Antwerpen Merksem BELGIUM Tel 32 3...

Page 27: ...ross Trainer Workouts Cross Train Reverse Cross Train Reverse Cross Train Aerobics Sport Training Workout Standard EZ Resistance Workout Standard Classic Workouts Hill Random Manual My Workouts Not Av...

Page 28: ...www lifefitness com Part 7049101...

Reviews: