46
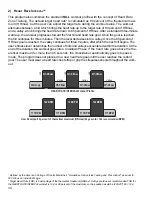
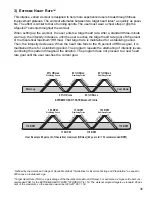
For Level workouts, each interval is identified by the time at which it occurs during the workout. For
target heart rate workouts, each interval is identified by a number (1 - 30). If Level is selected, a
graph shows up displaying each interval. For Target Heart Rate workout one graph shows up display-
ing each interval. To change intervals use the arrow keys under the word Interval.
You can save your custom workout after editing by pressing the OK button. Press the Cancel button
if you do not want to save the custom workout. Press the Clear Workout button to erase the custom
workout.
4) T
OUCH
S
CREEN
C
ONFIGURATION
Follow the instructions on the screen to recalibrate the Touchscreen. When finished touch anywhere
on the screen to return to the Main Menu.
5) E
XPORT
/ I
MPORT
S
ETTINGS
Brings up the Export / Import Settings screen which is used to import or export manager and
manufacturer configurable settings. This can be advantageous when many or all optional fea-
tures are enabled and configured.
To Export Settings: Turn the unit off at the power switch. Remove the eight screws securing
the front console to the rear. Carefully tilt the front console forward exposing the console cir-
cuit board. Carefully insert a Compactflash
TM
card into the available slot. Carefully set the
console front onto the rear console. Turn the unit on at the power switch. Enter the Export /
Import Settings through the Configuration Menu. Select “Export Settings To Flash Card”.
Upon notification, turn the unit off at the power switch. Unplug the Compactflash
TM
card.
Reposition the front console onto the rear console and secure them together using the eight
previously removed screws. Turn the unit on at the power switch.
To Import Settings: Turn the unit off at the power switch. Remove the eight screws securing
the front console to the rear. Carefully tilt the front console forward exposing the console cir-
cuit board. Carefully insert a Compactflash
TM
card into the available slot. Carefully set the
console front onto the rear console. Turn the unit on at the power switch. Enter the Export /
Import Settings through the Configuration Menu. Select “Import Settings From Flash Card”.
Upon notification, turn the unit off at the power switch. Unplug the Compactflash
TM
card.
Reposition the front console onto the rear console and secure them together using the eight
previously removed screws. Turn the unit on at the power switch.
NOTE:
It is important to turn the unit off before inserting or removing the Compactflash
TM
card.
NOTE:
Exported setting information is product specific. Treadmill settings can only be imported
into other, same model treadmills. Treadmill settings cannot be used to update settings of any
other product.
NOTE:
This method is not recommended for the setup of basic TV or FM channels. See TV
Setup or FM Radio Setup to set basic channel configuration.
6) C
LOCK
To Set the Clock/Date: Use the up and down arrows to set the time, and then select the AM or
PM button. To set the date, use the Previous Month and Next Month buttons to bring up the cor-
rect month and year on the calendar. Touch the appropriate day on the calendar. Select OK to
accept. Select Cancel to decline changes, and to return to the Main Menu.
6.2
P
REVENTIVE
M
AINTENANCE
S
CHEDULE
Follow the schedule below to ensure proper operation of the product.

