background image

C

ONTACT

H

EART

R

ATE

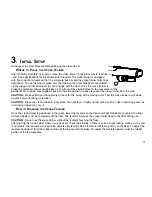
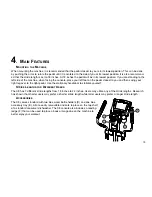
The X8 includes hand pulse sensors on the stationary handlebar that are a built-in heart rate monitoring system. During
a workout grasp the hand pulse sensors to monitor your heart rate. If your console comes equipped with a heart rate
chest strap we recommend using it during workouts and using the hand pulse sensors to only to occasionally monitor
your heart rate when not using the chest strap. In addition, to utilize heart rate controlled workouts the chest strap must
be used. For the most accurate reading, use a comfortable grip. The console will show a heart rate reading after 15 to
20 seconds.

Hand pulse sensors can work differently with different body types. With some individuals it can be very difficult to extract
a heart rate reading. Follow the below tips to improve the heart rate reading.

·

Remove your hands from the heart rate sensors and wait for the heart rate display to clear. Grasp sensors
again.  

·

Make sure hands are fully contacting the sensors.

·

Dry hands periodically during use.

·

Limit movement.

·

Clean hand pulse sensors.  

Note:

The heart rate hand pulse sensors provide an approximate heart rate value. The sensors are not medical devices

and should not be used in any type of medical application.

F

LEX

P

EDAL

™ S

HOCK

A

BSORPTION

S

YSTEM

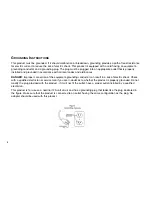
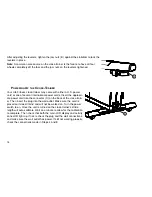
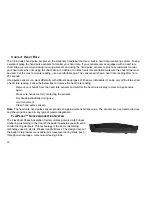
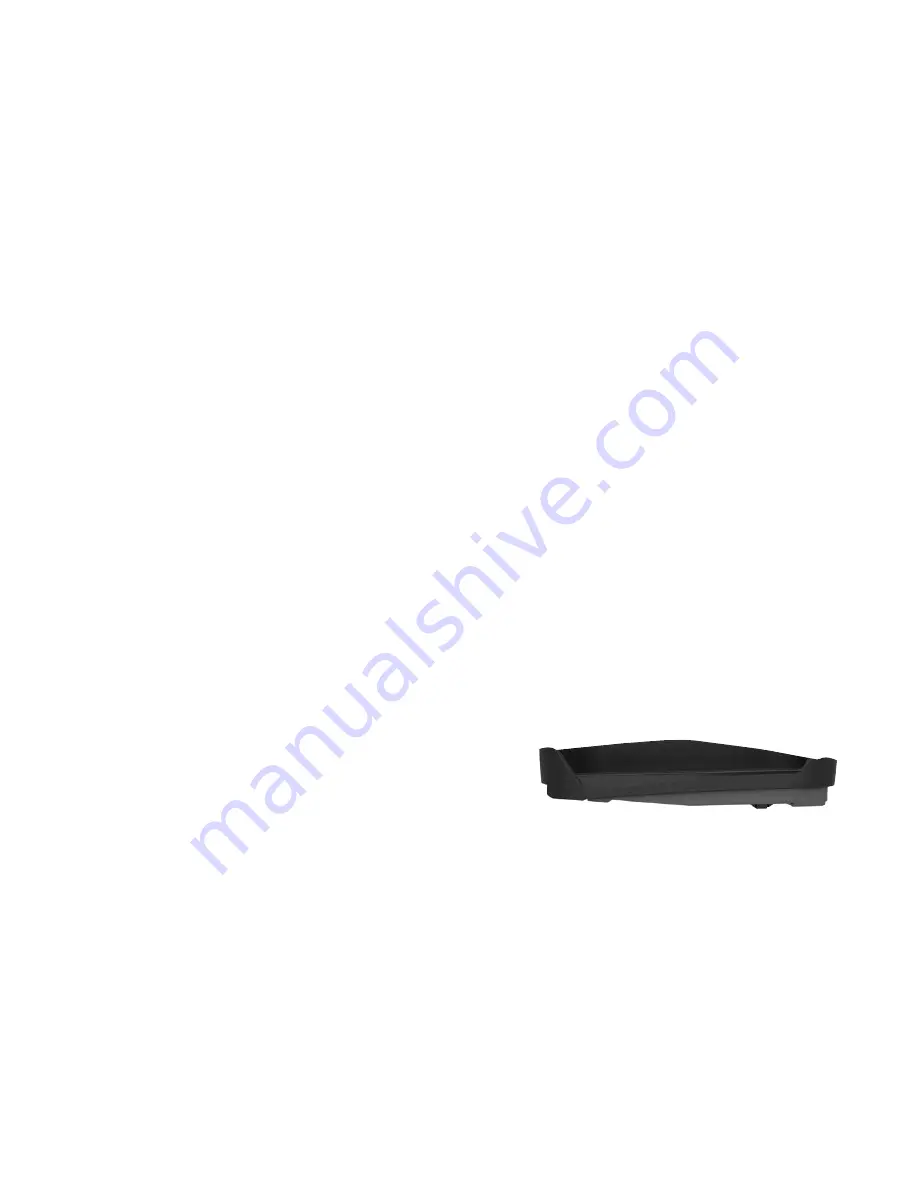
The FlexPedal Shock Absorption System utilizes patented Life Fitness
LifeSpring cushioning in the front of the pedal to provide you with extra
comfort during workouts. This technology is the same cushioning 
technology used in all Life Fitness treadmill decks. The design intent of
the pedal is to promote more ankle joint movement during stride push
through to encourage a more natural feeling stride.

20

Summary of Contents for X8

Page 1: ...X8 T O T A L B O D Y E L L I P T I C A L C R O S S T R A I N E R A S S E M B L Y a n d U S E R I N S T R U C T I O N S ...

Page 2: ... LB Barendrecht THE NETHERLANDS Telephone 31 180 646 666 Fax 31 180 646 699 Service Email internationalservicesupport lifefitness com Sales Marketing Email marketing benelux lifefitness com Operating Hours 9 00h 17 00h CET United Kingdom Ireland Life Fitness UK LTD Queen Adelaide Ely Cambs CB7 4UB Telephone General Office 44 1353 666017 Customer Support 44 1353 665507 Fax 44 1353 666018 Service Em...

Page 3: ...enelux lifefitness com Operating Hours 9 00h 17 00h CET All Other EMEA countries distributor business C EMEA Bijdorpplein 25 31 2992 LB Barendrecht THE NETHERLANDS Telephone 31 180 646 666 Fax 31 180 646 699 Service Email service db cemea lifefitness com Sales Marketing Email marketing db cemea lifefitness com Operating Hours 9 00h 17 00h CET ASIA PACIFIC AP Japan Life Fitness Japan Nippon Brunswi...

Page 4: ...ed to provide reasonable protection against harmful interference in a residential installation This equipment generates uses and can radiate radio frequency energy and if not installed and used in accordance with the user manual may cause harmful interference to radio communications However there is no guarantee that the interference will not occur in a particular installation If this equipment do...

Page 5: ...combines low impact elliptical pedal ing with push pull arm motion to provide an efficient effective total body workout Health related injuries may result from incorrect or excessive use of exercise equipment The manufacturer STRONGLY recommends seeing a physician for a complete medical exam before undertaking an exercise pro gram particularly if the user has a family history of high blood pressur...

Page 6: ...iner 4 Main Features 19 Mounting The Machine Stride Lengths For Different Users Accessories Contact Heart Rate FlexPedal Shock Absorption System 5 Activity Zone 21 5 1 Stride Length Functionality 22 Key Press Display Changes 5 2 Resistance Level Intensity Level Functionality 23 Key Press Upper Console Display Changes Activity Zone Display Changes 5 3 Total Body Trainer 24 Advanced Console Basic Co...

Page 7: ...tions 29 Audio Sleep Mode Contrast Units Language 8 Service Product Maintenance 34 8 1 Troubleshooting 34 8 2 Preventative Maintenance Tips 38 8 3 How To Obtain Product Service 39 9 Specifications 40 10 X8 Warranty Information 41 2009 Life Fitness a division of Brunswick Corporation All rights reserved Life Fitness is a registered trademark of Brunswick Corporation Any use of these trademark witho...

Page 8: ... beyond reach contact Customer Support Services Never place liquids of any type directly on the unit except in an accessory tray Containers with lids are recommended Do not use the Cross Trainer outdoors near swimming pools or in areas of high humidity Keep all loose clothing shoelaces and towels away from the Cross Trainer pedals Keep the area around the Cross Trainer clear of any obstructions in...

Page 9: ...stened securely The heart rate hand pulse sensors provide an approximate heart rate value The sensors are not medical devices and should not be used in any type of medical application SAVE THESE INSTRUCTIONS FOR FUTURE REFERENCE DANGER To reduce the risk of electrical shock Always unplug this appliance from the electrical outlet immediately after using and before cleaning SAFETY WARNING To reduce ...

Page 10: ...nto water Return the appliance to a service center for examination and repair Do not carry this appliance by supply cord or use cord as a handle Keep the cord away from heated surfaces Never operate the appliance with the air openings blocked Keep the air openings free of lint hair and the like Never drop or insert any object into any opening Do not use outdoors Do not operate where aerosol spray ...

Page 11: ...nces DANGER Improper connection of the equipment grounding conductor can result in a risk of electric shock Check with a qualified electrician or serviceman if you are in doubt as to whether the product is properly grounded Do not modify the plug provided with the product if it will not fit the outlet have a proper outlet installed by a qualified electrician This product is for use on a nominal 12...

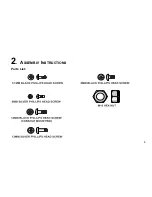
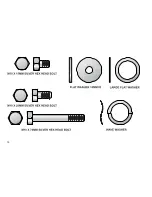
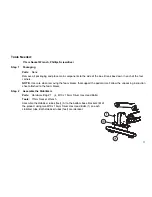
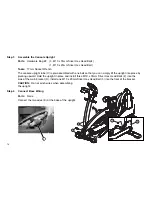
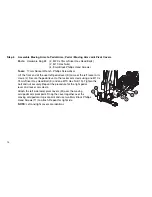
Page 12: ...9 2 ASSEMBLY INSTRUCTIONS Parts List ...
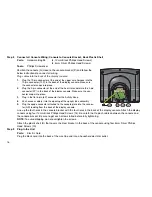
Page 13: ...10 ...

Page 14: ...ng the foam blocks that support the pedal arms Follow the unpacking instruction sheet attached to the foam blocks Step 2 Assemble the Stabilizers Parts Hardware Bag 1 4 M10 x 15mm Silver Hex Head Bolts Tools 17mm Socket Wrench Assemble the stabilizer tubes feet A to the bottom base brackets B of the product using two M10 x 15mm Silver Hex Head Bolts 1 on each stabilizer tube Both stabilizer tubes ...

Page 15: ...olt so that you can simply lift the upright into place by pivoting upward Hold the upright in place and install three M10 x 74mm Silver Hex Head Bolts 2 into the side of the main bracket D Install one M10 x 20mm Silver Hex Head Bolt 3 into the front of the bracket CAUTION Do not pinch wires when assembling the upright Step 4 Connect Base Wiring Parts None Connect the two wires E at the base of the...

Page 16: ...t rocker arm assembly H marked with an R With the top handgrip facing the front of the units slide the right rocker arm assembly onto the user right pivot shaft until seated against the washers Secure the rocker arm assembly to the pivot shaft using one flat washer 6 and one M10 x 20mm Silver Hex Head Bolt 7 Tighten the bolt securely Repeat the procedure for the left rocker arm assembly Attach the...

Page 17: ...ker arm clevis L Secure the pedal lever to the rocker arm clevis using one M10 x 74mm Silver Hex Head Bolt 9 and one M10 Hex Nut 10 Tighten the bolt and nut securely Repeat the procedure for the right pedal lever and rocker arm clevis Attach the left side lower pivot covers M over the moving arm pedal arm pivot point Snap the cover together over the moving arm pedal arm pivot point and use two 8mm...

Page 18: ...d Bolts Tools Phillips Screwdriver 17mm Socket Wrench Position the left side base shroud N over the metal bracket O and screw in with four 12mm Silver Phillips Head Screws 12 Repeat for the right side base shroud Slide the console bracket P into the upright Use two M10 x 15mm Silver Hex Head Bolts 13 to attach the console bracket to the upright 15 ...

Page 19: ...into place 3 Plug in the flat 6 pin 6P connector for the Activity Zone 4 Push excess cable s into the opening of the upright tube assembly 5 Plug the spade connector attached to the console plate into the connec tor GR leading from the back of the display console Line up the four holes in the console bracket with the four holes in the back of the display console Attach the display console using fo...

Page 20: ...f room for the swing of the moving arms Test the cross trainer at all stride lengths before finalizing its location CAUTION Place the cross trainer in a dry place Do not place in highly humid areas such as near swimming pools as rust and corrosion may occur HOW TO STABILIZE THE CROSS TRAINER Once the cross trainer is positioned in the room lower the levelers on the front and back stabilizers to co...

Page 21: ...ert the appropri ate power cord into the connector C on the back of the cross train er Then insert the plug into the wall outlet Make sure the cord is placed so it doesn t bind and will not be walked on Turn the power switch to on Once the unit is turned on the cross trainer s stride length will auto calibrate Wait one minute to allow for the calibration to complete Then check that both the main L...

Page 22: ... and then swing your right leg over to the right pedal Use the stationary handlebar to stabilize yourself STRIDE LENGTHS FOR DIFFERENT USERS The X8 has 7 different stride lengths from 18 inches to 24 inches Users may utilize any of the stride lengths Research has shown that shorter users may prefer a shorter stride length while taller users may prefer a longer stride length ACCESSORIES The X8 come...

Page 23: ... to extract a heart rate reading Follow the below tips to improve the heart rate reading Remove your hands from the heart rate sensors and wait for the heart rate display to clear Grasp sensors again Make sure hands are fully contacting the sensors Dry hands periodically during use Limit movement Clean hand pulse sensors Note The heart rate hand pulse sensors provide an approximate heart rate valu...

Page 24: ...a workout Think of the activity zone as cruise control settings on your car s steering wheel The controls are placed in a location that is easily reachable to make driving safer and more convenient or in this case to make exercise safer and more convenient The activity zone includes UP DOWN level keys UP DOWN stride keys LegSculptor Mode and Total Body Trainer Mode ...

Page 25: ...represents a stride length of 18 inches while the top bar represents a stride length of 24 inches The third display change for stride length is the ergo person When the stride is adjusted the ergo person s leg position change at cer tain stride ranges and the target muscle groups at that stride length blink While all lower body muscles are engaged during exercise specific stride length ranges bett...

Page 26: ... Incline and Sports Training programs UPPER CONSOLE DISPLAY CHANGES When the up down level keys are pressed the digital reading for actual resistance level or difficulty level depending on which program is selected changes on the main console ACTIVITY ZONE DISPLAY CHANGES The activity zone has a separate and different level reading than the main console The Intensity level is displayed on the acti...

Page 27: ...SIC CONSOLE For an upper body workout that works all the muscles in the arms the console directs the user to push and pull the handlebar arms at various times The forward and reverse motions in a lower body workout alternate allowing you to maximize the workout and use all leg muscles during a single exercise session NOTE The Total Body Trainer workout is activated by pressing the Total Body Key o...

Page 28: ...e Leg Sculptor mode after a workout has been selected See the Leg Sculptor Mode section for more detailed information Note If you stop pedaling for 30 seconds the Leg Sculptor mode will be deactivated DISPLAY CHANGES After the Leg Sculptor Mode is activated the activity zone display will show an icon of the lower body When the mode is de activated the icon will disappear 25 ...

Page 29: ...ess the Leg Sculptor mode key once to activate the mode Press twice to deactivate the mode The Leg Sculptor mode can be overlaid on any workout It automatically adjusts the stride every two minutes by two inches In this mode you will not be able to make manual stride length adjustments using the stride up down keys Note If you do not pedal or press a key for 30 seconds the Leg Sculptor mode will a...

Page 30: ...t is NOT in progress Press and hold the Leg Sculptor Key for three plus seconds then press the Stride Down Key The display will beep consecutively three times and display the text settings in the lower left corner ADJUSTING SETTINGS MENU OPTIONS To make adjustments to the settings menu options use the up and down stride length keys SCROLLING THROUGH SETTINGS MENU OPTIONS Press the Leg Sculptor key...

Page 31: ...roll through all the menu options Press the Leg Sculptor key on the final settings menu option Sleep SL to exit the Settings Menu In addition if there is no key press after 20 seconds in the Sleep SL option the Settings Menu will be exited increase decrease 28 ...

Page 32: ... instructions to turn audio on off for the Leg Sculptor key Stride Down key and Stride Up key AUDIO ADJUSTMENT INSTRUCTIONS Step 1 Press and hold the Leg Sculptor Key for three plus seconds then press the Stride Down Key Step 2 The first option to appear should be Audio AU To adjust the audio from ON to OFF or vice versa press the stride length up or down key The bottom stride length level bar rep...

Page 33: ...seconds then press the Stride Down Key Step 2 The first option to appear should be Audio AU To scroll to Sleep press the Leg Sculptor key once Sleep SL should be displayed Step 3 To adjust Sleep from ON to OFF or vice versa press the stride length up or down key The bottom stride length level bar represents Sleep ON and the top stride length level bar represents Sleep OFF Step 4 To select the desi...

Page 34: ... Contrast press the Leg Sculptor key twice Contrast CO should be displayed Step 3 The bars located to the left display the current contrast setting If you would like to modify the contrast press the stride up or down key to adjust from the LOW MID and HIGH settings The appearance of the display will slightly change with each adjustment Step 4 To select the desired adjustments press the Leg Sculpto...

Page 35: ...ulptor key three times Units Un should be displayed Step 3 To adjust the units from inches to centimeters or vice versa press the stride length up or down key The dis play will toggle between in and cm Step 4 To select the desired adjustments press the Leg Sculptor key once This will save any changes you have made to units and advance you to the next settings menu option Step 5 To exit the setting...

Page 36: ...en press the Stride Down Key Step 2 The first option to appear should be Au Audio To scroll to units press the Leg Sculptor key four times Language LA should be displayed Step 3 To adjust the language from English to German or vice versa press the stride length up or down key The display will toggle between the English and German text Step 4 To select the desired adjustments press the Leg Sculptor...

Page 37: ... to extract a heart rate reading Follow the below tips to improve the heart rate reading Remove your hands from the heart rate sensors and wait for the heart rate display to clear Grasp sensors again Make sure hands are fully contacting the sensors Dry hands periodically during use Limit movement Clean hand pulse sensors You may need to wait longer for the heart rate to display Note The heart rate...

Page 38: ...vot covers and check to make certain the bolt holding the total body arms in place is fully tightened If the total body arms still feel loose you may need to disassemble the total body arms and make sure all of the proper hardware from the assembly instructions was used ACTIVITY ZONE KEEPS TURNING OFF The activity zone is preset to turn the backlight off after 5 minutes in order to save power and ...

Page 39: ...ear ACTIVITY ZONE DISPLAYS SETTINGS AND WON T WORK You have accessed the settings menu To exit the settings menu press the Leg Sculptor Key until settings has been exited ACTIVITY ZONE DISPLAYS STRANGE INFORMATION IN THE DIGITAL DISPLAY You may have accessed the settings menu or diagnostics menu To exit both menus continue to press the Leg Sculptor key until the menu is exited NOISE FROM PEDALS So...

Page 40: ...ING LEVELS The resistance curve of the cross trainer is designed so that you can feel a greater difference in resistance at higher levels ERRORS E1 E6 Error codes E1 through E6 indicate an issue with the stride motor reaching the home position Turn the unit off and then back on again to return the motor to its home position ...

Page 41: ...tive maintenance tips will keep the cross trainer operating at peak performance Locate the cross trainer in a cool dry place Clean the top surface of the pedals when needed Use a 100 cotton cloth lightly moistened with water or a mild liquid cleaning product to clean the product Other fabrics including paper towels may scratch the surface of the product Do not use ammonia or acid based cleaners At...

Page 42: ...t and its features and workouts 2 Locate and document the serial number of the unit The serial number plate is located on the front stabilizer below the shroud 3 Contact Customer Support Services via the Web at www lifefitness com or contact the nearest Customer Support Services group see front pages of this manual for contact information 39 ...

Page 43: ...xPedal Shock Absorption System Yes Accessories 2 water bottle holders and 1 accessory tray Power Supply 120 VAC 60 Hz 12 Amps or 230 VAC 50Hz 6 3 Amps ASSEMBLED DIMENSIONS Length 83 inches 211 centimeters Width 26 inches 66 centimeters Height 63 inches 160 centimeters Weight 250 pounds 113 kilograms SHIPPING DIMENSIONS Length 81 5 inches 207 centimeters Width 20 inches 51 centimeters Height 32 inc...

Page 44: ... shipping and insurance charges after the warranty has expired WHAT WE WILL DO TO CORRECT COVERED DEFECTS We will ship to you any new or rebuilt replacement part or component or at our option replace the Product Such replacement parts are warranted for the remaining portion of the original warranty period WHAT IS NOT COVERED Any failures or damage caused by unauthorized service misuse accident neg...

Page 45: ...T PARTS SERVICE Simply call Customer Service at 1 800 351 3737 or 1 847 288 3300 Monday through Friday from 8 00 a m to 5 00 p m Central Standard Time and tell them your name address and the serial number of your Product consoles and frames may have separate serial numbers They will tell you how to get a replacement part or if necessary arrange for service where your Product is located EXCLUSIVE W...

Page 46: ...c legal rights and you may have other rights which vary from state to state WARRANTY PERIODS MODEL LIFETIME 7 YEARS 5 YEARS 3 YEARS 1 YEAR MODEL LIFETIME 10 YEARS 7 YEARS 2 YEARS 1 YEAR X8 Frame Resistance System Electrical Parts Console Labor LifeSprings Includes parts enclosed Mechanical Parts All LCD displays in flywheel does not Base Unit circuit boards include servo motor ...

Page 47: ...emier fitness equipment for the home T O T A L B O D Y E L L I P T I C A L C R O S S T R A I N E R S T R E A D M I L L S L I F E C Y C L E E X E R C I S E B I K E S G Y M S Y S T E M S 2009 Life Fitness a division of Brunswick Corporation All rights reserved Life Fitness is a registered trademark of Brunswick Corporation 8758501 Rev A 1 06 09 ...

Reviews: