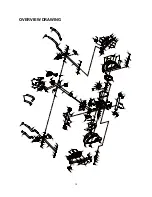
background image


15

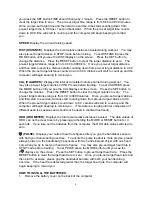
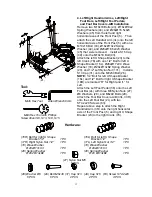
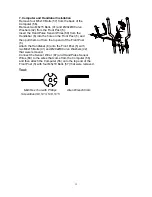
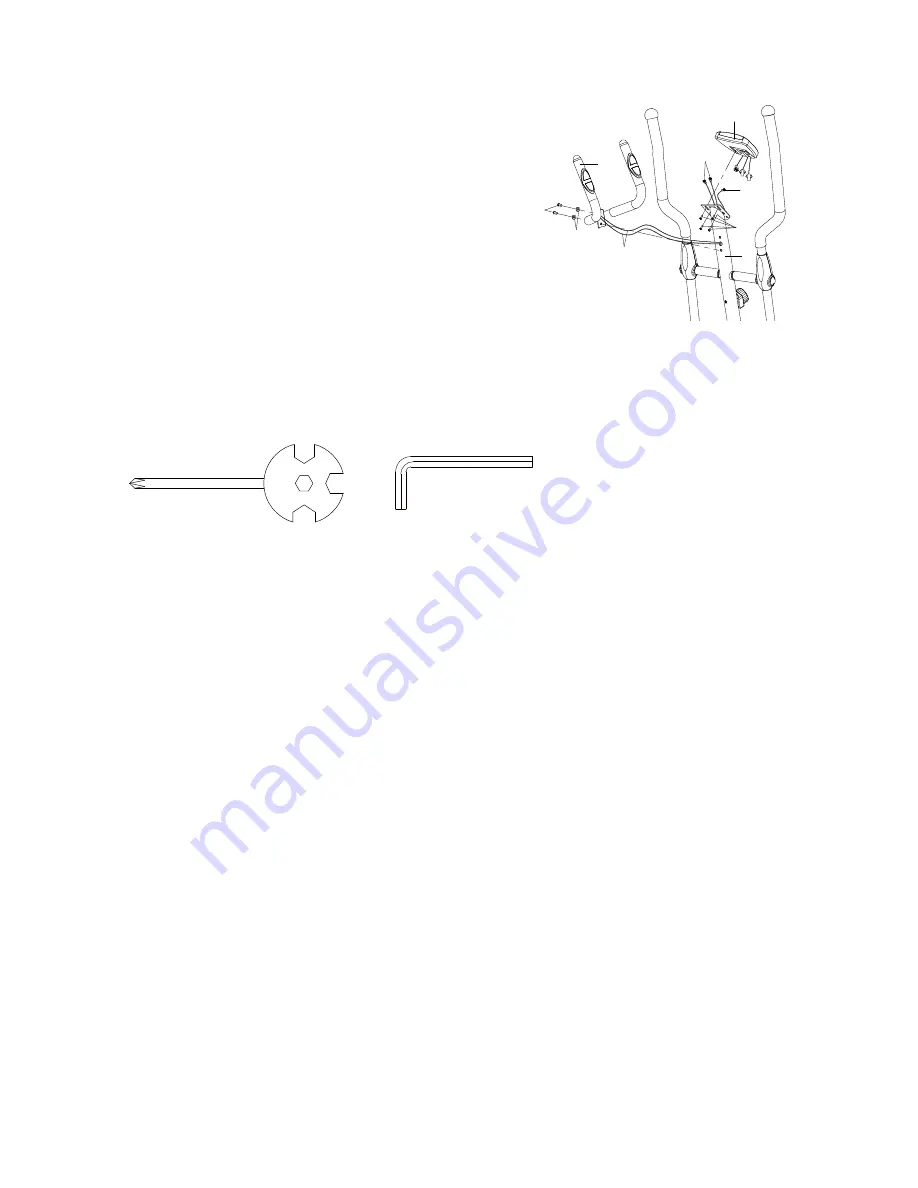
7. Computer and Handlebar Installation   

Remove four M5x10 Bolts (57) from the back of the 
Computer (56).   
Remove two M8x15 Bolts (41) and Ø20xØ8 Curve 
Washers (42) from the Front Post (5).   
Insert the Hand Pulse Sensor Wires (69) from the 
Handlebar (6) into the hole on the Front Post (5) and 
then pull them out from the top end of the Front Post 
(5). 
Attach the Handlebar (6) onto the Front Post (5) with 
two M8x15 Bolts (41) and Ø20xØ8 Curve Washers (42) 
that were removed. 
Connect the Sensor Wire I (67) and Hand Pulse Sensor 
Wires (69) to the wires that come from the Computer (56) 
and then attach the Computer (56) onto the top end of the   
Front Post (5) with four M5x10 Bolts (57) that were removed. 
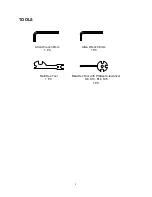
 

Tool: 


5

56

67

57

69

42

41

6

69

Multi Hex Tool with Phillips 

Screwdriver S8, S13, S14, S15


Allen Wrench 6mm

Summary of Contents for 93320

Page 1: ...Gentle Revolution Elliptical Transorbit Item No 93320 Owner s Manual The specifications of this product may vary from this photo and are subject to change without notice 2014 Dec ...

Page 2: ...en installed and operated in accordance with LifeGear s Owner s Manual LifeGear s obligation under this warranty is limited to replacing or repairing free of charge any parts which may prove to be defective under normal home use This warranty does not include any damage caused by improper operation misuse or commercial application From the date of purchase the frame is warranted to be free from de...

Page 3: ...pedal at your side at the lowest position step on the pedal and stride over the main frame then step on the other pedal When using please hold the handlebar by hands make the pedals running smoothly by push or pull handlebars then run the equipment regularly by cooperation of hands and feet After exercise please also make one pedal at the lowest position and leave your foot on the higher pedal fir...

Page 4: ...s the MODE button to select each function of computer Press and hold the MODE button for 3 seconds all data values will clear to zero except the ODO ODOMETER data values SET Press the SET button to set data values of TIME DISTANCE CALORIES or PULSE for target pre setting RESET Press the RESET button to clear data values of TIME DISTANCE or CALORIES to zero Press the RESET button to clear data valu...

Page 5: ...ar the target calories to zero The pre set target calories range is from 0 0 to 9999 calories Once you pre set target calories and then start to exercise calories start counting down from pre set target calories to 0 0 When the pre set target calories count down to 0 0 calories will start to count up and the computer will begin beeping to remind you This data is a rough guide for comparison of dif...

Page 6: ...ing 3 Insure batteries are correctly positioned and battery springs are in proper contact with batteries 4 Re install the battery cover 5 If the display is illegible or only partial segment appears remove batteries and wait 15 seconds before reinstalling ...

Page 7: ...x1 5x480 1 040 Handlebar Foam Grip Ø33xØ27x360 2 012 Bolt M8x65 4 041 Bolt M8x15 8 013 Rear Right Stabilizer End Cap 1 042 Curve Washer Ø20xØ8 12 014 Bolt M8x62 5 1 043 Bolt M10x18 2 015 Cap Nut M8 4 044 Spring Washer Ø18xØ10x2 2 016L Bolt for left U Shape Bracket 1 2 1 045 Washer Ø28xØ16 5x4x5 2 016R Bolt for right U Shape Bracket 1 2 1 046 Powder Metal Bushing Ø33xØ29xØ16x14x4 4 017L Left Nylon ...

Page 8: ...0 J6 1 064 Curve Washer for Tension Control Knob Ø20xØ5 2 1 083 Idle Wheel Bracket 1 065 Bolt for Tension Control Knob M5x45 1 084 Bolt M8x20 2 066 Phillips Self Tapping Screw ST4 2x25 6 085 Adjustable Bolt M8x85 1 067 Sensor Wire I L 1100 1 086 Adjustable Bolt M6x36 2 068 Sensor Wire II L 1600 1 087 Left Decorate Cover 1 069 Hand Pulse Sensor Wire L 750 2 088 Right Decorate Cover 1 070 Left Cover...

Page 9: ...20 xØ13xB2 1 PC 16L Bolt for left U Shape Bracket 1 2 1 PC 17L Left Nylon Nut 1 2 1 PC 18 Wave Washer Ø28xØ17x0 3 1 PC 20 Spring Washer Ø20 xØ13xB2 1 PC 27 Nylon Nut M6 6 PCS 28 Washer Ø6 6 PCS 29 Bolt M6x40 6 PCS 31 Cap S13 2 PCS 42 Curve Washer Ø20xØ8 4 PCS 47 Bolt M6x35 4 PCS 48 Curve Washer Ø6 4 PCS 49 Cap S16 2 PCS 50 Cap Nut M6 4 PCS 55 Screw ST2 9x12 8 PCS 63 Screw ST4 2x20 4 PCS ...

Page 10: ...9 TOOLS Allen Wrench 8mm 1 PC Allen Wrench 6mm 1 PC Multi Hex Tool 1 PC Multi Hex Tool with Phillips Screwdriver S8 S13 S14 S15 1 PC ...

Page 11: ... 9 3 4 1 9 8 4 3 6 3 7 4 1 4 2 4 1 6 0 6 0 4 2 4 1 4 9 4 3 4 4 4 5 4 6 4 6 4 7 5 0 4 8 5 2 L 5 5 5 3 L 5 1 5 1 5 2 R 5 3 R 5 5 4 7 5 0 4 8 4 6 4 6 4 9 4 3 4 4 4 5 5 7 5 8 6 9 5 9 5 9 6 1 6 1 6 2 6 3 6 4 6 5 6 6 6 6 6 6 6 6 6 3 6 3 6 3 6 3 6 7 6 7 6 8 6 8 7 0 7 1 7 3 7 2 7 5 7 7 7 2 7 3 7 4 7 6 7 8 8 1 8 0 8 2 8 0 8 3 4 0 1 4 8 5 2 4 3 2 6 6 6 6 5 5 6 3 6 3 8 6 8 7 8 8 3 3 L 3 3 R 7 8 9 1 3 8 9 9 0...

Page 12: ...hers 42 Tighten bolts with the Multi Hex Tool provided Hardware 2 Rear Stabilizer Installation Slide both Rear Left Right Stabilizer End Caps 9 13 onto each end of the Rear Stabilizer 11 Install two M10 Adjustable Levelers 38 with M10 Nuts 39 onto the Rear Stabilizer 11 Position the Rear Stabilizer 11 behind the Main Frame 1 and align bolt holes Attach the Rear Stabilizer 11 onto the rear curve of...

Page 13: ...ve the Ø20xØ5 2 Curve Washer for Tension Control Knob 64 and M5x45 Bolt for Tension Control Knob 65 from the Tension Control Knob 54 Put the cable end of resistance cable of Tension Control Knob 54 into the spring hook of Tension Cable 30 as shown in drawing A of figure 3 Pull the resistance cable of Tension Control Knob 54 up and force it into the gap of metal bracket of Tension Cable 30 as shown...

Page 14: ...6R are marked R for Right and L for Left Attach the Left Foot Pedal 36 onto the Left Foot Bar 2L with three M6 Nylon Nuts 27 Ø6 Washers 28 and M6x40 Bolts 29 Attach the Foot Bar Covers A B 33L 33R onto the Left Foot Bar 2L with two ST4 2x20 Screws 63 Repeat above step to attach the Right Handrail Arm 3R onto the right horizontal axis of the Front Post 5 and right U Shape Bracket 23 to the right Cr...

Page 15: ... Handrail Arm Cover B 53L onto the Left Handrail Arm 3L with four ST2 9x12 Screws 55 Attach the Right Handrail Arm Cover A 52R and Right Handrail Arm Cover B 53R onto the Right Handrail Arm 3R with four ST2 9x12 Screws 55 Tool Hardware 4R 4L 50 48 47 47 48 50 3L 5 3R Multi Hex Tool with Phillips Screwdriver S8 S13 S14 S15 52L 53L 55 55 3L 5 4L 52R 4R 3R 53R 47 Bolt M6x35 4 PCS 48 Curve Washer Ø6 4...

Page 16: ...ll them out from the top end of the Front Post 5 Attach the Handlebar 6 onto the Front Post 5 with two M8x15 Bolts 41 and Ø20xØ8 Curve Washers 42 that were removed Connect the Sensor Wire I 67 and Hand Pulse Sensor Wires 69 to the wires that come from the Computer 56 and then attach the Computer 56 onto the top end of the Front Post 5 with four M5x10 Bolts 57 that were removed Tool 5 56 67 57 69 4...

Page 17: ...the computer console SOLUTION Remove the computer console and verify the wires that come from the computer console are properly connected to the wires that come from the front post SOLUTION Check the batteries are correctly positioned and battery springs are proper contact with batteries SOLUTION The batteries in the computer console may be dead Change the new batteries PROBLEM There is no heart r...

Page 18: ... of your entire exercise routine The WARM UP is an important part of any workout It should begin every session to prepare your body for more strenuous exercise by heating up and stretching your muscles increasing your circulation and pulse rate and delivering more oxygen to your muscles COOL DOWN at the end of your workout repeat these exercises to reduce soreness in tired muscles HEAD ROLLS Rotat...

Page 19: ...ADRICEPS STRETCH With one hand against a wall for balance reach behind you and pull your right foot up Bring your heel as close to your buttocks as possible Hold for 15 counts and repeat with left foot INNER THIGH STRETCH Sit with the soles of your feet together and your knees pointing outward Pull your feet as close to your groin as possible Gently push your knees toward the floor Hold for 15 cou...

Page 20: ...ean against a wall with your left leg in front of the right and your arms forward Keep your right leg straight and the left foot on the floor then bend the left leg and lean forward by moving your hips toward the wall Hold then repeat on the other side for 15 counts TOE TOUCHES Slowly bend forward from your waist letting your back and shoulders relax as you stretch toward your toes Reach as far as...

Reviews: