background image

37


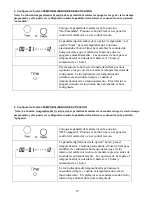
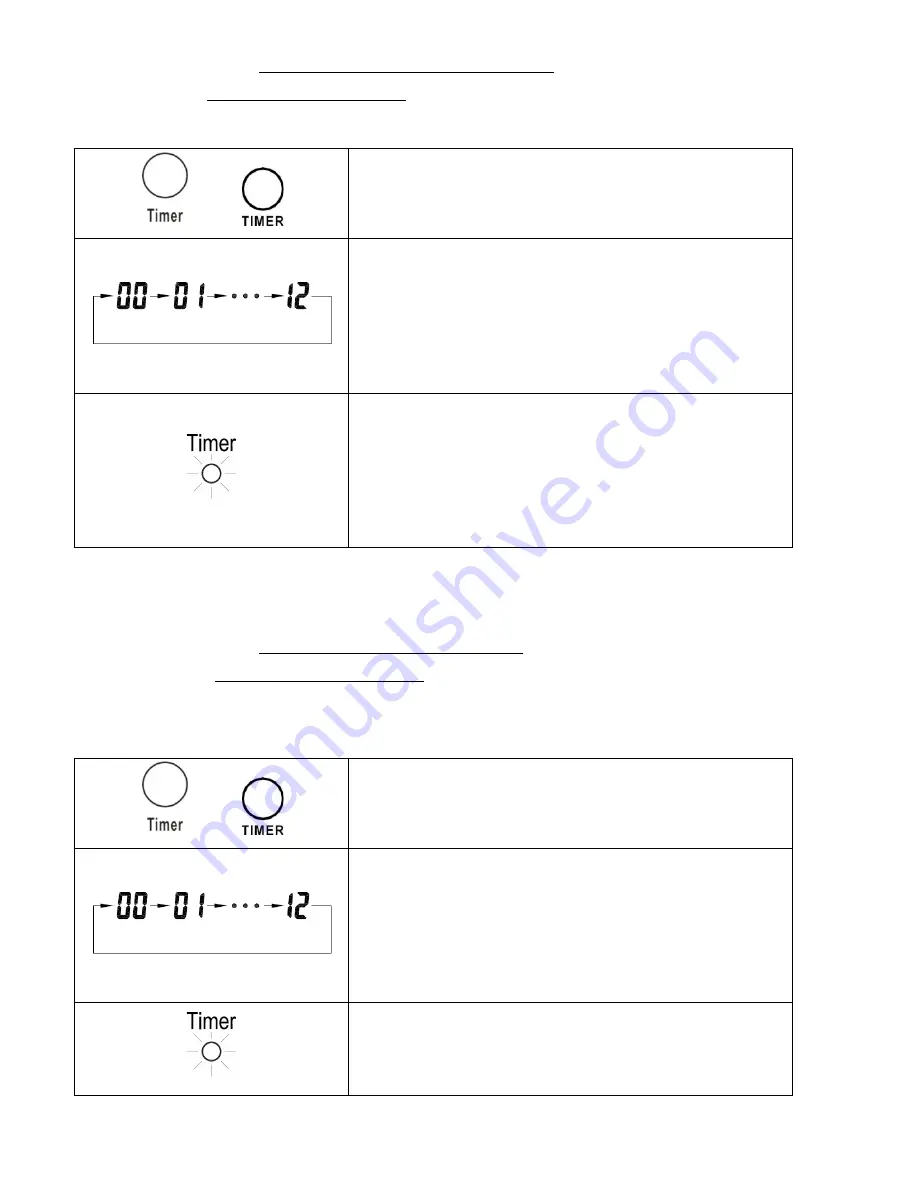
3.  Configurar la función TEMPORALIZADOR DE DESACTIVACION


Nota: La función temporalizador desactivado le permitirá al calefactor apagarse luego de cierto tiempo 
programado y sólo puede ser configurada cuando la pantalla del calefactor se encuentra en la posición 
“encendida”.


    O   


Coloque la pantalla del calefactor en la posición 
"On/Encendida". Presione el botón Timer en el panel de 
control del calefactor o en el control remoto. 


La pantalla digital cambia de la opción “temperatura” a la 
opción “horas” para el temporalizador. Continúe 
presionando el botón Timer para cambiar la cantidad de 
horas que desea que el calefactor funcione antes de 
apagarse automáticamente.  Las opciones de hora para el 
temporalizador van desde la 0 hasta las 12 horas (y 
aumentan de a 1 hora). 


El aumento de la hora seleccionada destellará por unos 
segundos y luego volverá a marcar la temperatura deseada 
configurada. La luz indicadora del temporalizador 
permanecerá encendida siempre y cuando el 
temporalizador esté en funcionamiento.  El calefactor se 
apagará cuando el reloj interno haya alcanzado la hora 
configurada. 


4.  Configurar la función TEMPORALIZADOR DE ACTIVACION


Nota: La función temporalizador de activacion le permitirá al calefactor encenderse luego de cierto tiempo 

programado y sólo puede ser configurada cuando la pantalla del calefactor se encuentra en la posición 
“apagada”.


    O   


Coloque la pantalla del calefactor en la posición 
"OFF/Apagado". Presione el botón Timer en el panel de 
control del calefactor o en el control remoto. 


La pantalla digital muestra la opción “horas” para el 
temporalizador. Continúe presionando el botón Timer para 
modificar la cantidad de horas que desea que el reloj 
interno del calefactor cuente, de manera regresiva, antes de 
encenderse automáticamente.  Las opciones de hora para el 
temporalizador van desde la 0 hasta las 12 horas (y 
aumentan de a 1 hora). 


La luz indicadora del temporalizador permanecerá 
encendida siempre y cuando el temporalizador esté en 
funcionamiento.  El calefactor se encenderá cuando el reloj 
interno haya alcanzado la hora configurada. 


Summary of Contents for LS1002THD13

Page 1: ...1 INFRARED ZONE HEATING SYSTEM OWNER S MANUAL Model No LS1002THD13 WARNING READ THIS ENTIRE OWNER S MANUAL CAREFULLY BEFORE USE ...

Page 2: ...nual will provide you with valuable information necessary for the proper care and maintenance of your new product Please take a few moments to thoroughly read the instructions and familiarize yourself with all the operational aspects of your new heater PLEASE SAVE THESE INSTRUCTIONS ...

Page 3: ... receipt Be Patient Clear and Concise Describe the issue and symptoms you have for and about the product A certified LIFESMART Technical Support agent will give you an evaluation of your issue and your resolution options If the answer is not available at that time you will be referred to the appropriate channels or given a call e mail back within 72 hours with an answer or resolution If after spea...

Page 4: ...utlet with other appliances connected to the same outlet Risk of fire overheat malfunction property damage injury or even death may result if not adhered to 3 This heater is hot when in use To avoid burns do not let bare skin touch hot surfaces Use handles certain models or wheels to move this heater 4 Keep combustible materials such as furniture pillows bedding papers clothes and curtains at leas...

Page 5: ...low foreign objects to enter or block any ventilation or exhaust opening as this may cause an electric shock or fire or damage the heater 15 Allow at least 3 feet of unobstructed space to the front and rear of the heater to allow for maximum heat air and ventilation flow 16 A heater has hot and arcing or sparking parts inside Do not use it in areas where gasoline paint or flammable liquids are use...

Page 6: ...scapes the room being heated since the on cycle will run longer The Formula To determine the cost of this or ANY 1500 watt appliance multiply 1 5 X your cost per Kilowatt Hour You can find the cost per KWH for your state at http www eia doe gov fuelelectric html Can the heating elements be replaced If after speaking to a Lifesmart Technical Support Agent it is determined that heating elements have...

Page 7: ... have dedicated circuits 15 amps minimum with no GFCI outlets If unsure what a GFCI outlet is contact a certified electrician Can I use more than one heater at a time Can I use the heater and another appliance at the same time Yes But make sure they are not plugged into the same circuit Each heater heaters are considered appliances requires its own minimum15 amp circuit with no other items plugged...

Page 8: ... other brands will ultimately depend on individual consumer perception I purchased my heater so that it could cut my heating costs but my electric bill has gone up Why The compact LIFESMART heater can definitely save you on heating costs when compared to the existing central heating system in place in your home and when used as directed Your heater is designed to give your main heat source a suppl...

Page 9: ...tion turn on the heater using the supplied remote control or the control panel on the heater Overheat Safety Feature This heater is equipped with a overheat safety feature When the heaters internal components reach a certain temperature that could cause overheat and possible fire the heater will automatically shut off WARNING It is normal for the power cord to feel warm to the touch however a loos...

Page 10: ...OX INFRARED ZONE HEATING SYSTEM REMOTE CONTROL 2 AAA batteries not Included INSTRUCTION BOOKLET PRODUCT DIAGRAM Air Outlet Temp Sensor Control Panel Wheels Remote Control Air Intake Cord Clamp Master Power Switch ...

Page 11: ... mode is engaged 8 Temperature Up button To increase desired temperature 9 High Mode indicator light Will be lit when High Heat mode is engaged 10 Temperature Down button To decrease desired temperature 11 Timer indicator light Will be lit when the Timer is engaged and active 12 Timer button Used to engage timer mode and to set hour value for the timer 13 Fahrenheit indicator light Will be lit whe...

Page 12: ...s the display on and off Temp up button To increase desired temperature Temp down button To decrease desired temperature Timer button Used to engage timer mode and to set hour value for the timer Mode button Used for mode selection Battery compartment rear of remote Battery compartment cover ...

Page 13: ...ached Turn on the main power switch in the rear of the unit Press the On Off button on the display to power up the heater s display You may also use the ON OFF button on the remote as well but you will need to insert 2 AAA batteries into the remote control battery compartment before using Batteries Sold Separately Rear of Remote Push and Slide Cover Battery Reinstall Cover ...

Page 14: ...ngs High Mode uses 1500W Low Mode uses 750W ECO mode is an Economic Energy Saving Function When ECO mode is chosen the heater will work to maintain a constant warm 68 20 2 Setting Desired Temperature Or Or Or Adjust the desired temperature by pressing the Up Down arrows on the control panel or remote control Or Desired temperature options vary from 59 to 86 or from 15 to 30 Once you have chosen th...

Page 15: ...dicator light will remain lit as long as the Timer is set The heater will power OFF when the internal heater clock counts down the hour increments you set 4 Setting the POWER ON TIMER Function Note The Power ON Timer Function will allow for the heater to power ON after a certain set time and can only be set while the heater s display is in the Off position Or Turn the heater to the OFF position Pr...

Page 16: ...des And Press Temp Up and Temp Down buttons at the same time for 3 seconds Locking is complete when you hear a beep When locked the functions of the control panel and remote will be locked for use And When you need to unlock it press Temp Up and Temp Down buttons at the same time for 3 seconds You will hear a beep The control panel and remote control will become functional again ...

Page 17: ...y cause damage or deterioration to the surface of the heater 4 DO NOT immerse the heater in water 5 Wait until the unit is completely dry before use 6 Air filter needs cleaning after used 3 months Please take down the filter as following steps Flush and clean the taken down filter with water then dry it out and re assemble 7 If you do not use the heater for a while please take out the remote batte...

Page 18: ... is plugged into an electrical outlet if not plug in 2 Check if power to the main power switch in the back is working 3 Check to see if the battery on the remote is placed correctly undamaged and if the insulating film is pulled out NOTE For the heater to function properly the desired temperature on the heater must be set a few degrees higher than the temperature in the room If it seems to not be ...

Page 19: ...ESMART was the direct shipper shipping damage should be addressed with the shipping company retailer or place of purchase prior to making a claim to LIFESMART as the manufacturer The manufacturer s sole obligation under this warranty shall be limited to furnishing the original purchaser replacement parts for units deemed repairable by the LIFESMART warranty department The purchaser may also opt to...

Page 20: ...tectors GFCI Outdoor applications Normal wear tear weathering Pet Consumer accidents Purchases from dealers unauthorized by LIFESMART Authorization in writing Disclaimers LIFESMART shall not be liable for any loss due to use or misuse of the heater or other LIFESMART products or other incidental or consequential costs expense or damages without irrefutable foundations Under no circumstances shall ...

Page 21: ...21 SISTEMA DE CALEFACCIÓN LOCALIZADA POR INFRARROJOS MANUAL DEL USUARIO Modelo N LS1002THD13 ADVERTENCIA LEA ATENTAMENTE TODO ESTE MANUAL DEL USUARIO ANTES DE UTILIZAR EL PRODUCTO ...

Page 22: ...anual del usuario le proporcionará valiosa información necesaria para el cuidado y mantenimiento adecuado de su nuevo producto Por favor tómese unos minutos para leer en detalle las instrucciones y familiarizarse con el funcionamiento de su nuevo calefactor POR FAVOR CONSERVE ESTAS INSTRUCCIONES ...

Page 23: ...un número de teléfono valido y posiblemente una copia de su factura de compra Sea paciente claro y breve Describa el asunto y los síntomas que tiene el producto Un técnico de soporte certificado de LIFESMART PRODUCTS evaluará su reclamo y le dará opciones para resolverlo Si no tuviesen una respuesta en ese momento usted será derivado a los canales correspondientes o lo llamarán o enviarán un corre...

Page 24: ... e incluso la muerte 2 Conecte solamente a un tomacorriente de 3 clavijas con la conexión a tierra debidamente instalada No conecte el calefactor a prolongaciones estabilizadores temporalizadores interruptores o a un tomacorriente que ya tenga conectados otros electrodomésticos No cumplir con esto puede provocar riesgo de incendio recalentamiento mal funcionamiento daño de la vivienda lesiones e i...

Page 25: ...ar con él 12 El calefactor debe ser enchufado en un tomacorriente ubicado sobre la pared es decir a un CIRCUITO DEDICADO con un mínimo de 15A de potencia en ese circuito en particular 13 Para desconectar el calefactor PRIMERO ubique el botón de encendido en la posición apagado y luego desenchufe del tomacorriente ubicado en la pared 14 No permita que objetos extraños ingresen u obstruyan cualquier...

Page 26: ...26 POR FAVOR CONSIDERE LAS PREGUNTAS FRECUENTES QUE APARECEN EN LAS PRÓXIMAS PÁGINAS ANTES DE UTILIZAR SU CALEFACTOR ...

Page 27: ...cción suplementario o de asistencia debería realizar un ciclo de encendido y apagado emitiendo calor durante un total aproximado de 8 horas de las 24 horas del día Si consideramos la media nacional de aproximadamente 10 centavos por kilovatios por hora consulte su boleta para corroborar el precio exacto de los kW h ya que esto varía según el estado su promedio de consumo en calefacción sumando alg...

Page 28: ...riar de la temperatura que se muestra en otro termostato como el que tiene en su pared o como el de un termostato externo que haya comprado El sensor de temperatura de su calefactor lee la temperatura interna y de los alrededores de este La unidad está cerca del suelo fresco y el calor aumenta lo que a su vez mostrará una temperatura más baja que un termostato alejado del suelo o externo La mejor ...

Page 29: ...s elementos de calefacción comenzarán nuevamente su ciclo Esto no permitirá que el ventilador enfríe la cámara completamente y pueda apagarse Parecerá que el ventilador funciona ininterrumpidamente Es un mecanismo de seguridad para evitar el recalentamiento Si esto le ocurriese la solución es muy simple aumente la temperatura programada al menos 5 grados por encima de la temperatura ambiente para ...

Page 30: ...e realice un ciclo de encendido y apagado y no está diseñado para ser utilizado como la única fuente de calor especialmente en hogares grandes Si usted piensa utilizarlo como única fuente de calor lo cual podría tenga en cuenta que el calefactor 1 tardará hasta 24 horas en calefaccionar el área 2 permanecerá encendido por períodos más largos sin completar el ciclo debido a la pérdida de calor y 3 ...

Page 31: ...enda el calefactor utilizando el control remoto o el panel de control en el calefactor Característica de seguridad en caso de recalentamiento Este calefactor está provisto de una característica de seguridad en caso de recalentamiento Cuando los componentes internos del calefactor alcancen cierta temperatura que pudiese causar recalentamiento y un posible incendio el calefactor se apagará automátic...

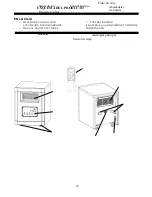
Page 32: ... INFRARROJOS MANUAL DE INSTRUCCIONES CONTROL REMOTO 2 BATERÍAS AAA REQUIRIDAS Y VENDIDAS POR SEPARADO ESQUEMA DEL PRODUCTO Salida de Aire Sensor de temp Panel de Control Rueditas Control Remoto Filtro De Aire Abrazaderas de Cuerda interruptor principal ...

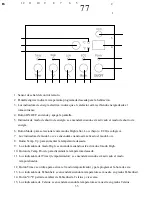
Page 33: ...tivado el modo Low 8 Botón Temp Up para aumentar la temperatura deseada 9 Luz indicadora de modo High se encenderá cuando esté activado el modo High 10 Botón de Temp Down para disminuir la temperatura deseada 11 Luz indicadora del Timer temporalizador se encenderá cuando esté activado el modo temporalizador 12 Botón Timer se utiliza para activar el modo temporalizador y para programar la hora de e...

Page 34: ...mperatura deseada Botón Timer se utiliza para activar el modo temporalizador y para programar la hora de este Mode button Used for mode selection Botón permite cambiar de Fahrenheit a Celsius Tapa Botón Temp Up para aumentar la temperatura deseada BotónON OFF enciende o apaga la pantalla ...

Page 35: ...y con las ruedas incorporadas Encienda el interruptor de poder principal en el reverso de la unidad Apriete el botón ON OFF en el Panel de Control para encender la pantalla Usted también puede utilizar el control remoto también para encender la pantalla pero primeramente tendrá que instalar 2 baterías AAA en el compartimento de las pilas Baterías Vendidas Por Separado Posterior del Control Remoto ...

Page 36: ...o ECO es una función de ahorro de energía económico Cuando se elije el modo ECO el calefactor utilizará menos energía para calefaccionar y trabajará para mantenerse a una temperatura constante de 68 20 2 Configurar la temperatura deseada O O O Ajuste la temperatura deseada presionando los botones designados Up Down Arriba Abajo en el panel de control o en el control remoto O Las opciones de temper...

Page 37: ...ecerá encendida siempre y cuando el temporalizador esté en funcionamiento El calefactor se apagará cuando el reloj interno haya alcanzado la hora configurada 4 Configurar la función TEMPORALIZADOR DE ACTIVACION Nota La función temporalizador de activacion le permitirá al calefactor encenderse luego de cierto tiempo programado y sólo puede ser configurada cuando la pantalla del calefactor se encuen...

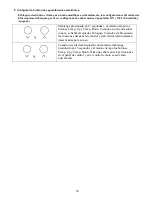
Page 38: ...sionado por 3 segundos y al mismo tiempo los botones Temp Up y Temp Down Cuando escuche una señal sonora se habrá efectuado el bloqueo Cuando esté bloqueado las funciones del panel de control y del control remoto estarán desactivadas para su uso Y Cuando necesite desbloquearlo nuevamente mantenga presionado por 3 segundos y al mismo tiempo los botones Temp Up y Temp Down Oirá una señal sonar Las f...

Page 39: ... externa del calefactor 4 NO sumerja el calefactor en agua 5 Espere a que la unidad esté completamente seca antes de utilizarla 6 Los filtros de aire deben ser limpiados cada 3 meses de uso Quite los filtros de la siguiente manera Limpie los filtros con agua y luego séquelos bien antes de colocarlos nuevamente 7 Si no utiliza el calefactor por un tiempo largo quite la batería del control remoto pa...

Page 40: ...entre enchufado en un tomacorriente si no lo estuviese enchúfelo 2 Asegurese que esté llegando corriente al interruptor principal de energía en la parte posterior 3 Asegurese que la batería del control remoto esté correctamente ubicada que no esté dañada y que se haya quitado la película aisladora NOTA Para que el calefactor funcione correctamente la temperatura deseada debe ser configurada alguno...

Page 41: ...e el traslado deben ser reclamados a la compañía transportista al vendedor o al lugar donde compró el producto antes de realizar un reclamo al fabricante LIFESMART La única obligación del fabricante estipulada por medio de esta garantía se limita a proporcionarle al comprador original el reemplazo de las piezas por unidades consideradas reparables según el departamento de garantía de LIFESMART El ...

Page 42: ...exterior Desgaste uso o alteración normal Accidentes ocasionados por mascotas o por el consumidor Compras a vendedores no autorizados por LIFESMART La autorización debe ser por escrito Exención de responsabilidades LIFESMART no se responsabiliza por cualquier pérdida debida al uso o uso incorrecto del calefactor o de otro producto LIFESMART o por otros gastos resultantes o imprevistos o cargos o d...

Page 43: ...43 LS1002THD13 Rev 1 Printed In China ...

Reviews: