background image

Page | 7  


Setting Up Your Elliptical 
 

 Height Adjuster Cap


Important:

 Make sure that the LC-985VGS is always positioned in a location that has a solid level 

floor. It is recommended that if this elliptical is being placed on a hardwood, tile or any delicate 
surface  that  a  protective  mat  is  placed  under  the  machine  to  help  prevent  damaged  to  the 
machine  and/or  damage  to  the  flooring  surface.  Please  contact  your  dealer  to  purchase  a 
compatible mat for this machine. 

 
1)  To  stabilize  your  elliptical,  first  make  sure  the  left  and  right  front  stabilizer  wheel  caps  (112  & 

113) are touching the ground. 
 

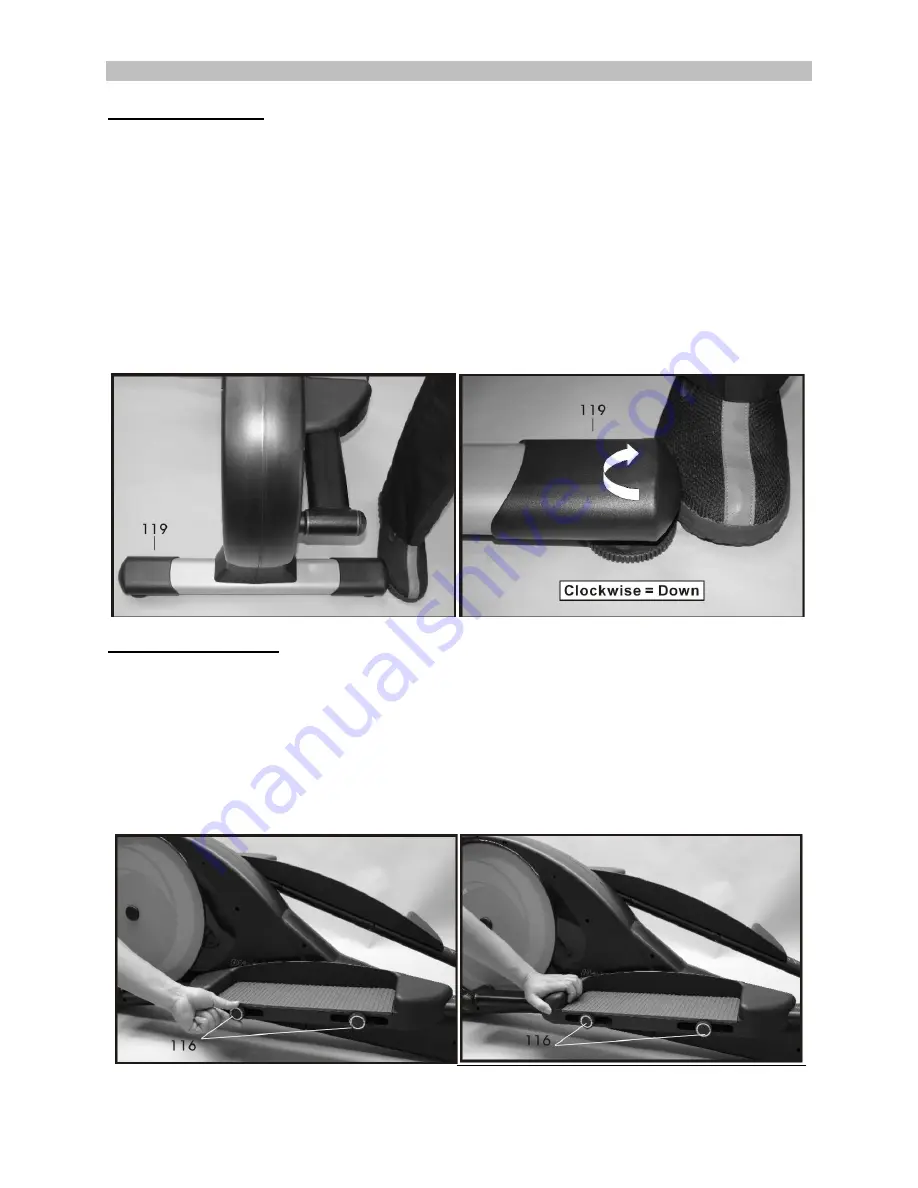
2)  Determine which side of the machine is unstable. Using the rear stabilizer caps (119) in the back 

of the machine, adjust the dial clockwise (lower) or counter-clock wise (Lift) to help lift or lower 
the back of the machine to stabilize it.  


Foot pedal Adjustment 

 
1)  To adjust the foot pedals, simply loosen Qty.  2 foot pedal knobs (116) on each side of the foot 

pedals.  
 

2)  Slide the adjustable foot pedals (115) to the desired setting using the number labels as a guide. 

(1-5)  Slide  the  edge  of  the  adjustable  foot  pedal  to  the  gray  line  of  desired  number. 

Note:  To 

prevent injury, make sure that each foot pedal is adjusted to the same number.


3)  Retighten foot pedal knobs (116) firmly on both sides of the adjustable foot pedal.  


Summary of Contents for LC-985VGS

Page 1: ...User s Product Manual OM Edition 3 LifeCore LC 985VGS Elliptical...

Page 2: ...ifeCORE the best it can be please review the enclosed user s manual prior to assembly and first use Be sure to keep the instructions for reference and or maintenance We also offer a complete line of f...

Page 3: ...ructions and Warnings Assembly Instructions Setting Up Your Elliptical Correct Exercising Guide Console Operation Instructions Calculating Target Heart Rate Heart Rate Monitoring Devices Care and Main...

Page 4: ...your exercise program gradually Exercise only for a few minutes the first day to let your body adjust to the new exercise 2 Slowly increase your exercise time and intensity over the first two weeks If...

Page 5: ...machine as illustrated below C With the rear end of the machine now raised off the floor use a 14mm wrench to undo Qty 2 bolts 308 and Qty 2 washers 403 Discard the red transportation tube A Assemble...

Page 6: ...308 and Qty 2 washers 403 Discard the red transportation tube B Assemble the front stabilizer tube 002 with the same 2 bolts 308 and 2 washers 403 tighten bolts firm C Remove the polystyrene block and...

Page 7: ...Locate hardware bags and secure with Qty 4 bolts 306 Qty 4 washers 401 and Qty 4 nuts 200 Using a 13mm wrench tighten nuts firm Slide top pivot covers over hardware Step 12 Computer Assembly Tools Nee...

Page 8: ...el caps 112 113 are touching the ground 2 Determine which side of the machine is unstable Using the rear stabilizer caps 119 in the back of the machine adjust the dial clockwise lower or counter clock...

Page 9: ...rd position at setting position 3 As you progress move your feet to the position that feels most comfortable and best suits your capabilities Slowly adjust the foot pedals to different numbers as your...

Page 10: ...if needed Page 7 WARNING Never attempt to lift or move the 985VG by yourself ask for additional help if needed and never attempt to lift the machine if you have any medical issues Correct Exercise Gui...

Page 11: ...Handlebar Use the stationary or dual action Muscles Used Quadriceps Calf Hamstring Glutes and Upper body This position utilizes all the major muscle groups more evenly Keep your body in an upright po...

Page 12: ...ou can choose from Below is the console layout and detailed operation instructions Make sure the 985VG is powered up before you start using this console This product is powered by AC power please make...

Page 13: ...value and press the ENTER key to confirm the value Note I Setting a number other than 0 in those display windows will count the number down If data display setting is set at 0 the reading will count u...

Page 14: ...file Before picking a program it is recommended to set up your user profile It will ensure workout data calculations are more accurate and future workouts are more convenient There are four user space...

Page 15: ...ws will start to count and you can exercise immediately Simply start pedaling and rotate the adjustment dial to adjust resistance level II Manual Program If you press the ENTER key to confirm manual p...

Page 16: ...d and maintained during the entire program Your target heart rate the intensity needed to improve cardiovascular fitness depends primarily on your age and not your state of fitness It is calculated as...

Page 17: ...djustment dial is rotated during category selection mode and user program name is lit pressing the ENTER key will confirm the user setting program The 1st segment LCD on the dot matrix window will sta...

Page 18: ...per minute We recommend taking your heart rate at these times at rest after warming up during your workout and two minutes into your cool down to accurately track your progress as it relates to better...

Page 19: ...es dampening your palms may help the sensors register a more stable heart rate Chest Strap Optional The 985VG is equipped with a built in wireless 5k receiver for your heart rate monitoring transmitte...

Page 20: ...the unit off with a clean towel to remove left over moisture after every use After the first 12 hours of use check and retighten any bolts nuts screws pedals etc making sure that they are tight and w...

Page 21: ...Page 20 Parts List Parts Diagram...

Page 22: ...Page 21...

Page 23: ...ld any Product be submitted for warranty service be found ineligible an estimate of repair cost will be furnished Warranty Service Area It is the purchaser s sole responsibility to pay for any fees as...

Page 24: ...rt taxes custom duties and taxes or any other charges associated with transportation of the parts or Product In addition you are responsible for insuring any parts shipped or returned You assume the r...

Page 25: ...omer Service Toll Free 888 815 5559 Mon Friday 7 30 5 30 PT Service lifecorefitness com Lifecore Fitness Inc 2575 Pioneer Ave Suite 101 Vista CA 92081 Visit our website for assembly videos www lifecor...

Reviews: